Page 7 of 722
�Î
�Î
�Î
�Î �Î
�Î �Î�Î
�Î �Î
�Î
�Î
�Î
�Î
�Î
To use the horn, press the center pad of the steering wheel.
1:
2 : If equippedYour Vehicle at a Glance4
CRUISE CONTROL
BUTTONS
HORN WINDSHIELD WIPERS/WASHERS
PASSENGER AIRBAG
OFF INDICATORHAZARD WARNING
BUTTON
AUXILIARY INPUT JACK
STEERING WHEEL
ADJUSTMENTS (P.33)
(P.136)
(P.169)
(P.163)
(P.486)
(P.143)
(P.83)(P.209)(P.412)
(P.414,
442)
AUDIO SYSTEM (P.234)
(P.142) (P.189)
(P.135)
(P.480)
(P.411)
(P.571)
(P.585)
(P.496, 517)
BLIND SPOT
INFORMATION SYSTEM
(BSI) OFF SWITCH
POWER SLIDING
DOOR SWITCH
POWER TAILGATE
SWITCH
PARKING SENSOR
SYSTEM SWITCH
VOICE CONTROL BUTTONS MULTI-INFORMATION
BUTTONSCOOL BOX SWITCHREAR ENTERTAINMENT
SYSTEM
SEAT HEATER SWITCHES
REMOTE AUDIO
CONTROLS
BLUETOOTH HANDSFREELINK
BUTTONS (P.496,
517)
HEADLIGHT/TURN SIGNAL/
FOG LIGHTS
VEHICLE STABILITY ASSIST
(VSA) OFF SWITCH1
2
2
2 2
2 22
2 2
2
2
2
10/07/19 15:50:11 31TK8600_009
2011 Odyssey
Page 64 of 722

This section gives inf ormation about
the controls and displays that
contribute to the daily operation of
your vehicle. All the essential
controls are within easy reach............................
Control Locations .62
............................
Instrument Panel .63
..........
Instrument Panel Indicators . 65
.............................................
Gauges .77
.............
Multi-Inf ormation Display . 83
Controls Near the Steering .........................................
Wheel .134 Windshield Wipers and
.................................
Washers .135
Rear Window Wiper and ...................................
Washer .136
.........
Turn Signal and Headlights . 136
.....................................
Fog Lights .139
......
Instrument Panel Brightness . 140
...............
Hazard Warning Button . 142
...............
Rear Window Def ogger . 142
......
Steering Wheel Adjustments . 143
.............................
Keys and Locks .144
......................
Immobilizer System .145
..............................
Ignition Switch .147
.....................
Remote Transmitter .148
Opening or Closing the Power .........................
Sliding Doors .151
Opening or Closing the Power ..................................
Tailgate .151
....................................
Door Locks .155
....................
Power Door Locks . 155
Auto Door Locking/ ..............................
Unlocking .156
............
Childproof Door Locks . 162
..........................................
Tailgate .162
..........................
Power Tailgate .163
.................................
Sliding Doors .167 ...............................................
Seats .175
..................................
Seat Heaters .189
Driving Position Memory ........................................
System .190
............................
Power Windows .192
.......................................
Moonroof .195
...........................................
Mirrors .197
...............................
Parking Brake .199
.........
Interior Convenience Items . 201
.....
Removable Center Console . 202
............
Flip-up Trash Bag Ring . 203
.....................
Beverage Holders .203
..............
Integrated Sunshades . 205
....................
Sunglasses Holder .206
................
Conversation Mirror . 207
...................................
Sun Visor .207
............................
Vanity Mirror .208
................................
Coat Hooks .208
..................................
Glove Box .208
...........................
Center Pocket .209
....................................
C ool Box
.209
....................................
Coin Box .211
........
Accessory Power Sockets . 211
.......................
AC Power Outlet .212
...............................
Interior Lights .213
Instruments and Controls
Instruments and Controls
61
10/07/17 09:42:28 31TK8600_066
2011 Odyssey
Page 96 of 722
 position, and the
vehicle must be stopped with th")
�Û�Ý
CONT INUED
On Touring ModelsYou can customize some vehicle
control settings. To change the
settings, the ignition switch must be
in the ON (II) position, and the
vehicle must be stopped with the
transmission in Park.
To enter the customizing mode,
press either INFO button ( / )
repeatedly until ‘‘CUSTOMIZE
SETTINGS’’ is displayed, then press
the SEL/RESET button.
If you try to enter the customizing
mode while the vehicle is moving,
you will see a ‘‘MUST STOP AND
SHIFTTOPARKTOCHANGE
SETTINGS’’ message and you
cannot change the settings.You can customize some vehicle
control settings f or ‘‘DRIVER 1’’ and
‘‘DRIVER 2’’ separately. If ‘‘DRIVER
1’’ or ‘‘DRIVER 2’’ is not displayed,
customizing is not possible.
To have the driver’s ID detected,
make sure your remote transmitter
is linked to the system and the
driver’s door is unlocked with a
corresponding remote transmitter. If you want the settings as they were
when the vehicle lef t the f actory,
select DEFAULT ALL, as described
on page .
If you want to change any vehicle
control settings, select CHANGE
SETTINGS, then press the SEL/
RESET button.
Ref er to the table on the next page
about the settings you can customize.
96
Multi-Inf ormation Display
Customized Settings
Instruments and Controls
93
DRIVER’S ID
10/07/17 09:47:14 31TK8600_098
2011 Odyssey
Page 98 of 722

Multi-Inf ormation Display
Instruments and Controls
95
10/07/17 09:47:14 31TK8600_098
�Î�Î
�Î
�Î
�Î
�Î
�Î
�Î �Î
�Î
�Î
Page
Menu Item Setting Option
Group Setup Description120
122
124
126
128
130
132
96
AUTO DOOR LOCK
AUTO DOOR UNLOCK
KEY AND REMOTE
UNLOCK MODE
PSD KEYLESS OPEN
MODE
PTG KEYLESS OPEN
MODE
KEYLESS LOCK
ACKNOWLEDGMENT
SECURITY RELOCK
TIMER
SHIFT FROM P
WITH VEH SPEED
OFF
SHIFT TO P
IGN OFF
OFF
DRIVER DOOR
ALL DOORS
ANY TIME
WHEN UNLOCKED
ANY TIME
WHEN UNLOCKED
ON
OFF
90 sec
60 sec
30 sec
SET
CANCEL
DOOR SETUP
(P.119)
DEFAULT ALL
(P.96) Changes the setting of when to automatically lock
the doors.
Changes the setting of when to automatically
unlock the driver’s/all the doors.
Changes which doors unlock with the remote
transmitter on a first push.
Changes the power sliding door opening setting.
Changes the power tailgate opening setting.
The exterior lights flash each time you press the
LOCK or UNLOCK button. A beeper will also
sound when you press the LOCK button twice.
Changes how long it takes (in seconds) for the
doors to relock and the security system to set after
you unlock but do not open the door.
Set/Cancel all the customized settings as default.
Default setting
1:
2 : U.S. models only
2 1
1
1
1
1
1
1 1
DRIVER DOOR /
AL L DOORS
2011 Odyssey
Page 122 of 722
�Û�Ý
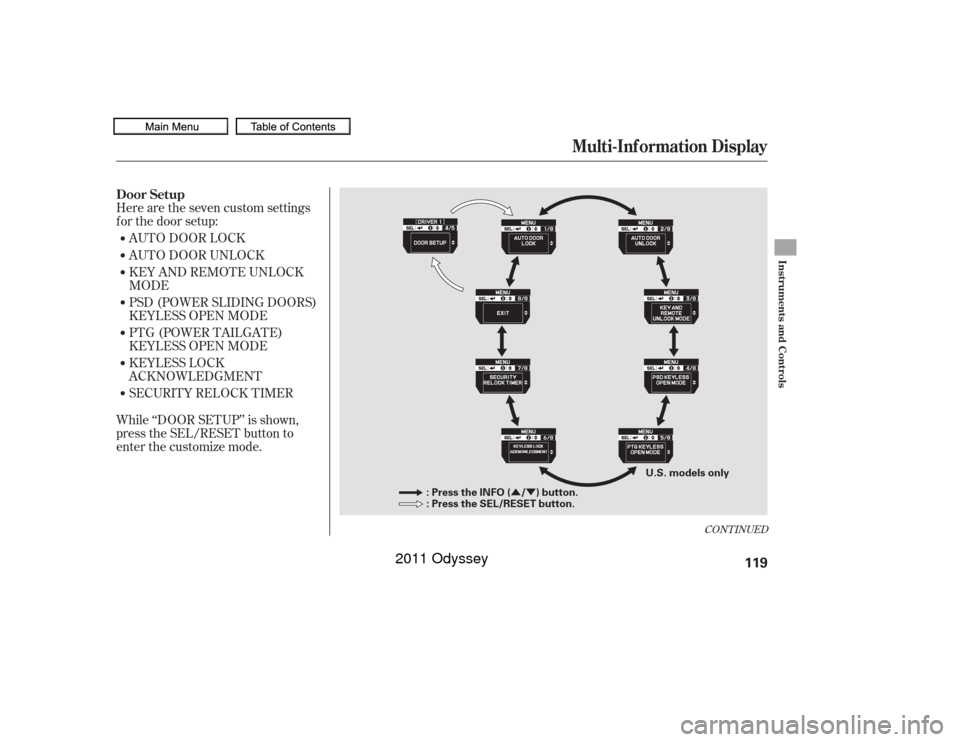
Here are the seven custom settings
f or the door setup:
While ‘‘DOOR SETUP’’ is shown,
press the SEL/RESET button to
enter the customize mode.AUTO DOOR LOCK
AUTO DOOR UNLOCK
KEY AND REMOTE UNLOCK
MODE
PSD (POWER SLIDING DOORS)
KEYLESS OPEN MODE
PTG (POWER TAILGATE)
KEYLESS OPEN MODE
KEYLESS LOCK
ACKNOWLEDGMENT
SECURITY RELOCK TIMER
CONT INUED
Door Setup
Multi-Inf ormation Display
Instruments and Controls
119
: Press the INFO ( / ) button.
: Press the SEL/RESET button.
U.S. models only
10/07/17 09:50:00 31TK8600_124
2011 Odyssey
Page 128 of 722
When your selection is successf ully
completed, the display changes as
shown above, and then goes back to
the customize item screen.If the ‘‘SETTING INCOMPLETE’’
message appears, go back to ‘‘KEY
AND REMOTE UNLOCK MODE’’
and repeat the procedure again. To exit this mode without changing
the settings, select ‘‘EXIT’’ by
pressing the INFO button, then
press the SEL/RESET button. The
display goes back to the customize
item screen.
CONT INUED
Multi-Inf ormation Display
Instruments and Controls
125
10/07/17 09:50:41 31TK8600_130
2011 Odyssey
Page 137 of 722
�Î
�Î
�Î
�Î
�Î
�Î �Î �Î�Î
�Î
�Î
�Î
�Î
�Î
�ΠTo use the horn, press the center pad of the steering wheel.
If equipped
1:
2:Controls Near the Steering Wheel134
HAZARD WARNING
BUTTON
AUXILIARY INPUT JACK
HORN WINDSHIELD
WIPERS/WASHERS
CRUISE CONTROL
BUTTONS
PASSENGER AIRBAG
OFF INDICATOR
Vehicle with navigation system is shown. (P.136)
(P.169)
(P.163)
(P.486)
STEERING WHEEL
ADJUSTMENTS
(P.143)(P.83) (P.209)(P.412) (P.414,
442)
(P.189)
AUDIO SYSTEM
(P.234)
(P.33)
(P.142)
(P.135)
(P.480)
(P.411)
(P.571)
(P.585)
(P.496, 517)
(P.496,517)
HEADLIGHT/TURN SIGNAL/
FOG LIGHTS
BLIND SPOT
INFORMATION SYSTEM
(BSI) OFF SWITCH
POWER SLIDING
DOOR SWITCHES
PARKING SENSOR
SYSTEM SWITCH
VOICE CONTROL
BUTTONS
BLUETOOTH
HANDSFREELINK
BUTTONS MULTI-INFORMATION
BUTTONS
COOL BOX SWITCHREAR ENTERTAINMENT
SYSTEM
SEAT HEATER
SWITCHES
REMOTE AUDIO
CONTROLS
POWER TAILGATE
SWITCH VEHICLE STABILITY ASSIST
(VSA) OFF SWITCH
1
2
2
2
2
2 2 22
2
2
2
2
10/07/19 15:50:55 31TK8600_139
2011 Odyssey
Page 152 of 722
�´
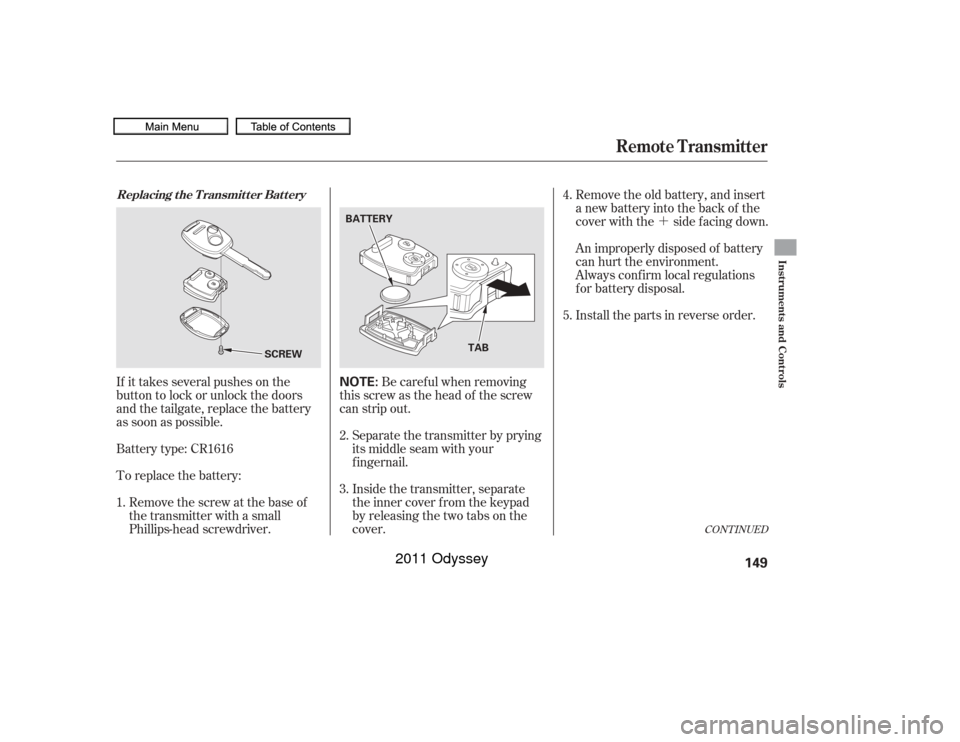
If it takes several pushes on the
button to lock or unlock the doors
and the tailgate, replace the battery
as soon as possible.
Battery type: CR1616
To replace the battery: Remove the screw at the base of
the transmitter with a small
Phillips-head screwdriver. Inside the transmitter, separate
the inner cover f rom the keypad
by releasing the two tabs on the
cover. Separate the transmitter by prying
its middle seam with your
f ingernail.Be caref ul when removing
this screw as the head of the screw
can strip out. Remove the old battery, and insert
a new battery into the back of the
cover with the side f acing down.
An improperly disposed of battery
can hurt the environment.
Always conf irm local regulations
for battery disposal.
Install the parts in reverse order.
3. 4.
1. 2. 5.
CONT INUED
Replacing the Transmitter Battery
Remote Transmitter
Instruments and Controls
149
NOTE:
SCREWBATTERY
TAB
10/07/17 09:53:44 31TK8600_154
2011 Odyssey