Page 7 of 356
�: If equipped
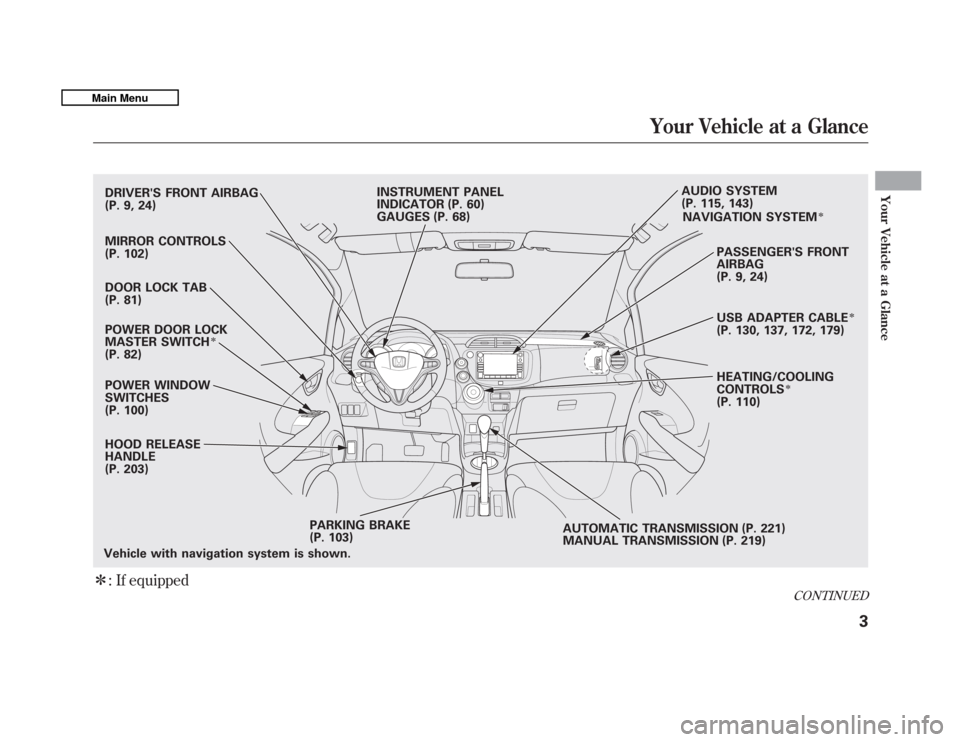
Vehicle with navigation system is shown.DRIVER'S FRONT AIRBAG
(P. 9, 24)
MIRROR CONTROLS
(P. 102)
DOOR LOCK TAB
(P. 81)
POWER DOOR LOCK
MASTER SWITCH
�
(P. 82)
POWER WINDOW SWITCHES
(P. 100)
HOOD RELEASE
HANDLE
(P. 203)
INSTRUMENT PANEL
INDICATOR (P. 60)
GAUGES (P. 68)
AUDIO SYSTEM
(P. 115, 143)
PASSENGER'S FRONT
AIRBAG
(P. 9, 24)
USB ADAPTER CABLE
�
(P. 130, 137, 172, 179)
HEATING/COOLING
CONTROLS
�
(P. 110)
PARKING BRAKE
(P. 103) AUTOMATIC TRANSMISSION (P. 221)
MANUAL TRANSMISSION (P. 219)NAVIGATION SYSTEM
�
CONTINUED
Your Vehicle at a Glance
3
Your Vehicle at a Glance
Main Menu
Page 62 of 356
�: If equipped
MIRROR CONTROLS
(P. 102)
POWER DOOR
LOCK MASTER SWITCH
�
(P. 82)
HOOD RELEASE HANDLE
(P. 203)
POWER WINDOWSWITCHES
(P. 100)
PARKING BRAKE (P. 103)AUTOMATIC TRANSMISSION
(P. 221)
MANUAL TRANSMISSION
(P. 219)HEATING/COOLING CONTROLS
�
(P. 110)
AUDIO SYSTEM (P. 115, 143)
INSTRUMENT PANEL INDICATORS (P. 60)
GAUGES (P. 68)
DOOR LOCK TAB
(P. 81)
Vehicle with navigation system is shown. USB ADAPTER CABLE
�
(P. 130, 137, 172, 179)
NAVIGATION SYSTEM
�
Control Locations
58
Main MenuTable of Contents
Page 98 of 356
Armrest
On Sport model and Canadian LX model
The driver's seat has an armrest on
the side of the seat-back. To use,
pivot it down.Rear Seat Adjustments
You can adjust the angle of the rear
seat-backs separately. To change the
seat-back angle, pull up the release
lever on the outer side of the seat-back.Head Restraints
See page 13 for important safety
information and a warning aboutimproperly positioning head restraints.
Your vehicle is equipped with head
restraints in all seating positions to
help protect you and your
passengers from the likelihood of
whiplash and other injuries.
They are most effective when you
adjust them so the center of the back
of the occupant's head rests against
the center of the restraint.
RELEASE LEVER
Seats
94
Main MenuTable of Contents
Page 207 of 356
Opening and Closing the Hood
1. Park the vehicle, and set theparking brake. Pull the hood
release handle under the lower left
corner of the dashboard. The hood
will pop up slightly.
2. Put your fingers under the frontedge of the hood near the center.
Slide your hand to the left until
you feel the hood latch handle.
Push this handle up to release it.
Lift up the hood.
If the hood latch handle moves
stiffly, or if you can open the hood
without lifting the handle, the
mechanism should be cleaned andlubricated.3. Holding the grip, pull the supportrod out of its clip. Insert the end
into the designated hole in thehood.
To close the hood, lift it up slightly to
remove the support rod from the
hole. Put the support rod back into
its holding clip. Lower the hood to
about a foot (30 cm) above the
fender, then let it drop. Make sure it
is securely latched.
HOOD RELEASE HANDLELATCHSUPPORT ROD
GRIP CLIP
Service Station Procedures
203
Before Driving
Main MenuTable of Contents