Page 59 of 356
RADIATOR CAP
U.S. modelsCanadian models
DOORJAMBS
Safety Labels
55
Driver and Passenger Safety
Main MenuTable of Contents
Page 208 of 356
Oil Check
Wait a few minutes after turning the
engine off before you check the oil.
1. Remove the dipstick (orange loop).
2. Wipe off the dipstick with a cleancloth or paper towel.
3. Insert the dipstick all the way back into its hole.
4. Remove the dipstick again, andcheck the level. It should be
between the upper and lowermarks.
If it is near or below the lower mark,see Adding Engine Oil on page 255.Engine Coolant Check
Look at the coolant level in the
radiator reserve tank. Make sure it is
between the MAX and MIN lines. If
it is below the MIN line, see
Adding
Engine Coolant on page 258 for
information on adding the propercoolant.
Refer to Owner's Maintenance
Checks on page 252 for information
about checking other items on your vehicle.
DIPSTICK
UPPER MARK
LOWER MARK
RESERVE TANK
MAX
MIN
Service Station Procedures
204
Main MenuTable of Contents
Page 256 of 356

However, service at a dealer is not
mandatory to keep your warranties in
effect. Maintenance may be done by
any qualified service facility or
person who is skilled in this type of
automotive service. Make sure to
have the service facility or person
reset the display as previously
described. Keep all receipts as proof
of completion, and have the person
who does the work fill out your
Honda Service History or Canadian
Maintenance Log. Check your
warranty booklet for moreinformation.
We recommend using Honda parts
and fluids whenever you have
maintenance done. These are
manufactured to the same high
quality standards as the original
components, so you can be confident
of their performance and durability.U.S. Vehicles:
According to state and federal
regulations, failure to perform
maintenance on the items markedwith
�will not void your emissions
warranties. However, all
maintenance services should be
performed in accordance with the
intervals indicated by the informationdisplay.
Owner's Maintenance Checks
You should check the following
items at the specified intervals. If you
are unsure of how to perform any
check, turn to the appropriate pagelisted. �
Engine oil level �Check every
time you fill the fuel tank. See page204.
� Engine coolant level �Check the
radiator reserve tank every time
you fill the fuel tank. See page 204.
� Automatic transmission �Check
the fluid level monthly. See page261.
� Brakes �Check the fluid level
monthly. See page 263.
� Tires �Check the tire pressure
monthly. Examine the tread for
wear and foreign objects. See page276.
� Lights �Check the operation of
the headlights, parking lights,
taillights, high-mount brake light,
and license plate lights monthly.
See page 264.
Maintenance MinderTM
252
Main MenuTable of Contents
Page 258 of 356
CLUTCH FLUID
(Manual
Transmission only)
(Gray cap)
RADIATOR CAP
ENGINE OIL FILL CAP
AUTOMATIC TRANSMISSION
FLUID DIPSTICK (Yellow loop)
WASHER FLUID
(Blue cap)
ENGINE OIL DIPSTICK
(Orange loop) ENGINE COOLANT RESERVOIR BRAKE FLUID
(Black cap)
Fluid Locations
254
Main MenuTable of Contents
Page 262 of 356

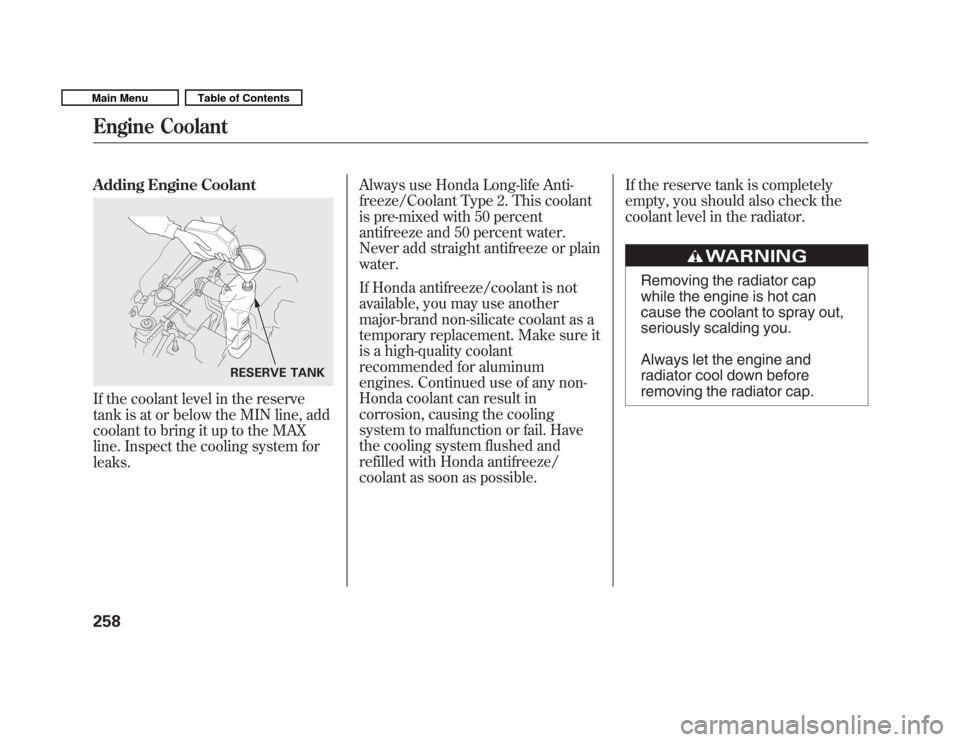
Adding Engine Coolant
If the coolant level in the reserve
tank is at or below the MIN line, add
coolant to bring it up to the MAX
line. Inspect the cooling system forleaks.Always use Honda Long-life Anti-
freeze/Coolant Type 2. This coolant
is pre-mixed with 50 percent
antifreeze and 50 percent water.
Never add straight antifreeze or plainwater.
If Honda antifreeze/coolant is not
available, you may use another
major-brand non-silicate coolant as a
temporary replacement. Make sure it
is a high-quality coolant
recommended for aluminum
engines. Continued use of any non-
Honda coolant can result in
corrosion, causing the cooling
system to malfunction or fail. Have
the cooling system flushed and
refilled with Honda antifreeze/
coolant as soon as possible.If the reserve tank is completely
empty, you should also check the
coolant level in the radiator.
Removing the radiator cap
while the engine is hot can
cause the coolant to spray out,
seriously scalding you.
Always let the engine and
radiator cool down before
removing the radiator cap.
RESERVE TANK
Engine Coolant
258
Main MenuTable of Contents
Page 263 of 356
1. Make sure the engine and radiatorare cool.
2. Relieve any pressure in the cooling system by turning the radiator cap
counterclockwise, without
pressing down.
3. Remove the radiator cap by pushing down and turning counterclockwise.4. The coolant level should be up tothe base of the filler neck. Add
coolant if it is low.
Pour the coolant slowly and
carefully so you do not spill any.
Clean up any spill immediately; it
could damage components in the
engine compartment.
5. Put the radiator cap back on, and tighten it fully. 6. Pour coolant into the reserve tank.
Fill it halfway between the MAX
and MIN marks. Put the cap back
on the reserve tank.
Do not add any rust inhibitors or
other additives to your vehicle's
cooling system. They may not be
compatible with the coolant or
engine components.
RADIATOR CAPRESERVE TANK
Engine Coolant
259
Maintenance
Main MenuTable of Contents
Page 265 of 356

Automatic Transmission Fluid
Check the fluid level with the engine
at normal operating temperature.
1. Park the vehicle on level ground.Start the engine, let it run until the
radiator fan comes on, then shut
off the engine. For accurate
results, wait about 60 seconds (but
no longer than 90 seconds) before
doing step 2.
2. Remove the dipstick (yellow loop)from the transmission, and wipe it
with a clean cloth.
3. Insert the dipstick all the way into the transmission securely as
shown in the illustration. 4. Remove the dipstick, and check
the fluid level. It should be
between the upper and lowermarks.
5. If the level is below the lower mark, add fluid into the dipstick
hole to bring it to the level
between the upper and lowermarks.
Pour the fluid slowly and carefully so
you do not spill any. Clean up any
spill immediately; it could damage
components in the engine
compartment.
Always use Honda ATF DW-1
(automatic transmission fluid).
DIPSTICK
UPPER MARK
LOWER
MARK
HOTMARK
CONTINUED
Transmission Fluid
261
Maintenance
Main MenuTable of Contents
Page 308 of 356

5. Look for any obvious coolantleaks, such as a split radiator hose.
Everything is still extremely hot,
so use caution. If you find a leak, it
must be repaired before you
continue driving (see Emergency
Towing on page 313).
6. If you don't find an obvious leak, check the coolant level in the
radiator reserve tank. Add coolant
if the level is below the MIN mark.
7. If there was no coolant in the reserve tank, you may need to add
coolant to the radiator. Let the
engine cool down until the high
temperature indicator goes off
before checking the radiator.
Removing the radiator cap
while the engine is hot can
cause the coolant to spray out,
seriously scalding you.
Always let the engine and
radiator cool down before
removing the radiator cap.
8. Using gloves or a large heavy cloth, turn the radiator cap
counterclockwise, without pushing
down, to the first stop. After the
pressure releases, push down on
the cap, and turn it until it comesoff. 9. Start the engine, and set the
temperature control dial to
maximum heat. Add coolant to the
radiator up to the base of the filler
neck. If you do not have the proper
coolant mixture available, you can
add plain water. Remember to
have the cooling system drained
and refilled with the proper
mixture as soon as you can.
10. Put the radiator cap back on tightly. Run the engine, and check
the high temperature indicator. If
it begins to blink or comes on
again, the engine needs repair (see
Emergency Towing on page 313).
11. If the temperature stays normal, check the coolant level in the
radiator reserve tank. If it has gone
down, add coolant to the MAX
mark. Put the cap back on tightly.
If the Engine Overheats
304
Main MenuTable of Contents