Page 77 of 356
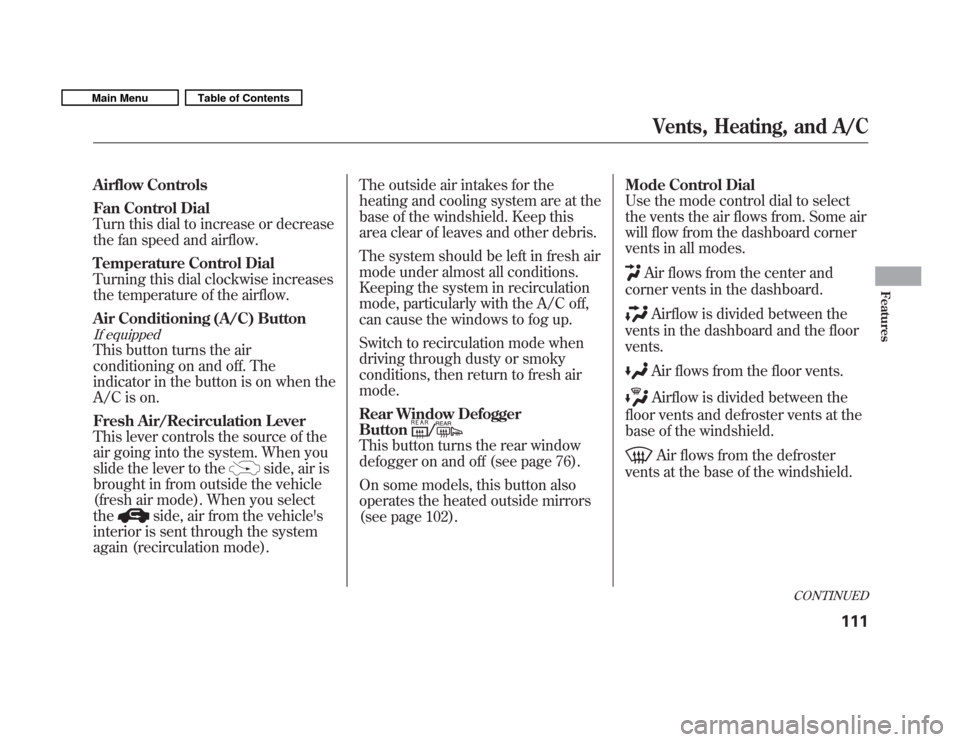
Windshield Wipers
1. MIST
2. OFF
3. INT�Intermittent
4. LO �Low speed
5. HI �High speed
6. Windshield washers
Push the right lever up or down to
select a position. MIST
�The wipers run at high
speed until you release the lever. OFF �The wipers are not activated.
INT �The wipers operate every few
seconds. LO �The wipers run at low speed.
HI �The wipers run at high speed.
Windshield Washers �Pull the
wiper control lever toward you, and
hold it. The washers spray until you
release the lever. The wipers run at
low speed, then complete one more
sweep after you release the lever. Rear Window Wiper and Washer1. OFF
When you turn the wiper switch to the ‘‘OFF ’’position, the wiper will
return to its parked position.
2. Rotate the switch clockwise to turn the rear window wiper ON.
3. Hold past ON to turn the rear window wiper on and to spray the
rear window washer.
CONTINUED
Windshield Wipers and Washers
73
Instruments and Controls
Main MenuTable of Contents
Page 115 of 356

Airflow Controls
Fan Control Dial
Turn this dial to increase or decrease
the fan speed and airflow.
Temperature Control Dial
Turning this dial clockwise increases
the temperature of the airflow.
Air Conditioning (A/C) Button
If equipped
This button turns the air
conditioning on and off. The
indicator in the button is on when the
A/C is on.
Fresh Air/Recirculation Lever
This lever controls the source of the
air going into the system. When you
slide the lever to the
side, air is
brought in from outside the vehicle
(fresh air mode). When you selectthe
side, air from the vehicle's
interior is sent through the system
again (recirculation mode). The outside air intakes for the
heating and cooling system are at the
base of the windshield. Keep this
area clear of leaves and other debris.
The system should be left in fresh air
mode under almost all conditions.
Keeping the system in recirculation
mode, particularly with the A/C off,
can cause the windows to fog up.
Switch to recirculation mode when
driving through dusty or smoky
conditions, then return to fresh airmode.
Rear Window Defogger Button
/
This button turns the rear window
defogger on and off (see page 76).
On some models, this button also
operates the heated outside mirrors
(see page 102).
Mode Control Dial
Use the mode control dial to select
the vents the air flows from. Some air
will flow from the dashboard corner
vents in all modes.
Air flows from the center and
corner vents in the dashboard.
Airflow is divided between the
vents in the dashboard and the floor vents.
Air flows from the floor vents.
Airflow is divided between the
floor vents and defroster vents at the
base of the windshield.
Air flows from the defroster
vents at the base of the windshield.
CONTINUED
Vents, Heating, and A/C
111
Features
Main MenuTable of Contents
Page 197 of 356

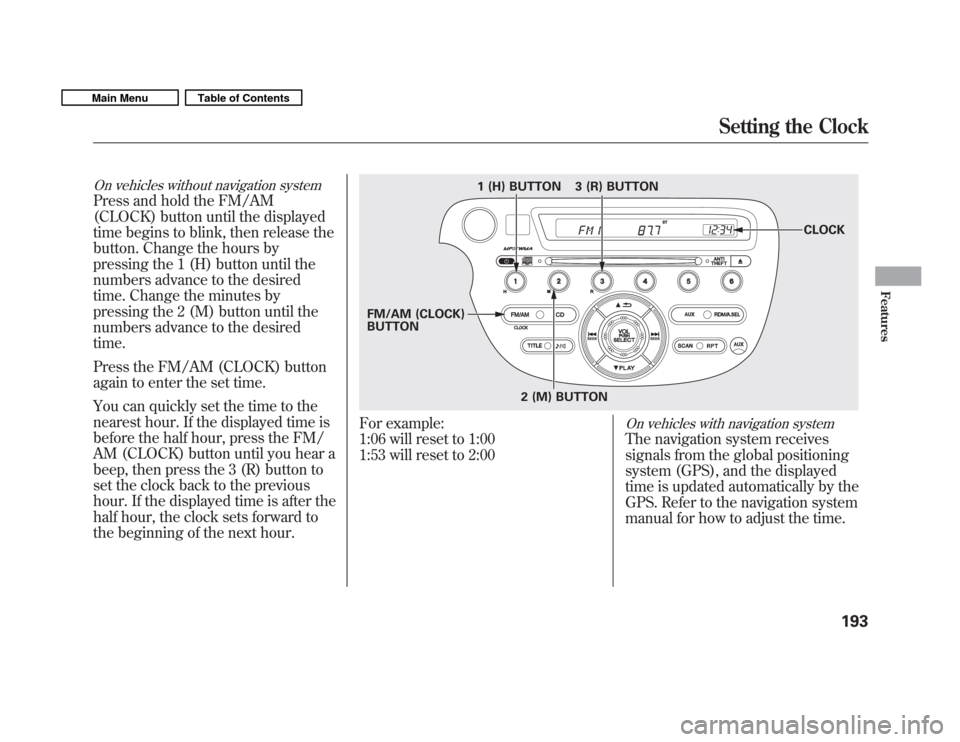
On vehicles without navigation system
Press and hold the FM/AM
(CLOCK) button until the displayed
time begins to blink, then release the
button. Change the hours by
pressing the 1 (H) button until the
numbers advance to the desired
time. Change the minutes by
pressing the 2 (M) button until the
numbers advance to the desiredtime.
Press the FM/AM (CLOCK) button
again to enter the set time.
You can quickly set the time to the
nearest hour. If the displayed time is
before the half hour, press the FM/
AM (CLOCK) button until you hear a
beep, then press the 3 (R) button to
set the clock back to the previous
hour. If the displayed time is after the
half hour, the clock sets forward to
the beginning of the next hour.
For example:
1:06 will reset to 1:00
1:53 will reset to 2:00On vehicles with navigation system
The navigation system receives
signals from the global positioning
system (GPS), and the displayed
time is updated automatically by the
GPS. Refer to the navigation system
manual for how to adjust the time.
1 (H) BUTTON
FM/AM (CLOCK) BUTTON 3 (R) BUTTON
CLOCK
2 (M) BUTTON
Setting the Clock
193
Features
Main MenuTable of Contents
Page 263 of 356
1. Make sure the engine and radiatorare cool.
2. Relieve any pressure in the cooling system by turning the radiator cap
counterclockwise, without
pressing down.
3. Remove the radiator cap by pushing down and turning counterclockwise.4. The coolant level should be up tothe base of the filler neck. Add
coolant if it is low.
Pour the coolant slowly and
carefully so you do not spill any.
Clean up any spill immediately; it
could damage components in the
engine compartment.
5. Put the radiator cap back on, and tighten it fully. 6. Pour coolant into the reserve tank.
Fill it halfway between the MAX
and MIN marks. Put the cap back
on the reserve tank.
Do not add any rust inhibitors or
other additives to your vehicle's
cooling system. They may not be
compatible with the coolant or
engine components.
RADIATOR CAPRESERVE TANK
Engine Coolant
259
Maintenance
Main MenuTable of Contents
Page 269 of 356

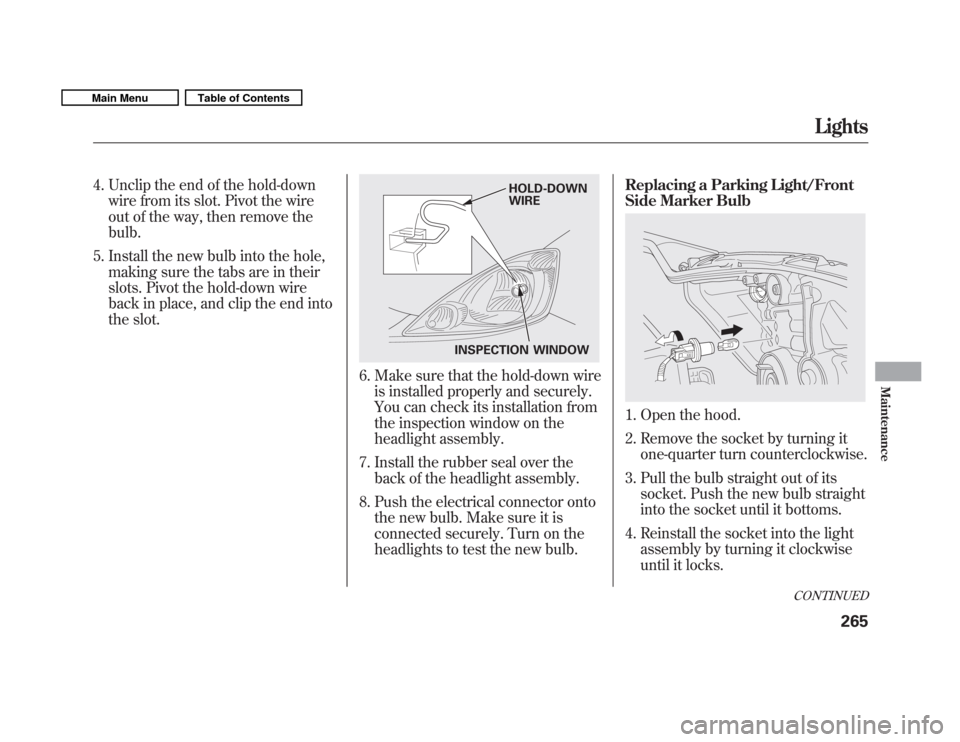
4. Unclip the end of the hold-downwire from its slot. Pivot the wire
out of the way, then remove thebulb.
5. Install the new bulb into the hole, making sure the tabs are in their
slots. Pivot the hold-down wire
back in place, and clip the end into
the slot.
6. Make sure that the hold-down wire
is installed properly and securely.
You can check its installation from
the inspection window on the
headlight assembly.
7. Install the rubber seal over the back of the headlight assembly.
8. Push the electrical connector onto the new bulb. Make sure it is
connected securely. Turn on the
headlights to test the new bulb. Replacing a Parking Light/Front
Side Marker Bulb
1. Open the hood.
2. Remove the socket by turning it
one-quarter turn counterclockwise.
3. Pull the bulb straight out of its socket. Push the new bulb straight
into the socket until it bottoms.
4. Reinstall the socket into the light assembly by turning it clockwise
until it locks.
INSPECTION WINDOW HOLD-DOWN WIRE
CONTINUED
Lights
265
Maintenance
Main MenuTable of Contents
Page 270 of 356
5. Turn on the lights to make surethe new bulb is working. Replacing a Front Turn Signal
Light Bulb
1. Open the hood.
2. Remove the socket by turning it
one-quarter turn counterclockwise.
3. Remove the bulb from the socket by pushing the bulb in and turning
it counterclockwise until it unlocks.
4. Install the new bulb in the socket. Turn it clockwise to lock it in place. 5. Reinstall the socket into the light
assembly by turning it clockwise
until it locks.
6. Turn on the lights to make sure the new bulb is working.
Lights
266
Main MenuTable of Contents
Page 271 of 356
Replacing a Fog Light Bulb
On Sport model
The fog lights use halogen bulbs.
When replacing a bulb, handle it
carefully. See page 264 for moreinformation.
1. Use a Phillips-head screwdriver toremove the screw.
2. To remove the fog light assembly, pull it out of the bumper.
3. Remove the electrical connectorfrom the bulb by squeezing the
connector to unlock the tab, then
slide the connector off the bulb.
4. Remove the bulb by turning it about one-quarter turncounterclockwise. 5. Insert the new bulb into the hole,
and turn it one-quarter turn
clockwise to lock it in place.
6. Push the electrical connector back onto the bulb. Make sure it is on
all the way.
7. Turn on the fog lights to test the new bulb.
8. Reinstall the fog light assembly, then tighten the screw.
SCREW
ELECTRICAL CONNECTOR
CONTINUED
Lights
267
Maintenance
Main MenuTable of Contents
Page 272 of 356
Replacing Rear Bulbs
1. Open the tailgate. Place a cloth onthe edge of the light assembly
cover to prevent scratches.
Remove the cover by carefully
prying in the notch on its middle
edge with a flat-tip screwdriver.
2. Determine which of the threebulbs is burned out: stop/taillight,
back-up light, or turn signal light.
3. Remove the socket by turning it one-quarter turn counterclockwise. 4. Remove the burned out bulb from
the socket by pulling it straight out
of its socket.
5. Install the new bulb in the socket.
6. Turn on the lights to make sure the new bulb is working.
7. Reinstall the socket into the light assembly by turning it clockwise
until it locks.
8. Reinstall the light assembly cover.
High-mount Brake Light
The high-mount brake light should
be replaced by your dealer.LIGHT ASSEMBLY COVER
Lights
268
Main MenuTable of Contents