2011 HONDA FIT set clock
[x] Cancel search: set clockPage 197 of 356

On vehicles without navigation system
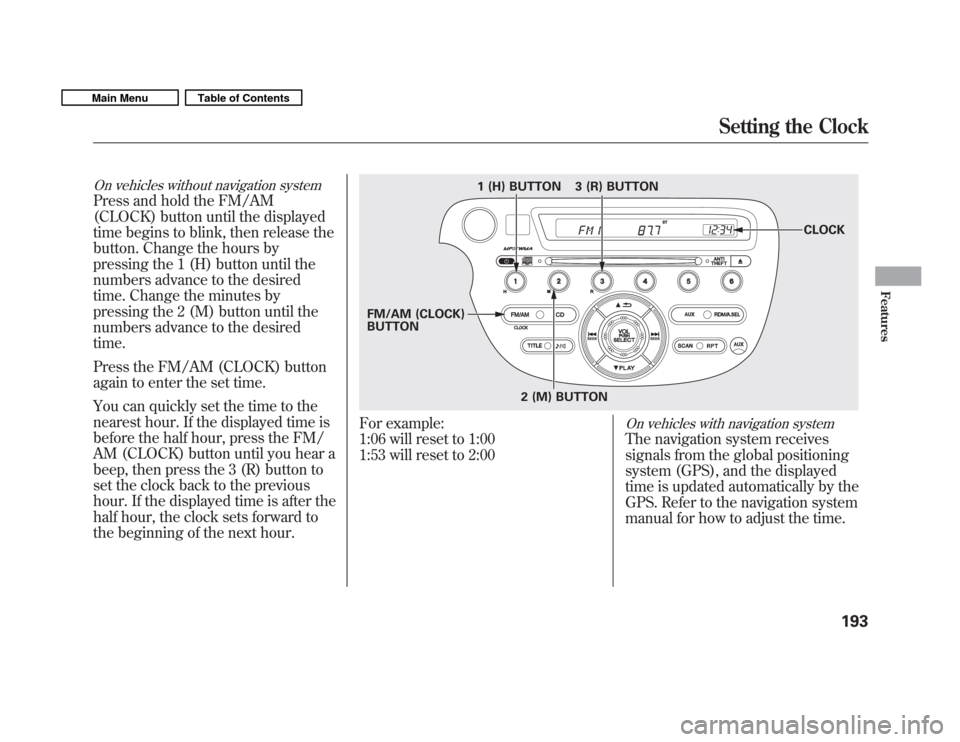
Press and hold the FM/AM
(CLOCK) button until the displayed
time begins to blink, then release the
button. Change the hours by
pressing the 1 (H) button until the
numbers advance to the desired
time. Change the minutes by
pressing the 2 (M) button until the
numbers advance to the desiredtime.
Press the FM/AM (CLOCK) button
again to enter the set time.
You can quickly set the time to the
nearest hour. If the displayed time is
before the half hour, press the FM/
AM (CLOCK) button until you hear a
beep, then press the 3 (R) button to
set the clock back to the previous
hour. If the displayed time is after the
half hour, the clock sets forward to
the beginning of the next hour.
For example:
1:06 will reset to 1:00
1:53 will reset to 2:00On vehicles with navigation system
The navigation system receives
signals from the global positioning
system (GPS), and the displayed
time is updated automatically by the
GPS. Refer to the navigation system
manual for how to adjust the time.
1 (H) BUTTON
FM/AM (CLOCK) BUTTON 3 (R) BUTTON
CLOCK
2 (M) BUTTON
Setting the Clock
193
Features
Main MenuTable of Contents
Page 308 of 356

5. Look for any obvious coolantleaks, such as a split radiator hose.
Everything is still extremely hot,
so use caution. If you find a leak, it
must be repaired before you
continue driving (see Emergency
Towing on page 313).
6. If you don't find an obvious leak, check the coolant level in the
radiator reserve tank. Add coolant
if the level is below the MIN mark.
7. If there was no coolant in the reserve tank, you may need to add
coolant to the radiator. Let the
engine cool down until the high
temperature indicator goes off
before checking the radiator.
Removing the radiator cap
while the engine is hot can
cause the coolant to spray out,
seriously scalding you.
Always let the engine and
radiator cool down before
removing the radiator cap.
8. Using gloves or a large heavy cloth, turn the radiator cap
counterclockwise, without pushing
down, to the first stop. After the
pressure releases, push down on
the cap, and turn it until it comesoff. 9. Start the engine, and set the
temperature control dial to
maximum heat. Add coolant to the
radiator up to the base of the filler
neck. If you do not have the proper
coolant mixture available, you can
add plain water. Remember to
have the cooling system drained
and refilled with the proper
mixture as soon as you can.
10. Put the radiator cap back on tightly. Run the engine, and check
the high temperature indicator. If
it begins to blink or comes on
again, the engine needs repair (see
Emergency Towing on page 313).
11. If the temperature stays normal, check the coolant level in the
radiator reserve tank. If it has gone
down, add coolant to the MAX
mark. Put the cap back on tightly.
If the Engine Overheats
304
Main MenuTable of Contents
Page 314 of 356

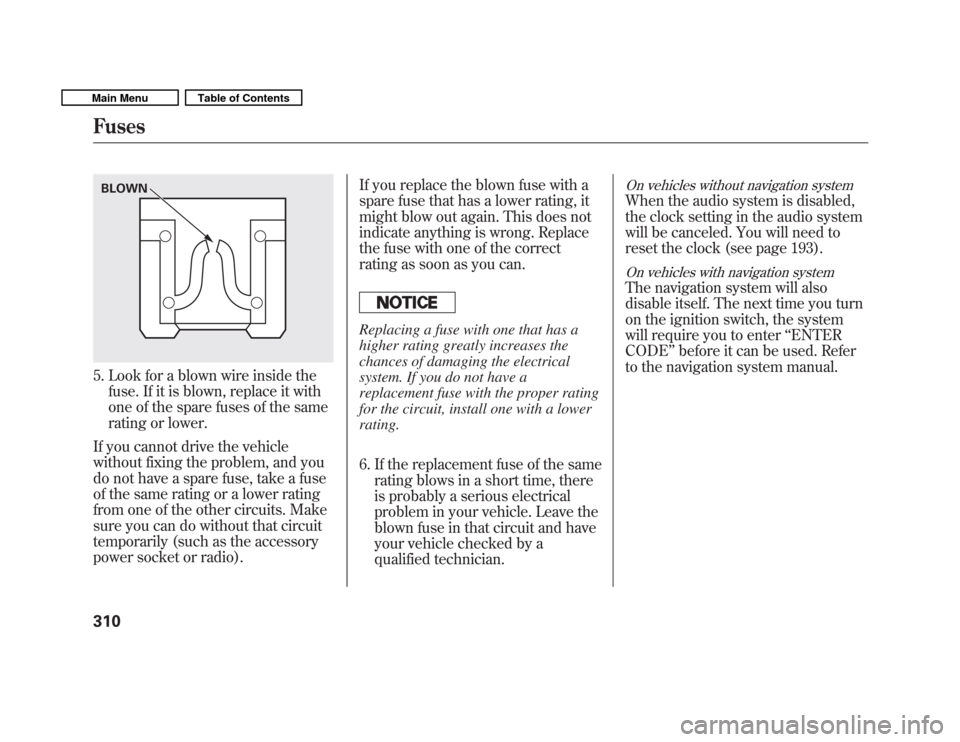
5. Look for a blown wire inside thefuse. If it is blown, replace it with
one of the spare fuses of the same
rating or lower.
If you cannot drive the vehicle
without fixing the problem, and you
do not have a spare fuse, take a fuse
of the same rating or a lower rating
from one of the other circuits. Make
sure you can do without that circuit
temporarily (such as the accessory
power socket or radio). If you replace the blown fuse with a
spare fuse that has a lower rating, it
might blow out again. This does not
indicate anything is wrong. Replace
the fuse with one of the correct
rating as soon as you can.
Replacing a fuse with one that has a
higher rating greatly increases the
chances of damaging the electrical
system. If you do not have a
replacement fuse with the proper rating
for the circuit, install one with a lowerrating.
6. If the replacement fuse of the same
rating blows in a short time, there
is probably a serious electrical
problem in your vehicle. Leave the
blown fuse in that circuit and have
your vehicle checked by a
qualified technician.
On vehicles without navigation system
When the audio system is disabled,
the clock setting in the audio system
will be canceled. You will need to
reset the clock (see page 193).
On vehicles with navigation system
The navigation system will also
disable itself. The next time you turn
on the ignition switch, the system
will require you to enter ‘‘ENTER
CODE ’’before it can be used. Refer
to the navigation system manual.
BLOWN
Fuses
310
Main MenuTable of Contents
Page 351 of 356

Seat Under Box.......................... 106
Security System .........................194
Security System Indicator ............66
Sensors
Driver's Seat Position Sensor ...26
Front Passenger's Weight Sensors ................................ 26
Impact Sensors ........................22
Serial Number ............................ 318
Service Intervals .........................247
Service Manual (U.S. only) ........337
Service Station Procedures ........201
Setting the Clock ........................193
Shifting the Automatic Transmission .......................... 221
Shift Lever Position Indicators ...221
Shift Lock Release ......................225
Side Airbags ................................. 28
How the Side Airbag Off Indicator Works ...................30
How Your Side Airbags Work ..28
Side Curtain Airbags ....................29
How Your Side Curtain Airbags
Work .................................... 29
Side Marker Lights, Bulb Replacement in .......................265Signaling Turns
............................ 63
Snow Tires ................................. 280
Spare Tire .................................. 286
Inflating ........................... 275, 286
Specifications .......................... 322
Spark Plugs ................................ 320
Specifications ............................. 320
Speed Control ............................ 195
Speed Limiter ......................220, 224
Speedometer ................................ 68
SRS, Additional Information .........22
Additional Safety Precautions ...33
Airbag Service .......................... 32
Airbag System Components .....22
How the Side Airbag Off
Indicator Works ...................30
How the SRS Indicator Works ..30
How Your Front Airbags Work .................................... 24
How Your Side Airbags Work ..28
How Your Side Curtain Airbags Work .................................... 29
SRS Indicator ......................... 30, 61
START (Ignition Key Position) .....80 Starting the Engine
....................
218
In Cold Weather at High
Altitude ................................ 218
With a Dead Battery ................301
State Emissions Testing .............331
Steam Coming from Engine .......303
Steering Wheel Adjustments ............................. 77
Anti-theft Column Lock ............80
Buttons ........................... 190, 195
Storing Your Vehicle ..................283
Sun Visor ................................... 106
Supplemental Restraint
System .............................. 9, 22
Servicing .................................. 32
SRS Indicator ...................... 30, 61
System Components ................22
Synthetic Oil .............................. 256
T
Tachometer .................................. 68
Tailgate ........................................ 88
Open Indicator ......................... 62
Opening the ............................. 88
CONTINUED
Index
IX
INDEX
Main Menu