Page 305 of 356

Although this seems like a simple
procedure, you should take severalprecautions.
A battery can explode if you do
not follow the correct
procedure, seriously injuring
anyone nearby.
Keep all sparks, open flames,
and smoking materials away
from the battery.
You cannot start your vehicle with an
automatic transmission by pushing
or pulling it.
To Jump Start Your Vehicle:
1. Open the hood, and check the physical condition of the battery.
In very cold weather, check the
condition of the electrolyte. If it
seems slushy or frozen, do not try
jump starting until it thaws.
If a battery sits in extreme cold, the
electrolyte inside can freeze. Attempting
to jump start with a frozen battery can
cause it to rupture.
2. Turn off all the electricalaccessories: heater, A/C (if
equipped), audio system, lights,
etc. Put the transmission in neutral
(manual) or Park (automatic), and
set the parking brake.
The numbers in the illustration show
you the order to connect the jumpercables.
BOOSTER BATTERY
CONTINUED
Jump Starting
301
Taking Care of the Unexpected
Main MenuTable of Contents
Page 306 of 356
.
Connect one jumper cable to the
positive ( +) terminal on your
battery. Connect the other end to
the positive ( +) terminal on the")
3. Remove the cover from the under-hood fuse box (see page 308).
Connect one jumper cable to the
positive ( +) terminal on your
battery. Connect the other end to
the positive ( +) terminal on the
booster battery.4. Connect the second jumper cable
to the negative ( �) terminal on
the booster battery. Connect the
other end to the ground strap as
shown. Do not connect this jumper
cable to any other part of theengine. 5. If the booster battery is in another
vehicle, have an assistant start that
vehicle and run it at a fast idle.
6. Start your vehicle. If the starter motor still operates slowly, check
that the jumper cables have good
metal-to-metal contact.
7. Once your vehicle is running, disconnect the negative cable from
your vehicle, then from the
booster battery. Disconnect the
positive cable from your vehicle,
then from the booster battery.
Keep the ends of the jumper cables
away from each other and any metal
on the vehicle until everything is
disconnected. Otherwise, you may
cause an electrical short.
Jump Starting
302
Main MenuTable of Contents
Page 309 of 356

Low Oil Pressure Indicator
This indicator should never
come on when the engine is
running. If it starts flashing or stays
on, the oil pressure has dropped very
low or lost pressure. Serious engine
damage is possible, and you should
take immediate action.
Running the engine with low oil
pressure can cause serious mechanical
damage almost immediately. Turn off
the engine as soon as you can safely get
the vehicle stopped. 1. Safely pull off the road, and shut
off the engine. Turn on the hazard
warning lights.
2. Let the vehicle sit for a minute. Open the hood, and check the oil
level (see page 204). An engine
very low on oil can lose pressure
during cornering and other drivingmaneuvers.
3. If necessary, add oil to bring the level back to the full mark on the
dipstick (see page 255).
4. Start the engine, and watch the oil pressure indicator. If it does not go
out within 10 seconds, turn off the
engine. There is a mechanical
problem that needs to be repaired
before you can continue driving(see Emergency Towing on page
313). Charging System Indicator
If the charging system
indicator comes on brightly
when the engine is running, the
battery is not being charged.
Immediately turn off all electrical
accessories. Try not to use other
electrically operated controls such as
the power windows. Keep the engine
running; starting the engine will
discharge the battery rapidly.
Go to a service station or garage
where you can get technicalassistance.
Low Oil Pressure Indicator, Charging System Indicator
305
Taking Care of the Unexpected
Main MenuTable of Contents
Page 310 of 356

If this indicator comes on
while driving, it means one
of the engine's emissions control
systems may have a problem. Even
though you may feel no difference in
your vehicle's performance, it can
reduce your fuel economy and cause
increased emissions. Continued
operation may cause serious damage.
If you have recently refueled your
vehicle, the indicator coming on
could be due to a loose or missing
fuel fill cap. You will also see a‘‘ CHECK FUEL CAP ’’message on
the information display. Tighten the
cap until it clicks at least once.
Tightening the cap will not turn the
indicator off immediately; it can take
several days of normal driving. If the indicator comes on repeatedly,
even though it may go off as you
continue driving, have your vehicle
checked by a dealer as soon aspossible.
If you keep driving with the malfunction
indicator lamp on, you can damage
your vehicle's emissions controls and
engine. Those repairs may not be
covered by your vehicle's warranties.
If your vehicle has an automatic
transmission, the malfunction
indicator lamp may also come on
with the
‘‘D ’’indicator. Readiness Codes
Your vehicle has certain
‘‘readiness
codes ’’that are part of the on-board
diagnostics for the emissions
systems. In some states, part of the
emissions testing is to make sure
these codes are set. If they are not
set, the test cannot be completed.
If the battery in your vehicle has
been disconnected or gone dead,
these codes are erased. It can take
several days of driving under various
conditions to set the codes again.
To check if they are set, turn the
ignition switch to the ON (II)
position, without starting the engine.
The malfunction indicator lamp will
come on for 20 seconds. If it then
goes off, the readiness codes are set.
If it blinks five times, the readiness
codes are not set. If possible, do not
take your vehicle for an emissions
test until the readiness codes are set.
Refer to Emissions Testing for
more information (see page 331).
Malfunction Indicator Lamp
306
Main MenuTable of Contents
Page 312 of 356
The vehicle's fuses are contained in
two fuse boxes.
The interior fuse box is behind the
fuse lid. To access it, pull the fuse lid
toward you.The under-hood fuse box is on the
positive terminal of the battery.
INTERIORFUSE LID
FUSE LABEL
INTERIOR
UNDER-HOOD (On Battery)
Fuses
308
Main MenuTable of Contents
Page 316 of 356
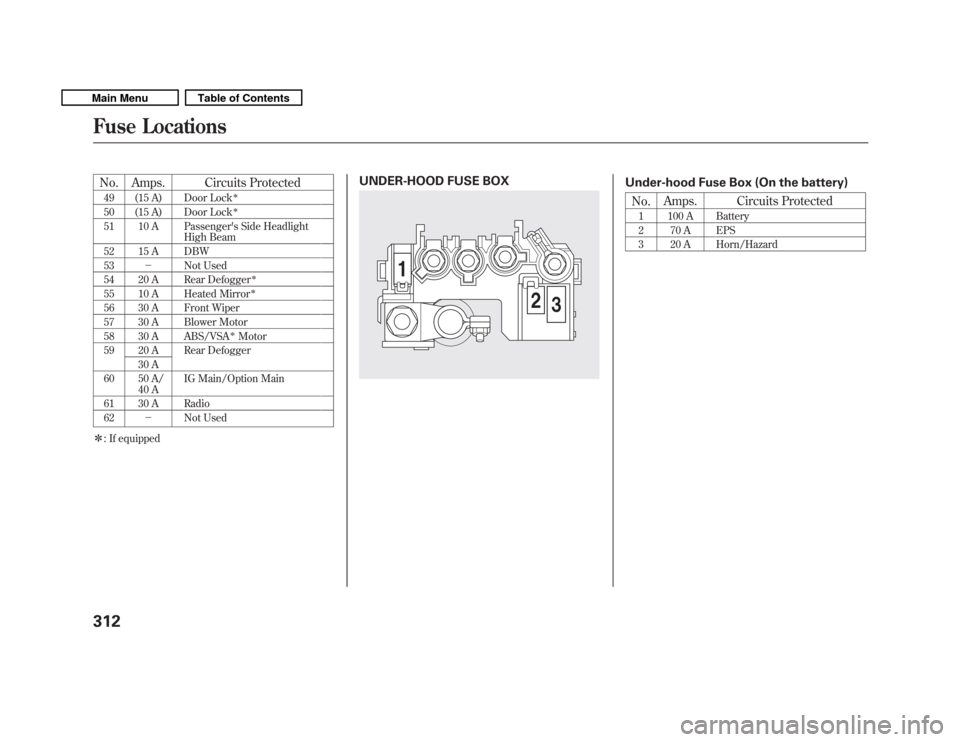
No. Amps. Circuits Protected49 (15 A) Door Lock�
50 (15 A) Door Lock�
51 10 A Passenger's Side Headlight High Beam
52 15 A DBW 53 � Not Used
54 20 A Rear Defogger
�
55 10 A Heated Mirror�
56 30 A Front Wiper
57 30 A Blower Motor
58 30 A ABS/VSA
�Motor
59 20 A Rear Defogger
30 A
60 50 A/ 40 A IG Main/Option Main
61 30 A Radio62 � Not Used
� : If equipped UNDER-HOOD FUSE BOX
Under-hood Fuse Box (On the battery)
No. Amps. Circuits Protected
1 100 A Battery
2 70 A EPS
3 20 A Horn/Hazard
Fuse Locations
312
Main MenuTable of Contents
Page 326 of 356
BatteryCapacity 12 V -32 AH/5 HR
12 V -34 AH/5 HR
12 V -40 AH/20 HR
Fuses Interior See page 311 or the fuse label attached to the dashboard.
Under-hood See page 312 or the fuse box cover.
Alignment Toe-in Front 0.0 in (0 mm)
Rear 0.10 in (2.5 mm)
Camber Front 0
Page 335 of 356

Testing of Readiness Codes
If you take your vehicle for an
emissions test shortly after the
battery has been disconnected or
gone dead, it may not pass the test.
This is because of certain‘‘readiness
codes ’’that must be set in the on-
board diagnostics for the emissions
systems. These codes are erased
when the battery is disconnected,
and set again only after several days
of driving under a variety ofconditions. If the testing facility determines that
the readiness codes are not set, you
will be requested to return at a later
date to complete the test. If you must
get the vehicle retested within the
next two or three days, you can
condition the vehicle for retesting by
doing the following.
1. Make sure the gas tank is nearly,
but not completely, full (around 3/4).
2. Make sure the vehicle has been parked with the engine off for 6
hours or more.
3. Make sure the ambient temperature is between 40° and
95°F (4° and 35°C). 4. Without touching the accelerator
pedal, start the engine, and let it
idle for 20 seconds.
5. Keep the vehicle in Park (automatic transmission) or
neutral (manual transmission).
Increase the engine speed to 2,000
rpm, and hold it there until the low
temperature indicator goes off.
6. Without touching the accelerator pedal, let the engine idle for 20 seconds.
CONTINUED
Emissions Testing
331
Technical Information
Main MenuTable of Contents