Page 146 of 388

�Î
�Î
This audio system can select and
play the audio f iles on a USB f lash
memory device with the same
controls used f or the disc player. To
play a USB f lash memory device,
connect it to the USB adapter cable
in the console compartment, then
press the AUX button. The ignition
switch must be in the ACCESSORY
(I) or ON (II) position. The recommended USB f lash
memory devices are 256 MB or
higher, and f ormatted with the FAT
f ile system. Some digital audio
players may be compatible as well.
Some USB f lash memory devices
(such as devices with security lock-
out f eatures, etc.) will not work in
this audio unit.
Do not use a device such as a card
reader or hard drive as the device
or your f iles may be damaged.
Do not connect your USB f lash
memory device using a hub.
The audio system reads and plays
the audio f iles on the USB f lash
memory device in MP3, WMA or
AAC f ormats. Depending on the
f ormat, the display shows MP3,
WMA or AAC when a USB flash
memory device is playing. The USB
f lash memory device limit is up to
700 f olders or up to 65535 f iles.
Only AAC f ormat f iles recorded
with iTunes are playable on this
audio unit.
:
To Play a USB Flash Memory
Device
Audio System (Models without navigation system)
142
NOTE:
Main Menu
Page 147 of 388

Some versions of MP3, WMA, or
AAC f ormat may not be supported. If
an unsupported f ile is f ound, the
audio unit displays UNSUPPORTED,
then skips to the next f ile.
In WMA or AAC format, DRM
(digital rights management) f iles
cannot be played. If the system f inds
a DRM f ile, the audio unit displays
UNPLAYABLE FILE, and then skips
to the next file.
Depending on the sof tware the
f iles were made with, it may not be
possibletoplaysomefiles,or
displaysometextdata.
Depending on the type of
encoding and writing sof tware
used, there may be cases where
character inf ormation does not
display properly.
The order of f iles in USB playback
maybedifferentfromtheorderof
f iles displayed in PC or other
devices etc. Files are played in the
orderstoredinUSBflashmemory
device.
Do not keep a USB f lash memory
device in the vehicle. Direct
sunlight and high heat will damage
it.
We recommend backing up your
data bef ore playing a USB f lash
memory device.
Some devices cannot be powered
or charged via the USB adapter. If
this is the case, use the accessory
adapter to supply power to your
device.
Depending on the type and
number of f iles, it may take some
time bef ore they begin to play.
Do not use an extension cable to
the USB adapter cable equipped
with your vehicle.
CONT INUED
Audio System (Models without navigation system)
Features
143
Combining a low sampling f requency
with a low bitrate may result in
extremely degraded sound quality.
Main Menu
Page 148 of 388
�¼
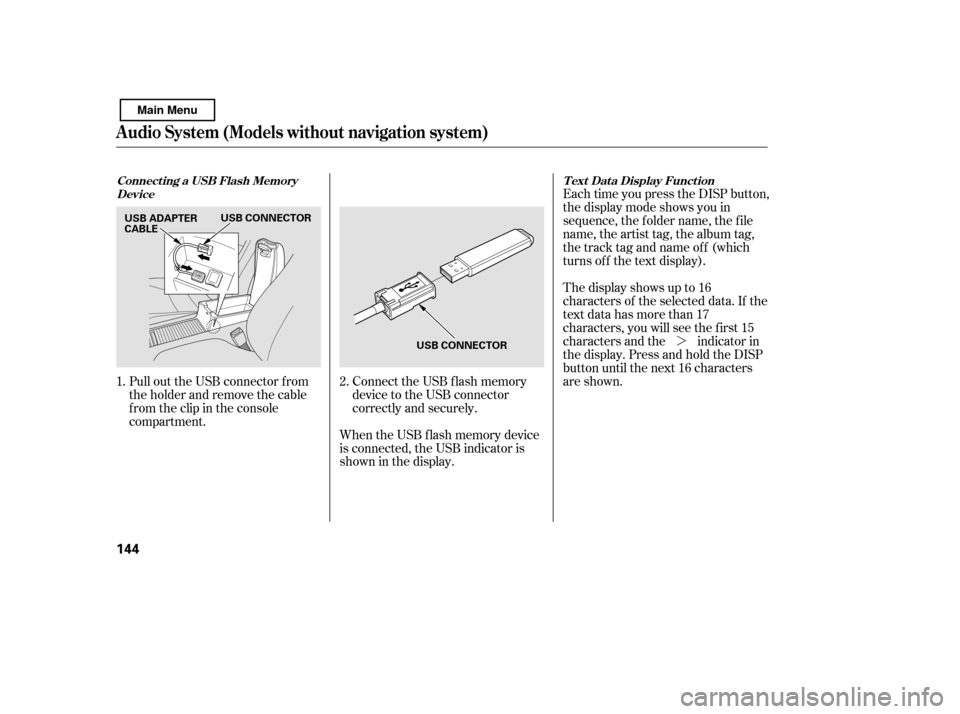
When the USB f lash memory device
is connected, the USB indicator is
showninthedisplay.
Pull out the USB connector f rom
the holder and remove the cable
f rom the clip in the console
compartment.
Connect the USB f lash memory
device to the USB connector
correctly and securely.Each time you press the DISP button,
the display mode shows you in
sequence, the f older name, the f ile
name, the artist tag, the album tag,
the track tag and name off (which
turns off the text display).
The display shows up to 16
characters of the selected data. If the
text data has more than 17
characters, you will see the f irst 15
characters and the indicator in
the display. Press and hold the DISP
button until the next 16 characters
are shown.
1. 2.
Connect ing a USB Flash Memory
Device T ext Data Display Function
Audio System (Models without navigation system)
144
USB ADAPTER
CABLE
USB CONNECTOR
USB CONNECTOR
Main Menu
Page 149 of 388

�µ�µ�µ
�µ
CONT INUED
Use the SKIP bar while a USB f lash
memory device is playing to select
passages and change f iles.Each time you press and
releasethe sideof theSEEK/
SKIP button, the system skips
f orward to the beginning of the next
f ile. Press and release the side
of thebuttontoskipbackwardtothe
beginning of the current f ile. Press it
again to skip to the beginning of the
previous f ile.
To move rapidly within a f ile, press
andholdeitherside( or )
of the SEEK/SKIP button. To
select a different folder, turn the
TUNE knob to move to the
beginning of the next f older. Turn
theknobtotherighttoskiptothe
next f older, and to the lef t to move to
the beginning of the current f older.
Turn it again to skip to the beginning
of the previous f older. Turning the
TUNE knob more than one click
skips several f olders at a time. This feature
continuously plays a f ile. To activate
the repeat f eature, press the RPT
button. You will see ‘‘RPT’’ in the
display. To turn it of f , press and hold
the RPT button.
This feature
replays all the f iles in the selected
f older in the order they are stored.
To activate the folder repeat feature,
press the RPT button repeatedly.
You will see ‘‘F-RPT’’ in the display.
To turn it of f , press and hold the
RPT button.
Each time you press and release the
RPT button, the mode changes f rom
f ile repeat to f older repeat, then to
normal play.
You can select any type of repeat,
random and scan modes by using the
RPT button, RDM button, or SCAN
button.
Audio System (Models without navigation system)
T o Change or Select Files
T o Select Repeat , Random or ScanMode:
SK IP FOL DER SEL ECT ION REPEA T
FOLDER REPEAT
Features
145
Main Menu
Page 150 of 388

�µ�µ�µ
This f eature plays the
f iles within a USB f lash memory
device in random order. To active
random play, press the RDM button
twice. You will see RDM in the
display. Press and release the RDM
button to return to normal play. This
feature, when activated, plays all
f iles in the selected f older in random
order. To activate f older random,
press and release the RDM button.
You will see F-RDM in the display.
The system will then select and play
f iles randomly. This continues until
you deactivate f older random by
pressing and holding the RDM
button f or 2 seconds, or by selecting
a different folder with the TUNE
knob.
Each time you press and release the
RDM button, the mode changes
f rom f older random, to all random,
then to normal play. This feature samples all
f iles in the current f older in the
order they are stored. To activate
the scan feature, press the SCAN
button. You will see ‘‘SCAN’’ in the
display. You will get a 10 second
sampling of each f ile in the f older.
Press and hold the SCAN button to
get out of the scan mode and play
the last f ile sampled.
Audio System (Models without navigation system)
RANDOM FOLDER-RANDOM SCAN
146
Main Menu
Page 151 of 388

�µThis feature
samples the f irst f ile in each f older in
the order they are stored. To
activate the folder scan feature,
press the SCAN button repeatedly.
You will see ‘‘F-SCAN’’ in the display.
You will get a 10 second sampling of
the f irst f ile in each f older. Press and
hold the SCAN button to get out of
the f older scan mode and play the
last f ile sampled.
Each time you press and release the
SCAN button, the mode changes
from file scan to folder scan, then to
normal play. To play the radio, press the AM/FM
button. Press the CD button to
switch to the disc mode (if a disc is
loaded). Press the AUX button to
switch the audio mode between the
USB or XM Radio (if equipped).
When you disconnect the USB f lash
memory device while it is playing,
the display shows ‘‘USB NO DATA.’’
If you reconnect the same USB f lash
memory device, the system will
begin playing where it lef t of f .If you see an error message in the
display, see page .
You can disconnect the USB f lash
memory device at any time even if
the USB mode is selected on the
audio system. Always f ollow the USB
f lash memory device’s instructions
when you remove it. 148
Audio System (Models without navigation system)
FOL DER SCAN T o Stop Playing a USB Flash
Memory DeviceUSB Flash Memory Device Error
Messages
Disconnect ing a USB Flash Memory
Device
Features
147
Main Menu
Page 152 of 388

If you see an error message on the
audio display while playing a USB
f lash memory device, f ind the
solution in the chart to the right. If
you cannot clear the error message,
take your vehicle to your dealer.Cause Solution
Error MessageUSB ROM Error
Appears when an
incompatible device is
connected
Use of unsupported
files
No files in USB flash
memory device
Use of unsupported
USB f lash memory
device There is a problem with the USB adapter unit.
Disconnect the device. Then, turn the audio
systemoff,andturnitonagain.Donot
reconnect the device that caused the error.
Appears when the files in the USB flash
memory device are DRM or an unsupported
format. This error message appears for about 3
seconds, then plays the next song.
Appears when the USB f lash memory device is
emptyortherearenoMP3,WMA,orAACfiles
in the USB flash memory device. Save some
MP3, WMA, or AAC files in the USB flash
memory device.
Appears when an unsupported device is
connected. See page 142 for the specification
information for the USB flash memory device.
If it appears when the supported device is
connected, reconnect the device.
Audio System (Models without navigation system)
USB Flash Memory Device Error
Messages
148
USB ERROR
BAD USBDEVICE
PLEASE CHECK
OWNERSMANUAL
UNPLAYABLE FILE
USB NO SONG
UNSUPPORTED
Main Menu
Page 154 of 388
 or ON (II) position.
Turn the system on by pushing the
power/volume knob or the AM/FM
button. Adjust the volume by turni")
�µ�Û�Ý
�Û
�Ý
�Î �Î
�Î
The ignition switch must be in the
ACCESSORY (I) or ON (II) position.
Turn the system on by pushing the
power/volume knob or the AM/FM
button. Adjust the volume by turning
the power/volume knob.
Pushing the AUDIO button will also
turn on the system.
You can also operate the audio
system without using the control
icons on the audio screen. Use the
control buttons on the lef t side of the
screen. The status bar appears on
the bottom of the screen each time
you operate any of the control
buttons. On the navigation screen,
you can also see audio inf ormation
by touching the AUDIO INFO icon
on the lower half of the screen. You can use any of f ive methods to
f ind radio stations on the selected
band: tune, seek, scan, the preset
buttons, and auto select.
Use the TUNE bar to tune
the radio to a desired f requency.
Press the side of the bar to tune
to a higher f requency, and press the
side to tune to a lower
f requency.
Press and hold the or side of
the TUNE bar until you hear two
beeps to change the f requency
rapidly. Release the bar when the
display reaches the desired
f requency.
The band and f requency that the
radio was last tuned to are displayed.
To change bands, press the AM/FM
button, or touch the desired band
icon (FM1, FM2, AM, XM1 , or
XM2 ). On the FM band, STEREO
will be displayed if the station is
broadcasting in stereo. Stereo
reproduction on AM is not available.
If equipped
For inf ormation on XM Radio, see
page . :
153
T o Play the A M/FM Radio
T o Select a Station
TUNE
Audio System (Models with navigation system)
150
Main Menu