Page 223 of 369
A notif ication that there is an
incoming call, or HFL is in use, will
appear on the navigation screen
when the audio system is on.On the map screen, you will see a
‘‘HFL’’ message on the screen.
A indicator will also be
displayed on the screen if your
phone is linked to HFL.
However, when the current street is
shown, and AUDIO INFO icon is
visible, ‘‘HFL’’ will not appear when
there is an incoming call.
BluetoothHandsFreeL ink
Inf ormation Display
Features
219
BLUETOOTH INDICATOR
HFL MESSAGE
Main Menu
Page 230 of 369

Bluetooth is the wireless technology
that links your phone to HFL. HFL
uses a Class 2 Bluetooth, which
means the maximum range between
yourphoneandvehicleis30feet(10
meters).
During a call, HFL allows you to talk
up to 30 minutes af ter you remove
the key from the ignition switch.
However, this may weaken the
vehicle’s battery.
You can make calls using a name in
the HFL phonebook or any phone
number. You can also redial the last
number called.
Press and release the HFL Talk
button bef ore a command.
Press and release the HFL Talk
button bef ore a command.
Say ‘‘ ’’ or ‘‘ .’’
Follow the HFL prompts and say
thenamestoredintheHFL
phonebook that you want to call.
Follow the HFL prompts to
conf irm the name and make the
call. Say ‘‘ ’’ or ‘‘ .’’
Follow the HFL prompts and say
the phone number you want to dial.
Follow the HFL prompts to
conf irm the number and say
‘‘ ’’ or ‘‘ .’’
Once connected, you will hear the
person you called through the audio
speakers.
1. 2. 3.
1. 2. 3.
Making a Call
Call Dial Call Dial
Call Dial
BluetoothHandsFreeL ink
TomakeacallusinganameintheHFL phonebook: T o make a call using a phone
number:
226
Main Menu
Page 233 of 369
You can transfer a call from HFL to
your phone, or f rom your phone to
HFL.
Press and release the HFL Talk
button and say ‘‘ .’’
When you receive a call, an incoming
call notif ication (if activated) will
play and interrupt the audio system
if it is on.
Press the HFL Talk button to answer
the call, or the HFL Back button to
hang up. If your phone has Call Waiting, press
and release the HFL Talk button to
put the original call on hold and
answer the incoming call.
To return to the original call, press
the HFL Talk button again. If you
don’t want to answer the incoming
call, disregard it and continue with
your original call. If you want to hang
up the original call and answer the
new call, press the HFL Back button. Transf erring a Call
Transfer
Receiving a Call
Call Wait ing
BluetoothHandsFreeL ink
Features
229
Main Menu
Page 254 of 369

Your dealer has Honda accessories
that allow you to personalize your
vehicle. These accessories have
been designed and approved f or your
vehicle, and are covered by warranty.Bef ore installing any accessory:
Make sure the accessory does not
obscure any lights, or interf ere
with proper vehicle operation or
perf ormance.
Modif ying your vehicle, or installing
some non-Honda accessories, can
make it unsaf e. Bef ore you make any
modif ications or add any accessories,
be sure to read the f ollowing
inf ormation.
Be sure electronic accessories do
not overload electrical circuits
(see page ) or interf ere with
the proper operation of your
vehicle.
Do not install accessories on the
side pillars or across the rear
windows. Accessories installed in
theseareasmayinterferewith
proper operation of the side
curtain airbags.
Bef ore installing any electronic
accessory, have the installer
contact your dealer for assistance.
If possible, have your dealer
inspect the f inal installation.
When properly installed, cellular
phones, alarms, two-way radios, and
low-powered audio systems should
not interf ere with your vehicle’s
computer controlled systems, such
as your airbags, anti-lock brakes, and
tire pressure monitoring system (if
equipped).
Although non-Honda accessories
may f it on your vehicle, they may not
meet f actory specif ications, and
could adversely af f ect your vehicle’s
handling, stability, and reliability. 327
A ccessories
A ccessories and Modif icat ions
250 Improper accessories or
modifications can affect your
vehicle’s handling, stability, and
performance, and cause a
crash in which you can be hurt
or killed.
Follow all instructions in this
owner’s manual regarding
accessories and modifications.
Main Menu
Page 302 of 369
Pull the bulb straight out of its
socket. Push the new bulb straight
into the socket until it bottoms.
Insert the socket back into the
light assembly. Turn it clockwise
to lock it in place.
Push the trunk lid trim back into
position.
Put the f asteners into the holes on
the trunk lid trim. Reinstall the
screws.Beforeusinganautomaticcarwash,
remove the audio antenna so it does
not get damaged. Remove the
antenna by unscrewing it. When you
reinstall the antenna, tighten it
securely.
Bef ore entering or parking in areas
with low ceiling height, remove the
antenna.
Turn on the lights to make sure
the new bulb is working.
Remove the socket by turning it
one-quarter turn counterclockwise.
2. 3. 4.5. 6.7.
Lights, Roof Antenna
A udio A ntenna
298 BULB
SOCKET
Main Menu
Page 323 of 369

�´�´
Although this seems like a simple
procedure, you should take several
precautions.
To jump start your vehicle:
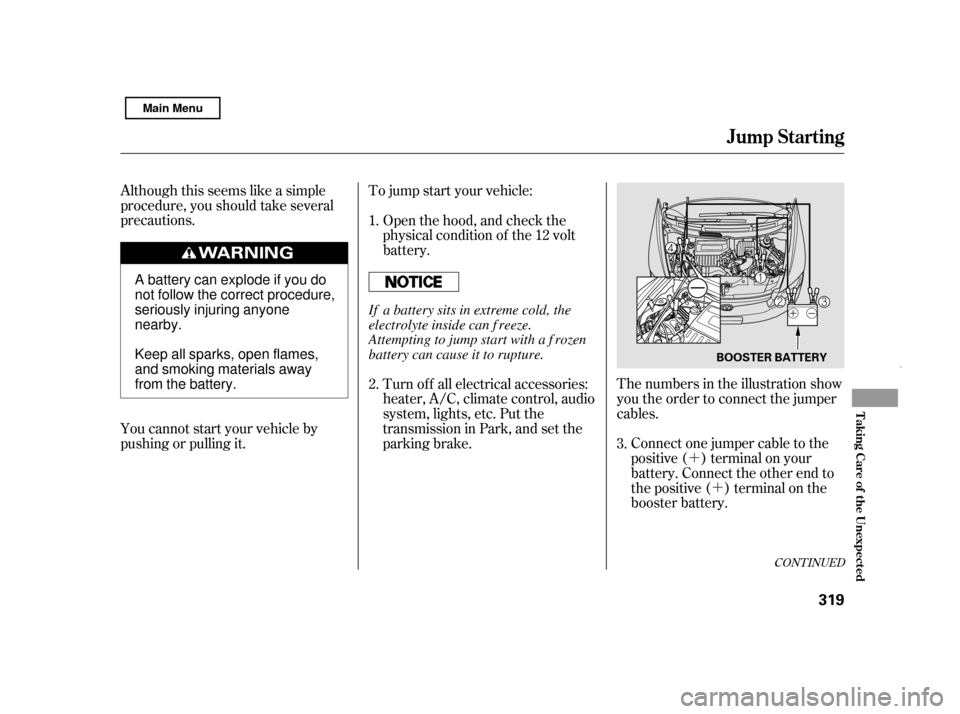
The numbers in the illustration show
you the order to connect the jumper
cables.Connect one jumper cable to the
positive ( ) terminal on your
battery. Connect the other end to
the positive ( ) terminal on the
booster battery.
You cannot start your vehicle by
pushing or pulling it. Open the hood, and check the
physical condition of the 12 volt
battery.
Turn of f all electrical accessories:
heater, A/C, climate control, audio
system, lights, etc. Put the
transmission in Park, and set the
parking brake.
1. 2.
3.
CONT INUED
Jump Start ing
T aking Care of t he Unexpect ed
319
BOOSTER BATTERY
A battery can explode if you do
not follow the correct procedure,
seriously injuring anyonenearby.
Keep all sparks, open flames,
and smoking materials away
from the battery.
If a battery sits in extreme cold, the
electrolyte inside can f reeze.
Attempting to jump start with a f rozen
battery can cause it to rupture.
Main Menu
Page 334 of 369
When the audio system is disabled,
the clock setting in the audio system
will be canceled. You will need to
reset the clock according to the
instructions in the audio system
sectioninthisowner’smanual.
If the replacement fuse of the
same rating blows in a short time,
there is probably a serious
electrical problem with your
vehicle. Leave the blown fuse in
that circuit, and have your vehicle
checked by a qualif ied technician.
6.
Fuses
330
Replacing a f use with one that has a
higher rating greatly increases the
chances of damaging the electrical
system. If you do not have a
replacement f use with the proper rating
f or the circuit, install one with a lower
rating.
Main Menu
Page 361 of 369

CONT INUED
....................................
Accessories . 250
ACCESSORY (Ignition Key
.......................................
Position) . 80
.............
Accessory Power Socket . 101
....................
Additives, Engine Oil . 285
.............................
Airbag (SRS) . 10, 22
...
Airbags, Additional Information . 22
...
Additional Safety Precautions . 33
..........
AdvancedAirbagSystem .26
.............................
Airbag Service . 32
How the Passenger Airbag Of f
......................
Indicator Works . 31
How the Side Airbag Of f ......................
Indicator Works . 31
..
How the SRS Indicator Works . 30
How Your Front Airbags
.........................................
Work . 24
...
How Your Side Airbags Work . 28
How Your Side Curtain Airbags
.........................................
Work . 30
........................
SRS Components . 22
..............
Air Conditioning System . 104
.......................
Air Pressure, Tires . 304
......................................
Antif reeze . 288 Anti-lock Brakes (ABS)
...............................
Indicator . 59, 268
...................................
Operation . 268
..............
Anti-thef t, Audio System . 209
Anti-thef t Steering Column
..........................................
Lock . 80
........................................
Armrest . 95
................................
Audio System . 110
.....
Auto Door Locking/Unlocking . 82
.........................
Auto Door Locking . 82
.....................
Auto Door Unlocking . 85
........................
Auto Idle Stop . 264, 265
...
Automatic Seat Belt Tensioners . 20
.............
Automatic Speed Control . 214
.
Automatic Transmission (CVT) . 260
..........................
Capacity,Fluid .338
...............
Checking Fluid Level . 291
.......................................
Shif ting . 261
Shif t Lever Position
...............................
Indicators . 260
................
Shif t Lever Positions . 261
....................
Shif t Lock Release . 263 Battery
Charging System ...........................
Indicator . 62, 324
............................
Jump Starting . 319
..............................
Maintenance . 308
............................
Specif ications . 339
..............................
Bef ore Driving . 241
....................................
Belts,Seat .9,19
...........................
Beverage Holder . 101
Brakes
...........
Anti-lock System (ABS) . 268
.............
Break-in, New Linings . 242
....................
Bulb Replacement . 296
...........................................
Fluid . 292
...................
Pad Wear Indicator . 268
.........................................
Parking . 99
...........
System Indicator . 58, 63, 326
.............................
Braking System . 267
.................
Break-in, New Vehicle . 242
..
Brightness Control, Instruments . 75
Index
A B
INDEX
I
Main Menu