Page 7 of 369
�Î�Î
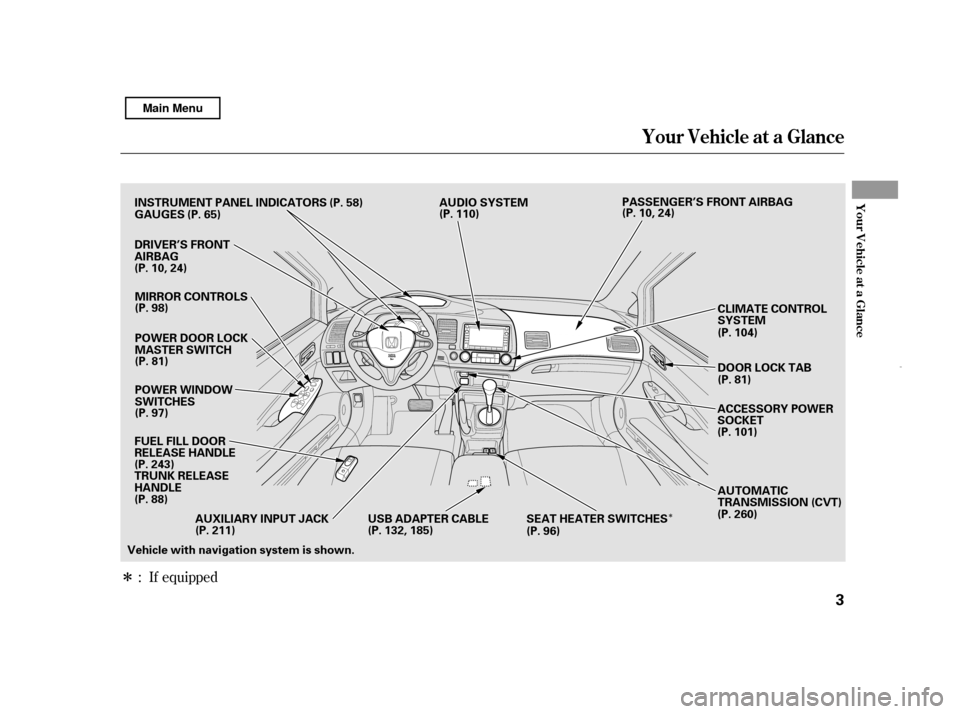
If equipped
:
Your Vehicle at a Glance
Your Vehicle at a Glance
3
PASSENGER’S FRONT AIRBAG
DRIVER’S FRONT
AIRBAG MIRROR CONTROLS
POWER DOOR LOCK
MASTER SWITCH
POWER WINDOW
SWITCHES
FUEL FILL DOOR
RELEASE HANDLE
TRUNK RELEASE
HANDLE AUTOMATIC
TRANSMISSION (CVT)
ACCESSORY POWER
SOCKET
DOOR LOCK TAB
CLIMATE CONTROL
SYSTEM
INSTRUMENT PANEL INDICATORS
GAUGES
(P. 58)
(P. 98)
(P. 81)
(P. 97)
(P. 88) (P. 104)
(P. 81)
(P. 101)
(P. 65)
(P. 243) (P. 260)
AUXILIARY INPUT JACK SEAT HEATER SWITCHES
(P. 96)
(P. 211) USB ADAPTER CABLE
(P. 132, 185)AUDIO SYSTEM
(P. 110)
Vehicle with navigation system is shown. (P. 10, 24)
(P. 10, 24)
Main Menu
Page 60 of 369
�Î�Î
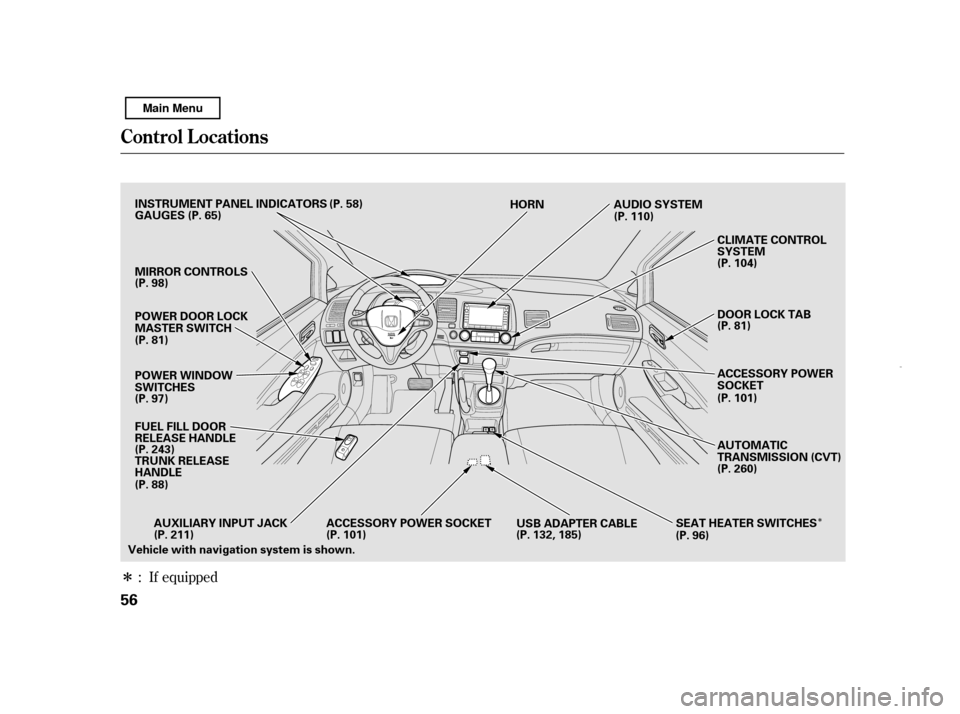
If equipped
:
Control L ocat ions
56 POWER WINDOW
SWITCHES
MIRROR CONTROLS
FUEL FILL DOOR
RELEASE HANDLE INSTRUMENT PANEL INDICATORS
GAUGES
POWER DOOR LOCK
MASTER SWITCH (P. 58)
TRUNK RELEASE
HANDLE AUTOMATIC
TRANSMISSION (CVT)
ACCESSORY POWER
SOCKET
CLIMATE CONTROL
SYSTEM
DOOR LOCK TAB
(P. 98)
(P. 81)
(P. 97)
(P. 88) (P. 101)
(P. 81)
(P. 104)
(P. 65)
(P. 243) (P. 260)
SEAT HEATER SWITCHES
(P. 96)
USB ADAPTER CABLE
(P. 132, 185)
ACCESSORY POWER SOCKET
(P. 101)
AUXILIARY INPUT JACK
(P. 211) HORN
AUDIO SYSTEM
(P. 110)
Vehicle with navigation system is shown.
Main Menu
Page 104 of 369
�Î
�Î
Interior Convenience Items
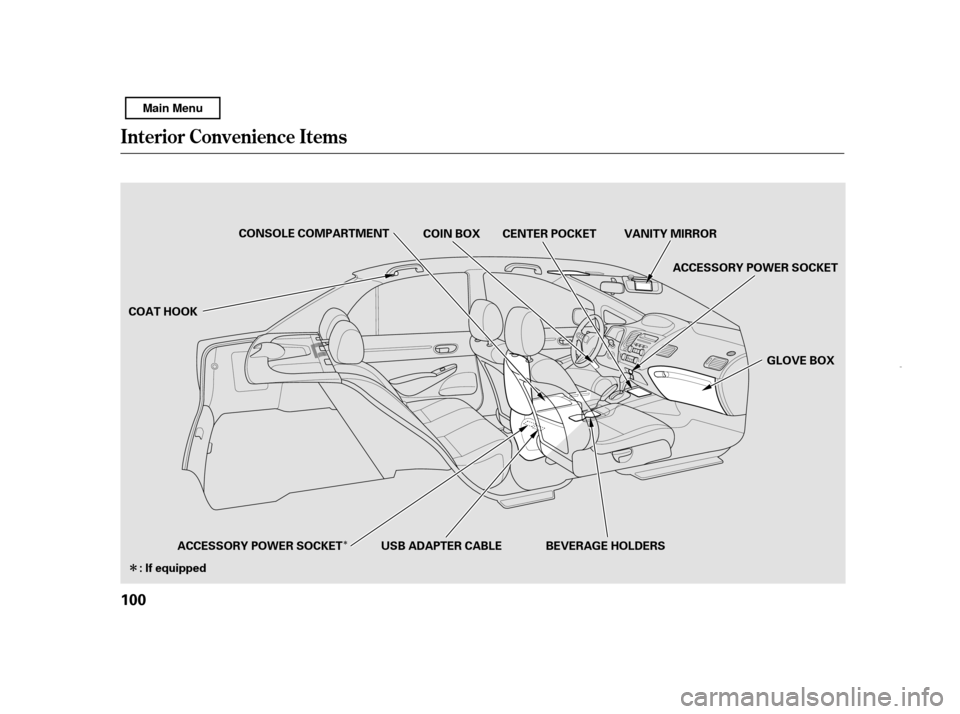
100 COAT HOOK
ACCESSORY POWER SOCKET
: If equipped USB ADAPTER CABLE BEVERAGE HOLDERS GLOVE BOX
VANITY MIRROR
CENTER POCKET
COIN BOX
CONSOLE COMPARTMENT
ACCESSORY POWER SOCKET
Main Menu
Page 107 of 369

The climate control system in your
vehicle provides a comf ortable
driving environment in all weather
conditions.
The standard audio system has
many f eatures. This section
describes those f eatures and how to
use them. (If you have an optional
audio system, ref er to the operating
instructions that came with it.)
Your vehicle has an anti-theft audio
system that requires a code number
to enable it.
The security system helps to dis-
courage vandalism and thef t of your
vehicle..............................
Climate Control . 104
................................
Audio System . 110
Audio System (Models without
...................
navigation system) . 112
..........
Playing the AM/FM Radio . 113
.....................
Adjusting the Sound . 115
................
Playing the XM
Radio . 116
................................
Playing a Disc . 121
.......
Disc Player Error Messages . 128
Optional Disc Changer Error
...................................
Messages . 129
............................
PlayinganiPod
. 130
.................
iPod
Error Messages . 138
Playing a USB Flash Memory
........................................
Device . 139
USB Flash Memory Device ........................
Error Messages . 146
Audio System (Models with ...................
navigation system) . 147
..........
Playing the AM/FM Radio . 148
................
Playing the XM
Radio . 151
.....................
Adjusting the Sound . 158
................................
Playing a Disc . 160
.......
Disc Player Error Messages . 169
.........................
Playing a PC Card . 170
.............
PC Card Error Messages . 182 ............................
PlayinganiPod
. 183
.................
iPod
Error Messages . 192
Playing a USB Flash Memory ........................................
Device . 193
USB Flash Memory Device
........................
Error Messages . 203
............
AM/FM Radio Reception . 204
..................
Protecting Your Discs . 206
.................
Radio Thef t Protection . 209
................
Remote Audio Controls . 210
......................
Auxiliary Input Jack . 211
..........................
Setting the Clock . 212
............................
Security System . 213
...............................
Cruise Control . 214
........
HandsFreeLink
. 217Bluetooth
Features
Features
103
Main Menu
Page 130 of 369

�µ�µ
Pressing either side of the SEEK/
SKIP button also turns of f the scan
feature. Each time you press and release the
SCAN button, the mode changes
from file scan to folder scan, then to
normal play.Press the eject button ( ) to
remove the disc. If you eject the disc,
but do not remove it f rom the slot,
the system will automatically reload
it af ter 10 seconds and put it in pause
mode. To begin playing, press the
CD button.
You can also eject the disc when the
ignition switch is of f .
The scan f unction samples all tracks
(f iles in MP3 or WMA) on the disc in
the order they are recorded on the
disc. To activate scan, press the
SCAN button. In MP3 or WMA
mode, press the SCAN button
repeatedly to select SCAN. You will
see SCAN in the display. You will get
a10secondsamplingof eachtrack/
f ile on the disc. Press the SCAN
button again to get out of scan mode
and play the last track/f ile sampled. This
feature, when activated, samples the
f irst f ile in each f older on the disc.
To activate folder scan, press the
SCAN button twice. You will see
F-SCAN in the display.
The system plays the f irst f ile in the
f irst f older f or about 10 seconds. If
you do nothing, the system will then
play the f irst f iles in the next f olders
f or 10 seconds. Af ter playing the f irst
file in the last folder, the system
plays normally.
Pressing either side of the SEEK/
SKIP button, selecting a dif f erent
folder with the TUNE knob, or
pressing the SCAN button, also turns
of f the f older scan. To play the radio when a disc is
playing, press the AM/FM button.
Press the AUX button to switch to an
appropriate audio unit (if it is
connected to the auxiliary input jack
or the USB adapter cable). Press the
CD button again to switch back to
the disc player.In MP3 or WMA modeTo Stop Playing a Disc
SCA N (T RA CK /FIL E SCA N)
F-SCAN (FOLDER SCAN)
Playing a Disc (Models wit hout navigation syst em)
126
Main Menu
Page 135 of 369

iPod classic
(120 G)
iPod with video
(iPod 5th
generation)
iPod nano
iPod nano
2nd generation
iPod nano
3rd generation
iPod nano
4th generation
iPod nano
5th")
CONT INUED
Model
iPod classic
(80/160 G)
iPod classic
(120 G)
iPod with video
(iPod 5th
generation)
iPod nano
iPod nano
2nd generation
iPod nano
3rd generation
iPod nano
4th generation
iPod nano
5th generation
iPod touch
iPod touch
2nd generation Sof tware
Ver. 1.1.2 or more
Ver. 2.0.1 or more
Ver. 1.3.0 or more
Ver. 1.3.1 or more
Ver. 1.1.3 or more
Ver. 1.1.3 or more
Ver. 1.0.3 or more
Ver. 1.0.1 or more
Ver. 1.1.5 or more
Ver. 2.2.1 or more
This audio system can select and
play the audio f iles on the iPod
with
the same controls used f or the disc
player. To play an iPod, connect it to
the USB adapter cable in the console
compartment by using your dock
connector, then press the AUX
button. The ignition switch must be
in the ACCESSORY (I) or ON (II)
position. The iPod will also be
charged with the ignition switch in
these positions.
The audio system reads and plays
playable sound f iles on the iPod. The
system cannot operate an iPod as a
mass storage device. The system will
only play songs stored on the iPod
with iTunes.
iPod and iTunes are registered
trademarks owned by Apple Inc. iPods compatible with your audio
system using the USB adapter cable
are:
Use only compatible iPods with the
latest sof tware. iPods that are not
compatible will not work in this audio
unit.
To Play an iPod
Playing an iPod(Models without navigation syst em)
Features
131
Main Menu
Page 136 of 369
Do not connect your iPod using a hub.
DonotkeeptheiPodinthe
vehicle. Direct sunlight and high
heat will damage it.
Do not use an extension cable
between the USB adapter cable
equipped with your vehicle and
your dock connector.
We recommend backing up your
data bef ore playing it.Install the dock connector to the
USB adapter cable securely.
Connect your dock connector to
the iPod correctly and securely.
Pull out the USB connector f rom
the holder and remove the cable
f rom the clip in the console
compartment.
In AAC f ormat, DRM (digital rights
management) f iles cannot be played.
If the system finds a DRM file, the
audio unit displays UNPLAYABLE,
andthenskipstothenextfile. Some devices cannot be powered
or charged via the USB adapter. If
this is the case, use the accessory
adapter to supply power to your
device.
1.
2. 3.
Playing an iPod(Models without navigation syst em)
Connect ing an iPod
132
NOTE:
DOCK CONNECTOR
USB CONNECTOR
USB ADAPTER
CABLE
CABLE
Main Menu
Page 141 of 369
�Î
�Î
You can disconnect the iPod at any
time when you see the ‘‘OK to
disconnect’’ message in the iPod
display. With the AUX mode, you will
see a ‘‘USB NO DATA’’ message in
the display. Always make sure you
see the ‘‘OK to disconnect’’ in the
iPod display bef ore you disconnect it.
Make sure to f ollow the iPod’s
instructions on how to disconnect
the dock connector f rom the USB
adapter cable.
The displayed message may
vary on models or versions. On
some models, there is no
message to disconnect.
If you reconnect the same iPod, the
system may begin playing where it
lef t of f , depending on what mode the
iPod is in when it is reconnected. If you see an error message in the
display, see page .
: 138
Playing an iPod(Models without navigation syst em)
Disconnect ing an iPodiPodError Messages
Features
137
Main Menu