Page 251 of 400
This command group allows you to
change or customize HFL basic
settings.Press and release the HFL Talk
button bef ore a command.
Say ‘‘ .’’ Once a passcode is set, you
will need to enter it to use HFL each
time you start the vehicle. If you
f orget the code, your dealer will have
toresetitforyou,oryouwillhaveto
clear the entire system (see page ).
Follow the HFL prompts and say
the 4-digit passcode you want to
set.
Say‘‘ ’’aftertheprompts.
Follow the HFL prompts to
conf irm the number.
1. 2.3. 4.
249
CONT INUED
System Setup
System setup
SecurityT o set a 4-digit passcode t o lock t heHFL syst em f or securit y purposes:
BluetoothHandsFreeL ink
Features
247
NOTE:
Main Menu
Page 264 of 400
�µ�µ
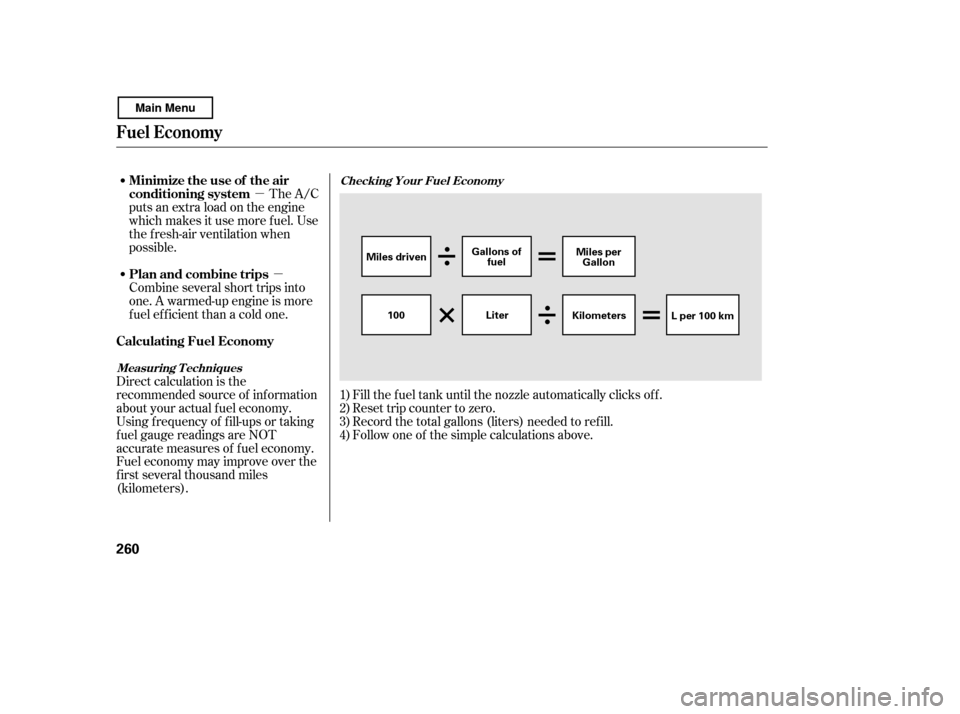
Fill the f uel tank until the nozzle automatically clicks of f .
Reset trip counter to zero.
Record the total gallons (liters) needed to ref ill.
Follow one of the simple calculations above.
The A/C
puts an extra load on the engine
which makes it use more f uel. Use
the f resh-air ventilation when
possible.
Combine several short trips into
one. A warmed-up engine is more
f uel ef f icient than a cold one.
Direct calculation is the
recommended source of inf ormation
about your actual f uel economy.
Using f requency of f ill-ups or taking
f uel gauge readings are NOT
accurate measures of f uel economy.
Fuel economy may improve over the
f irst several thousand miles
(kilometers). 1)2)3)4)
Fuel Economy
Checking Your Fuel Economy
Measuring T echniquesMinimize the use of the air
conditioning system
Plan and combine trips
Calculating Fuel Economy
260
Miles driven Gallons of
fuel Miles per
Gallon
100 KilometersL per 100 km
Liter
Main Menu
Page 286 of 400

The VSA system cannot enhance the
vehicle’s driving stability in all
situations and does not control your
vehicle’s entire braking system. It is
still your responsibility to drive and
corner at reasonable speeds and to
leave a sufficient margin of safety.
When VSA activates, you will see the
VSA Activation indicator blinks.
If this indicator comes on while
driving, pull to the side of the road
when it is saf e, and turn of f the
engine. Reset the system by
restarting the engine. If the VSA
system indicator stays on or comes
back on while driving, have the VSA
system inspected by your dealer.
The vehicle stability assist (VSA)
system helps to stabilize the vehicle
during cornering if the vehicle turns
more or less than desired. It also
assists you in maintaining traction
while accelerating on loose or
slippery road surf aces. It does this
by regulating the engine’s output and
by selectively applying the brakes.
When VSA activates, you may notice
that the engine does not respond to
the accelerator in the same way it
does at other times. There may also
be some noise f rom the VSA
hydraulic system. You will also see
the VSA activation indicator blink.
The main f unction of the
VSA system is generally known as
Electronic Stability Control (ESC).
The system also includes a traction
control f unction.
Without VSA, your vehicle will have
normal braking and cornering ability,
but it will not have VSA traction and
stability enhancement.
If the low tire pressure indicator or
TPMS indicator comes on, the VSA
system automatically turns on even if
the VSA system is turned of f by
pressing the VSA OFF switch (see
page ). If this happens, you
cannot turn the VSA system of f by
pressing the VSA OFF switch again. 283
U.S. models
EX-LandSimodels
VSA A ctivation Indicator
Vehicle Stability Assist
(VSA ) System Indicator
Vehicle St abilit y A ssist (VSA), aka Electronic Stability Control (ESC), System
282
NOTE:
Main Menu
Page 295 of 400

100% 91% 90% 81%
80% 71%
70% 61%
60% 51%
50% 41%
40% 31%
30% 21%
20% 16%
15% 11%
10% 6%
15% 6%5% 1%")
�µ �µ�µ�µ�µ�µ�µ�µ�µ�µ�µ�µ�µ�Î
�Î�Î
�Î�Î
CONT INUED
Calculated Engine Oil Lif e (%)
100% 91% 90% 81%
80% 71%
70% 61%
60% 51%
50% 41%
40% 31%
30% 21%
20% 16%
15% 11%
10% 6%
15% 6%5% 1% 0% Displayed
Engine Oil Lif e (%) 100%90%80%70%60%50%40%30%20%15%10%15%5%0%
Your vehicle displays engine oil lif e
and maintenance service items on
the inf ormation display to show you
when you should have your dealer
perf orm engine oil replacement and
indicated maintenance service.
Based on the engine operating
conditions and accumulated engine
revolutions, the onboard computer in
your vehicle calculates the remaining
engine oil lif e and displays it as a
percentage. The remaining engine oil lif e is
displayed on the inf ormation display
according to this table:
To see the current engine oil lif e,
turn the ignition switch to the ON
(II) position, then push and release
the SEL/RESET button repeatedly
until the engine oil lif e indicator
appears (see page ). 1:2:
67
DX and Canadian DX-G
LX, SE, EX, EX-L, and Si
1
12
Maintenance Minder
Engine Oil L if e Indicator
Maint enance
291
MAINTENANCE
MINDER INDICATOR ENGINE OIL LIFE
INDICATOR
INFORMATION DISPLAY
TM
Main Menu
Page 297 of 400
 or more.
When the remaining engine oi")
If you do not perf orm the indicated
maintenance, negative distance
traveled is displayed and begins to
blink af ter the vehicle has been
driven 10 miles (10 km) or more.
When the remaining engine oil lif e is
0 percent, the engine oil lif e indicator
will blink. The display comes on
everytimeyouturntheignition
switch to the ON (II) position. The
Maintenance Minder indicator
( ) also comes on and remains
on in the instrument panel. When
you see this message, immediately
have the indicated maintenance done
by your dealer.
The maintenance item code or codes
indicate the main and sub items
required at the time of the oil change
(see page ).
You can switch the display to the
odometer, the trip meter, and the
outside temperature indicator (if
equipped) by pushing the SEL/
RESET button on the dashboard
repeatedly.
Whentheengineoillifeis15to1
percent, the Maintenance Minder
indicator ( ) comes on every
time you turn the ignition switch to
the ON (II) position, then it goes out
if you switch the inf ormation display.
When you see this message, have
the indicated maintenance
perf ormed by your dealer as soon as
possible.
Immediately have the indicated
maintenance done by your dealer.
Negative distance traveled means
your vehicle has passed the
maintenance required point.
297
CONT INUED
Maintenance Minder
Maint enance
293
NEGATIVE DISTANCE TRAVELED
TM
Main Menu
Page 298 of 400

Your dealer will reset the display
af ter completing the required
maintenance service. You will see
‘‘OIL LIFE 100%’’ on the inf ormation
display the next time you turn the
ignition switch to the ON (II)
position.
If maintenance service is done by
someone other than your dealer,
reset the Maintenance Minder as
f ollows:Turn the ignition switch to the ON
(II) position.
Press the SEL/RESET button
repeatedly until the engine oil lif e
indicator is displayed.
All maintenance items displayed on
the inf ormation display are in code.
For an explanation of these
maintenance codes, see page .
You can change the inf ormation
display f rom the engine oil lif e
display to the odometer, the trip
meter, or the outside temperature (if
equipped) every time you press and
release the SEL/RESET button.
When the engine oil lif e is 0 percent
or negative distance traveled, the
Maintenance Minder indicator
( )remainsonevenif you
change the inf ormation display.
Immediately have the service
perf ormed, and make sure to reset
the display as described as f ollows.
1.
2.
297
Maintenance Minder
Resetting the Engine Oil Lif e
Display
Maintenance Main Items and Sub
Items
294
MAINTENANCE MAIN ITEM
MAINTENANCE SUB ITEM
TM
Main Menu
Page 299 of 400
CONT INUED
If you have the required service
done but do not reset the display, or
reset the display without doing the
service, the system will not show the
correct maintenance intervals. This
canleadtoseriousmechanical
problems because you will no longer
have an accurate record of when
maintenance is needed.
Your authorized Honda dealer
knows your vehicle best and can
provide competent, ef f icient service.
Press the SEL/RESET button f or
more than 5 seconds. The
maintenance item code(s) will
disappear, and the engine oil lif e
will reset to ‘‘100.’’
Press the SEL/RESET button f or
about 10 seconds. The engine oil
lif e and the maintenance item
code(s) will blink.
4.
3.
Maintenance Minder
Important Maintenance
Precautions
Maint enance
295
TM
Main Menu
Page 300 of 400

�Ì�µ�µ �µ
�µ
�µ
�µ
However, service at a dealer is not
mandatory to keep your warranties
in effect. Maintenance may be done
by any qualif ied service f acility or
person who is skilled in this type of
automotive service. Make sure to
have the service f acility or person
reset the display as previously
described. Keep all receipts as proof
of completion, and have the person
who does the work f ill out your
Honda Service History or Canadian
Maintenance Log. Check your
warranty booklet f or more
inf ormation.
We recommend using Honda parts
and fluids whenever you have
maintenance done. These are
manuf actured to the same high
quality standards as the original
components, so you can be conf ident
of their perf ormance and durability. U.S. Vehicles:
According to state and federal
regulations, f ailure to perf orm
maintenance on the items marked
with will not void your emissions
warranties. However, all
maintenance services should be
perf ormed in accordance with the
intervals indicated by the
inf ormation display.
Youshouldcheckthefollowing
items at the specif ied intervals. If
you are unsure of how to perf orm
any check, turn to the appropriate
page listed.
Engine oil level Check every
time you fill the fuel tank. See
page .
Engine coolant level Check the
radiator reserve tank every time
you f ill the f uel tank. See page . Automatic transmission Check
the f luid level monthly. See page
.
Brakes Check the f luid level
monthly. See page .
Tires Check the tire pressure
monthly. Examine the tread f or
wear and foreign objects. See page .
Lights Check the operation of
the headlights, parking lights,
taillights, high-mount brake light,
and license plate lights monthly.
See page .
255 257308
310
323
312
Maintenance Minder
Owner’s Maintenance Checks
296
TM
Main Menu