Page 65 of 400

position. If it comes on at any other
time, there is a problem with the
ABS. If this happens, hav")
This indicator normally comes on f or
a f ew seconds when you turn the
ignition switch to the ON (II)
position. If it comes on at any other
time, there is a problem with the
ABS. If this happens, have your
vehicle checked at a dealer. With
this indicator on, your vehicle still
has normal braking ability but no
anti-lock f unction. For more
inf ormation, see page .This indicator comes on brief ly when
you turn the ignition switch to the
ON (II) position. It will then go of f if
you have inserted a properly coded
ignition key. If it is not a properly
coded key, the indicator will blink,
and the engine’s f uel system will be
disabled (see page ).
The lef t or right turn signal indicator
blinks when you signal a lane change
or turn. If an indicator does not blink
or blinks rapidly, it usually means
one of the turn signal bulbs is
burned out (see pages and ).
Replace the bulb as soon as possible,
since other drivers cannot see that
you are signaling.
When you press the hazard warning
button, both turn signal indicators
and all turn signals on the outside of
the vehicle f lash.
280
80
315 316
Instrument Panel Indicators
Anti-lock Brake System
(A BS) IndicatorImmobilizer System
Indicator Turn Signal and
Hazard Warning
Indicators
Inst rument s and Cont rols
61
Main Menu
Page 76 of 400
�Î
�Î �Î
�Î
�Î
�Î �Î
�Î �Î
�Î
�Î
�Î �Î�Î
To use the horn, press the center pad of the steering wheel.
If equipped.
Only on vehicles equipped with navigation system. Ref er to the navigati
on system manual.
1:2:3:
Controls Near the Steering Wheel
72
HORN
STEERING WHEEL
ADJUSTMENTS
(P.219)
REMOTE AUDIO CONTROLS CRUISE CONTROL
BUTTONS(P.224)
NAVIGATION SYSTEM VOICE CONTROL BUTTONS
VEHICLE STABILITY
ASSIST (VSA) SYSTEM
OFF SWITCH
(P.283)
BLUETOOTH
HANDSFREELINK
SYSTEM VOICE
CONTROL
(P.227)
(P.108)
INSTRUMENT PANEL
BRIGHTNESS
(P.76)
HEADLIGHTS/FOG LIGHTS /TURN SIGNALS
(P.74, 75)
MIRROR CONTROLS
REAR WINDOW DEFOGGER
(P.77)
HEATED MIRRORS
(P.109)
HAZARD WARNING BUTTON
(P.77)
ACCESSORY POWER SOCKET
(P.112)
AUXILIARY INPUT JACK
(P.220)
(P.30)
PASSENGER’S AIRBAG
OFF INDICATOR
AUDIO SYSTEM
WINDSHIELD WIPERS/WASHERS
(P.73)
(P.123)
(P.78)
1
2 2
3
2 2
2 2
2
2
Main Menu
Page 81 of 400

Make sure the rear window is clear
and you have good visibility bef ore
starting to drive.
The rear window def ogger will clear
fog, frost, and thin ice from the
window. Push the def ogger button to
turn it on and off. The indicator in
the button comes on to show the
def ogger is on. If you do not turn it
of f , the def ogger will shut itself of f
af ter about 15 minutes. It also shuts
of f when you turn of f the ignition
switch. You have to turn the
def ogger on again when you restart
the vehicle. The def ogger and antenna wires on
the inside of the rear window can be
accidentally damaged. When
cleaning the glass, always wipe side-
to-side.
Pushthebuttontoturnonthe
hazard warning lights (f our-way
flashers). This causes all four
outside turn signals and both turn
indicators in the instrument panel to
f lash. Use the hazard warning lights
if you need to park in a dangerous
area near heavy traffic, or if your
vehicle is disabled. Pushing this button also turns the
mirror heaters on or of f . For more
inf ormation, see page .
109
On U.S. EX-L, Canadian SE, EX-L and
Si models
Rear Window Def ogger
Hazard Warning Button
Hazard Warning Button, Rear Window Def ogger
Inst rument s and Cont rols
77
U.S. EX-L, Canadian SE, EX-L, Si
Main Menu
Page 99 of 400
�µ
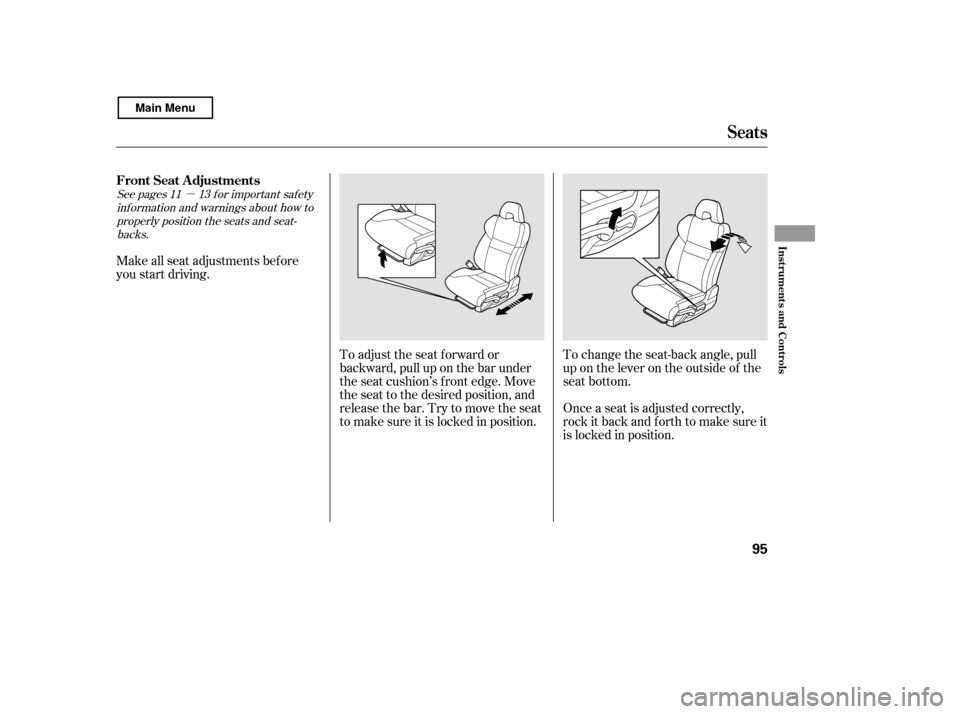
To change the seat-back angle, pull
up on the lever on the outside of the
seat bottom.
Make all seat adjustments bef ore
you start driving.
To adjust the seat f orward or
backward, pull up on the bar under
the seat cushion’s f ront edge. Move
the seat to the desired position, and
releasethebar.Trytomovetheseat
to make sure it is locked in position.Once a seat is adjusted correctly,
rock it back and f orth to make sure it
is locked in position.
See pages f or important saf ety
inf ormation and warnings about how toproperly position the seats and seat-
backs. 11 13
FrontSeatAdjustments
Seats
Inst rument s and Cont rols
95
Main Menu
Page 102 of 400
See page f or important saf etyinf ormation and a warning aboutimproperly positioning head restraints. 13
Your vehicle is equipped with head
restraints in all seating positions to
help protect you and your
passengers f rom the likelihood of
whiplash and other injuries.
They are most ef f ective when you
adjust them so the center of the back
of the occupant’s head rests against
the center of the restraint.The head restraints adjust f or height.
You need both hands to adjust a
restraint.Donotattempttoadjustit
while driving. To raise it, pull upward.
To lower the restraint, push the
release button sideways, and push
the restraint down.
Head Restraints
A djust ing t he Head Rest raint
Seats
98
FRONT
LEGS SEAT-BACK RELEASE
BUTTON
Main Menu
Page 337 of 400
Check the condition of the battery
monthlybylookingatthetest
indicator window. The label on the
battery explains the test indicator’s
colors.If additional battery maintenance is
needed, see your dealer or a
qualif ied technician.
Battery posts,
terminals, and related accessories
contain lead and lead compounds.
Check the terminals f or corrosion (a
white or yellowish powder). To
remove it, cover the terminals with a
solution of baking soda and water. It
will bubble up and turn brown. When
this stops, wash it of f with plain
water. Dry off the battery with a
cloth or paper towel. Coat the
terminals with grease to help prevent
f urther corrosion.
The location of the test indicator
window varies between
manuf acturers.
CONT INUED
WARNING:
Wash your hands af ter handling.
Checking the Battery
Maint enance
333
Si
TEST INDICATOR WINDOW TEST INDICATOR WINDOW
DX, DX-G, LX, SE, EX, EX-L
Main Menu
Page 343 of 400

CONT INUED
If you have a f lat tire while driving,
pull over saf ely. Drive slowly along
the shoulder until you get to an area
far away from traffic lanes.Turn on the hazard warning lights,
and turn the ignition switch to the
LOCK (0) position. Have all
passengers get out of the vehicle
while you change the tire.
Park the vehicle on f irm, level, and
non-slippery ground. Put the
transmission in Park (automatic)
or reverse (manual). Apply the
parking brake.
Open the trunk. Raise the trunk
f loor by lif ting up on the back edge.
Unscrew the wing bolt, and take
the spare tire out of its well.
Take the tool kit case out of the
trunk.
Thecompactsparetireissmaller
than a standard tire, and it will affect
the vehicle’s handling. Drive
cautiously when the spare is
mounted on your vehicle.
Thesizedifferencemayalsocause
damage to the dif f erential, so do not
mount the compact spare on the
f ront. If either f ront tire goes f lat,
removethereartireonthatsame
side, mount the compact spare tire
on the rear, then mount the rear tire
on the f ront.
5.
4.
3.
2.
1.
On Si model only
Changing a Flat T ire
T aking Care of t he Unexpect ed
339
SPARE TIRE
TRUNK FLOOR JACK TOOL CASE
The vehicle can easily roll off
the jack, seriously injuring
anyone underneath.
Follow the directions for
changing a tire exactly, and
never get under the vehicle
when it is supported only by thejack.
Main Menu
Page 351 of 400

CONT INUED
Once your vehicle is running,
disconnect the negative cable f rom
your vehicle, then f rom the
booster battery. Disconnect the
positive cable f rom your vehicle,
then from the booster battery.
Keep the ends of the jumper cables
away from each other and any metal
on the vehicle until everything is
disconnected. Otherwise, you may
cause an electrical short. If the vehicle overheats, you
should take immediate action. The
only indication may be the
temperature gauge climbing to or
above the red mark. Or you may
see steam or spray coming f rom
under the hood.
If you see steam and/or spray
coming f rom under the hood, turn
of f the engine. Wait until you see
no more signs of steam or spray,
then open the hood.
The reading of the vehicle’s
temperature gauge should stay in
the midrange. If it climbs to the red
mark, you should determine the
reason (hot day, driving up a steep
hill, etc.).
Saf ely pull to the side of the road.
Put the transmission in neutral
(manual) or Park (automatic), and
set the parking brake. Turn of f all
accessories, and turn on the
hazard warning lights.
7.
1. 2.
Jump Starting, If the Engine Overheats
If the Engine Overheats
T aking Care of t he Unexpect ed
347
Steam and spray from an
overheated engine can
seriously scald you.
Do not open the hood if steam
is coming out.
Driving with the temperature gauge
reading at the red mark can cause
serious damage to the engine.
Main Menu