2011 FORD F550 wheel torque
[x] Cancel search: wheel torquePage 3 of 449

Roadside Emergencies 314Getting roadside assistance 314
Hazard flasher control 315
Fuel pump shut-off 316
Fuses and relays 316
Changing tires 326
Wheel lug nut torque 342
Jump starting 343
Wrecker towing 347
Customer Assistance 349Reporting safety defects (U.S. only) 356
Reporting safety defects (Canada only) 356
Cleaning 357
Maintenance and Specifications 366Engine compartment 367
Engine oil 371
Battery 373
Engine coolant 375
Fuel information 382
Air filter(s) 401
Part numbers 406
Maintenance product specifications and capacities 407
Engine data 411
Accessories 415
Ford Extended Service Plan 418Table of Contents
3
2011 F-250/350/450/550 (f23)
Owners Guide, 4th Printing
USA (fus)
Page 55 of 449

FOR 4X4 LOW SHIFT TO N (if equipped) — Displayed when 4X4
LOW is selected and the vehicle is stopped. For more information, refer
to Four-wheel drive (4WD) operation in the Driving chapter.
FOR 4X4 LOW SLOW TO 3 MPH (if equipped) — Displayed when
4X4 LOW is selected while the vehicle is moving. For more information,
refer to Four-wheel drive (4WD) operation in the Driving chapter.
TO EXIT 4X4 LOW APPLY BRAKE (if equipped) — Displayed when
2WD is selected from 4X4 LOW mode. For more information, refer to
Four-wheel drive (4WD) operation in the Driving chapter.
TO EXIT 4X4 LOW SHIFT TO N (if equipped) — Displayed when
2WD is selected while the vehicle has been stopped in 4X4 LOW. For
more information, refer to Four-wheel drive (4WD) operation in the
Driving chapter.
TO EXIT 4X4 LOW SLOW TO 3 MPH (if equipped) — Displayed
when 2WD is selected while the vehicle is operating in 4X4 LOW. For
more information, refer to Four-wheel drive (4WD) operation in the
Driving chapter.
FOR HILL DESCENT REDUCE SPEED (if equipped) — Displayed
when the vehicle speed requirement for off-road mode entry has not
been met.
FOR HILL DESCENT SELECT GEAR (if equipped) — Displayed
when the driver is able to select a transmission gear for hill descent
mode.
HILL DESCENT - DRIVER RESUME CONTROL (if equipped) —
Displayed when hill descent control mode is deactivated and the driver
must resume control.
HILL DESCENT CONTROL FAULT (if equipped) — Displayed when
a hill descent system fault is present.
HILL DESCENT CONTROL OFF (if equipped) — Displayed when
hill descent control mode becomes inactive.
HILL DESCENT CONTROL OFF SYSTEM COOLING (if equipped)
— Displayed when the hill descent system is cooling due to overuse.
HILL DESCENT CONTROL READY (if equipped) — Displayed
when the hill descent control switch is turned on.
REDUCE ACCELERATOR TO PREVENT WHEEL SLIP (if
equipped) — Displayed when the vehicle senses that torque to the
drive wheels has overcome the available traction.
SHIFT DELAYED PULL FORWARD (if equipped) — May display
when shifting to or from 4X4 LOW. For more information, refer to
Four-wheel drive (4WD) operation in the Driving chapter.Instrument Cluster
55
2011 F-250/350/450/550 (f23)
Owners Guide, 4th Printing
USA (fus)
Page 280 of 449

If any steering components are serviced or replaced, install new
fasteners (many are coated with thread adhesive or have prevailing
torque features which may not be re-used). Never re-use a bolt or nut.
Torque fasteners to specifications in Workshop Manual .
A high crown in the road or high crosswinds may also make the steering
seem to wander/pull.
ELECTRONIC LOCKING DIFFERENTIAL (ELD) (IF EQUIPPED)
The electronic locking differential (ELD) is a device housed in the rear
axle which allows both rear wheels to turn at the same speed. It provides
added traction on slippery and/or off road surfaces, particularly when
one wheel is on a poor traction surface. The ELD may be locked or
unlocked by the vehicle operator and can be engaged or disengaged on
the fly. When the axle is unlocked it will function like a standard rear
axle. When the axle is locked it will not allow the rear wheels to rotate
at different speeds when turning. It is not recommended for use on good
traction surfaces such as dry pavement. Doing so may result in abnormal
driving behavior and noise while cornering and excessive tire wear.
The ELD is affected by the following conditions of your vehicle:
• On 2WD vehicles and 4WD vehicles in 2H (4X2) or 4H (4X4 High),
the ELD will not engage if the vehicle speed is above 25 mph
(40 km/h).
• On 2WD vehicles and 4WD vehicles in 2H (4X2) or 4H (4X4 High),
the ELD will automatically disengage at speeds above 25 mph
(40 km/h) and will automatically reengage at speeds below 19 mph
(30 km/h).
• On 4WD vehicles in 4L (4X4 Low), the ELD can be engaged at any
speed and will not automatically disengage.
Activating the electronic locking differential (ELD)
For vehicles equipped with an
electronic shift 4WD system:
Pull the knob on the 4WD control
toward you. The
indicator light
will display in the instrument
cluster.Driving
280
2011 F-250/350/450/550 (f23)
Owners Guide, 4th Printing
USA (fus)
Page 281 of 449

For 2WD vehicles and vehicles
equipped with a manual shift
4WD system:
Turn the control to ON. The
indicator light will display in the
instrument cluster.
Once the light is displayed in the instrument cluster, both rear wheel
axle shafts will be locked together providing added traction.
If the
indicator light in the instrument cluster turns off, one of the
following has occurred:
• The vehicle speed is too high.
• The left and right rear wheel speed difference is too high during an
engagement attempt.
• The system has malfunctioned and will be accompanied by the
CHECK LOCKING DIFFERENTIAL message in the message center.
See your authorized Ford dealer for assistance.
Note: The ELD may have difficulty disengaging either by operator
command or automatically if the driveline is under torque. If driving
conditions allow, releasing the accelerator pedal or turning the steering
wheel in the opposite direction may assist in disengagement.
Note: The ELD is designed for off-road use only and is not intended for
use on dry pavement.
PREPARING TO DRIVE
WARNING: Utility vehicles have a significantly higher rollover
rate than other types of vehicles.
WARNING: In a rollover crash, an unbelted person is
significantly more likely to die than a person wearing a seat belt.
Utility vehicles and trucks have larger tires and increased ground
clearance, giving the vehicle a higher center of gravity than a passenger
car. Driving
281
2011 F-250/350/450/550 (f23)
Owners Guide, 4th Printing
USA (fus)
Page 338 of 449

15. Remove the lug nuts with the lug wrench.
16. Replace the flat tire with the spare tire, making sure the valve stem
is facing outward on all front an inboard rear wheels. If replacing the
outboard wheel, the valve stem must be facing inward. Reinstall the lug
nuts until the wheel is snug against the hub. Do not fully tighten the lug
nuts until the wheel has been lowered.
17. Lower the wheel by slowly turning the release valve
counterclockwise. Opening the release valve slowly will provide a more
controlled rate of descent.
The following steps apply to all vehicles:
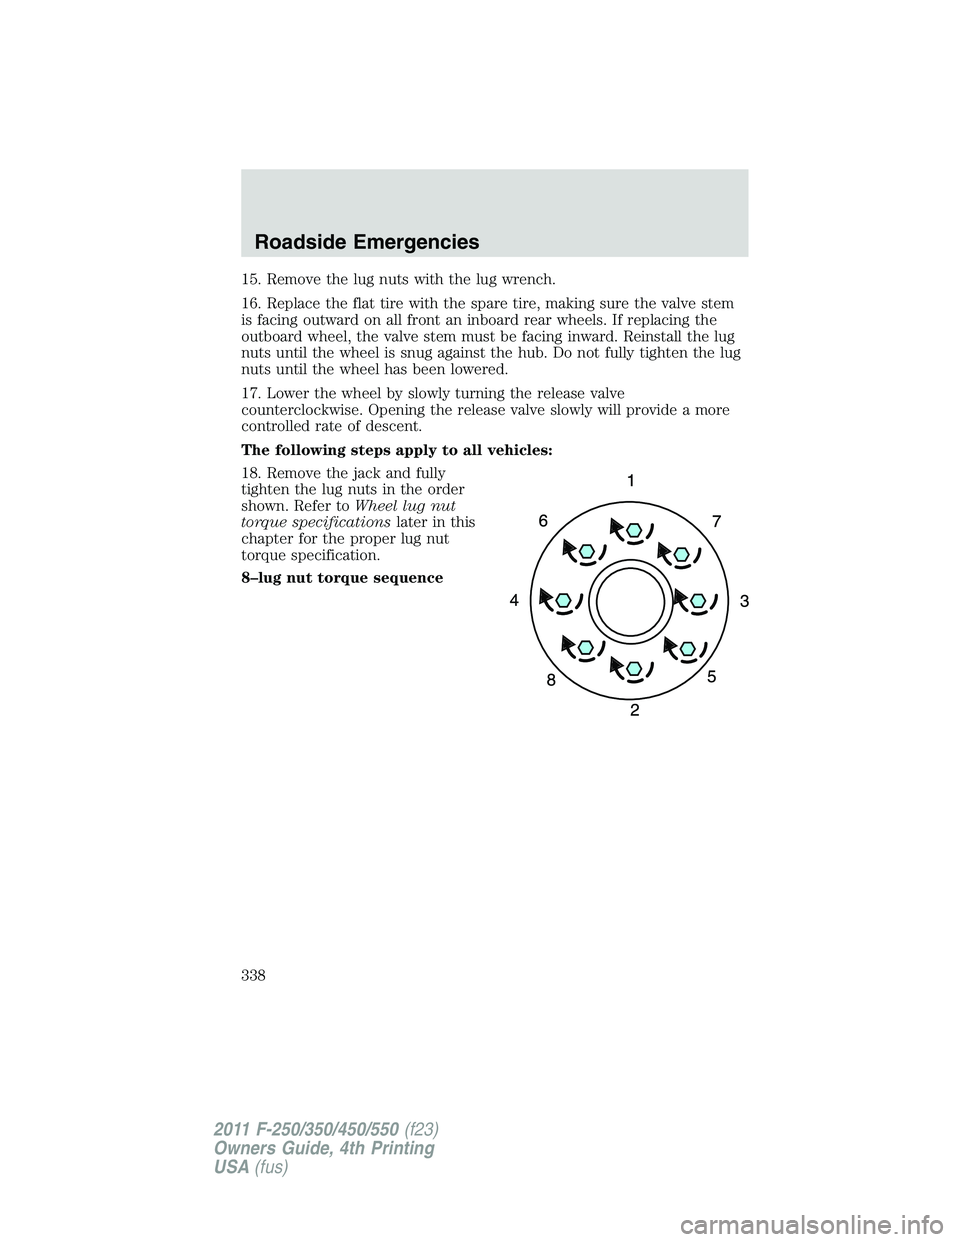
18. Remove the jack and fully
tighten the lug nuts in the order
shown. Refer to Wheel lug nut
torque specifications later in this
chapter for the proper lug nut
torque specification.
8–lug nut torque sequenceRoadside Emergencies
338
2011 F-250/350/450/550 (f23)
Owners Guide, 4th Printing
USA (fus)
Page 339 of 449

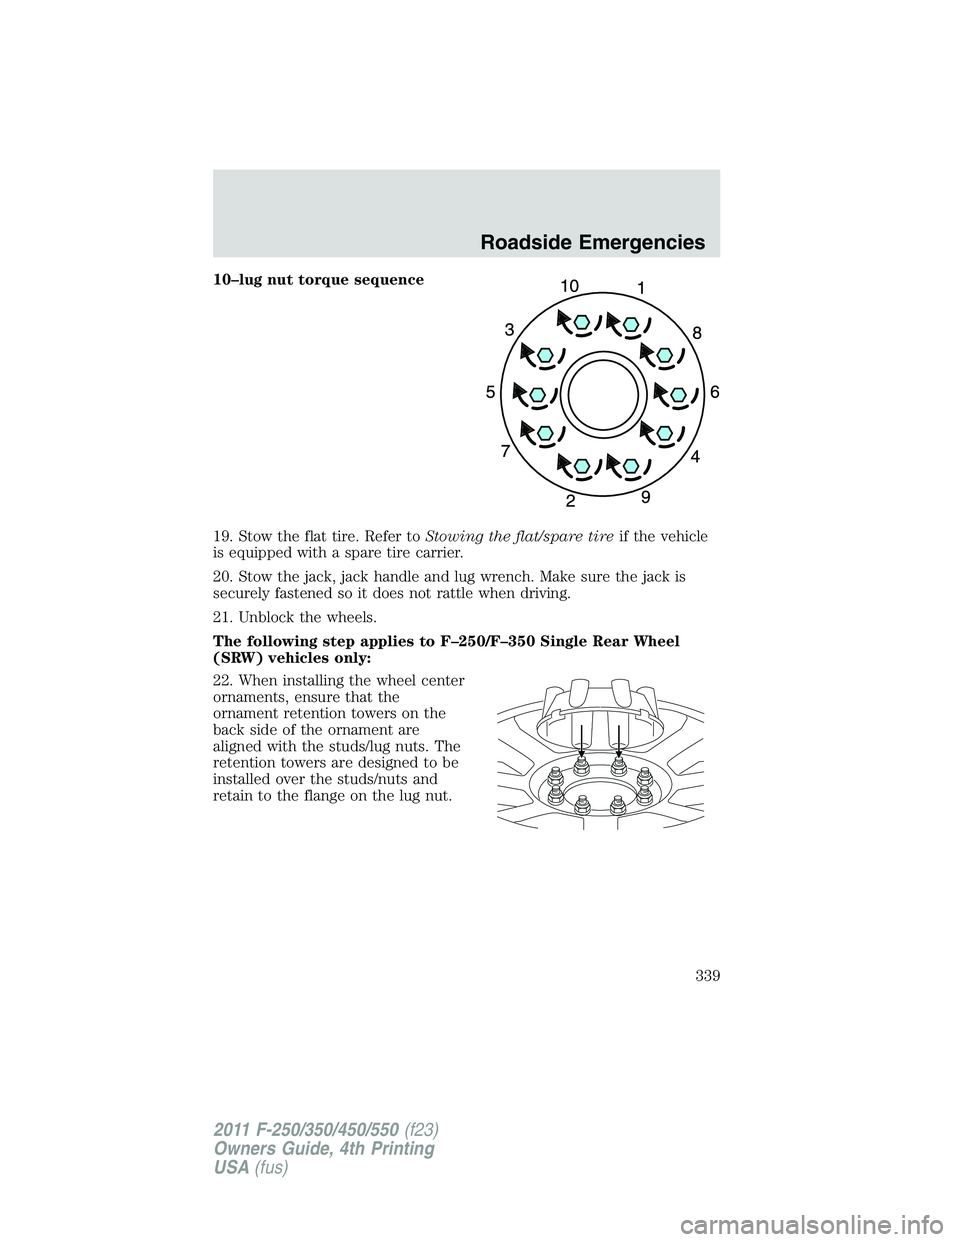
10–lug nut torque sequence
19. Stow the flat tire. Refer to Stowing the flat/spare tire if the vehicle
is equipped with a spare tire carrier.
20. Stow the jack, jack handle and lug wrench. Make sure the jack is
securely fastened so it does not rattle when driving.
21. Unblock the wheels.
The following step applies to F–250/F–350 Single Rear Wheel
(SRW) vehicles only:
22. When installing the wheel center
ornaments, ensure that the
ornament retention towers on the
back side of the ornament are
aligned with the studs/lug nuts. The
retention towers are designed to be
installed over the studs/nuts and
retain to the flange on the lug nut. Roadside Emergencies
339
2011 F-250/350/450/550 (f23)
Owners Guide, 4th Printing
USA (fus)
Page 342 of 449

4. Slide the wheel partially under the vehicle and install the retainer
through the wheel center. Pull on the cable to align the components at
the end of the cable.
5. Turn the jack handle clockwise until the tire is raised to its stowed
position underneath the vehicle. The effort to turn the jack handle
increases significantly and the spare tire carrier ratchets or slips when
the tire is raised to the maximum tightness. Tighten to the best of your
ability, to the point where the ratchet/slip occurs, if possible. The spare
tire carrier will not allow you to overtighten. If the spare tire carrier
ratchets or slips with little effort, take the vehicle to your authorized
dealer for assistance at your earliest convenience.
6. Check that the tire lies flat against the frame and is properly
tightened. Try to push or pull, then turn the tire to be sure it will not
move. Loosen and retighten, if necessary. Failure to properly stow the
spare tire may result in failure of the winch cable and loss of the tire.
7. Repeat this tightness check procedure when servicing the spare tire
pressure (every six months, per scheduled maintenance information),
or at any time that the spare tire is disturbed through service of other
components.
8. If removed, install the spare tire lock (if equipped) into the bumper
drive tube with the spare tire lock key (if equipped) and jack handle.
WHEEL LUG NUT TORQUE SPECIFICATIONS
On vehicles equipped with single rear wheels, retighten the lug nuts to
the specified torque at 500 miles (800 km) after any wheel disturbance
(tire rotation, changing a flat tire, wheel removal, etc.).
On vehicles equipped with dual rear wheels, retighten the wheel lug nuts
to the specified torque at 100 miles (160 km), and again at 500 miles
(800 km) of new vehicle operation and after any wheel disturbance (tire
rotation, changing a flat tire, wheel removal, etc.).
Bolt size Wheel lug nut torque*
ft-lb N • m
M14 x 1.5 165 224
* Torque specifications are for nut and bolt threads free of dirt and
rust. Use only Ford recommended replacement fasteners.
It is important to follow the proper wheel mounting and lug nut torque
procedures.Roadside Emergencies
342
2011 F-250/350/450/550 (f23)
Owners Guide, 4th Printing
USA (fus)
Page 429 of 449

6.2L and 6.8L engines
Miles (x 1,000)* 7.5 15 22.5 30 37.5 45 52.5 60 67.5 75
Kilometers (x 1,000)* 12 24 36 48 60 72 84 96 108 120
Months* 6 12 18 24 30 36 42 48 54 60
Change engine oil and filter • •••••••••
Rotate tires, inspect tire wear and measure tread depth; dual rear
wheels should only be rotated if unusual wear is observed • •••••••••
Inspect wheels and related components for abnormal noise, wear,
looseness or drag • •••••••••
Perform multi-point inspection (recommended) • •••••••••
Inspect automatic transmission fluid level (if equipped with
dipstick); consult dealer for requirements •••••
Inspect brake pads, shoes, rotors, drums, brake linings, hoses and
parking brake •••••
Inspect engine cooling system concentration and hoses •••••
Inspect exhaust system and heat shields •••••
Inspect front axle and U-joints; lubricate if equipped with grease
fittings (4WD vehicles) •••••
Inspect half-shaft boots (if equipped) •••••
Inspect steering linkage, ball joints, suspension, tie-rod ends,
driveshaft and U-joints; lubricate if equipped with grease fittings •••••
Torque rear U-bolts (Transit Connect) •••••
Inspect cabin air filter (if equipped) • ••••
* Whichever comes first
Scheduled maintenance for the diesel engine can be found in the diesel supplementScheduled Maintenance
429
2011 F-250/350/450/550 (f23)
Owners Guide, 4th Printing
USA (fus)