Page 87 of 461
Function Number of
bulbsTrade number
Rear
stop/turn/sidemarker/tail
lamp (styleside)4 3057K
High-mount brakelamp 1 912
Cargo lamp 2 912
License plate lamp 2 194
Exterior mounted mirror
turn signal indicator
(if equipped)2 See your dealer
Puddle lamp
(if equipped)2 See your dealer
All replacement bulbs are clear in color except where noted.
To replace all instrument panel lights - see your authorized dealer
Replacing exterior bulbs
Check the operation of all the bulbs frequently.
Replacing headlamp bulbs
1. Make sure that the headlamp control is in the off position and open
the hood.
2. Remove the pushpin that holds
the air deflector/protective cover
from the upper inboard corner of
the lamp.
Lights
87
2011 F-150(f12)
Owners Guide, 1st Printing
USA(fus)
Page 88 of 461
3. Loosen the three retaining bolts
(two at top of lamp, one at lower
inboard corner).
4. Once the three retaining bolts have been removed, slide the headlamp
assembly forward, disconnecting the two snap attachments at the fender.
5. Disconnect the electrical connector from the bulb by pulling rearward.
6. Remove the bulb and socket by
turning it counterclockwise, then
pull it straight out.
WARNING:Handle a halogen headlamp bulb carefully and keep
out of children’s reach. Grasp the bulb only by its plastic base
and do not touch the glass. The oil from your hand could cause the
bulb to break the next time the headlamps are operated.
Install the new bulb in reverse order.
Lights
88
2011 F-150(f12)
Owners Guide, 1st Printing
USA(fus)
Page 89 of 461
Replacing front parking lamp/turn signal/sidemarker bulbs
1. Make sure that the headlamp control is in the off position and open
the hood.
2. Remove the pushpin that holds
the air deflector/protective cover
from the upper inboard corner of
the lamp.
3. Loosen the three retaining bolts
(two at top of lamp, one at lower
inboard corner).
4. Once the three retaining bolts
have been removed, slide the
headlamp assembly forward,
disconnecting the two snap attachments at the fender.
5. Remove the bulb and socket by
turning it counterclockwise, then
pull it straight out.
6. Pull the bulb straight out of the
socket.
Install the new bulb(s) in reverse order.
Replacing tail/brake/turn signal/backup lamp bulbs
1. Make sure the headlamp control
is in the off position.
2. Open the tailgate to expose the
lamp assembly and remove the two
bolts from the tail lamp assembly.
Lights
89
2011 F-150(f12)
Owners Guide, 1st Printing
USA(fus)
Page 90 of 461

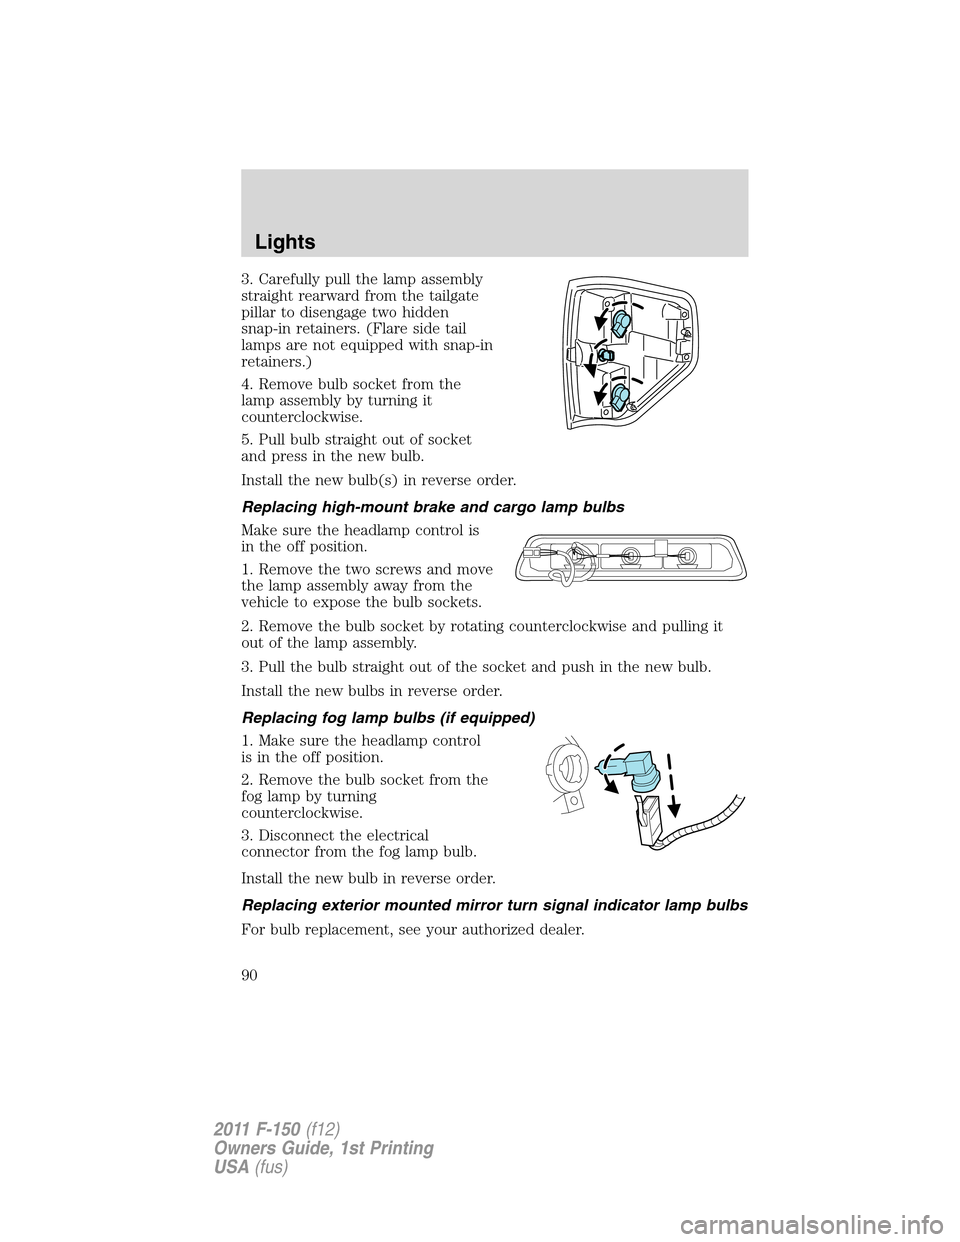
3. Carefully pull the lamp assembly
straight rearward from the tailgate
pillar to disengage two hidden
snap-in retainers. (Flare side tail
lamps are not equipped with snap-in
retainers.)
4. Remove bulb socket from the
lamp assembly by turning it
counterclockwise.
5. Pull bulb straight out of socket
and press in the new bulb.
Install the new bulb(s) in reverse order.
Replacing high-mount brake and cargo lamp bulbs
Make sure the headlamp control is
in the off position.
1. Remove the two screws and move
the lamp assembly away from the
vehicle to expose the bulb sockets.
2. Remove the bulb socket by rotating counterclockwise and pulling it
out of the lamp assembly.
3. Pull the bulb straight out of the socket and push in the new bulb.
Install the new bulbs in reverse order.
Replacing fog lamp bulbs (if equipped)
1. Make sure the headlamp control
is in the off position.
2. Remove the bulb socket from the
fog lamp by turning
counterclockwise.
3. Disconnect the electrical
connector from the fog lamp bulb.
Install the new bulb in reverse order.
Replacing exterior mounted mirror turn signal indicator lamp bulbs
For bulb replacement, see your authorized dealer.
Lights
90
2011 F-150(f12)
Owners Guide, 1st Printing
USA(fus)
Page 93 of 461

Windshield washer:Press the end
of the stalk:
•briefly: causes a single swipe of
the wipers without washer fluid.
•a quick press and hold: the
wipers will swipe three times with
washer fluid.
•a long press and hold: the wipers and washer fluid will be activated for
up to ten seconds.
Note:Do not operate the washer when the washer reservoir is empty.
This may cause the washer pump to overheat. Check the washer fluid
level frequently. Do not operate the wipers when the windshield is dry.
This may scratch the glass, damage the wiper blades and cause the wiper
motor to burn out. Before operating the wiper on a dry windshield,
always use the windshield washer. In freezing weather, be sure the wiper
blades are not frozen to the windshield before operating the wipers.
Courtesy wipe feature:One extra wipe will occur a few seconds after
washing the front window to clear any excess washer fluid remaining on
the windshield. This feature can be enabled/disabled through the
message center. Refer toMessage centerin theInstrument Cluster
chapter.
Windshield wiper rainlamp feature (if equipped with autolamp)
When the windshield wipers are turned on during daylight, and the
headlamp control is in the autolamp position, the exterior lamps will turn
on after a brief delay and will remain on until the wipers are turned off.
TILT OR TILT/TELESCOPE STEERING COLUMN (IF EQUIPPED)
To adjust the steering column:
1. Pull the lever down to unlock the
steering column.
2. Adjust the steering wheel up or
down.
3. If also equipped with the
telescope feature, adjust the
steering wheel in or out.
4. While holding the steering wheel
in place, pull the lever up to its
original position to lock the steering column.
o
Driver Controls
93
2011 F-150(f12)
Owners Guide, 1st Printing
USA(fus)
Page 273 of 461

WARNING:Do not park, idle, or drive your vehicle in dry grass
or other dry ground cover. The emission system heats up the
engine compartment and exhaust system, which can start a fire.
WARNING:Do not start your vehicle in a closed garage or in
other enclosed areas. Exhaust fumes can be toxic. Always open
the garage door before you start the engine. SeeGuarding against
exhaust fumesin this chapter for more instructions.
WARNING:If you smell exhaust fumes inside your vehicle, have
your dealer inspect your vehicle immediately. Do not drive if you
smell exhaust fumes.
Important safety precautions
A computer system controls the engine’s idle revolutions per minute
(RPM). When the engine starts, the idle RPM runs higher than normal in
order to warm the engine. If the engine idle speed does not slow down
automatically, have the vehicle checked. If the vehicle is operated in a
heavy snow storm or blowing snow conditions, the engine air induction
may become partially clogged with snow and/or ice. If this occurs the
engine may experience a significant reduction in power output. At the
earliest opportunity, clear all snow and/or ice away from the air induction
inlet. Do not allow the vehicle to idle for more than 10 minutes at the
higher engine RPM.
Before starting the vehicle:
1. Make sure all vehicle occupants have buckled their safety belts. For
more information on safety belts and their proper usage, refer to the
Seating and Safety Restraintschapter.
2. Make sure the headlamps and vehicle accessories are off.
Driving
273
2011 F-150(f12)
Owners Guide, 1st Printing
USA(fus)
Page 326 of 461

Fuse/Relay
LocationFuse Amp
RatingProtected Circuits
9 10A Radio display, GPS module, Navigation
display
10 10A Run/accessory relay
11 10A Instrument cluster
12 15A Interior lighting, Puddle lamps,
Backlighting, Cargo lamp
13 15A Right turn signals/stop lamps
14 15A Left turn signals/stop lamps
15 15A Reverse lights, High-mounted stop lamp
16 10A Right low-beam headlamp
17 10A Left low-beam headlamp
18 10A Brake-shift interlock, Keypad
illumination, PCM wakeup, PATS
19 20A Audio amplifier
20 20A Power door locks
21 10A Ambient lighting
22 20A Horn
23 15A Steering wheel control module
24 15A Datalink connector, Steering wheel
control module
25 15A Not used (spare)
26 5A Radio frequency module
27 20A Not used (spare)
28 15A Ignition switch
29 20A Radio/Navigation
30 15A Front parking lamps
31 5A BOO – IP, BOO – Engine
32 15A Delay/accessory – moon roof, power
windows, locks, Automatic dimming
mirror/Compass
33 10A Heated seats
Roadside Emergencies
326
2011 F-150(f12)
Owners Guide, 1st Printing
USA(fus)
Page 327 of 461

Fuse/Relay
LocationFuse Amp
RatingProtected Circuits
34 10A Reverse sensing system, 4x4 switch,
Rear video, Off road indicator (SVT
Raptor)
35 5A Hill descent switch (SVT Raptor)
36 10A Restraint control module, Occupant
classification system module
37 10A Trailer brake control
38 10A Delayed accessory – 110V power point,
Radio (AM/FM)
39 15A High beam headlamps
40 10A Rear park lamps
41 7.5A Passenger airbag deactivation indicator,
Upfitter switch (SVT Raptor)
42 5A Overdrive cancel switch
43 10A Not used (spare)
44 10A Not used (spare)
45 5A Not used (spare)
46 10A Climate controls module
47 15A Fog lamps, Exterior mirror turn signals
48 30A Circuit
BreakerPower rear windows, Power sliding back
window
49 Relay Delayed accessory
Power distribution box
The power distribution box is located in the engine compartment. The
power distribution box contains high-current fuses that protect your
vehicle’s main electrical systems from overloads.
WARNING:Always disconnect the battery before servicing high
current fuses.
WARNING:To reduce risk of electrical shock, always replace
the cover to the power distribution box before reconnecting the
battery or refilling fluid reservoirs.
Roadside Emergencies
327
2011 F-150(f12)
Owners Guide, 1st Printing
USA(fus)