Page 53 of 449
2. You can press some of the hard buttons to access their respective
menus.
3. Use the center control in the
same manner you would a joystick
— press
/to move up/down
in menus or press
/to move
out of or into a menu. When these
options are available, icons will
appear on the screen.
4. Press OK on the center control to make or confirm selections.
Note:You can also use the OK and
arrow buttons on the right side of
your steering wheel to make the
same selections you would with the
center control.
Setting the Clock
•Press CLOCK.
•Use the center controls to move
between the options and to
increase/decrease.
Note:You can also access this screen by pressing: Menu > Clock
Settings.
Language setting
To access/adjust the language setting, press MENU > Display Settings >
Language.
Entertainment Systems
52
2011 Explorer(exp)
Owners Guide, 1st Printing
USA(fus)
Page 57 of 449

SIRIUS�options
To access other options in SIRIUS mode, press MENU > SIRIUS.
•Scan:Select for a brief sampling of all available channels.
•Show ESN:Select to view your Satellite Radio Electronic Serial
Number (ESN). You will need this number when communicating with
SIRIUS�to activate, modify or track your satellite radio account.
•Channel Guide:Select to view a listing of available satellite radio
channels. Press OK or
to enter the Channel Guide and then scroll
through available channels. In this guide, you can choose to Tune
Channel, Skip Channel or Lock Channel by pressing the OK button
when the desired channel is selected. Once a channel has been
skipped or locked, you can only access those channels by pressing
Direct and entering in the channel number. Locking or unlocking a
channel also requires you to enter your PIN.
•Set Category:Select to scroll through a list of available SIRIUS�
channel categories (Pop, Rock, News, etc.)Note:If you select a
category, the seek and scan functions will only stop on channels in
that category.
•Alerts:Select this to create an alert for a particular song or artist or
team. The system will then alert you when it is playing on another
channel. From this screen you can also maintain alerts, enable/disable
and delete alerts from your list. You can save up to 20 alerts. If you
attempt to save an alert and your list is full, the system will prompt
you to delete one.
•Unlock All Stations:Select this and use your PIN to unlock all
previously locked channels (from the parental lock feature).
•Skip No Stations:Select this feature and use to ‘unskip’ all channels
you previously selected to skip.
•Parental Lock (PIN):Select to create a PIN which will allow you to
lock or unlock certain channels.Note:Your initial PIN is 1234.
Entertainment Systems
56
2011 Explorer(exp)
Owners Guide, 1st Printing
USA(fus)
Page 59 of 449

Troubleshooting tips
Radio Display Condition Possible action
Acquiring Radio requires more
than two seconds to
produce audio for the
selected channel.No action required.
This message should
disappear shortly.
SIRIUS�system
failureInternal module or
system failure
present.If this message does
not clear within shortly,
or with an ignition key
cycle, your receiver
may have a fault. See
your authorized dealer
for service.
Invalid Channel Channel no longer
available.Tune to another
channel or choose
another preset.
Unsubscribed Channel Subscription not
available for this
channel.Contact SIRIUS�at
1–888–539–7474 to
subscribe to the
channel, or tune to
another channel.
No Signal Loss of signal from
the SIRIUS�satellite
or SIRIUS�tower to
the vehicle antenna.The signal is currently
being blocked. When
you move into an open
area, the signal should
return.
Updating Update of channel
programming in
progress.No action required. The
process may take up to
three minutes.
Call SIRIUS�
1–888–539–7474Satellite service has
been deactivated by
SIRIUS�Satellite
Radio.Call SIRIUS�at
1–888–539–7474 to
re-activate or resolve
subscription issues.
Entertainment Systems
58
2011 Explorer(exp)
Owners Guide, 1st Printing
USA(fus)
Page 60 of 449

Radio Display Condition Possible action
No Channels Available All the channels in
the selected category
are skipped or locked.Using the channel
guide, unlock or unskip
the channels.
Subscription Updated SIRIUS�has updated
the channels available
for your vehicle.No action required.
Playing a disc
Press CD to access the disc screen. From this screen you can:
•Press
/to access the
previous/next track.
•Press
/to play/pause a
track.
•Select the Repeat soft key to
repeat the current song.
•Select the Shuffle soft key to shuffle the songs on the current disc.
CD Options
Press MENU > CD Options to access:
•Scan All:Press to hear a brief selection of all tracks on the current
disc.
•Scan Folder:Available when playing an MP3 disc. Select for a brief
sampling of all the music in the current folder.
•CD compression:Brings soft and loud CD passages together for a
more consistent listening level.
Audio settings
Press MENU > Audio Settings to access:
•Spd. Comp. Vol:Scroll to select Speed Compensated Volume and
press OK to enter the menu. This feature automatically adjusts the
system’s volume to compensate for speed and wind noise. You can set
the system between off and +7. Press OK to confirm and close.
•Sound:Press OK to enter and scroll using the center control to select
from Treble, Bass, Middle, Balance, Fade. Use the center controls to
make adjustments and press OK to confirm and close.
Entertainment Systems
59
2011 Explorer(exp)
Owners Guide, 1st Printing
USA(fus)
Page 75 of 449

•Rear Defrost On•Rear Defrost Off
•Recirc On•Recirc Off
•Panel On•Panel Floor On
•Floor On•Windshield Floor On
•Temperature High•Temperature Low
•Fan Increase•Fan Decrease
•Temperature•Temperature Increase
•Temperature Decrease•Temperature <15.5–29.5>
degrees
•Temperature <60–85> degrees•My Temp
•Help
*Note:If you have said “Temperature”, you can then say any of the
following commands:
•High•Low
•<15.5–29.5> degrees•<60–85> degrees
For more information on your touchscreen system, refer to theMyFord
Touch™ / MyLincoln Touch™ supplement.
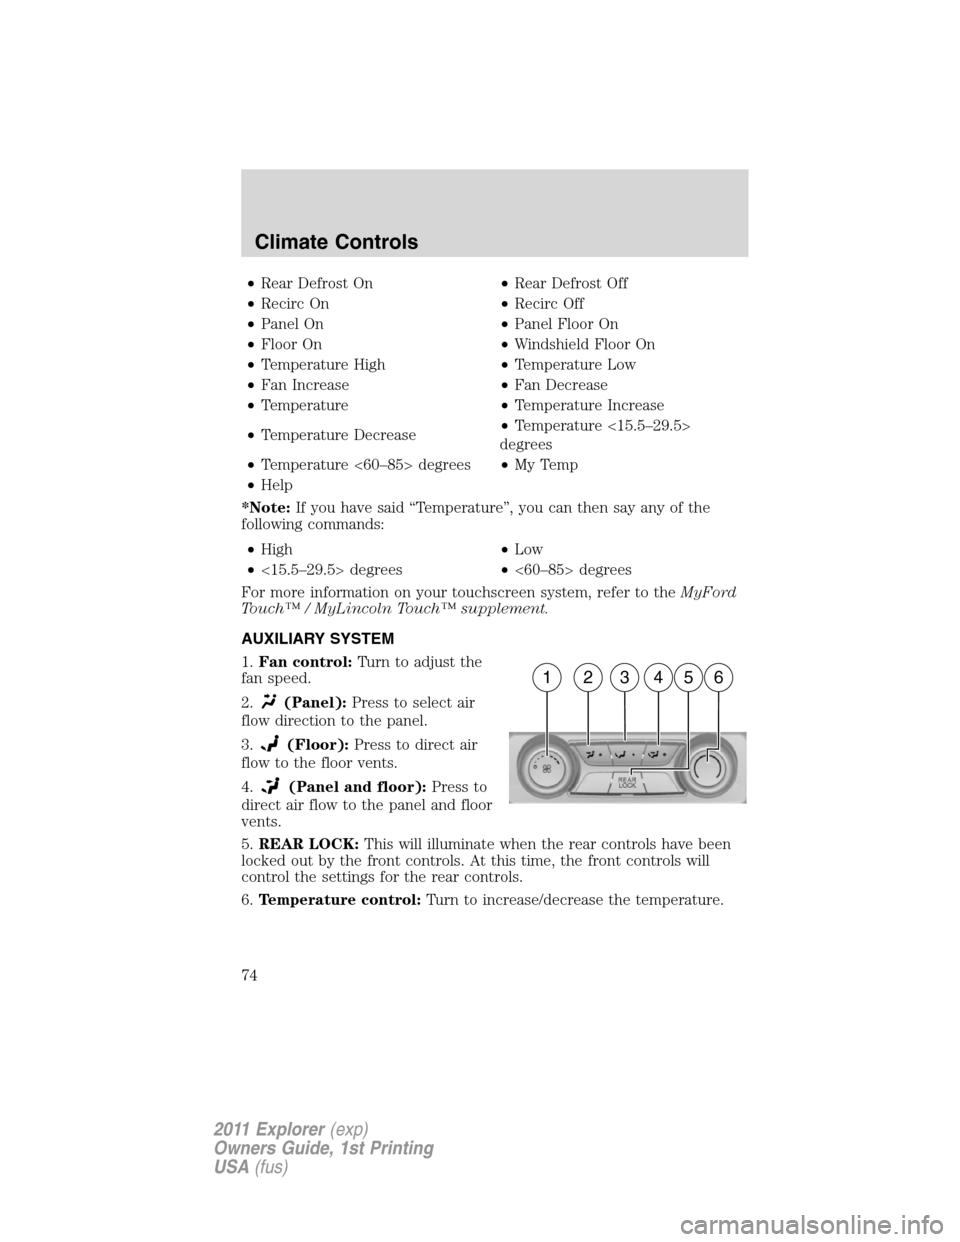
AUXILIARY SYSTEM
1.Fan control:Turn to adjust the
fan speed.
2.
(Panel):Press to select air
flow direction to the panel.
3.
(Floor):Press to direct air
flow to the floor vents.
4.
(Panel and floor):Press to
direct air flow to the panel and floor
vents.
5.REAR LOCK:This will illuminate when the rear controls have been
locked out by the front controls. At this time, the front controls will
control the settings for the rear controls.
6.Temperature control:Turn to increase/decrease the temperature.
162345
Climate Controls
74
2011 Explorer(exp)
Owners Guide, 1st Printing
USA(fus)
Page 82 of 449

•(1) 8 feet (2.4 m)
•(2) Center height of lamp to
ground
•(3) 25 feet (7.6 m)
•(4) Horizontal reference line
2. The center of the headlamp has a
3.0 mm circle on the lens. Measure
the height from the center of your
headlamp to the ground (2) and
mark an 8 foot (2.4 m) long
horizontal line on the plain surface (1) at this height (masking tape
works well).
3. Turn on the low beam headlamps to illuminate the wall or screen and
open the hood. To see a clearer light pattern for adjusting, block the
light from one headlamp while adjusting the other.
For vehicles with halogen headlamps:
On the wall or screen you will
observe a flat zone of high intensity
light located at the top of the right
hand portion of the beam pattern. If
the top edge of the high intensity
light zone is not at the horizontal
reference line, the headlamp will
need to be adjusted.
For vehicles with HID headlamps:
There is a distinct cut-off (change
from light to dark) in the left
portion of the beam pattern. The
top edge of this cut-off should be
positioned two inches (50.8 mm)
below the horizontal reference line.
4. Open the hood.
Lights
81
2011 Explorer(exp)
Owners Guide, 1st Printing
USA(fus)
Page 83 of 449

5. Locate the vertical adjuster for
each headlamp. Using a Phillips #2
screwdriver, turn the adjuster
control either clockwise (to adjust
down) or counterclockwise (to
adjust up).
Note:HORIZONTAL AIMING IS
NOT REQUIRED FOR THIS
VEHICLE AND IS
NON-ADJUSTABLE.
TURN SIGNAL CONTROL
The turn signal lever does not mechanically lock in the upward or
downward position when activated. The turn signal control activation and
cancellation is electronic.
•To operate the left turn signal,
push the lever down until it stops
and release.
•To operate the right turn signal,
push the lever up until it stops
and release.
•To manually cancel turn signal operation, push the lever again in
either direction.
Lane change
To indicate a left or right lane change:
•Push the lever up/down to the first stop position and release. The turn
signals will flash three times and stop.
•Push the lever up/down to the first stop position and hold. The turn
signals will flash for as long as the lever is held in this position.
Lights
82
2011 Explorer(exp)
Owners Guide, 1st Printing
USA(fus)
Page 87 of 449
Replacing exterior bulbs
Check the operation of all the bulbs frequently.
Replacing headlamp bulbs
1. Make sure that the headlamp control is in the off position.
2. Open the hood.
3. Remove the bulb cover.
4. Turn the bulb holder
counterclockwise and remove it.
5. Disconnect the electrical connector.
WARNING:Handle a halogen headlamp bulb carefully and keep
out of children’s reach. Grasp the bulb only by its plastic base
and do not touch the glass. The oil from your hand could cause the
bulb to break the next time the headlamps are operated.
Reverse steps to reinstall bulb(s).
Replacing HID headlamp bulbs (if equipped)
The headlamps on your vehicle use a “high intensity discharge” source.
These lamps operate at a high voltage. When the bulb is burned out, the
bulb and starter capsule assembly must be replaced by your authorized
dealer.
Lights
86
2011 Explorer(exp)
Owners Guide, 1st Printing
USA(fus)