Page 57 of 108

• Simultaneously, press and hold both the chosen HomeLink®button and the
hand-held transmitter button until the HomeLink®indicator flash rate changes
from a slow to a rapidly blinking light, then release both the HomeLink®and the
hand-held transmitter buttons. This may take up to 30 seconds, or longer in rare
cases.
• Press and hold the just-programmed HomeLink
®button; if the indicator light stays
on constantly, programming is complete and the garage door should open.
NOTE:
• Only use this transceiver with a garage door opener that has a “stop and reverse”
feature as required by Federal safety standards. This includes most garage door
opener models manufactured after 1982. Do not use a garage door opener without
these safety features. Call toll-free 1–800–355–3515 or, on the Internet, at
www.HomeLink.com for safety information or assistance.
• If you are having difficulty programming your HomeLink
®and your garage door
opener was manufactured after 1995, you may have a rolling code. Follow the steps
below for Programming A Rolling Code System.
Programming A Rolling Code System
• At the garage door opener motor (in the garage), locate the “learn” or
“programming” button. This can usually be found where the hanging antenna wire
is attached to the garage door opener motor (it is NOT the button normally used to
open and close the door).
• Firmly press and release the “learn” or “programming” button. The name and color
of the button may vary by manufacturer. Within 30 seconds, return to the vehicle
and press the programmed HomeLink
®button twice (holding the button for two
seconds each time). If the device is plugged in and activates, programming is
complete.
• If the device does not activate, press the button a third time (for two seconds) to
complete the programming.
Using HomeLink
®
• To operate, simply press and release the programmed HomeLink®button and the
programmed device will operate.
• Refer to your Owner’s Manual on the DVD for further details. If you have any
problems programming HomeLink
®, or require assistance, please call toll-free
1–800–355–3515 or, on the Internet, at www.HomeLink.com.
WARNING!
• Your motorized door or gate will open and close while you are programming
the universal transceiver. Do not program the transceiver if people or pets are
in the path of the door or gate.
ELECTRONICS
55
Page 58 of 108

• Do not run your vehicle in a closed garage or confined area while
programming the transceiver. Exhaust gas from your vehicle contains Carbon
Monoxide (CO) which is odorless and")
WARNING!(Continued)
• Do not run your vehicle in a closed garage or confined area while
programming the transceiver. Exhaust gas from your vehicle contains Carbon
Monoxide (CO) which is odorless and colorless. Carbon Monoxide is
poisonous when inhaled and can cause you and others to be severely injured
or killed.
POWER INVERTER
• There is a 115 Volt, 150 Watt power
inverter outlet located on the back of
the center console. This outlet can
power cellular phones, electronics and
other low power devices requiring
power up to 150 Watts.
• Press the switch located in the switch
bank on the lower instrument panel to
turn the power inverter on. The
indicator light will turn on to indicate
the inverter is producing AC power.
• Press the switch again to turn the power inverter off. The indicator light will turn
off.
NOTE:The power inverter is designed with built-in overload protection. If the power
rating of 150 Watts is exceeded, the power inverter will automatically shut down. Once
the electrical device has been removed from the outlet, the inverter should
automatically reset. If the power rating exceeds approximately 170 Watts, the power
inverter may have to be reset manually. To reset the inverter manually, unplug the
device and plug it in again. To avoid overloading the circuit, check the power ratings on
electrical devices prior to using the inverter.
WARNING!
To Avoid Serious Injury or Death: Do not use a three-prong adaptor. Do not
insert any objects into the receptacles. Do not touch with wet hands. Close the
lid when not in use. If this outlet is mishandled, it may cause an electric shock
and failure.
ELECTRONICS
56
Page 59 of 108
POWER OUTLET
• The front power outlet is located in the
front center storage bin of the
instrument panel.
• A second front power outlet is located
inside the center console.
• The rear power outlet is located in the
right rear cargo area.
• The power outlets are labeled with either a “key” or a “battery” symbol to indicate
how the outlet is powered. Power outlets labeled with a “key” are powered when
the ignition switch is in the ON/RUN or ACC position, while the outlets labeled
with a “battery” are connected directly to the battery and powered at all times.
NOTE:
• Do not exceed the maximum power of 160 Watts (13 Amps) at 12 Volts. If the 160
Watt (13 Amp) power rating is exceeded, the fuse protecting the system will need to
be replaced. See below image for fuse locations.
• All accessories connected to the “battery” powered outlets should be removed or
turned off when the vehicle is not in use to protect the battery against discharge.
ELECTRONICS
57
Page 60 of 108
 transfer case, which
provides convenient full-time
all-wheel drive. N")
ALL-WHEEL DRIVE
OPERATION
Single-Speed Operating Instructions/
Precautions
• This system contains a single-speed
(HI range only) transfer case, which
provides convenient full-time
all-wheel drive. No driver interaction
is required. The Brake Traction
Control (BTC) System, which
combines standard ABS and Traction
Control, provides resistance to any
wheel that is slipping to allow
additional torque transfer to wheels
with traction.
NOTE:This system is not appropriate for
conditions where AWD LOW range is
recommended. Refer to “Off-Road Driving
Tips” in “Starting and Operating” on the
DVD for further information.
Electronically Shifted Transfer Case
(Three-Position Switch)
• This is an electronic shift transfer
case and is operated by the AWD
Control Switch (Transfer Case
Switch), which is located on the
center console.• This electronically shifted transfer
case provides three mode positions:
• All-wheel drive automatic range
(AWD AUTO)
• All-wheel drive low range (LOW
RANGE)
• Neutral (NEUTRAL)
• When additional traction is required,
the LOW RANGE position can be
used to lock the front and rear
driveshafts together forcing the front
and rear wheels to rotate at the same
speed. The LOW RANGE position are
designed for loose, slippery road
surfaces only. Driving in the LOW
RANGE positions on dry hard
surfaced roads may cause increased
tire wear and damage to the driveline
components.
• When operating your vehicle in LOW
RANGE, the engine speed is
approximately three times that of the
AWD HI position at a given road
speed. Take care not to overspeed
the engine and do not exceed
25 mph (40 km/h).
NOTE:The “SERV AWD Warning Light”
monitors the electronic shift all-wheel
drive system. If this light remains on after
engine start up or illuminates during
driving, it means that the all-wheel drive
system is not functioning properly and
that service is required.
OFF-ROAD CAPABILITIES
58
Page 61 of 108

Shifting Procedures
AWD AUTO To LOW RANGE
NOTE:When shifting into or out of LOW
RANGE some gear noise may be heard.
This noise is normal and is not
detrimental to the vehicle or occupants.
• Shifting can be performed with the
vehicle rolling 2 to 3 mph (3 to
5 km/h) or completely stopped. Use
either of the following procedures:
Preferred Procedure
• With the engine running, slow the
vehicle to 2 to 3 mph (3 to 5 km/h).
• Shift the transmission into
NEUTRAL.
• While still rolling, rotate the transfer
case control switch to the desired
position.
• After the desired position indicator
light is ON (not flashing), shift the
transmission back into gear.
Alternate Procedure
• Bring the vehicle to complete stop.
• With the ignition switch in the ON
position and the engine either OFF or
running, shift the transmission into
NEUTRAL.
• Rotate the transfer case control
switch to the desired position.
• After the desired position indicator
light is ON (not flashing), shift the
transmission back into gear.NOTE:
• If Steps 1 or 2 of either the Preferred
or Alternate Procedure are not satisfied
prior to attempting the shift or if they
no longer are being met while the shift
attempt is in process, the desired
position indicator light will flash
continuously while the original position
indicator light is ON, until all
requirements have been met.
• The ignition switch must be in the ON
position for a shift to take place and for
the position indicator lights to be
operable. If the ignition switch is not in
the ON position, then the shift will not
take place and no position indicator
lights will be on or flashing.
WARNING!
• Always engage the parking brake
when powering down the vehicle if
the “SERV AWD Warning Light” is
illuminated. Not engaging the
parking brake may allow the
vehicle to roll which may cause
personal injury.
• You or others could be injured if
you leave the vehicle unattended
with the transfer case in the
NEUTRAL position without first
fully engaging the parking brake.
The transfer case NEUTRAL
position disengages both the front
and rear driveshafts from the
powertrain and will allow the
vehicle to move regardless of the
transmission position. The parking
brake should always be applied
when the driver is not in the
vehicle.
OFF-ROAD CAPABILITIES
59
Page 62 of 108
ROOF LUGGAGE RACK
• The crossbars on your vehicle are
delivered stowed within the roof rack
side rails. When installed, the roof
rack can hold a maximum of 150 lbs
(68 kg) of evenly distributed weight.
Installing The Crossbars
• To install the crossbars, completely
loosen the thumb screws at both
ends and lift the crossbar from its
stowed position.
• Bend the pivot points at each end of
the crossbar and slide the thumb
screw down.• Set the crossbars into position and
tighten the thumb screws.
NOTE:Position the crossbars across the
roof making sure the letters on the
crossbar align with the matching letters
on the side rail.
• Refer to the Owner's Manual on the
DVD for further details.
UTILITY
60
Page 63 of 108

Engine ModelGCWR
(Gross Combined Wt. Rating)Frontal AreaMax. GTW
(Gross Trailer Wt.)Max. Trailer Tongue
Wt. (See Note)
3.6L RWD 11,600 lbs (5 26")
TRAILER TOWING WEIGHTS (MAXIMUM TRAILER WEIGHT RATINGS)
Engine ModelGCWR
(Gross Combined Wt. Rating)Frontal AreaMax. GTW
(Gross Trailer Wt.)Max. Trailer Tongue
Wt. (See Note)
3.6L RWD 11,600 lbs (5 262 kg) 40 sq ft (3.72 sq
m)6,200 lbs (2 812 kg) 620 lbs (281 kg)
3.6L AWD 11,600 lbs (5 262 kg) 40 sq ft (3.72 sq
m)6,200 lbs (2 812 kg) 620 lbs (281 kg)
5.7L RWD 13,100 lbs (5 942 kg) 60 sq ft (5.57 sq
m)7,200 lbs (3 266 kg) 720 lbs (327 kg)
5.7L AWD 13,100 lbs (5 942 kg) 60 sq ft (5.57 sq
m)7,200 lbs (3 266 kg) 720 lbs (327 kg)
Refer to local laws for maximum trailer towing speeds.
NOTE: The trailer tongue weight must be considered as part of the combined weight of occupants and cargo, and should never exceed the
weight referenced on the Tire and Loading Information placard. The addition of passengers and cargo may require reducing trailer tongue load
and Gross Trailer Weight (GTW). Redistributing cargo (to the trailer) may be necessary to avoid exceeding Rear Gross Axle Weight Rating
(GAWR) of 3,900 lbs (1 769 kg).
• If the gross trailer weight is 3,500 lbs (1587 kg) or more, it is mandatory to use a weight-distributing hitch to ensure stable
handling of your vehicle.
NOTE:Vehicles not factory equipped with trailer tow package are limited to 3,500 lbs (350 lbs tongue weight).
UTILITY
61
Page 64 of 108

TOW/HAUL MODE
• When driving in hilly areas, towing a
trailer, carrying a heavy load, etc.,
and frequent transmission shifting
occurs, press the TOW/HAUL switch
to select TOW/HAUL mode. This will
improve performance and reduce the
potential for transmission
overheating or failure due to
excessive shifting. When operating in
TOW/HAUL mode, transmission
upshifts are delayed, and the
transmission will automatically
downshift (for engine braking) during
steady braking maneuvers.
• The “TOW/HAUL Indicator Light”
will illuminate in the instrument
cluster to indicate that TOW/HAUL
mode has been activated. Pressing
the switch a second time restores
normal operation. If the TOW/HAUL
mode is desired, the switch must be
pressed each time the engine is
started.
RECREATIONAL
TOWING (BEHIND
MOTORHOME, ETC.)
Rear-Wheel Drive Models
•Recreational towing is not allowed.
All-Wheel Drive Models (Single-Speed
Transfer Case)
•Recreational towing is not allowed.
This model does not have a
NEUTRAL position in the transfer
case.
All-Wheel Drive Models (Two-Speed
Transfer Case)
NOTE:The transfer case must be in the
NEUTRAL position, and the transmission
must be in the PARK position for
recreational towing.
Shifting Into NEUTRAL
• Use the following procedure to
prepare your vehicle for recreational
towing.
• Bring the vehicle to a complete stop
and shift the transmission to PARK.
Turn the engine off.
• For vehicles with Keyless Enter-N-Go,
remove the Keyless Enter-N-Go
button and use the Key Fob to
complete this procedure.
• Turn the ignition switch to the
ON/RUN position, but do not start
the engine.
• Press and hold the brake pedal and
shift the transmission into
NEUTRAL.
• Press and hold the transfer case N
(Neutral) button for four seconds,
until the light next to the N symbol
starts to blink, indicating shift in
progress. The light will stop blinking
(stay on solid) when the shift to N
(Neutral) is complete.
TOW/HAUL Switch
UTILITY
62
 1
1 2
2 3
3 4
4 5
5 6
6 7
7 8
8 9
9 10
10 11
11 12
12 13
13 14
14 15
15 16
16 17
17 18
18 19
19 20
20 21
21 22
22 23
23 24
24 25
25 26
26 27
27 28
28 29
29 30
30 31
31 32
32 33
33 34
34 35
35 36
36 37
37 38
38 39
39 40
40 41
41 42
42 43
43 44
44 45
45 46
46 47
47 48
48 49
49 50
50 51
51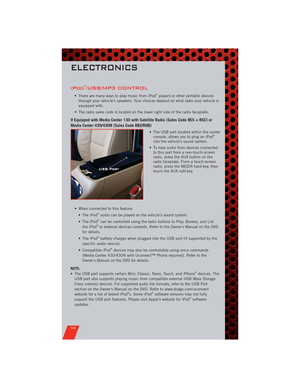 52
52 53
53 54
54 55
55 56
56 57
57 58
58 59
59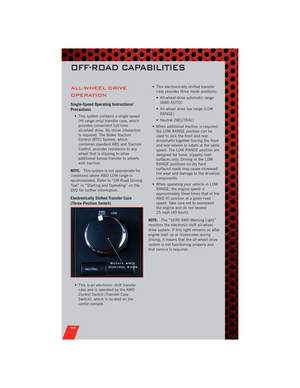 60
60 61
61 62
62 63
63 64
64 65
65 66
66 67
67 68
68 69
69 70
70 71
71 72
72 73
73 74
74 75
75 76
76 77
77 78
78 79
79 80
80 81
81 82
82 83
83 84
84 85
85 86
86 87
87 88
88 89
89 90
90 91
91 92
92 93
93 94
94 95
95 96
96 97
97 98
98 99
99 100
100 101
101 102
102 103
103 104
104 105
105 106
106 107
107
 of evenly distributed weig")