Page 140 of 452
High/Low Beam Switch
Pull the multifunction lever fully toward the steering
wheel to switch the headlights from high or low beam.
Battery Saver
To protect the life of your vehicle’s battery, Load Shed-
ding is provided for both the interior and exterior lights.
If the ignition is OFF and any door is left ajar for
15 minutes or the dimmer control is rotated upwards for
15 minutes, the interior lights will automatically turn off.
If the headlights remain on while the ignition is cycled
OFF, the exterior lights will automatically turn off after
eight minutes. If the headlights are turned on and left on
for eight minutes while the ignition is OFF, the exterior
lights will automatically turn off.
NOTE:Battery Saver mode is cancelled if the ignition is
ON.
High/Low Beam
138 UNDERSTANDING THE FEATURES OF YOUR VEHICLE
Page 142 of 452
Windshield Wipers
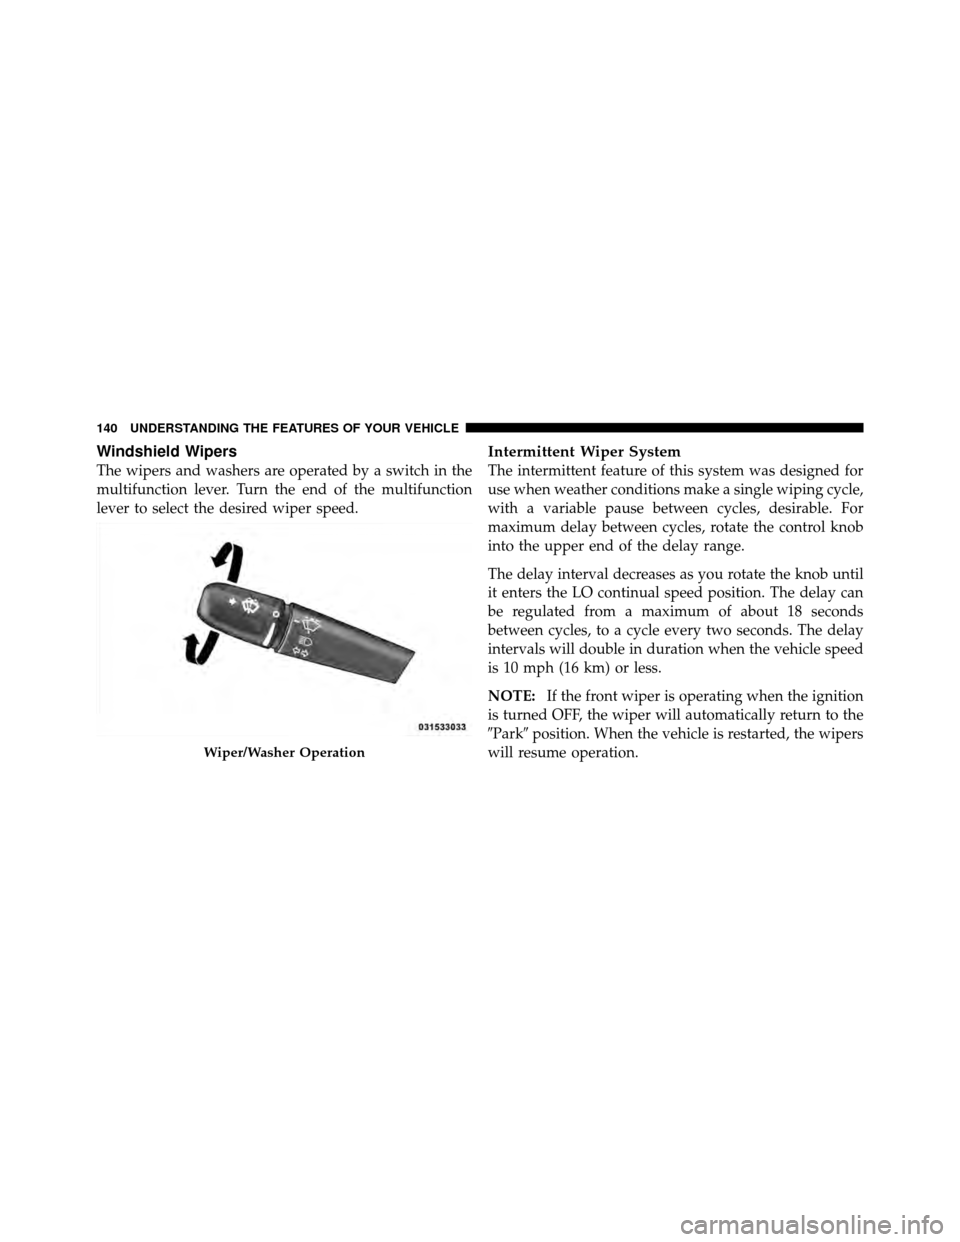
The wipers and washers are operated by a switch in the
multifunction lever. Turn the end of the multifunction
lever to select the desired wiper speed.
Intermittent Wiper System
The intermittent feature of this system was designed for
use when weather conditions make a single wiping cycle,
with a variable pause between cycles, desirable. For
maximum delay between cycles, rotate the control knob
into the upper end of the delay range.
The delay interval decreases as you rotate the knob until
it enters the LO continual speed position. The delay can
be regulated from a maximum of about 18 seconds
between cycles, to a cycle every two seconds. The delay
intervals will double in duration when the vehicle speed
is 10 mph (16 km) or less.
NOTE:If the front wiper is operating when the ignition
is turned OFF, the wiper will automatically return to the
�Park� position. When the vehicle is restarted, the wipers
will resume operation.
Wiper/Washer Operation
140 UNDERSTANDING THE FEATURES OF YOUR VEHICLE
Page 146 of 452
NOTE:In order to ensure proper operation, the Elec-
tronic Speed Control System has been designed to shut
down if multiple Speed Control functions are operated at
the same time. If this occurs, the Electronic Speed Control
System can be reactivated by pushing the Electronic
Speed Control ON/OFF button and resetting the desired
vehicle set speed.
To Activate
Push the ON/OFF button to the ON position. In the
instrument cluster, the word “CRUISE” illuminates to
indicate that the system is on.
To Set A Desired Speed
Turn the Electronic Speed Control ON. When the vehicle
has reached the desired speed, press and release the SET
button. Release the accelerator and the vehicle will
operate at the selected speed.
To Deactivate
A soft tap on the brake pedal, normal braking, or pressing
the CANCEL button will deactivate the speed control
without erasing the memory. Pushing the ON/OFF but-
ton to the OFF position or turning off the ignition erases
the memory.
WARNING!
Leaving the Electronic Speed Control ON when not
in use is dangerous. You could accidentally set the
Electronic Speed Control to cause it to go faster than
you want. You could lose control and have an acci-
dent. Always leave the system OFF when you are not
using it.
To Resume Speed
To resume a previously set speed, push and release the
RESUME button. Resume can be used at any speed above
20 mph (32 km/h).
144 UNDERSTANDING THE FEATURES OF YOUR VEHICLE
Page 152 of 452
NOTE:The DTE is not resettable.
When Distance To Empty = LOW FUEL, the fuel gauge
pointer will initially be on the red “E” marker. At this
point (fuel gauge pointer on the red “E” marker), there is
reserve fuel capacity, which corresponds to approxi-
mately 8% of tank volume. This reserve capacity was put
in place to prevent the likelihood of customers running
out of fuel when operating at maximum load conditions
in areas where there aren’t many gas stations.
NOTE: The Distance To Empty will remain equal to zero
until the vehicle runs out of fuel or is refueled.
Trip Odometer (ODO)
This display shows the distance traveled since the last
reset.
NOTE: The maximum value is approximately
6000 miles (9656 km). Resetting of this screen will cause the trip odometer to
change to zero. Then the trip odometer must be reset in
order to update the trip odometer miles.
Elapsed Time (ET)
This display shows the accumulated ignition ON time
since the last reset. Resetting the Elapsed Time will cause
the display to change to zero.
C/T Button
Use the C/T (Compass/Temperature) button to select a
readout of the outside temperature and one of eight
compass headings that indicate the direction in which the
vehicle is facing.
150 UNDERSTANDING THE FEATURES OF YOUR VEHICLE
Page 154 of 452

Automatic Compass Calibration
This compass is self-calibrating which eliminates the
need to manually set the compass. When the vehicle is
new, the compass may appear erratic and the CAL
symbol will be displayed.
After completing one 360 degree turn with the vehicle
traveling less than 5 mph (8 km/h) in an area free from
large metal or metallic objects, the CAL symbol will turn
off and the compass will function normally.
NOTE:Magnetic materials should be kept away from
the Overhead Console. This is where the compass sensor
is located.
Manual Compass Calibration
NOTE: To ensure proper compass calibration, make
sure the compass variance is properly set before manu-
ally calibrating the compass. If the compass appears erratic and the CAL symbol does
not appear, you must manually put the compass into the
“Calibration” mode.
To Put Into A Calibration Mode
Turn the ignition ON and set the display to “Compass/
Temperature.” Press and hold the RESET button to
change the display between VAR (compass variance) and
CAL (compass calibration) modes. When the CAL sym-
bol is displayed, complete one 360 degree turn in an area
free from large metal objects or power lines. The CAL
symbol will turn off and the compass will function
normally.
Compass Variance
is the difference between magnetic
North and geographic North. In some areas of the
country, the difference between magnetic and geographic
North is great enough to cause the compass to give false
readings. If this occurs, the compass variance must be set
according to the Compass Variance Map.
152 UNDERSTANDING THE FEATURES OF YOUR VEHICLE
Page 155 of 452
To set the variance: Turn the ignition ON and set the
display to “Compass/Temperature.” Press and hold the
RESET button approximately five seconds. The last vari-
ance zone number will be displayed. Press the STEPbutton to select the new variance zone and press the
RESET button to resume normal operation.
Outside Temperature
Because the ambient temperature sensor is located under
the hood, engine temperature can influence the displayed
temperature; therefore, temperature readings are slowly
updated when the vehicle speed is below 20 mph
(30 km/h) or during stop-and-go driving.
GARAGE DOOR OPENER — IF EQUIPPED
HomeLink�
replaces up to three remote controls (hand-
held transmitters) that operate devices such as garage
door openers, motorized gates, lighting or home security
systems. The HomeLink� unit operates off of your vehi-
cle’s battery.
Compass Variance Map
3
UNDERSTANDING THE FEATURES OF YOUR VEHICLE 153
Page 157 of 452
Programming HomeLink�
Before You Begin
The Compass Mini-Trip Computer (CMTC) illuminates
the HomeLink�symbol (a house with an arrow inside it)
along with 1, 2 or 3 indicators under it, when a
HomeLink� button is pressed.
Pay attention to the indicator(s), as they will flash at
different rates, or remain solid during training.
If you have not trained any of the HomeLink� buttons,
erase all channels before you begin training.
To do this, press and hold the two outside buttons for
20 seconds. Release the buttons when the indicators start
to flash.
It is recommended that a new battery be placed in the
handheld transmitter of the device being copied to
HomeLink� for more efficient training and accurate
transmission of the radio-frequency signal. Your vehicle should be parked outside of the garage
while training.
1. Turn the ignition switch to the ON/RUN position.
2. Place the handheld transmitter 1 to 3 inches (3 to 8 cm)
from the HomeLink�
buttons while keeping the
HomeLink� display in view.
For optimal training, point the battery end of the hand-
held transmitter away from the HomeLink�.
3. Simultaneously, press and hold both the chosen
HomeLink�button and the handheld transmitter button
until the indicator(s) change from a slow to a rapid flash
rate.
Then release both the HomeLink� and handheld trans-
mitter buttons.
It may take up to 30 seconds or longer in rare cases. The
garage door may open and close while you train.
3
UNDERSTANDING THE FEATURES OF YOUR VEHICLE 155
Page 160 of 452
If you unplugged the device for training, plug it back in
at this time.
Then proceed with Step 4 under, “Programming
HomeLink�,” earlier in this section.
Using HomeLink�
To operate, press and release the programmed
HomeLink�button. Activation will now occur for the
trained device (i.e., garage door opener, gate operator,
security system, entry door lock, home/office lighting,
etc.,). The handheld transmitter of the device may also be
used at any time.
Reprogramming A Single HomeLink� Button
To reprogram a channel that has been previously trained,
follow these steps:
1. Turn the ignition switch to the ON/RUN position. 2. Press and hold the desired HomeLink
�button for
20 seconds until the indicator(s) starts to flash. Do not
release the button.
3. Without releasing the button, proceed with Program-
ming HomeLink�, Step #2, and follow all remaining
steps.
Security
It is advised to erase all channels before you sell or turn
in your vehicle.
To do this, press and hold the two outside buttons for
20 seconds until the indicators begin to flash. Note that
all channels will be erased. Individual channels cannot be
erased.
The HomeLink� Universal Transceiver is disabled when
the Vehicle Theft Alarm is active.
158 UNDERSTANDING THE FEATURES OF YOUR VEHICLE