Page 288 of 566
The system allows the driver to select information by
pressing the following buttons mounted on the steering
wheel:UP Button
Press and release the UP button to scroll up-
ward through the main menu and Vehicle Info
and Trip Info sub-menus (Fuel Economy, Ve-
hicle Info, Tire PSI, Cruise, Messages, Trip Info,
Vehicle Speed, and Turn Menu OFF) and sub-menus.
DOWN Button Press and release the DOWN button to scroll
downward through the main menu and Ve-
hicle Info and Trip Info sub-menus (Fuel
Economy, Vehicle Info, Tire PSI, Cruise, Mes-
sages, Trip Info, Vehicle Speed, and Turn Menu OFF) and
sub-menus.
SELECT Button
Press and release the SELECT button for access to
main menus, sub-menus or to select a personal
setting in the setup menu. Press and hold the
SELECT button for two seconds to reset features.EVIC Steering Wheel Buttons
286 UNDERSTANDING YOUR INSTRUMENT PANEL
Page 292 of 566
 MalfunctionThis light will turn on when a ACC is not")
•Windshield Washer Fluid Low IndicatorThis light will turn on to indicate the wind-
shield washer fluid is low.
•Adaptive Cruise Control (ACC) MalfunctionThis light will turn on when a ACC is not
operating and needs service. For further infor-
mation, refer to “Adaptive Cruise Control
(ACC)” in “Understanding The Features Of
Your Vehicle.”
•SERV AWD (Service All Wheel Drive) Indicator This light will turn on when the All Wheel
Drive feature requires service. For further in-
formation, refer to “All Wheel Drive” in “Start-
ing And Operating.”
EVIC Red Telltale Lights
This area will show reconfigurable red telltales. These
telltales include:
•Door AjarThis light will turn on to indicate that one or
more doors may be ajar.
•Trunk AjarThis light will turn on to indicate that the trunk
may be ajar.
•Oil Pressure Warning LightThis light indicates low engine oil pressure. If the
light turns on while driving, stop the vehicle and
shut off the engine as soon as possible. A chime will
sound for four minutes when this light turns on.
290 UNDERSTANDING YOUR INSTRUMENT PANEL
Page 300 of 566

Turn Menu OFF
Select from Main Menu using the DOWN button. Press-
ing the SELECT button blanks the menu display. Pressing
any one of the four steering wheel buttons brings the
menu back.
Uconnect TOUCH™ SETTINGS
The Uconnect Touch™ system uses a combination of soft
and hard keys located on the center of the instrument
panel that allows you to access and change the customer
programmable features.
Hard-Keys
Hard-Keys are located on the left and right side of the
Uconnect Touch™ 4.3 screen. In addition, there is a
Scroll/Enter control knob located on the right side of the
Climate Controls in the center of the instrument panel.
Turn the control knob to scroll through menus andchange settings (i.e., 30, 60, 90), press the center of the
control knob one or more times to select or change a
setting (i.e., ON, OFF).
Soft-Keys
Soft-Keys are accessible on the Uconnect Touch™ screen.
Customer Programmable Features — Uconnect
Touch™ 4.3 Settings
In this mode the Uconnect Touch™ system allows you to
access programmable features that may be equipped
such as Display, Clock, Safety/Assistance, Lights, Doors
& Locks, Heated Seats, Engine Off Operation, Compass
Settings, Audio, Phone/Bluetooth and SIRIUS Setup
through hard-keys and soft-keys.
NOTE:
Only one touchscreen area may be selected at a
time.
298 UNDERSTANDING YOUR INSTRUMENT PANEL
Page 307 of 566

•Daytime Running Lights
Touch the Daytime Running Lights soft-key to change
this display. When this feature is selected, the headlights
will turn on whenever the engine is running. To make
your selection, touch the Daytime Running Lights soft-
key and select ON or OFF. Then touch the arrow back
soft-key.
•Steering Directed Lights
Touch the Steering Directed Lights soft-key to change this
display. When this feature is selected, the headlights turn
relative to a change in direction of the steering wheel. To
make your selection, touch the Steering Directed Lights
soft-key and select ON or OFF. Then touch the arrow
back soft-key.
•Flash Headlights With Lock
Touch the Flash Headlights With Lock soft-key to change
this display. When this feature is selected, the headlights
will flash when the doors are locked or unlocked with the Remote Keyless Entry (RKE) transmitter. This feature
may be selected with or without the sound horn on lock
feature selected. To make your selection, touch the Flash
Headlights With Lock soft-key and select ON or OFF.
Then touch the arrow back soft-key.
Doors & Locks
•
Auto Unlock On Exit
Touch the Auto Unlock On Exit soft-key to change this
display. When this feature is selected, all doors will
unlock when the vehicle is stopped and the transmission
is in the PARK or NEUTRAL position and the driver’s
door is opened. To make your selection, touch the Auto
Unlock On Exit soft-key and select ON or OFF. Then
touch the arrow back soft-key.
•Flash Lights With Lock
Touch the Flash Lights With Lock soft-key to change this
display. When this feature is selected, the front and rear
turn signals will flash when the doors are locked or
4
UNDERSTANDING YOUR INSTRUMENT PANEL 305
Page 321 of 566

transmitter. To change the Illuminated Approach status,
touch the + or - soft-key to select your desired time
interval. Touch the back arrow soft-key to return to the
previous menu.
•Headlights With Wipers — If Equipped
When this feature is selected, and the headlight switch is
in the AUTO position, the headlights will turn on ap-
proximately 10 seconds after the wipers are turned on.
The headlights will also turn off when the wipers are
turned off if they were turned on by this feature. To make
your selection, touch the Headlights With Wipers soft-
key, until a check-mark appears next to setting, showing
that setting has been selected. Touch the back arrow
soft-key to return to the previous menu.
•Auto Dim High Beams — If Equipped
When this feature is selected, the high beam headlights
will deactivate automatically under certain conditions. To make your selection, touch the Auto High Beams soft-
key, until a check-mark appears next to setting, showing
that setting has been selected. Touch the back arrow
soft-key to return to the previous menu. Refer to “Lights/
SmartBeam™ — If Equipped” in “Understanding The
Features Of Your Vehicle” for further information.
•Daytime Running Lights
When this feature is selected, the headlights will turn on
whenever the engine is running. To make your selection,
touch the Daytime Running Lights soft-key, until a
check-mark appears next to setting, showing that setting
has been selected. Touch the back arrow soft-key to
return to the previous menu.
•Steering Directed Lights
When this feature is selected, the headlights turn relative
to a change in direction of the steering wheel. To make
4
UNDERSTANDING YOUR INSTRUMENT PANEL 319
Page 324 of 566
 without having to press the Remote Keyless
Entry (RKE) transmitter lock or unlock buttons. To make
your selection, t")
•Passive Entry
This feature allows you to lock and unlock the vehicle’s
door(s) without having to press the Remote Keyless
Entry (RKE) transmitter lock or unlock buttons. To make
your selection, touch the Passive Entry soft-key, until a
check-mark appears next to setting, showing that setting
has been selected. Touch the back arrow soft-key to
return to the previous menu. Refer to “Keyless Enter-N-
Go” in “Things To Know Before Starting Your Vehicle”.
•Personal Settings Linked To FOB — If Equipped
This feature provides automatic driver seat positioning to
enhance driver mobility when entering and exiting the
vehicle. To make your selection, touch the Memory
Linked To FOB soft-key, until a check-mark appears next
to setting, showing that setting has been selected. Touch
the back arrow soft-key to return to the previous menu.
NOTE: The seat will return to the memorized seat
location (if Recall Memory with Remote Key Unlock is set to ON) when the Remote Keyless Entry (RKE) transmitter
is used to unlock the door. Refer to “Driver Memory
Seat” in “Understanding The Features Of Your Vehicle”
for further information.
Auto-On Comfort & Remote Start
After pressing the Auto-On Comfort & Remote Start
soft-key the following settings will be available.
•Horn With Remote Start
When this feature is selected, the horn will sound when
the remote start is activated. To make your selection,
touch the Sound Horn With Remote Start soft-key, until a
check-mark appears next to setting, showing that setting
has been selected. Touch the back arrow soft-key to
return to the previous menu.
•Auto-On Driver Heated/Ventilated Seat & Steering
Wheel With Vehicle Start — If Equipped
When this feature is selected the driver’s heated seat and
heated steering wheel will automatically turn on when
322 UNDERSTANDING YOUR INSTRUMENT PANEL
Page 329 of 566
iPod�/USB/MP3 CONTROL — IF EQUIPPED
This feature allows an iPod�or external USB device to be
plugged into the USB port.
iPod� control supports Mini, 4G, Photo, Nano, 5G iPod�
and iPhone� devices. Some iPod� software versions may
not fully support the iPod� control features. Please visit
Apple’s website for software updates.
For further information, refer to the Uconnect Touch™
User ’s Manual.
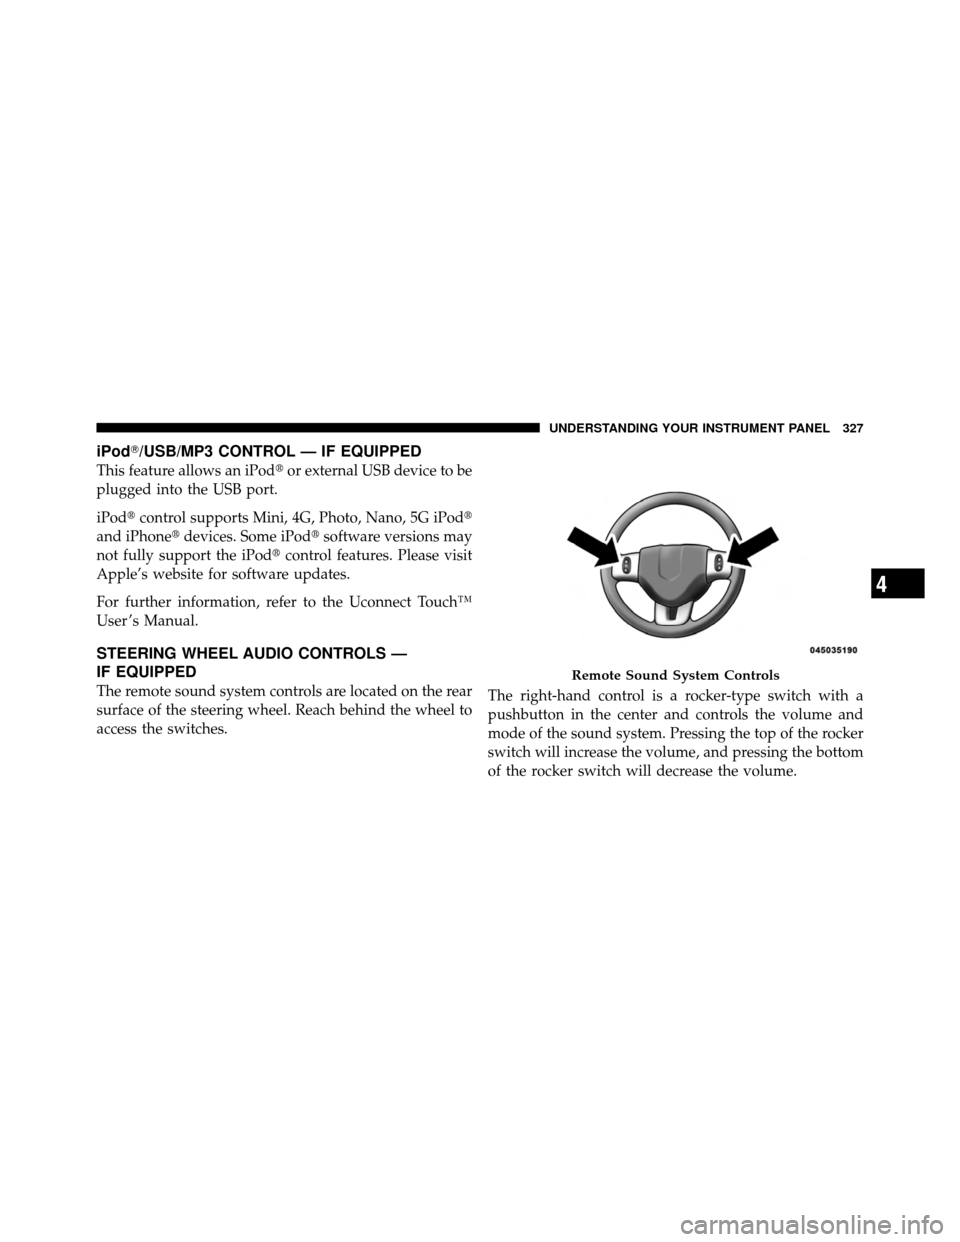
STEERING WHEEL AUDIO CONTROLS —
IF EQUIPPED
The remote sound system controls are located on the rear
surface of the steering wheel. Reach behind the wheel to
access the switches. The right-hand control is a rocker-type switch with a
pushbutton in the center and controls the volume and
mode of the sound system. Pressing the top of the rocker
switch will increase the volume, and pressing the bottom
of the rocker switch will decrease the volume.
Remote Sound System Controls
4
UNDERSTANDING YOUR INSTRUMENT PANEL 327
Page 337 of 566

NOTE:In Sync mode, this button will also automati-
cally adjust the passenger temperature setting at the
same time.
11. Driver Temperature Control Up Button
Provides the driver with independent temperature con-
trol. Push the button for warmer temperature settings.
NOTE: In Sync mode, this button will also automati-
cally adjust the passenger temperature setting at the
same time.
12. Modes
The airflow distribution mode can be adjusted so air
comes from the instrument panel outlets, floor outlets,
demist outlets and defrost outlets. The Mode settings are
as follows:
•Panel Mode Air comes from the outlets in the instrument panel.
Each of these outlets can be individually adjusted to direct the flow of air. The air vanes of the center outlets
and outboard outlets can be moved up and down or side
to side to regulate airflow direction. There is a shut off
wheel located below the air vanes to shut off or adjust the
amount of airflow from these outlets.
•Bi-Level Mode
Air comes from the instrument panel outlets and
floor outlets. A slight amount of air is directed
through the defrost and side window demister outlets.
NOTE: BI-LEVEL mode is designed under comfort
conditions to provide cooler air out of the panel outlets
and warmer air from the floor outlets.
•Floor Mode Air comes from the floor outlets. A slight amount of
air is directed through the defrost and side window
demister outlets.
4
UNDERSTANDING YOUR INSTRUMENT PANEL 335