Page 296 of 566

Fuel Economy
Press and release the UP or DOWN button until “Fuel
Economy” displays highlighted in the EVIC and press
the SELECT button. Press and release the UP/DOWN
buttons until one of the following Fuel Economy func-
tions displays in the EVIC:
•Average Fuel Economy/Fuel Saver Mode
•Distance To Empty (DTE)
•Miles Per Gallon (MPG)
Press the UP/DOWN buttons to cycle through all the
Trip Computer functions. The Trip Functions mode displays the following informa-
tion:
Average Fuel Economy / ECO Fuel Saver Mode —
If Equipped
Shows the average fuel economy since the last reset.
When the fuel economy is reset, the display will read
“RESET” or show dashes for two seconds. Then, the
history information will be erased, and the averaging will
continue from the last fuel average reading before the
reset.
There is an ECO icon between the Compass and Outside
Temperature info at the top of the EVIC display. This icon
will appear whenever the Multi-Displacement System
(MDS) (if equipped) allows the engine to operate on four
cylinders, or if you are driving in a fuel efficient manner.
This feature allows you to monitor when you are driving
in a fuel efficient manner, and it can be used to modify
driving habits in order to increase fuel economy.
294 UNDERSTANDING YOUR INSTRUMENT PANEL
Page 297 of 566

Shows the estimated distance that can be traveled with
the fuel remaining in the tank. This estimated distance is
determined by a weighted average of the instantaneous
and aver")
Distance To Empty (DTE)
Shows the estimated distance that can be traveled with
the fuel remaining in the tank. This estimated distance is
determined by a weighted average of the instantaneous
and average fuel economy, according to the current fuel
tank level. DTE cannot be reset through the SELECT
button.
NOTE:Significant changes in driving style or vehicle
loading will greatly affect the actual drivable distance of
the vehicle, regardless of the DTE displayed value.
When the DTE value is less than 30 miles (48 km)
estimated driving distance, the DTE display will change
to a “LOW FUEL” message. This display will continue
until the vehicle runs out of fuel. Adding a significant
amount of fuel to the vehicle will turn off the “LOW
FUEL” message and a new DTE value will display.
Miles Per Gallon (MPG)
The Miles Per Gallon (MPG) feature displays instanta-
neous fuel economy in a bar graph below the DTE, this
function cannot be reset. Press the BACK button to return
to the main menu.
Vehicle Speed
Press and release the UP or DOWN button until “Vehicle
Speed” displays highlighted in the EVIC and press the
SELECT button. Press the SELECT button to display the
current speed in mph or km/h. Pressing the SELECT
button a second time will toggle the unit of measure
between mph or km/h.
NOTE: Changing the unit of measure in the Vehicle
Speed menu will not change the unit of measure in the
EVIC.
Trip Info
Press and release the UP or DOWN button until “Trip
Info” displays highlighted in the EVIC and press the
4
UNDERSTANDING YOUR INSTRUMENT PANEL 295
Page 298 of 566

SELECT button. Press and release the UP/DOWN but-
tons until one of the following Trip functions displays in
the EVIC:
•Trip A
•Trip B
•Elapsed Time
Press the UP/DOWN buttons to cycle through all the
Trip Computer functions.
The Trip Functions mode displays the following informa-
tion:
Trip A
Shows the total distance traveled for Trip A since the last
reset.
Trip B
Shows the total distance traveled for Trip B since the last
reset.
Elapsed Time
Shows the total elapsed time of travel since the last reset
when the ignition is in the ACC position. Elapsed time
will increment when the ignition is in the ON/RUN
position.
To Reset The Display
Reset will only occur while a resettable function is being
displayed. Press and release the SELECT button once to
clear the resettable function being displayed. To reset all
resettable functions, press and hold the SELECT button
for two seconds. The current display will reset along with
other functions.
Units
Press and release the UP or DOWN button until “Units”
displays highlighted in the EVIC and press the SELECT
button. The EVIC, odometer, and navigation system (if
equipped) can be changed between English and Metric
units of measure. To make your selection, scroll up or
296 UNDERSTANDING YOUR INSTRUMENT PANEL
Page 299 of 566

down until the preferred setting is highlighted, then
press and release the SELECT button until a check-mark
appears next to the setting, showing that the setting has
been selected.
Vehicle Info (Customer Information Features)
Press and release the UP or DOWN button until “Vehicle
Info” displays in the EVIC and press the SELECT button.
Press the UP and DOWN button to scroll through the
available information displays, then press SELECT to
display any one of the following choices.
•Coolant Temp
Displays the actual coolant temperature.
•Oil Temperature
Displays the actual oil temperature.
•Oil Pressure
Displays the actual oil pressure.
•Trans Temperature
Displays the actual transmission temperature.
•Engine Hours
Displays the number of hours of engine operation.
•Tire Pressure
Shows the actual tire pressure for each tire (EXCLUDING
THE SPARE TIRE).
Messages #
Select from Main Menu using the UP or DOWN buttons.
This feature shows the number of stored warning mes-
sages (in the # place holder). Pressing the SELECT button
will allow you to see what the stored messages are.
Pressing the BACK button takes you back to the Main
Menu.
4
UNDERSTANDING YOUR INSTRUMENT PANEL 297
Page 300 of 566

Turn Menu OFF
Select from Main Menu using the DOWN button. Press-
ing the SELECT button blanks the menu display. Pressing
any one of the four steering wheel buttons brings the
menu back.
Uconnect TOUCH™ SETTINGS
The Uconnect Touch™ system uses a combination of soft
and hard keys located on the center of the instrument
panel that allows you to access and change the customer
programmable features.
Hard-Keys
Hard-Keys are located on the left and right side of the
Uconnect Touch™ 4.3 screen. In addition, there is a
Scroll/Enter control knob located on the right side of the
Climate Controls in the center of the instrument panel.
Turn the control knob to scroll through menus andchange settings (i.e., 30, 60, 90), press the center of the
control knob one or more times to select or change a
setting (i.e., ON, OFF).
Soft-Keys
Soft-Keys are accessible on the Uconnect Touch™ screen.
Customer Programmable Features — Uconnect
Touch™ 4.3 Settings
In this mode the Uconnect Touch™ system allows you to
access programmable features that may be equipped
such as Display, Clock, Safety/Assistance, Lights, Doors
& Locks, Heated Seats, Engine Off Operation, Compass
Settings, Audio, Phone/Bluetooth and SIRIUS Setup
through hard-keys and soft-keys.
NOTE:
Only one touchscreen area may be selected at a
time.
298 UNDERSTANDING YOUR INSTRUMENT PANEL
Page 301 of 566
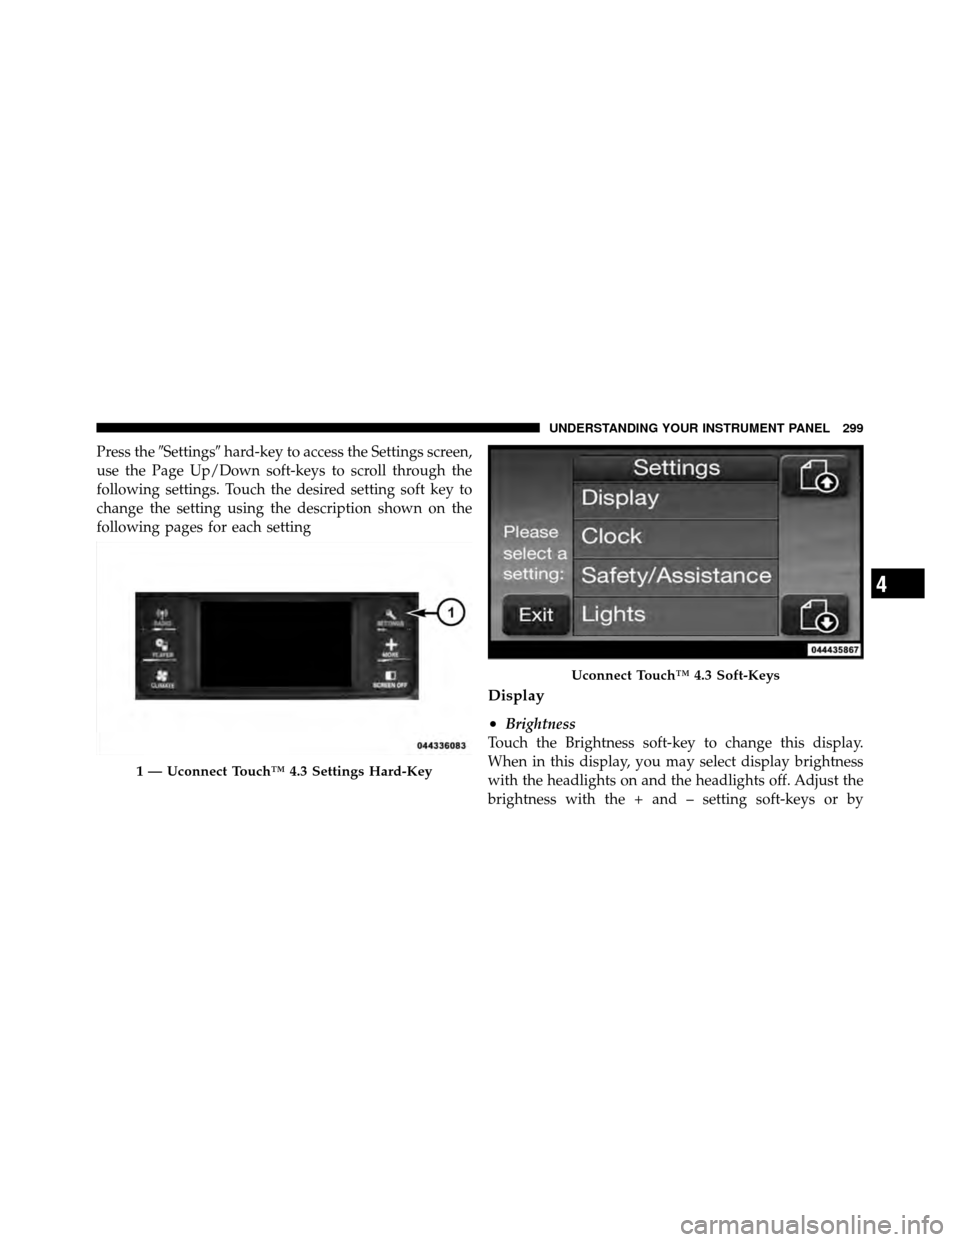
Press the�Settings� hard-key to access the Settings screen,
use the Page Up/Down soft-keys to scroll through the
following settings. Touch the desired setting soft key to
change the setting using the description shown on the
following pages for each setting
Display
•
Brightness
Touch the Brightness soft-key to change this display.
When in this display, you may select display brightness
with the headlights on and the headlights off. Adjust the
brightness with the + and – setting soft-keys or by
1 — Uconnect Touch™ 4.3 Settings Hard-Key
Uconnect Touch™ 4.3 Soft-Keys
4
UNDERSTANDING YOUR INSTRUMENT PANEL 299
Page 304 of 566

dynamic driving, select the Near setting. This warns you
of a possible collision when you are much closer to the
vehicle in front of you. This allows for a more dynamic
driving experience. To change the FCW status, press and
release the OFF, Near or Far button. Then touch the arrow
back soft-key.
For further information, refer to ”Adaptive Cruise Con-
trol (ACC)” in “Understanding The Features Of Your
Vehicle”.
•Park Assist
Touch the Park Assist soft-key to change this display. The
Rear Park Assist system will scan for objects behind the
vehicle when the transmission shift lever is in REVERSE
and the vehicle speed is less than 11 mph (18 km/h). The
system can be enabled with Sound Only, Sound and
Display, or turned OFF. To change the Park Assist status,
press and release the OFF, Sound Only or Sounds and
Display soft-key. Then touch the arrow back soft-key. Refer to “ParkSense�
Rear Park Assist” in “Understand-
ing The Features Of Your Vehicle” for system function
and operating information.
•Tilt Mirrors In Reverse
Touch the Tilt Mirrors In Reverse soft-key to change this
display. When this feature is selected, the outside rear-
view mirrors will tilt downward when the ignition is in
the RUN position and the transmission shift lever is in
the REVERSE position. The mirrors will move back to
their previous position when the transmission is shifted
out of REVERSE. To make your selection, touch the Tilt
Mirrors In Reverse soft-key and select ON or OFF. Then
touch the arrow back soft-key.
•Blind Spot Alert
Touch the Blind Spot Alert soft-key to change this dis-
play. When this feature is selected, the Blind Spot Alert
feature can be set to Off, Lights or Lights and Chime. The
Blind Spot Alert feature can be activated in “Lights”
302 UNDERSTANDING YOUR INSTRUMENT PANEL
Page 305 of 566
 system is activated and will only show a visual
alert in the outside mirrors. When “Lights & Chime”
mode is activated, the Blind Sp")
mode. When this mode is selected, the Blind Spot Moni-
tor (BSM) system is activated and will only show a visual
alert in the outside mirrors. When “Lights & Chime”
mode is activated, the Blind Spot Monitor (BSM) will
show a visual alert in the outside mirrors as well as an
audible alert when the turn signal is on. When “Off” is
selected, the Blind Spot Monitor (BSM) system is deacti-
vated. To change the Blind Spot Alert status, touch the
OFF, Lights or Lights & Chime soft-key. Then touch the
arrow back soft-key.
NOTE:If your vehicle has experienced any damage in
the area where the sensor is located, even if the fascia is
not damaged, the sensor may have become misaligned.
Take your vehicle to an authorized dealer to verify sensor
alignment. Having a sensor that is misaligned will result
in the BSM not operating to specification.•Rain Sensing
Touch the Rain Sensing soft-key to change this display.
When this feature is selected, the system will automati-
cally activate the windshield wipers if it senses moisture
on the windshield. To make your selection, touch the
Rain Sensing soft-key and select ON or OFF. Then touch
the arrow back soft-key.
•Hill Start Assist — If Equipped
Touch the Hill Start Assist soft-key to change this display.
When this feature is selected, the Hill Start Assist (HSA)
system is active. Refer to “Electronic Brake Control
System” in “Starting And Operating” for system function
and operating information. To make your selection, touch
the Hill Start Assist soft-key and select ON or OFF. Then
touch the arrow back soft-key.4
UNDERSTANDING YOUR INSTRUMENT PANEL 303