Page 174 of 494
The instrument panel power outlet, located below the
climate control knobs, has power available only when the
ignition is ON. This power outlet will also operate a
conventional cigar lighter unit.
NOTE:To preserve the heating element, do not hold the
lighter in the heating position. A second power outlet is located inside the center con-
sole.
The center console power outlet is powered directly from
the battery (power available at all times). Items plugged
into this power outlet may discharge the battery and/or
prevent the engine from starting.
Instrument Panel Power Outlet
Center Console
172 UNDERSTANDING THE FEATURES OF YOUR VEHICLE
Page 175 of 494
NOTE:To ensure proper operation a MOPAR� knob
and element must be used.
CAUTION!
•Do not exceed the maximum power of 160 Watts
(13 Amps) at 12 Volts. If the 160 Watt (13 Amp)
power rating is exceeded the fuse protecting the
system will need to be replaced.
•Power outlets are designed for accessory plugs
only. Do not insert any other object in the power
outlets as this will damage the outlet and blow the
fuse. Improper use of the power outlet can cause
damage not covered by your New Vehicle Limited
Warranty.
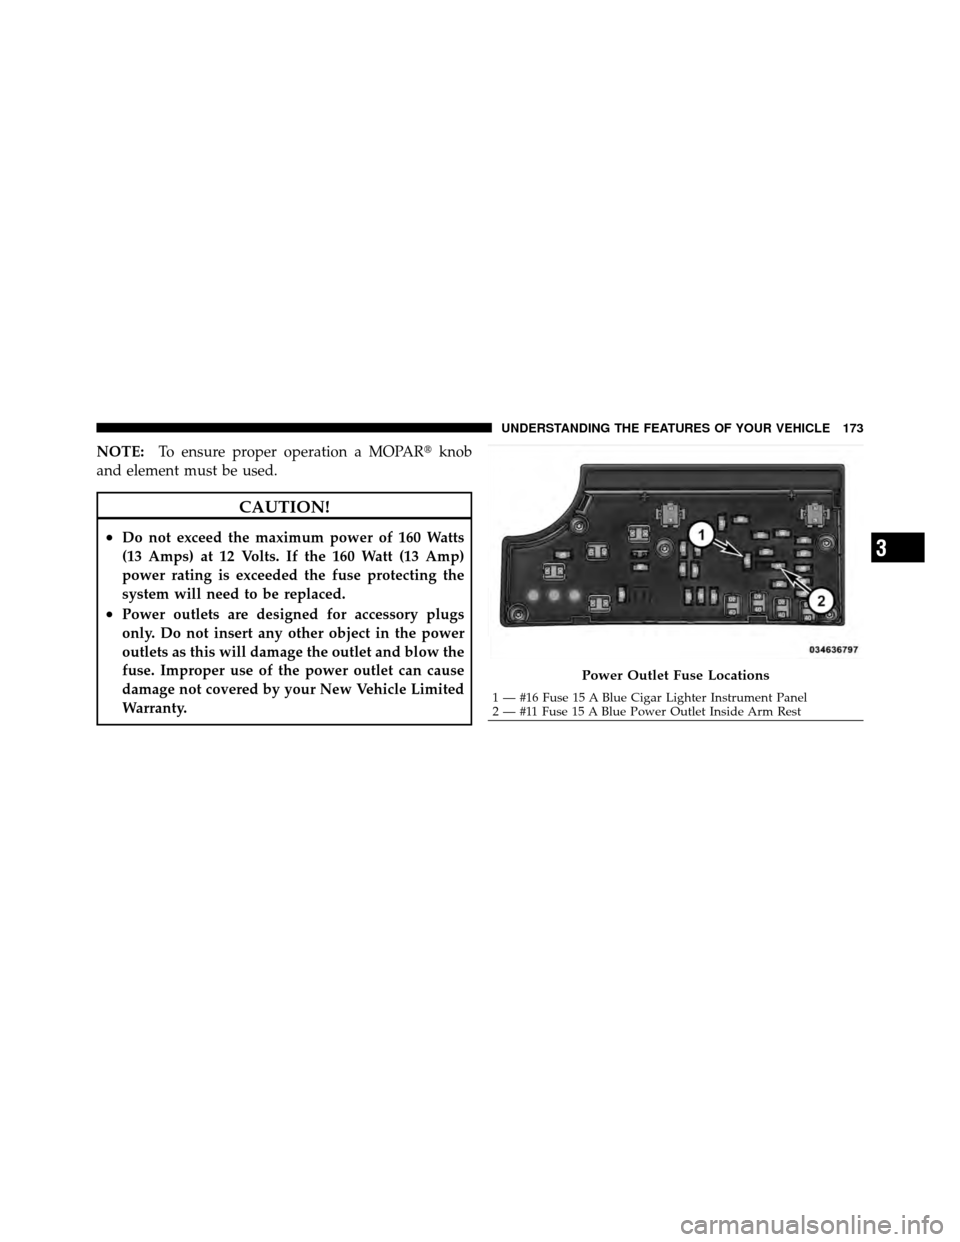
Power Outlet Fuse Locations
1 — #16 Fuse 15 A Blue Cigar Lighter Instrument Panel
2 — #11 Fuse 15 A Blue Power Outlet Inside Arm Rest
3
UNDERSTANDING THE FEATURES OF YOUR VEHICLE 173
Page 176 of 494

WARNING!
To avoid serious injury or death:
•Only devices designed for use in this type of
outlet should be inserted into any 12 Volt outlet.
•Do not touch with wet hands.
•Close the lid when not in use and while driving
the vehicle.
•If this outlet is mishandled, it may cause an
electric shock and failure.
CAUTION!
•Many accessories that can be plugged in draw
power from the vehicle’s battery, even when not in
use (i.e., cellular phones, etc.). Eventually, if
plugged in long enough, the vehicle’s battery will
discharge sufficiently to degrade battery life
and/or prevent the engine from starting.
•Accessories that draw higher power (i.e., coolers,
vacuum cleaners, lights, etc.) will degrade the
battery even more quickly. Only use these inter-
mittently and with greater caution.
•After the use of high power draw accessories, or
long periods of the vehicle not being started (with
accessories still plugged in), the vehicle must be
driven a sufficient length of time to allow the
generator to recharge the vehicle’s battery.
174 UNDERSTANDING THE FEATURES OF YOUR VEHICLE
Page 177 of 494
CIGAR LIGHTER AND ASH RECEIVER — IF
EQUIPPED
An optional ash receiver is available from your autho-
rized dealer and will fit in the center console front
cupholder.
The optional ash receiver also comes with a cigar lighter
that can be used with the power outlets. Refer to “Power
Outlets” in “Understanding the Features of Your Vehicle”
for further information.
CUPHOLDERS
There are two cupholders located in the center console
for the front passengers.Front Cupholders
3
UNDERSTANDING THE FEATURES OF YOUR VEHICLE 175
Page 180 of 494
“Power Outlets” in “Understanding The Feature Of Your
Vehicle” for further information.
Two separate storage compartments are located under-
neath the armrest.The top compartment holds small items, such as a pen
and note pad, while the larger bottom compartment will
hold CDs and alike. The bottom compartment also con-
tains a 12 Volt power outlet. The console’s front opening
lid allows for easy access to these compartments.
Lifting the left latch at the front of the hinged armrest
provides access to the upper storage bin.
Lifting the right latch allows access to the lower storage
compartment, without first exposing the upper storage
bin.
NOTE:
•A notch in the front of the console base allows for use
of a cellular phone while it is plugged into the power
outlet with the armrest latched down.
•The power outlet can also energize the cigar lighter in
the optional cup holder ash receiver.
Center Console
178 UNDERSTANDING THE FEATURES OF YOUR VEHICLE
Page 191 of 494
, the fuel symbol will light and a
single chime will sound.
NOTE: This light will remain on until a minimum of
app")
5. Low Fuel LightWhen the fuel level drops to approximately 2.0 gal-
lons (7.6 Liters), the fuel symbol will light and a
single chime will sound.
NOTE: This light will remain on until a minimum of
approximately 3.0 gallons of fuel is added.
6. Charging System Light This light shows the status of the electrical charg-
ing system. The light should come on briefly when
the ignition is first turned on and remain on briefly as a
bulb check. If the light stays on or comes on while
driving, turn off some of the vehicle’s electrical devices,
such as the Front Fog Lights or Rear Window Defroster.
If the Charging System Light remains on, it means that
the vehicle is experiencing a problem with the charging
system. Obtain SERVICE IMMEDIATELY. See your local
authorized dealer. If jump starting is required, refer to “Jump Starting
Procedures” in “What To Do In Emergencies”.
7. Air Bag Warning Light
This light will turn on for four to eight seconds
as a bulb check when the ignition switch is first
turned to ON/RUN. If the light is either not on
during starting, stays on, or turns on while
driving, have the system inspected at an authorized
dealer as soon as possible. Refer to “Occupant Restraints”
in “Things To Know Before Starting Your Vehicle” for
further information.
8. Seat Belt Reminder Light When the ignition switch is first turned to ON/
RUN, this light will turn on for four to eight
seconds as a bulb check. During the bulb check, if
the driver’s seat belt is unbuckled, a chime will sound.
After the bulb check or when driving, if the driver seat
belt remains unbuckled, the Seat Belt Warning Light will
4
UNDERSTANDING YOUR INSTRUMENT PANEL 189
Page 192 of 494

flash or remain on continuously. Refer to “Occupant
Restraints” in “Things To Know Before Starting Your
Vehicle” for further information.
9. Oil Pressure Warning LightThis light indicates low engine oil pressure. The
light will come on and remain on when the
ignition switch is turned from the OFF to the ON/RUN
position, and the light will turn off after the engine is
started. If the bulb does not come on during starting,
have the system checked by an authorized dealer.
If the light comes on and remains on while driving, stop
the vehicle and shut off the engine. DO NOT OPERATE
THE VEHICLE UNTIL THE CAUSE IS CORRECTED.
The light does not show the quantity of oil in the engine.
This can be determined using the procedure shown in
“Maintaining Your Vehicle”. 10. Engine Temperature Warning Light
This light warns of an overheated engine condi-
tion. If the engine is critically hot, a warning chime
will sound 10 times. After the chime turns off, the
engine will still be critically hot until the light goes out.
11. Brake Warning Light This light monitors various brake functions,
including brake fluid level and parking brake
application. If the brake light turns on it may
indicate that the parking brake is applied, that
the brake fluid level is low, or that there is a problem with
the anti-lock brake system.
The dual brake system provides a reserve braking capac-
ity in the event of a failure to a portion of the hydraulic
system. Failure of either half of the dual brake system is
indicated by the Brake Warning Light which will turn on
when the brake fluid level in the master cylinder has
dropped below a specified level.
190 UNDERSTANDING YOUR INSTRUMENT PANEL
Page 193 of 494

The light will remain on until the cause is corrected.
NOTE:The light may flash momentarily during sharp
cornering maneuvers which change fluid level condi-
tions. The vehicle should have service performed, and
the brake fluid level checked.
If brake failure is indicated, immediate repair is neces-
sary.
WARNING!
Driving a vehicle with the brake light on is danger-
ous. Part of the brake system may have failed. It will
take longer to stop the vehicle. You could have a
collision. Have the vehicle checked immediately.
Vehicles equipped with Anti-Lock brakes (ABS), are also
equipped with Electronic Brake Force Distribution (EBD). In the event of an EBD failure, the Brake Warning Light
will turn on along with the ABS Light. Immediate repair
to the ABS system is required.
The operation of the Brake Warning Light can be checked
by turning the ignition switch from the OFF position to
the ON/RUN position. The light should illuminate for
approximately three seconds. The light should then turn
off unless the parking brake is applied or a brake fault is
detected. If the light does not illuminate, have the light
inspected by an authorized dealer.
The light also will turn on when the parking brake is
applied with the ignition switch in the ON/RUN posi-
tion.
NOTE:
This light shows only that the parking brake is
applied. It does not show the degree of brake application.
4
UNDERSTANDING YOUR INSTRUMENT PANEL 191