Page 160 of 494
column) is placed in the AUTO position. In addition, the
headlights will turn off when the wipers are turned off if
they were turned on by this feature.
The headlights with wipers feature can be turned on or
off through the Electronic Vehicle Information Center
(EVIC) — if equipped. Refer to “Electronic Vehicle Infor-
mation Center (EVIC)/Personal Settings (Customer-
Programmable Features)” in “Understanding Your In-
strument Panel” for further information.
TILT/TELESCOPING STEERING COLUMN
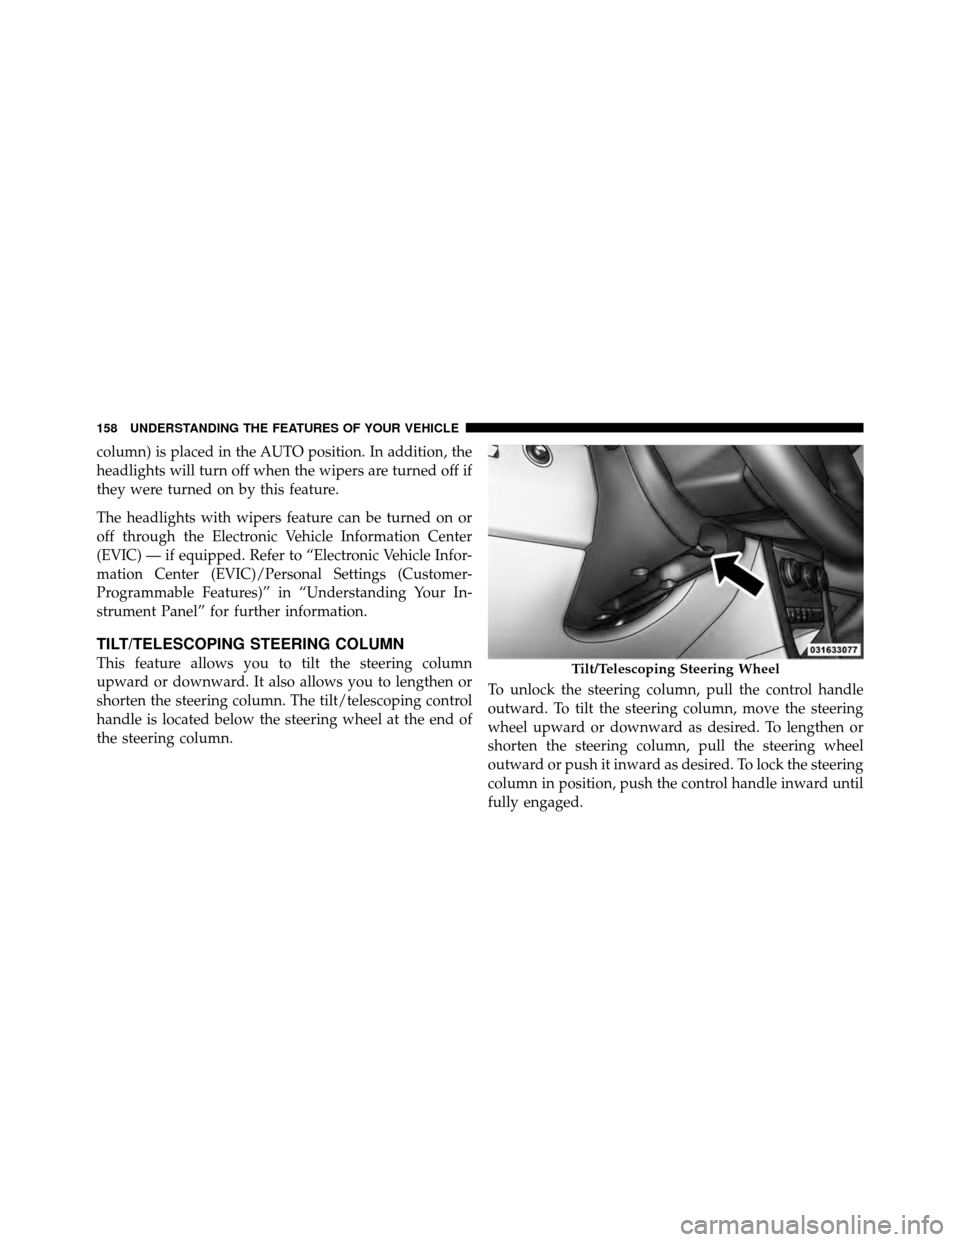
This feature allows you to tilt the steering column
upward or downward. It also allows you to lengthen or
shorten the steering column. The tilt/telescoping control
handle is located below the steering wheel at the end of
the steering column.To unlock the steering column, pull the control handle
outward. To tilt the steering column, move the steering
wheel upward or downward as desired. To lengthen or
shorten the steering column, pull the steering wheel
outward or push it inward as desired. To lock the steering
column in position, push the control handle inward until
fully engaged.Tilt/Telescoping Steering Wheel
158 UNDERSTANDING THE FEATURES OF YOUR VEHICLE
Page 162 of 494
System can be reactivated by pushing the Electronic
Speed Control ON/OFF button and resetting the desired
vehicle set speed.
To Activate
Push the ON/OFF button. The Cruise Indicator Light in
the instrument cluster will illuminate. To turn the system
off, push the ON/OFF button a second time. The Cruise
Indicator Light will turn off. The system should be
turned off when not in use.
WARNING!
Leaving the Electronic Speed Control system on
when not in use is dangerous. You could accidentally
set the system or cause it to go faster than you want.
You could lose control and have an accident. Always
leave the system OFF when you are not using it.
To Set A Desired Speed
Turn the Electronic Speed Control ON. When the vehicle
has reached the desired speed, press the SET (-) button
and release. Release the accelerator and the vehicle will
operate at the selected speed.
NOTE:The vehicle should be traveling at a steady
speed and on level ground before pressing the SET
button.
To Deactivate
A soft tap on the brake pedal, pushing the CANCEL
button, or normal brake pressure while slowing the
vehicle will deactivate Electronic Speed Control without
erasing the set speed memory. Pressing the ON/OFF
button or turning the ignition switch OFF erases the set
speed memory.
160 UNDERSTANDING THE FEATURES OF YOUR VEHICLE
Page 163 of 494
To Resume Speed
To resume a previously set speed, push the RES (+)
button and release. Resume can be used at any speed
above 20 mph (32 km/h).
To Vary The Speed Setting
When the Electronic Speed Control is set, you can in-
crease speed by pushing the RES (+) button. If the button
is continually pressed, the set speed will continue to
increase until the button is released, then the new set
speed will be established.
Pressing the RES (+) button once will result ina1mph
(2 km/h) increase in set speed. Each subsequent tap of
the button results in an increase of 1 mph (2 km/h).
To decrease speed while the Electronic Speed Control is
set, push the SET (-) button. If the button is continually
held in the SET (-) position, the set speed will continue todecrease until the button is released. Release the button
when the desired speed is reached, and the new set speed
will be established.
Pressing the SET (-) button once will result in a 1 mph
(2 km/h) decrease in set speed. Each subsequent tap of
the button results in a decrease of 1 mph (2 km/h).
To Accelerate For Passing
Press the accelerator as you would normally. When the
pedal is released, the vehicle will return to the set speed.
Using Electronic Speed Control On Hills
The transmission may downshift on hills to maintain the
vehicle set speed.
NOTE:
The Electronic Speed Control system maintains
speed up and down hills. A slight speed change on
moderate hills is normal.
3
UNDERSTANDING THE FEATURES OF YOUR VEHICLE 161
Page 164 of 494
On steep hills, a greater speed loss or gain may occur so
it may be preferable to drive without Electronic Speed
Control.
WARNING!
Electronic Speed Control can be dangerous where the
system cannot maintain a constant speed. Your ve-
hicle could go too fast for the conditions, and you
could lose control and have an accident. Do not use
Electronic Speed Control in heavy traffic or on roads
that are winding, icy, snow-covered or slippery.
GARAGE DOOR OPENER — IF EQUIPPED
HomeLink�replaces up to three remote controls (hand-
held transmitters) that operate devices such as garage
door openers, motorized gates, lighting or home security
systems. The HomeLink� unit operates off your vehicle’s
battery. The HomeLink�
buttons that are located in the headliner
or sun visor designate the three different HomeLink�
channels.
NOTE: HomeLink� is disabled when the Vehicle Secu-
rity Alarm is active.
HomeLink� Buttons
162 UNDERSTANDING THE FEATURES OF YOUR VEHICLE
Page 166 of 494
Place the handheld transmitter 1 to 3 in (3 to 8 cm) away
from the HomeLink�button you wish to program while
keeping the indicator light in view.
3. Simultaneously press and hold both the chosen
HomeLink� button and the handheld transmitter button
until the HomeLink� indicator changes from a slow to a
rapidly blinking light, then release both the HomeLink�
and handheld transmitter buttons.
Watch for the HomeLink� indicator to change flash rates.
When it changes, it is programmed. It may take up to
30 seconds or longer in rare cases. The garage door may
open and close while you train.
NOTE:
•Some gate operators and garage door openers may
require you to replace Step 3 with procedures noted in
the “Gate Operator/Canadian Programming” section.
•After training a HomeLink� channel, if the garage
door does not operate with HomeLink� and the ga-
rage door opener was manufactured after 1995, the
garage door opener may have a rolling code. If so,
proceed to Step 5 “Programming A Rolling Code
System.”
4. Press and hold the just-trained HomeLink� button
and observe the indicator light.
If the indicator light stays on constantly, programming is
complete and the garage door (or device) should activate
when the HomeLink� button is pressed.
If the indicator light blinks rapidly for two seconds and
then turns to a constant light, proceed to “Programming
A Rolling Code System.”
5. Programming A Rolling Code
At the garage door opener motor (in the garage), locate
the “Learn” or “Training” button.
164 UNDERSTANDING THE FEATURES OF YOUR VEHICLE
Page 168 of 494
Gate Operator/Canadian Programming
Canadian radio frequency laws require transmitter sig-
nals to time-out (or quit) after several seconds of trans-
mission – which may not be long enough for HomeLink�
to pick up the signal during programming. Similar to this
Canadian law, some U.S. gate operators are designed to
time-out in the same manner.
It may be helpful to unplug the device during the cycling
process to prevent possible overheating of the garage
door or gate motor.
If you are having difficulties programming a garage door
opener or a gate operator, replace “Programming
HomeLink�” Step 3, with the following:
3. Continue to press and hold the HomeLink�button,
while you press and release (“cycle”), your handheld
transmitter every two seconds until HomeLink� hassuccessfully accepted the frequency signal. The indica-
tor light will flash slowly and then rapidly when fully
trained.
If you unplugged the device for training, plug it back in
at this time.
Then proceed with Step 4 under “Programming
HomeLink�,” earlier in this section.
Using HomeLink�
To operate, press and release the programmed
HomeLink�
button. Activation will now occur for the
trained device (i.e., garage door opener, gate operator,
security system, entry door lock, home/office lighting,
etc.,). The handheld transmitter of the device may also be
used at any time.
166 UNDERSTANDING THE FEATURES OF YOUR VEHICLE
Page 169 of 494
Reprogramming A Single HomeLink�Button
To reprogram a channel that has been previously trained,
follow these steps:
1. Turn the ignition switch to the ON/RUN position.
2. Press and hold the desired HomeLink� button until
the indicator light begins to flash after 20 seconds. Do not
release the button.
3. Without releasing the button, proceed with Program-
ming HomeLink� Step 2 and follow all remaining steps.
Security
It is advised to erase all channels before you sell or turn
in your vehicle.
To do this, press and hold the two outside buttons for
20 seconds until the red indicator flashes. Note that all
channels will be erased. Individual channels cannot be
erased. The HomeLink�
Universal Transceiver is disabled when
the Vehicle Security Alarm is active.
Troubleshooting Tips
If you are having trouble programming HomeLink �, here
are some of the most common solutions:
•Replace the battery in the original transmitter.
•Press the LEARN button on the Garage Door Opener
to complete the training for a Rolling Code.
•Did you unplug the device for training, and remember
to plug it back in?
If you have any problems, or require assistance, please
call toll-free 1–800–355–3515 or, on the Internet at
www.HomeLink.com for information or assistance.
3
UNDERSTANDING THE FEATURES OF YOUR VEHICLE 167
Page 170 of 494
General Information
This device complies with FCC rules Part 15 and Industry
Canada RSS-210. Operation is subject to the following
two conditions:
1. This device may not cause harmful interference.
2. This device must accept any interference that may be
received including interference that may cause undesired
operation.
NOTE:
•The transmitter has been tested and it complies with
FCC and IC rules. Changes or modifications not
expressly approved by the party responsible for com-
pliance could void the user ’s authority to operate the
device.
•The term IC before the certification/registration num-
ber only signifies that Industry Canada technical
specifications were met.
POWER SUNROOF — IF EQUIPPED
The sunroof controls are mounted between the dome/
reading lights.
Power Sunroof Switch
168 UNDERSTANDING THE FEATURES OF YOUR VEHICLE