2011 Citroen JUMPY Ring
[x] Cancel search: RingPage 231 of 260

9.87
04
1
2
3
4
1
2
3
4
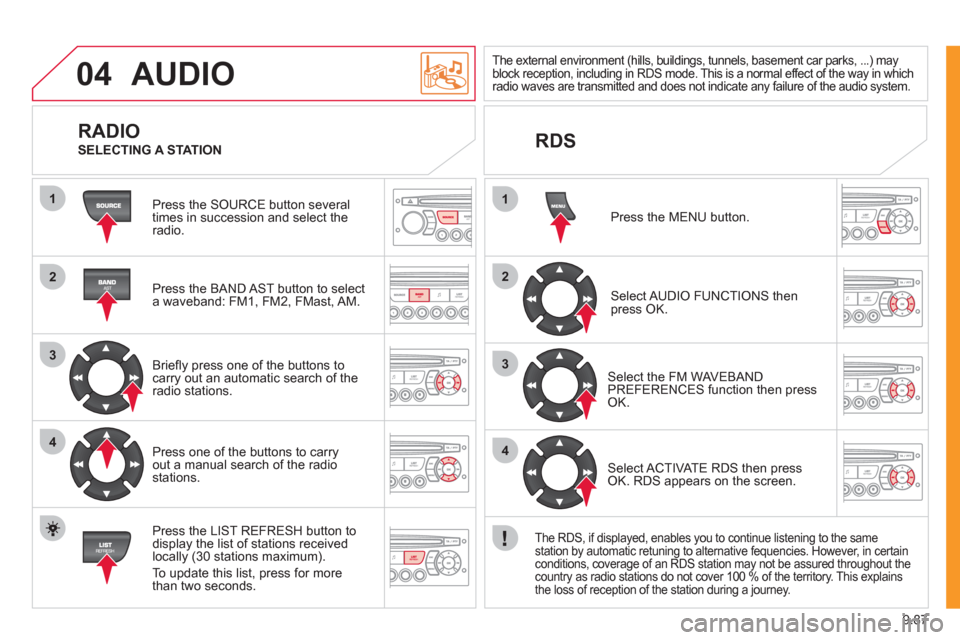
AUDIO
Press the SOURCE button several
times in succession and select theradio.
Press the BAND A
ST button to select
a waveband: FM1, FM2, FMast, AM.
Briefl
y press one of the buttons tocarry out an automatic search of theradio stations.
Press one o
f the buttons to carry out a manual search of the radio stations.
Press the LI
ST REFRESH button to
display the list of stations received
locally (30 stations maximum).
To update this list, press for more
t
han two seconds.
The external environment (hills, buildings, tunnels, basement car parks, ...) may
block reception, including in RDS mode. This is a normal effect of the way in whichradio waves are transmitted and does not indicate any failure of the audio system.
RDS
RADIO
SELECTING A STATION
Pr
ess the MENU button.
Select AUDIO FUNCTIONS thenpress OK.
Select the FM WAVEBANDPREFERENCES function then pressOK.
Select ACTIVATE RDS then pressOK. RDS appears on the screen.
The RDS, if displayed, enables you to continue listening to the same station by automatic retuning to alternative fequencies. However, in certain conditions, coverage of an RDS station may not be assured throughout the country as radio stations do not cover 100 % of the territory. This explains
the loss of reception of the station during a journey.
Page 234 of 260

9.90
05
1
1
2
3
USB BOX
The system puts together playlists (temporary memory) createdover a period which depends on the capacity of the USB device.
The other sources are available durin
g this time.
The pla
ylists are updated each time the ignition is switched off or each time a USB memory stick is connected.
When connectin
g for the fi rst time, the classifi cation suggested
is by folder. When you reconnect, the classifi cation selected
previously is retained.
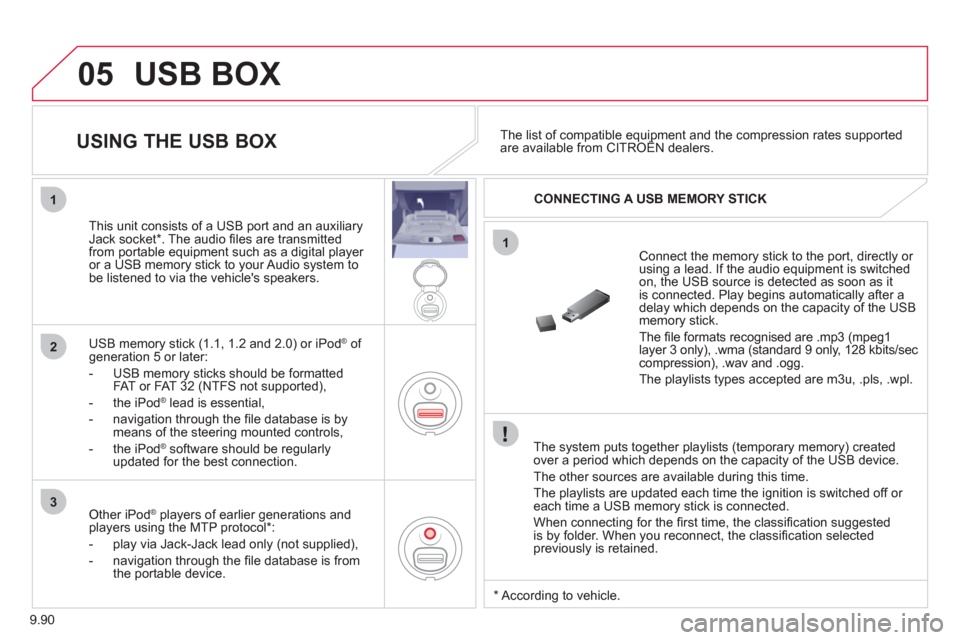
Connect the memory stick to the port, directly or using a lead. If the audio equipment is switched
on, the USB source is detected as soon as it
is connected. Play begins automatically after a
delay which depends on the capacity of the USB memory stick.
The fi le formats reco
gnised are .mp3 (mpeg1layer 3 only), .wma (standard 9 only, 128 kbits/seccompression), .wav and .ogg.
The playlists types accepted are m
3u, .pls, .wpl.
This unit consists o
f a USB port and an auxiliaryJack socket * . The audio fi les are transmitted
from portable equipment such as a digital player
or a USB memory stick to your Audio system tobe listened to via the vehicle's speakers.
U
SB memory stick (1.1, 1.2 and 2.0) or iPod ®of generation 5 or later:
- USB memor
y sticks should be formattedFAT or FAT 32 (NTFS not supported),
- t
he iPod®
lead is essential, ®
- navigation through the fi le database is bymeans of the steering mounted controls,
- th
e iPodÆ
software should be regularlyÆ
updated for the best connection.
The list of compatible equipment and the compression rates supported are available from CITROÀN dealers. pqpp
USING THE USB BOX
CONNECTING A USB MEMORY STICK
Other iPod®
players of earlier generations and®
players using the MTP protocol * :
- pla
y via Jack-Jack lead only (not supplied),
- navi
gation through the fi le database is from
the portable device.
*
Accordin
g to vehicle.
Page 237 of 260

9.93
06
1
2
3
4
5
6
7
8
9
10
BLUETOOTH FUNCTIONS
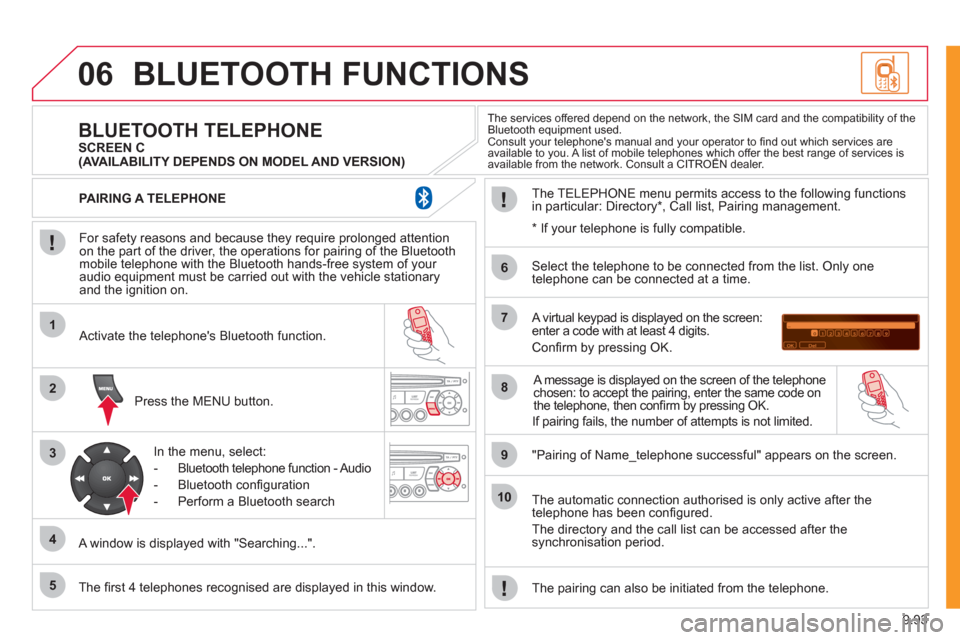
For safety reasons and because they require prolonged attentionon the part of the driver, the operations for pairing of the Bluetooth mobile telephone with the Bluetooth hands-free system of your
audio equipment must be carried out with the vehicle stationary
and the ignition on.
Press the MENU button.
A window is displa
yed with "Searching...".
Activate the telephone's Bluetooth
function.
In the menu, select:
- Bluetooth tele
phone function - Audio
- Bluetooth confi
guration
- P
erform a Bluetooth search
The services offered depend on the network, the SIM card and the compatibility of theBluetooth equipment used.
Consult your telephone's manual and your operator to fi nd out which services are available to you. A list of mobile telephones which offer the best range of services isavailable from the network. Consult a CITROËN dealer. yp
BLUETOOTH TELEPHONE SCREEN C
The TELEPH
ONE menu permits access to the following functions
in particular: Directory * , Call list, Pairing management.
The fi rst 4 telephones reco
gnised are displayed in this window.
A virtual keypad is displayed on the screen: enter a code with at least 4 digits.
Confi rm by pressing OK.
"Pairin
g of Name_telephone successful" appears on the screen.
Select the telephone to be connected from the list.
Only one
telephone can be connected at a time.
A messa
ge is displayed on the screen of the telephone chosen: to accept the pairing, enter the same code on
the telephone, then confi rm by pressing OK.
The automatic connection authorised is onl
y active after the
telephone has been confi gured.
The directory and the call list can be accessed a
fter thesynchronisation period.
PAIRING A TELEPHONE
The pairin
g can also be initiated from the telephone.
(AVAILABILITY DEPENDS ON MODEL AND VERSION)
* If
your telephone is fully compatible.
If pairin
g fails, the number of attempts is not limited.
Page 238 of 260

9.94
06
2
1
2
2
3
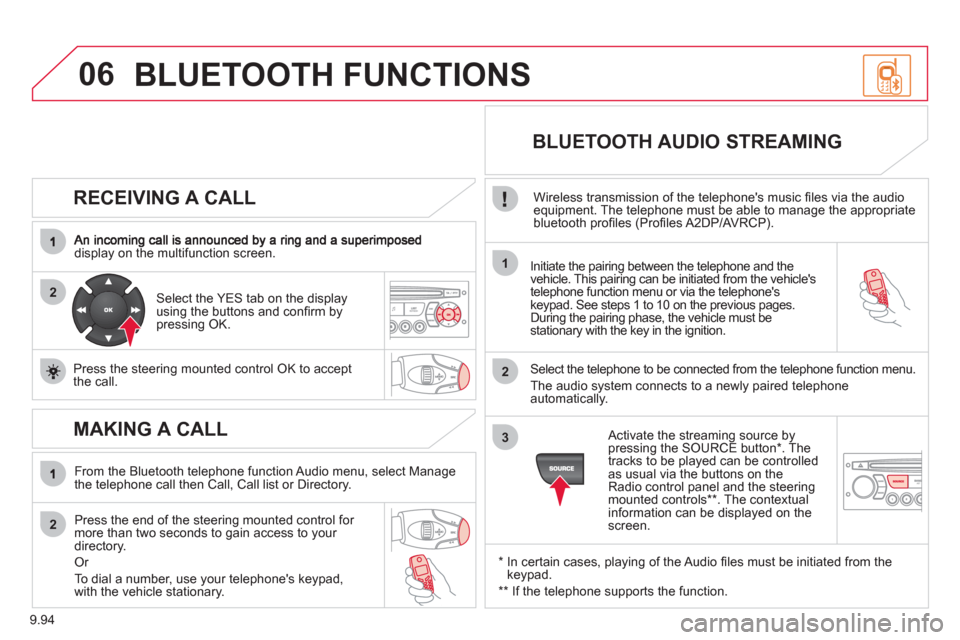
RECEIVING A CALL
display on the multifunction screen.Initiate the pairing between the telephone and the
vehicle. This pairing can be initiated from the vehicle's
telephone function menu or via the telephone'skeypad. See steps 1 to 10 on the previous pages.
During the pairing phase, the vehicle must be stationary with the key in the ignition.
Select the tele
phone to be connected from the telephone function menu.
The audio s
ystem connects to a newly paired telephone automatically.
Select the YES tab on the display
using the buttons and confi rm bypressing OK.
Press the steerin
g mounted control OK to accept
the call.
BLUETOOTH AUDIO STREAMING
Wireless transmission of the telephone's music fi les via the audio equipment. The telephone must be able to manage the appropriate
bluetooth profi les (Profi les A2DP/AVRCP).
*
In certain cases, playing of the Audio fi les must be initiated from the keypad.
**
If the tele
phone supports the function.
Activate the streamin
g source by
pressing the SOURCE button * . The
tracks to be played can be controlled as usual via the buttons on theRadio control panel and the steering
mounted controls ** . The contextual
information can be displayed on the screen.
MAKING A CALL
From the Bluetooth telephone function Audio menu, select Manage
the telephone call then Call, Call list or Directory.
Press the end o
f the steering mounted control for more than two seconds to gain access to your
directory.
Or
To dial a number, use
your telephone's keypad,with the vehicle stationary.
BLUETOOTH FUNCTIONS
Page 248 of 260

9.104
QUESTIONANSWERSOLUTION
The stored stations donot function (no sound, 87.5 Mhz is displayed...).
An incorrect waveband is selected.
Press the BAND AST button to return to the waveband (AM, FM1, FM2, FMAST) on which thestations are stored.
The traffi c announcement(TA) is displayed. I donot receive any traffi c information.
The radio station is not part of the regional traffi c information network.
Tune to a radio station which broadcasts traffi c information.
The quality of receptionof the radio station listened to graduallydeteriorates or the stored stations do not function(no sound, 87.5 Mhz is displayed...).
The vehicle is too far from the transmitter used by the station listenedto or there is no transmitter in the geographical area through which the vehicle is travelling.
Activate the RDS function to enable the system to check whether there is a more powerful transmitter in the geographical area.
The environment (hills, buildings, tunnels, basement car parks...) block reception, including in RDS mode. This phenomenon is normal and does not indicate a failure of the audio equipment.
The aerial is absent or has been damaged (for example when goingthrough a car wash or into an underground car park).
Have the aerial checked by a CITROËN dealer.
Sound cut-outs of 1 to2 seconds in radio mode.During this brief sound cut-out, the RDS searches for any frequency permitting better reception of the station.
Deactivate the RDS function if the phenomenon is too frequent and always on the same route.
With the engine off, the audio equipment switches off after a few minutes of use.
When the engine is switched off, the audio equipment operating timedepends on the battery charge.
The switch-off is normal: the audio equipment switches to economy mode and switches off to prevent discharging of the vehicle's battery.
Start the vehicle's engine to increase the batterycharge.
The message "the audio system is overheated" appears on the display.
In order to protect the installation if the surrounding temperature is toohigh, the audio equipment switches to an automatic thermal protectionmode leading to a reduction of the volume or stopping of the playing of the CD.
Switch the audio system off for a few minutes toallow the system to cool.
Page 250 of 260

144
Instruments and controls
Headlamp beam height adjustment 44
Starter, ignition 41
Wiper controls 45-46
Automatic wiping 45
Windscreen/headlamp wash 45
Trip computer Section 9
Cruise control 47-49
Fixed speed limiter 49
Speed limiter 50-52
Steering mounted controls:
- NaviDrive Section 9
- MyWay Section 9
- Audio system Section 9
Lighting controls 42-43
Automatic illumination of headlamps 44
Foglamps 43
Daytime running lamps 43
Opening the bonnet 102
Parking brake 82
Electric windows,
electric mirrors 79-81
Instrument panels, screens, speedometers 26-27
Warning lamps, indicator lamps 28-33
Indicators, gauge 34-36
Setting the time in the instrument panel 27
Dashboard lighting dimmer 36
Gear shift indicator 37
Steering wheel adjustment 41
Horn 84
Page 252 of 260

146
Interior
Rear view mirror 80
Toll cards, car park tickets 71
Front courtesy lamp 71
Changing courtesy
lamp bulbs 123
Rear suspension 76-78 Front, lateral airbags 89-92
Passenger's airbag deactivation 92
Parking brake,
handbrake 82
Opening the bonnet 102
Battery, charging, starting 113
Passenger compartment fuses 128 Front seats, adjustments,
head rests 64-65
2-seat front bench 66-67
Seat belts 86-87
Child seats 93-97
Rear courtesy lamp 71
Changing courtesy
lamp bulbs 123
Accessories 100-101
Towing, towbar,
converter's fuses 130
Platform cab fuses 126, 130 Load space 73-74, 100
- stowing rings,
- load retainer,
- roof box,
- trim,
- 12 volt socket,
- ladder separation or partition,
- stowing rail support,
- internal rack.
Temporary puncture repair kit 114
Spare wheel, jack,
changing a wheel, tools 116-120
Page 253 of 260

Technical data - Maintenance
VISUAL SEARCH
10
TECHNICAL DATA - MAINTENANCE
Identifi cation markingss, serial number,
paint code, tyres 142
Engine fuses 129
Windscreen/headlamp wash, levels 106
Bulbs, lighting,
changing bulbs 121-125
Opening the bonnet, stay 102 Warning lamps 28-33
Changing a wiper blade 131
Under the bonnet
- Diesel 103
- petrol 104
Fuel cut-off,
Diesel priming 111-112
Engine technical data 141
Van dimensions 134-137
Platform cab dimensions 138-139
Weights 140
Model code 148 Checks 107-108
- battery,
- gearbox,
- carbon/passenger compartment fi lter,
- oil fi lter,
- particle emission fi lter,
- parking brake,
- brake pads,
- brake drums, discs.
Emissions controls (EOBD) 35 Water bleeding, Diesel fi lter 108 Levels 105-106
- Diesel additive,
- dipstick,
- power steering fl uid,
- brake fl uid,
- coolant,
- screen and headlamp wash fl uid.
Towing, lifting 132-133
Towed loads 140