Page 165 of 260
9.21
05
1
2
3
5
6
7
8
4
TRAFFIC INFORMATION
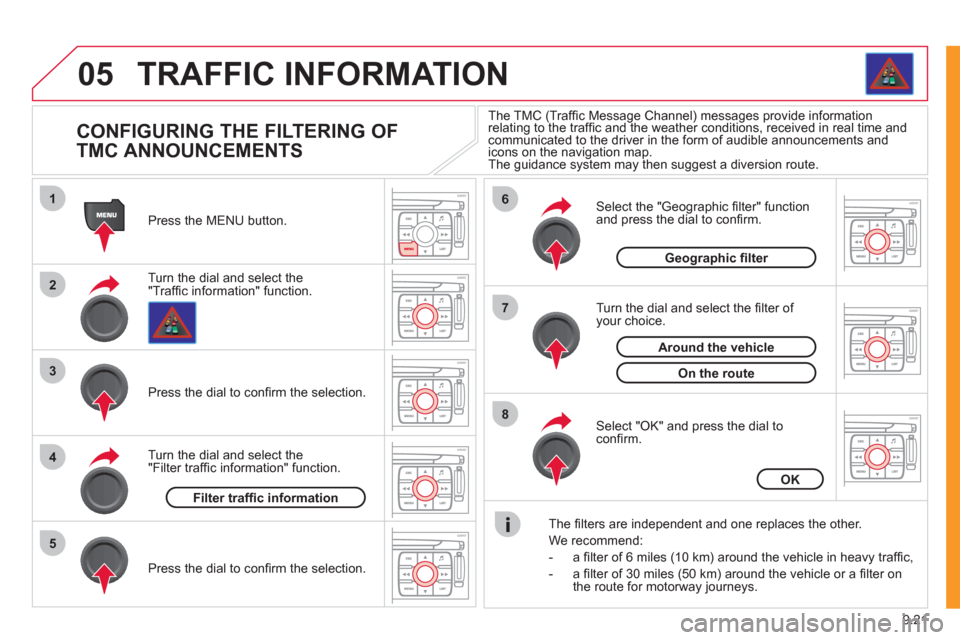
CONFIGURING THE FILTERING OF
TMC ANNOUNCEMENTS
Turn the dial and select the "Traffi c information" function. Press the MENU button.
Pr
ess the dial to confi rm the selection.
Turn the dial and select the "Filter traffi c information" function.
T
urn the dial and select the fi lter of your choice.
Select the "Geo
graphic fi lter" function
and press the dial to confi rm.
The
fi lters are independent and one replaces the other.
W
e recommend:
- a fi lter of 6 miles
(10 km) around the vehicle in heavy traffi c,
- a fi lter of 30 miles
(50 km) around the vehicle or a fi lter on
the route for motorway journeys.
Select "OK" and press the dial toconfi rm. The TMC
(Traffi c Message Channel) messages provide informationrelating to the traffi c and the weather conditions, received in real time and communicated to the driver in the form of audible announcements andicons on the navigation map.
The guidance system may then suggest a diversion route.
Pr
ess the dial to confi rm the selection.
Filter traffi c information
OK
Geographic fi lter
On the route
Around the vehicle
Page 166 of 260
9.22
05
1
2
3
4
5
6
8
7
TRAFFIC INFORMATION
CONFIGURING THE DISPLAY OF TMC
MESSAGES
Turn the dial and select the "Traffi cinformation" function. Press the MENU button.
Turn the dial and select the "Confi
gure
message announcement" function. Pr
ess the dial to confi rm the selection.
Select the "Read messages" tab.
Pr
ess the dial to confi rm the selection.
Select "OK" and press the dial to confi rm.
The Tra
ffi c Information Messages will
be read by the voice synthesiser.
Select the "New messa
ge display" tab.
The traffi c information messa
gesare extended to the fi lters selected (geographic...) and can also be displayed when guidance is not active. We recommend that
you do not select the "New message display" tab for regions with heavy traffi c.
Confi gure message announcementOK
Read messages
New message display
Page 167 of 260
9.23
06
1
2
4
3
1
2
4
3
AUDIO/VIDEO
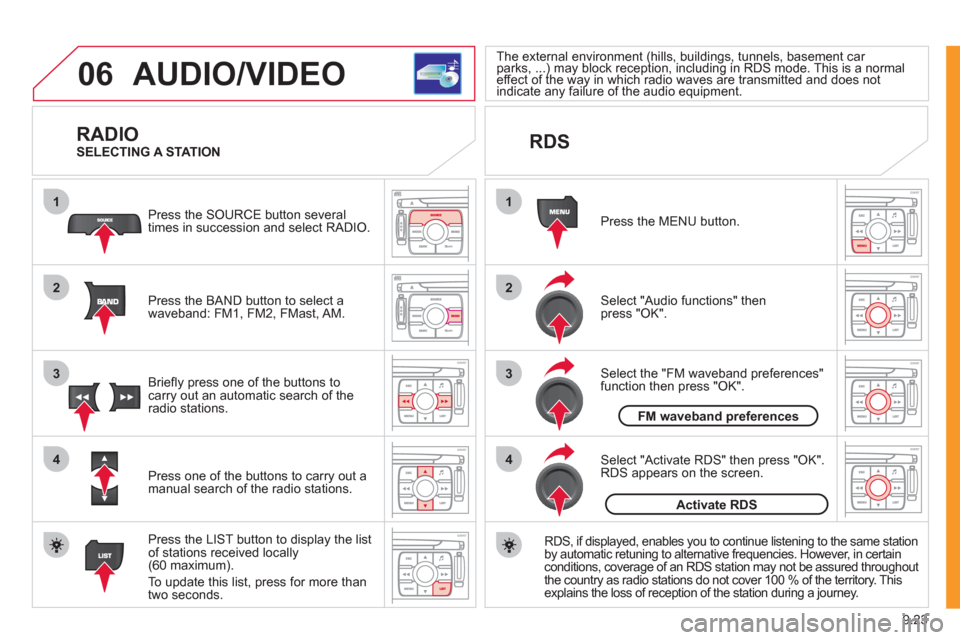
RADIO
Press the BAND button to select awaveband: FM1, FM2, FMast, AM. Pr
ess the SOURCE button several
times in succession and select RADIO.
Press the LIST button to displa
y the list
of stations received locally(60 maximum).
To update this list, press for more than
tw
o seconds.
Press one of the buttons to carr
y out a
manual search of the radio stations. Brie
fl y press one of the buttons tocarry out an automatic search of the radio stations.
RDS
Select "Audio functions" then press "OK".
Press the MENU button.
RD
S, if displayed, enables you to continue listening to the same station
by automatic retuning to alternative frequencies. However, in certain conditions, coverage of an RDS station may not be assured throughout
the country as radio stations do not cover 100 % of the territory. Thisexplains the loss of reception of the station during a journey.
Select "Activate RDS" then press "OK". RDS appears on the screen.
Select the "FM waveband preferences" function then press "OK".
The external environment (hills, buildings, tunnels, basement car parks, ...) may block reception, including in RDS mode. This is a normal(g(g
effect of the way in which radio waves are transmitted and does notp)y p g)y p g
indicate any failure of the audio equipment. yy
SELECTING A STATION
FM waveband preferences
Activate RDS
Page 169 of 260
9.25
06
1
2
1
AUDIO/VIDEO
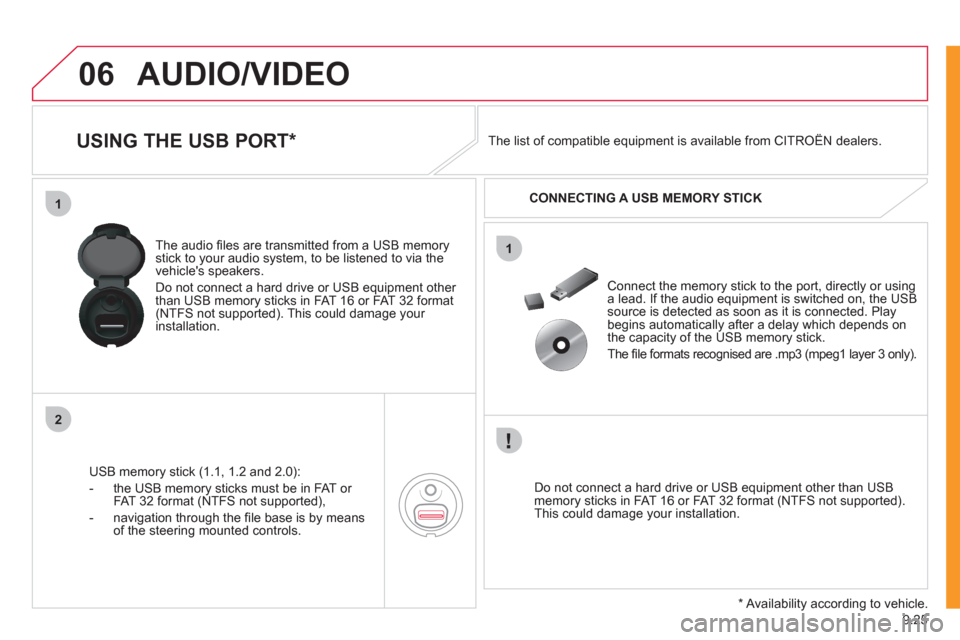
USING THE USB PORT *
USB memory stick (1.1, 1.2 and 2.0):
- the U
SB memory sticks must be in FAT or
FAT 32 format (NTFS not supported),
- navi
gation through the fi le base is by means of the steering mounted controls. The audio
fi les are transmitted from a USB memorystick to your audio system, to be listened to via the
vehicle's speakers.
Do not connect a hard drive or USB e
quipment other
than USB memory sticks in FAT 16 or FAT 32 format (NTFS not supported). This could damage your installation.
Do not connect a hard drive or USB e
quipment other than USB memory sticks in FAT 16 or FAT 32 format (NTFS not supported).This could damage your installation.
Connect the memor
y stick to the port, directly or using a lead. If the audio equipment is switched on, the USB source is detected as soon as it is connected. Play
begins automatically after a delay which depends on
the capacity of the USB memory stick.
The
fi le formats recognised are .mp3 (mpeg1 layer 3 only). The list of compatible equipment is available from CITRO
ÀN dealers.
CONNECTING A U
SB MEMORY STICK
*
Availability according to vehicle.
Page 171 of 260
9.27
06
1
2
4
3
6
5
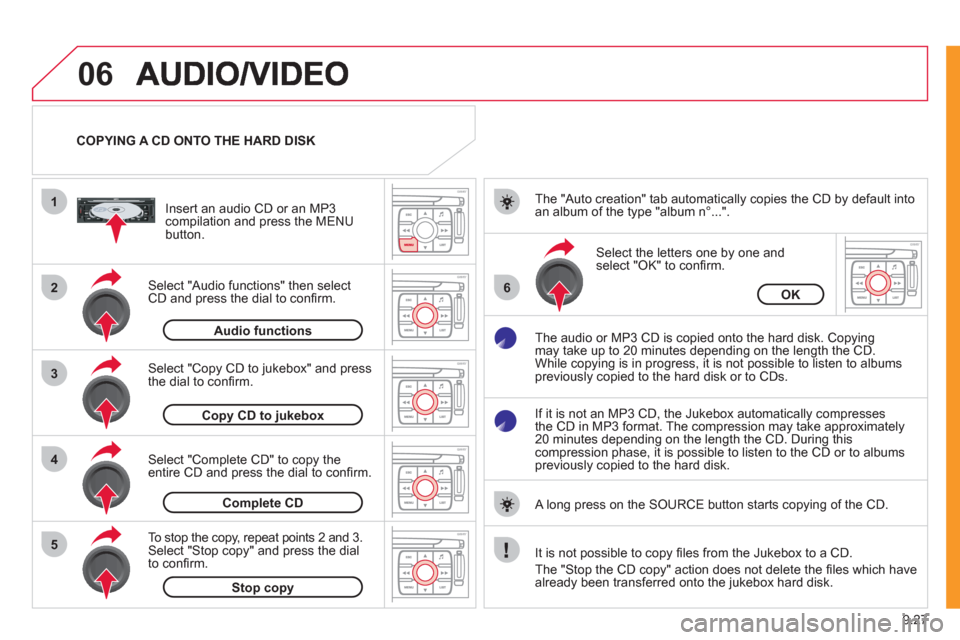
COPYING A CD ONTO THE HARD DISK
Select "Audio functions" then select
CD and press the dial to confi rm.
Insert an audio
CD or an MP3compilation and press the MENU button.
Select "Copy CD to jukebox" and press
the dial to confi rm.
Select the letters one b
y one and select "OK" to confi rm.
The "Auto creation" tab automaticall
y copies the CD by default into
an album of the type "album n∞...".
The audio or MP3
CD is copied onto the hard disk. Copying
may take up to 20 minutes depending on the length the CD.
While copying is in progress, it is not possible to listen to albums
previously copied to the hard disk or to CDs.
If it is not an MP3 CD, the Jukebox automaticall
y compresses
the CD in MP3 format. The compression may take approximately
20 minutes depending on the length the CD. During thiscompression phase, it is possible to listen to the CD or to albums
previously copied to the hard disk.
A lon
g press on the SOURCE button starts copying of the CD.
Audiofunctions
OK
Copy CD to jukebox
Select "Complete CD" to copy the entire CD and press the dial to confi rm.
Complete CD
To stop the cop
y, repeat points 2 and 3.Select "Stop copy" and press the dial
to confi rm.
Stop copy
It is not possible to copy fi les from the Jukebox to a CD.
The "
Stop the CD copy" action does not delete the fi les which have
already been transferred onto the jukebox hard disk.
Page 176 of 260
9.32
07
1
2
1
2
3
INTERNAL TELEPHONE
Install the SIM card in
the holder and then
insert it in the slot.
Open the holder by pressing the buttonusing the tip of a pen.
Your
SIM card must be installed and removed with the NaviDrive
audio and telematics system switched off and the ignition off.
To remove the
SIM card, repeat step 1.
Confi rm the PIN code by pressing the # button.
Enter the PIN code on the ke
ypad.
When enterin
g your PIN code, tick the "Store PIN" tab to gain
access to the telephone without having to enter this code when it is
used subsequently.
INSTALLING YOUR SIM CARD
(NOT SUPPLIED)
ENTERING THE PIN CODE
PINcode
Page 177 of 260
9.33
07
1
2
3
4
INTERNAL TELEPHONE
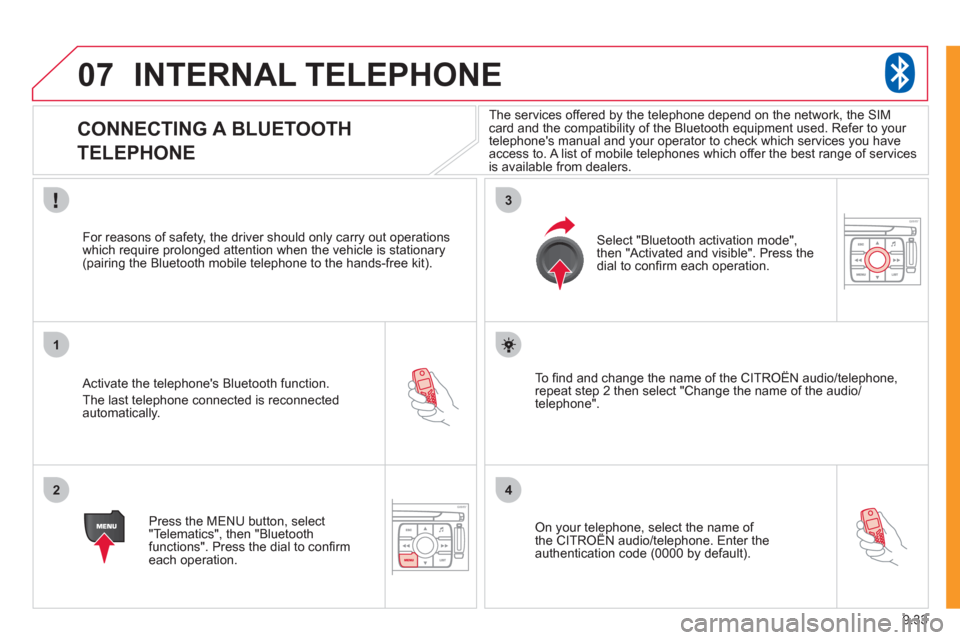
CONNECTING A BLUETOOTH
TELEPHONE
Activate the telephone's Bluetooth function.
The last telephone connected is reconnectedautomatically.
For reasons o
f safety, the driver should only carry out operations
which require prolonged attention when the vehicle is stationary (pairing the Bluetooth mobile telephone to the hands-free kit).
Press the MENU button, select
"Telematics", then "Bluetoothfunctions". Press the dial to confi rmeach operation.
To fi nd and chan
ge the name of the CITROËN audio/telephone,
repeat step 2 then select "Change the name of the audio/
telephone".
Select "Bluetooth activation mode"
,
then "Activated and visible". Press thedial to confi rm each operation.
On your telephone, select the name of the CITROÀN audio/telephone. Enter the yp,
authentication code (0000 by default).
The services offered b
y the telephone depend on the network, the SIM card and the compatibility of the Bluetooth equipment used. Refer to your
telephone's manual and your operator to check which services you have
access to. A list of mobile telephones which offer the best range of services
is available from dealers.
Page 187 of 260
9.43
10
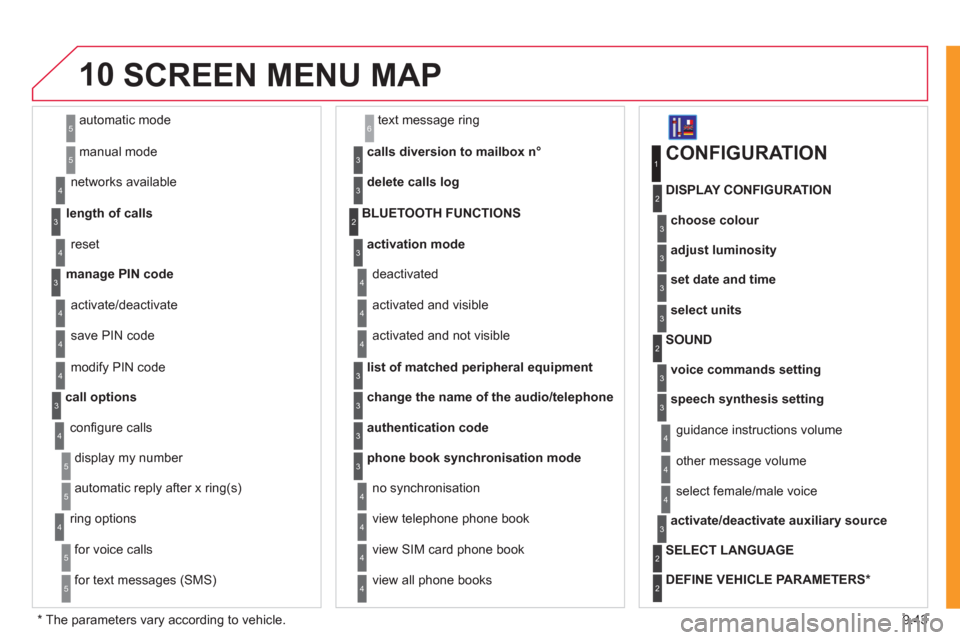
automatic mode
manual mode
5
5
length of calls n
etworks available
3
4
reset 4
manage PIN code3
activate/deactivate
save PIN code 4
4
modify PIN code 4
call options3
confi gure calls
display my number
automatic repl
y after x ring(s)
5
5
4
ring options
for voice calls
for text messa
ges (SMS)
5
5
4
calls diversion to mailbox n°
text message ring 6
3
delete calls log3
activation mode3
BLUETOOTH FUNCTIONS2
deactivated
activated and visible
activated and not visible
4
4
4
list of matched peripheral equipment3
change the name of the audio/telephone3
authentication code3
phone book synchronisation mode3
no synchronisation
view telephone phone book
view
SIM card phone book
4
4
4
view all phone books 4
CONFIGURATION
choose colour
DISPLAY CONFIGURATION
1
2
3
adjust luminosity3
set date and time3
select units3
voice commands setting
SOUND2
3
speech synthesis setting3
guidance instructions volume
ot
her message volume
4
4
select female/male voice 4
activate/deactivate auxiliary source3
SELECT LANGUAGE2
DEFINE VEHICLE PARAMETERS *
2
SCREEN MENU MAP
*
The parameters vary according to vehicle.