2011 CHRYSLER TOWN AND COUNTRY oil change
[x] Cancel search: oil changePage 107 of 573
5. Following the child seat manufacturer’s instructions,
tighten the child restraint tether strap.
6. Inspect the tether anchor strap for nicks, abrasions,
discoloration, and loose threads. If these, or any other
condition that might affect the performance of the strap is
observed, DO NOT USE. Contact your authorized deal-
ership for a replacement part.
WARNING!
The vehicle tether anchor is designed to be used with
a child restraint only. It should not be used for any
other purpose. Before use, inspect the tether anchor
strap for nicks, abrasions, discoloration, and loose
threads. If these or any other condition that might
affect the performance of the strap is observed, DO
NOT USE that strap. Personal injury may result.
Contact your authorized dealership for a replacement
part.
ENGINE BREAK-IN RECOMMENDATIONS
A long break-in period is not required for the engine and
drivetrain (transmission and axle) in your vehicle.
Drive moderately during the first 300 miles (500 km).
After the initial 60 miles (100 km), speeds up to 50 or
55 mph (80 or 90 km/h) are desirable.
While cruising, brief full-throttle acceleration within the
limits of local traffic laws contributes to a good break-in.
Wide-open throttle acceleration in low gear can be detri-
mental and should be avoided.
The engine oil installed in the engine at the factory is a
high-quality energy conserving type lubricant. Oil
changes should be consistent with anticipated climate
conditions under which vehicle operations will occur. For
the recommended viscosity and quality grades, refer to
“Maintenance Procedures” in “Maintaining Your Ve-
hicle”. NON-DETERGENT OR STRAIGHT MINERAL
OILS MUST NEVER BE USED.
104 THINGS TO KNOW BEFORE STARTING YOUR VEHICLE
Page 109 of 573
Exhaust Gas
WARNING!
Exhaust gases can injure or kill. They contain carbon
monoxide (CO), which is colorless and odorless.
Breathing it can make you unconscious and can
eventually poison you. To avoid breathing (CO),
follow these safety tips:
Do not run the engine in a closed garage or in confined
areas any longer than needed to move your vehicle in or
out of the area.
If it is necessary to sit in a parked vehicle with the engine
running, adjust your heating or cooling controls to force
outside air into the vehicle. Set the blower at high speed. If you are required to drive with the liftgate open, make
sure that all windows are closed and the climate control
BLOWER switch is set at high speed. DO NOT use the
recirculation mode.
The best protection against carbon monoxide entry into
the vehicle body is a properly maintained engine exhaust
system.
Whenever a change is noticed in the sound of the exhaust
system, when exhaust fumes can be detected inside the
vehicle, or when the underside or rear of the vehicle is
damaged, have a competent mechanic inspect the com-
plete exhaust system and adjacent body areas for broken,
damaged, deteriorated, or mispositioned parts. Open
seams or loose connections could permit exhaust fumes
to seep into the passenger compartment. In addition,
inspect the exhaust system each time the vehicle is raised
for lubrication or oil change. Replace as required.
106 THINGS TO KNOW BEFORE STARTING YOUR VEHICLE
Page 258 of 573
6. Compass Mini-Trip Computer (CMTC) or Electronic
Vehicle Information Center (EVIC) Display —
If Equipped
Odometer
The odometer display shows the total distance the ve-
hicle has been driven.
U.S. Federal regulations require that upon transfer of
vehicle ownership, the seller certify to the purchaser the
correct mileage that the vehicle has been driven. If your
odometer needs to be repaired or serviced, the repair
technician should leave the odometer reading the same
as it was before the repair or service. If s/he cannot do so,
then the odometer must be set at zero, and a sticker must
be placed in the door jamb stating what the mileage was
before the repair or service. It is a good idea for you to
make a record of the odometer reading before the repair/
service, so that you can be sure that it is properly reset, or
that the door jamb sticker is accurate if the odometer
must be reset at zero.Message Display Area
When the appropriate conditions exist, the following
odometer messages will display:
door
............................. Door Ajar
gATE ........................... Liftgate Ajar
LoW tirE ..................... LowTirePr essure
gASCAP ....................... Fuel Cap Fault
noFUSE .......................... Fuse Fault
CHAngE OIL ............... Oil Change Required
CRUISE ..................... Cruise Control On
LoCOOL ........................ Low Coolant
LoWASH .................... LowW asher Fluid
NOTE: Some of the above warnings will be displayed in
the Electronic Vehicle Information Center Display Area
located in the instrument cluster.
Refer to ”Electronic Vehicle Information Center (EVIC)
Display — If Equipped” for further information.
4
UNDERSTANDING YOUR INSTRUMENT PANEL 255
Page 259 of 573
LoW tirE
When the appropriate condition exists, the odometer
display will toggle between LoW and tirE for three cycles.
gASCAP
If the vehicle diagnostic system determines that the fuel
filler cap is loose, improperly installed, or damaged, a
“gASCAP” message will display in the odometer display
area. Tighten the fuel filler cap properly and press the
TRIP ODOMETER button to turn off the message. If the
problem continues, the message will appear the next time
the vehicle is started.
noFUSE
If the vehicle diagnostic system determines that the
Ignition Off Draw (IOD) fuse is improperly installed, or
damaged, a “noFUSE” message will display in the odom-
eter display area. For further information on fuses and
fuse locations refer to “Fuses” in “Maintaining Your
Vehicle”.CHAngE OIL
Your vehicle is equipped with an engine oil change
indicator system. The
CHAngE OILmessage will flash in
the instrument cluster odometer for approximately
12 seconds, after a single chime has sounded, to indicate
the next scheduled oil change interval. The engine oil
change indicator system is duty cycle-based, which
means the engine oil change interval may fluctuate
dependent upon your personal driving style.
Unless reset, this message will continue to display each
time you turn the ignition switch to the ON/RUN
position. To turn off the message temporarily, press and
release the Trip / Odometer Display reset button on the
instrument cluster. To reset the oil change indicator
system (after performing the scheduled maintenance),
perform the following steps.
1. Turn the ignition switch to the ON/RUN position (do
not start the engine).
256 UNDERSTANDING YOUR INSTRUMENT PANEL
Page 260 of 573
2. Fully depress the accelerator pedal, slowly, three times
within 10 seconds.
3. Turn the ignition switch to the OFF/LOCK position.
NOTE:If the indicator message illuminates when you
start the engine, the oil change indicator system did not
reset. If necessary, repeat these steps.
Compass Mini-Trip Computer (CMTC) Display —
If Equipped
On vehicles equipped with Compass Mini-Trip Com-
puter (CMTC), the display provides the outside tempera-
ture, one of eight compass headings to indicate the
direction the vehicle is facing, and the current radio
station. For further information, refer to “Compass Mini-
Trip Computer”. Electronic Vehicle Information Center (EVIC)
Display — If Equipped
The Electronic Vehicle Information Center (EVIC) fea-
tures a driver-interactive display that is located in the
instrument cluster. For further information, refer to
“Electronic Vehicle Information Center (EVIC)”.
7. Anti-Lock Brake (ABS) Light
This light monitors the Anti-Lock Brake System
(ABS). The light will turn on when the ignition
switch is turned to the ON/RUN position and
may stay on for as long as four seconds.
If the ABS light remains on or turns on while driving, it
indicates that the Anti-Lock portion of the brake system
is not functioning and that service is required. However,
the conventional brake system will continue to operate
normally if the BRAKE warning light is not on.
4
UNDERSTANDING YOUR INSTRUMENT PANEL 257
Page 277 of 573
•Remote start active — Push Start Button
•Remote start active — Key to Run
•Wrong Key
•Damaged Key
•Key not programmed
•Vehicle Not in Park
•Key Left Vehicle
•Key Not Detected
•Press Brake Pedal and Push Button to Start
•Door(s) Ajar (with a single chime, if vehicle is in
motion)
•Liftgate Ajar (chime will sound when vehicle starts
moving)
•Low Tire Pressure
•Service TPM System (refer to “Tire Pressure Monitor-
ing System” in “Starting And Operating”)
•Turn Signal On
•RKE Battery Low
•Service Keyless System
•LOW WASHER FLUID
•Oil Change Required
•Check Gascap
•Left Front Turn Signal Light Out
•Left Rear Turn Signal Light Out
•Right Front Turn Signal Light Out
•Right Rear Turn Signal Light Out
•Park Assist Disabled
274 UNDERSTANDING YOUR INSTRUMENT PANEL
Page 282 of 573
WARNING!
If the Transmission Temperature Warning Light is
illuminated and you continue operating the vehicle,
in some circumstances you could cause the fluid to
boil over, come in contact with hot engine or exhaust
components and cause a fire.
Oil Change Required
Your vehicle is equipped with an engine oil change
indicator system. TheOil Change Required message will
flash in the EVIC display for approximately 10 seconds,
after a single chime has sounded, to indicate the next
scheduled oil change interval. The engine oil change
indicator system is duty-cycle based, which means the
engine oil change interval may fluctuate dependent upon
your personal driving style. Unless reset, this message will continue to display each
time you turn the ignition switch to the ON/RUN
position or cycle the ignition to the ON/RUN position if
equipped with Keyless Enter-N-Go. To turn off the
message temporarily, press and release the MENU but-
ton. To reset the oil change indicator system (after
performing the scheduled maintenance) refer to the fol-
lowing procedure.
Vehicles Equipped With Keyless Enter-N-Go
1. Without pressing the brake pedal, push the ENGINE
START/STOP button and cycle the ignition to the ON/
RUN position (Do not start the engine.)
2. Fully depress the accelerator pedal, slowly, three times
within 10 seconds.
3. Without pressing the brake pedal, push the ENGINE
START/STOP button once to return the ignition to the
OFF/LOCK position.
4
UNDERSTANDING YOUR INSTRUMENT PANEL 279
Page 283 of 573
Vehicles Not Equipped With Keyless Enter-N-Go
1. Turn the ignition switch to the ON/RUN position (Do
not start the engine.)
2. Fully depress the accelerator pedal, slowly, three times
within 10 seconds.
3. Turn the ignition switch to the OFF/LOCK position.
NOTE:If the indicator message illuminates when you
start the engine, the oil change indicator system did not
reset. If necessary, repeat these steps.
Fuel Economy
Press and release the UP or DOWN button until “Fuel
Economy” displays highlighted in the EVIC and press
the SELECT button. The following Fuel Economy func-
tions display in the EVIC:
•Average Fuel Economy
•Distance To Empty (DTE)
•Miles Per Gallon (MPG)
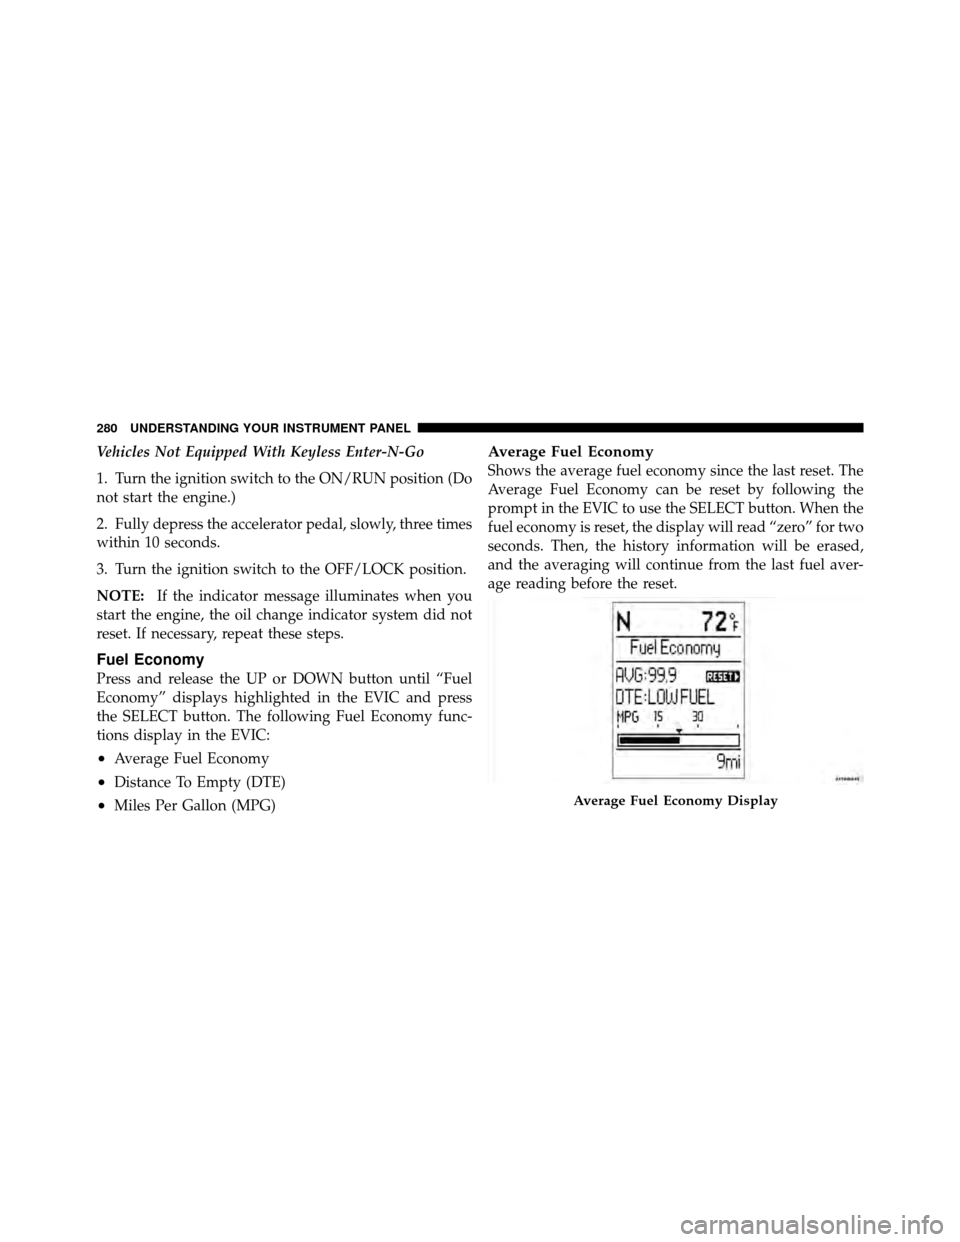
Average Fuel Economy
Shows the average fuel economy since the last reset. The
Average Fuel Economy can be reset by following the
prompt in the EVIC to use the SELECT button. When the
fuel economy is reset, the display will read “zero” for two
seconds. Then, the history information will be erased,
and the averaging will continue from the last fuel aver-
age reading before the reset.
Average Fuel Economy Display
280 UNDERSTANDING YOUR INSTRUMENT PANEL