Page 116 of 573
▫Headlights On With Wipers — If Equipped . . 171
▫ Headlight Delay — If Equipped .......... 171
▫ Daytime Running Lights — If Equipped .... 172
▫ Front Fog Lights — If Equipped .......... 173
▫ Battery Protection .................... 173
▫ Multifunction Lever .................. 173
▫ Turn Signals ........................ 174
▫ High/Low Beam Switch ............... 174
▫ Flash-To-Pass ....................... 174
▫ Smartbeam™ — If Equipped ............ 175
� Windshield Wipers And Washers .......... 176
▫ Mist, Front Wiper And Washer ........... 176
▫ Intermittent, Low And High Speed Wipers . . 177 ▫
Rear Wiper And Washer ............... 177
▫ Rain Sensing Wipers — If Equipped ....... 178
� Tilt/Telescoping Steering Column .......... 180
� Heated Steering Wheel — If Equipped ...... 181
� Adjustable Pedals — If Equipped .......... 182
� Electronic Speed Control — If Equipped ..... 183
▫ To Activate ......................... 184
▫ To Set A Desired Speed ................ 185
▫ To Deactivate ....................... 185
▫ To Resume Speed .................... 185
▫ To Vary The Speed Setting .............. 185
▫ To Accelerate For Passing .............. 186
3
UNDERSTANDING THE FEATURES OF YOUR VEHICLE 113
Page 171 of 573
CAUTION!
To prevent possible damage, do not slam the hood to
close it. Lower the hood until it is open approxi-
mately 12 in (30 cm) and then drop it. This should
secure both latches. Never drive your vehicle unless
the hood is fully closed, with both latches engaged.
WARNING!
Be sure the hood is fully latched before driving your
vehicle. If the hood is not fully latched, it could open
when the vehicle is in motion and block your vision.
Failure to follow this warning could result in serious
injury or death.
LIGHTS
All of the lights, except the Hazard Warning lights,
headlight high beams and flash-to-pass, are controlled by
switches to the left of the steering column on the instru-
ment panel.
Headlight Switch With Halo Control Assembly
168 UNDERSTANDING THE FEATURES OF YOUR VEHICLE
Page 176 of 573
Front Fog Lights — If Equipped
To activate the front fog lights, turn on the parking
lights or the low beam headlights and push in the
headlight switch control knob. Pressing the head-
light switch control knob in a second time will turn the
front fog lights off.
Battery Protection
This feature provides battery protection to avoid wearing
down the battery if the headlights, parking lights, or front
fog lights are left on for extended periods of time when
the ignition switch is in the LOCK position. After eight
minutes of the ignition switch being in the LOCK position
and the headlight switch in any position other than OFF
or AUTO, the lights will turn off automatically until the
next cycle of the ignition switch or headlight switch.
The battery protection feature will be disabled if the
ignition switch is turned to any other position other than
LOCK during the eight minute delay.
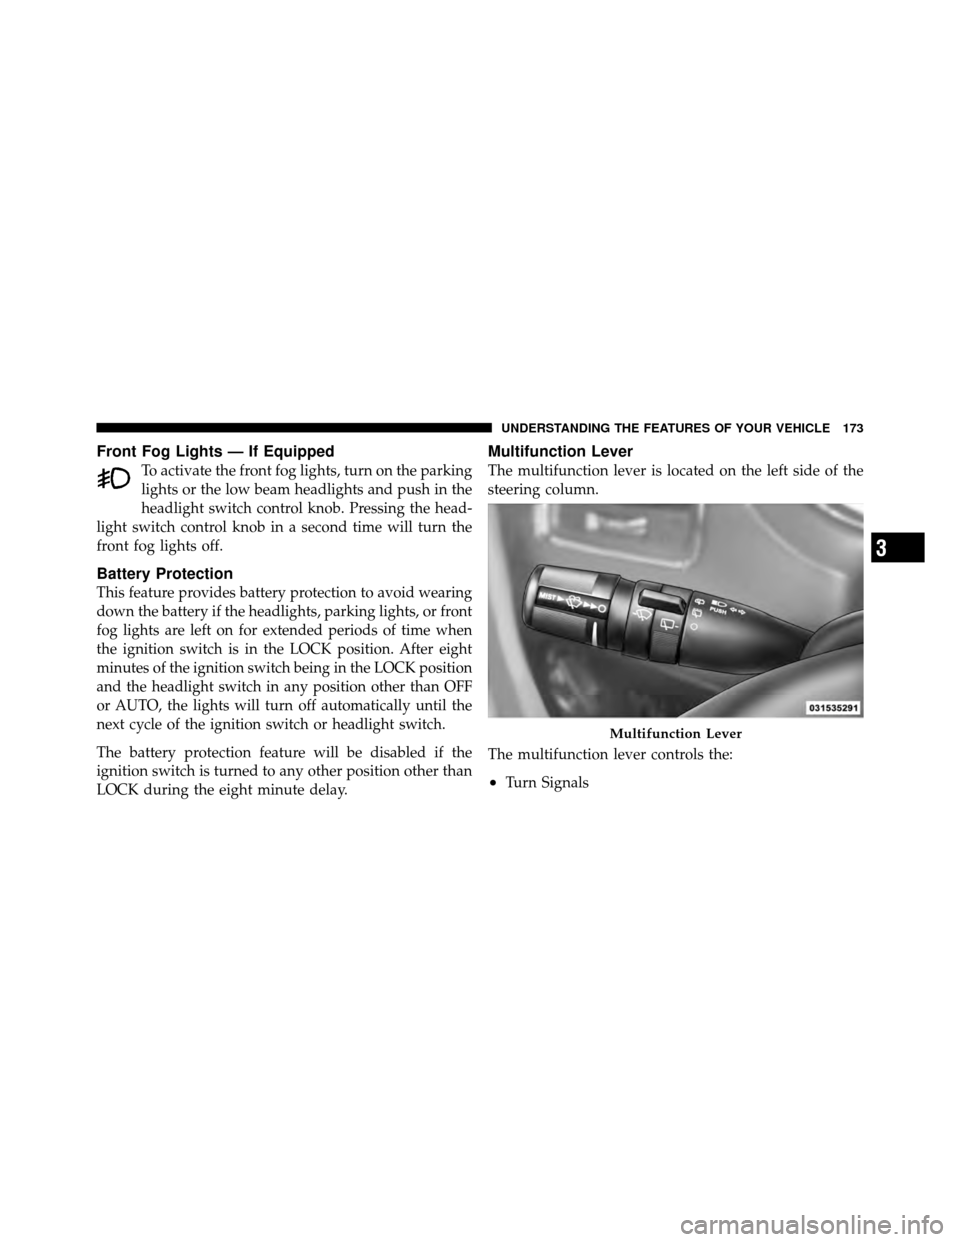
Multifunction Lever
The multifunction lever is located on the left side of the
steering column.
The multifunction lever controls the:
•Turn Signals
Multifunction Lever
3
UNDERSTANDING THE FEATURES OF YOUR VEHICLE 173
Page 177 of 573
•Headlight Beams Low/High
•Flash-To-Pass (Optical Horn)
•Front and Rear Wipers — Washer Functions
Turn Signals
Move the multifunction lever up or down and the arrows
on each side of the instrument cluster flash to show
proper operation of the front and rear turn signal lights.
NOTE:If either light remains on and does not flash, or
there is a very fast flash rate, check for a defective outside
light bulb. If an indicator fails to light when the lever is
moved, it would suggest that the indicator bulb is
defective.
Lane Change Assist
Tap the lever up or down once, without moving beyond
the detent, and the turn signal (right or left) will flash
three times then automatically turn off.
Turn Signal Warning
If the vehicle electronics sense that the vehicle has
traveled at over 18 mph (29 km/h) for approximately
1 mile (1.6 km) with the turn signals on, a chime will
sound to alert the driver.
High/Low Beam Switch
When the headlights are turned on, pushing the multi-
function lever toward the instrument panel will switch
from low beams to high beams. Pulling back to the
neutral position returns the headlights to the low beam
operation.
Flash-To-Pass
You can signal another vehicle with your headlights by
lightly pulling the multifunction lever toward you. This
will turn on the high beam headlights until the lever is
released.
174 UNDERSTANDING THE FEATURES OF YOUR VEHICLE
Page 178 of 573
SmartBeam™ — If Equipped
The SmartBeam™ system provides increased forward
lighting at night by automating high beam control
through the use of a digital camera mounted on the
inside rearview mirror. This camera detects vehicle spe-
cific light and automatically switches from high beams to
low beams until the approaching vehicle is out of view.
To Activate
1. Select “Automatic High Beams — ON” through the
EVIC. Refer to “Electronic Vehicle Information Center
(EVIC)/Customer-Programmable Features” in “Under-
standing Your Instrument Panel” for further information.
2. Rotate the headlight switch counterclockwise to the
AUTO (A) position.
3. Push the multifunction lever away from you to switch
the headlights to the high beam position. Refer to “Mul-
tifunction Lever” in this section for further information.NOTE:
This system will not activate until the vehicle is
at, or above, 25 mph (40 km/h).
To Deactivate
Perform either of the following steps to deactivate the
SmartBeam™ system.
1. Select “Automatic High Beams — OFF” through the
EVIC. Refer to “Electronic Vehicle Information Center
(EVIC)/Customer-Programmable Features” in “Under-
standing Your Instrument Panel” for further information.
2. Pull the multifunction lever toward you to switch the
headlights from the high beam to the low beam position.
3. Rotate the headlight switch clockwise from the AUTO
(A) to the on position.
NOTE: Broken, muddy or obstructed headlights and
taillights of vehicles in the field of view will cause
headlights to remain on longer (closer to the vehicle).
3
UNDERSTANDING THE FEATURES OF YOUR VEHICLE 175
Page 257 of 573
INSTRUMENT CLUSTER DESCRIPTIONS
1. Tachometer
The red segments indicate the maximum permissible
engine revolutions per minute (RPM x 1000) for each gear
range. Before reaching the red area, ease up on the
accelerator.
2. Front Fog Light Indicator — If EquippedThis indicator will illuminate when the front fog
lights are on.
3. Park/Headlight ON Indicator — If Equipped This indicator will illuminate when the park
lights or headlights are turned on. 4. Turn Signal Indicators
The arrow will flash with the exterior turn signal
when the turn signal lever is operated.
If the vehicle is driven 1 mile (1.6 km) with either turn
signal on, a continuous chime will sound to alert you to
turn the signal off. If either indicator flashes at a rapid
rate, check for a defective outside light bulb.
5. High Beam Indicator This indicator shows that the high beam head-
lights are on. Push the multifunction lever forward
to switch the headlights to high beam, and pull toward
yourself (normal position) to return to low beam.
254 UNDERSTANDING YOUR INSTRUMENT PANEL
Page 518 of 573
LIGHT BULBS – ExteriorBulb Number
Headlamp – (Low and High Beam Halogen) ..... H11
Headlamp (HID – If Equipped) Low Beam ...... D1S
Fog Lamp – If Equipped ................PSX24W
Front Side Marker ...................... W5W
Front Park/Turn Signal Lamp .....PY27/7W or 3757A
Rear Turn Signal Lamp .................. 3757A
Rear Tail, Stop, and Side Marker Lamp ........ LED
(Serviced at Authorized Dealer)
Backup ............................... 3157
Center High-Mounted Stop Lamp ............ LED
(Serviced at Authorized Dealer)
License ................................ 168
BULB REPLACEMENT
High Intensity Discharge Headlamps (HID) —
If Equipped
The headlamps are a type of high voltage discharge tube.
High voltage can remain in the circuit even with the headlamp switch off and the key removed.
Because of
this, you should not attempt to service a headlamp bulb
yourself. If a headlamp bulb fails, take your vehicle to
an authorized dealer for service.
WARNING!
A transient high voltage occurs at the bulb sockets of
High Intensity Discharge (HID) headlamps when the
headlamp switch is turned ON. It may cause serious
electrical shock or electrocution if not serviced prop-
erly. See your authorized dealer for service.
NOTE: On vehicles equipped with High Intensity Dis-
charge (HID) headlamps, when the headlamps are
turned on, there is a blue hue to the lamps. This dimin-
ishes and becomes more white after approximately
10 seconds, as the system charges.
7
MAINTAINING YOUR VEHICLE 515
Page 519 of 573

Quad Headlamps
1. Raise the hood to access the high or low beam bulbs at
the rear of the headlamp housing.
2. Release the two tabs on the side of the connector and
remove the connector from the bulb.
3. Twist the headlamp bulb and pull the bulb from the
headlamp housing.
4. Install the new headlamp bulb and twist until locked
into the headlamp housing.
CAUTION!
Do not touch the new bulb with your fingers. Oil
contamination will severely shorten bulb life. If the
bulb comes in contact with an oily surface, clean the
bulb with rubbing alcohol.
5. Reconnect the wiring connector to the bulb.
Front Park/Turn Signal Lamp
1. Raise the hood to access the rear of the headlamp
housing.
2. Twist the turn signal socket and remove from the
headlamp housing, then pull the bulb out.
3. Push the new bulb into the socket and reinstall the
socket by twisting until locked into the headlamp
housing.
Front Side Marker Lamp
1. Raise the hood to access the rear of the headlamp
housing.
NOTE: Access is somewhat limited. You may have to
remove the inner fender well or remove the headlamp
housing for bulb replacement.
2. Twist the socket and remove from the headlamp
housing, then pull the bulb out.
516 MAINTAINING YOUR VEHICLE