Page 133 of 573

turn signal is then activated, and it corresponds to an
alert present on that side of the vehicle, an audible chime
will also be sounded. Whenever a turn signal and de-
tected object are present on the same side at the same
time, both the visual and audio alerts will be issued. In
addition to the audible alert the radio (if on) will also be
muted.
NOTE:
•Whenever an audible alert is requested by the BSM
system, the radio is also muted.
•If the hazard flashers are on, the system will request
the appropriate visual alert only.
When the system is in RCP, the system shall respond
with both visual and audible alerts when a detected
object is present. Whenever an audible alert is re-
quested, the radio is also muted. Turn/hazard signal
status is ignored; the RCP state always requests the
chime.Blind Spot Alert Off
When the BSM system is turned off there will be no
visual or audible alerts from either the BSM or RCP
systems.
NOTE:
The BSM system will store the current operating
mode when the vehicle is shut off. Each time the vehicle
is started the previously stored mode will be recalled and
used.
Uconnect™ Phone — IF EQUIPPED
Uconnect™ Phone is a hands-free system that allows you
to use voice commands to dial a phone number stored in
your mobile phone. Press the Uconnect™ Phone button
on the radio or steering wheel controls (if equipped)
and follow the instructions to pair the mobile phone.
Refer to “Uconnect™ Phone” in the Uconnect™ User
Manual located on the DVD for further details.
130 UNDERSTANDING THE FEATURES OF YOUR VEHICLE
Page 134 of 573
VOICE COMMAND — IF EQUIPPED
Voice Commands can be initiated by pressing the VR
button
located on the radio or steering wheel
controls (if equipped).
Refer to “Voice Command” in the Uconnect™ User
Manual located on the DVD for further details.
SEATS
Seats are a part of the Occupant Restraint System of the
vehicle.
WARNING!
•It is dangerous to ride in a cargo area, inside or
outside of a vehicle. In a collision, people riding in
these areas are more likely to be seriously injured
or killed.
•Do not allow people to ride in any area of your
vehicle that is not equipped with seats and seat
belts. In a collision, people riding in these areas
are more likely to be seriously injured or killed.
•Be sure everyone in your vehicle is in a seat and
using a seat belt properly.
3
UNDERSTANDING THE FEATURES OF YOUR VEHICLE 131
Page 138 of 573

Vehicles Equipped With Remote Start
On models that are equipped with remote start, the
driver ’s heated seat and Heated Steering Wheel can be
programmed to come on during a remote start. Refer to
“Remote Starting System — If Equipped” in “Things To
Know Before Starting Your Vehicle” for further
information.
Front Heated Seats
There are two heated seat switches that allow the driver
and passenger to operate the seats independently. The
controls for each heater are located on the switch bank
below the climate controls.
You can choose from HIGH, LOW or OFF heat settings.
Amber indicator lights in each switch indicate the level of
heat in use. Two indicator lights will illuminate for
HIGH, one for LOW and none for OFF.Press the switch once to select HIGH-level
heating. Press the switch a second time to select
LOW-level heating. Press the switch a third
time to shut the heating elements OFF.
NOTE: Once a heat setting is selected, heat will be felt
within two to five minutes.
When the HIGH-level setting is selected, the heater will
provide a boosted heat level during the initial stages of
operation. Then, the heat output will drop to the normal
HIGH-level. If the HIGH-level setting is selected, the
system will automatically switch to LOW-level after
approximately 30 minutes of continuous operation. At
that time, the number of illuminated LEDs changes from
two to one, indicating the change. The LOW-level setting
will turn OFF automatically after approximately
45 minutes.
3
UNDERSTANDING THE FEATURES OF YOUR VEHICLE 135
Page 183 of 573

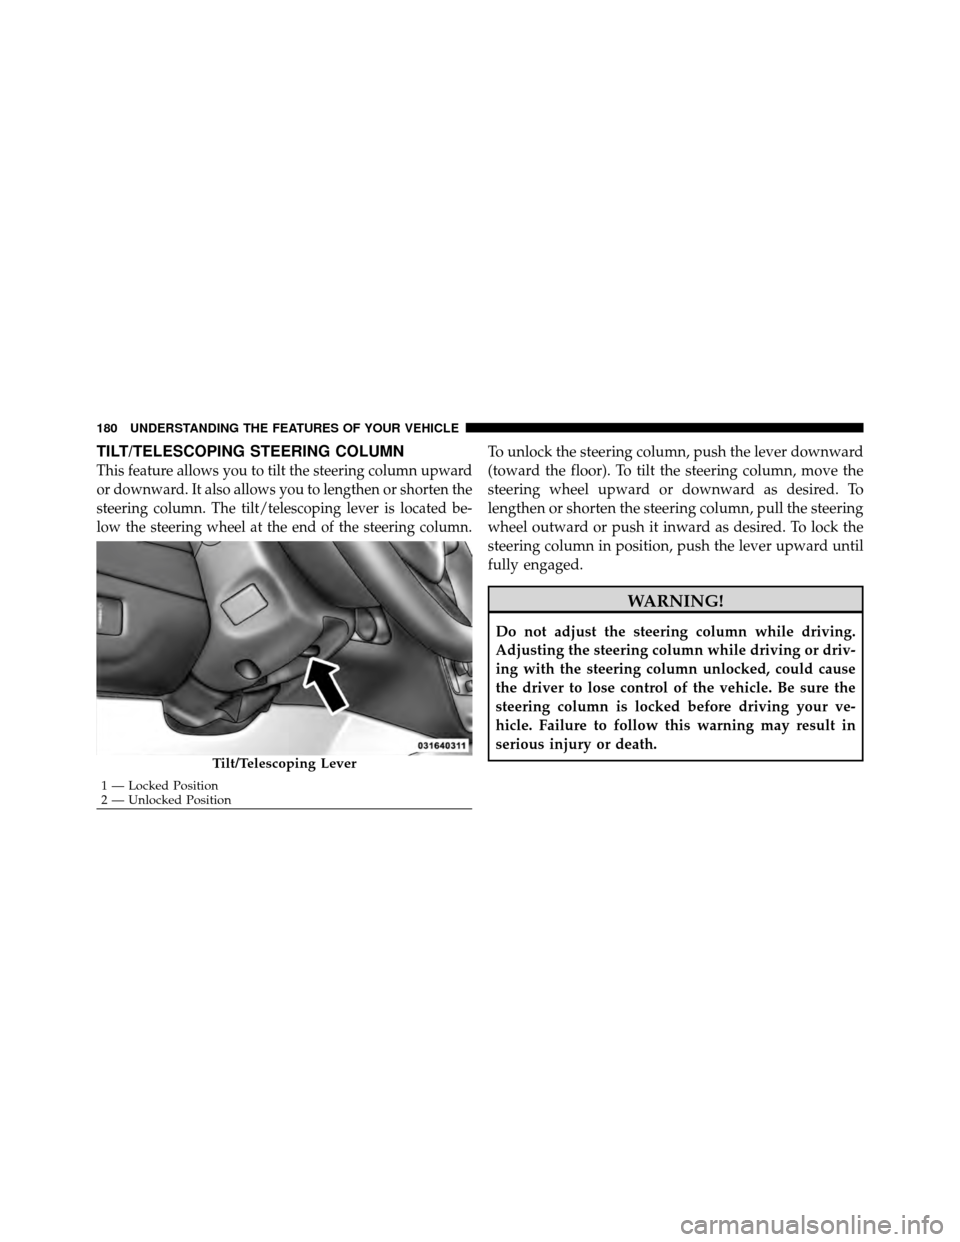
TILT/TELESCOPING STEERING COLUMN
This feature allows you to tilt the steering column upward
or downward. It also allows you to lengthen or shorten the
steering column. The tilt/telescoping lever is located be-
low the steering wheel at the end of the steering column.
To unlock the steering column, push the lever downward
(toward the floor). To tilt the steering column, move the
steering wheel upward or downward as desired. To
lengthen or shorten the steering column, pull the steering
wheel outward or push it inward as desired. To lock the
steering column in position, push the lever upward until
fully engaged.
WARNING!
Do not adjust the steering column while driving.
Adjusting the steering column while driving or driv-
ing with the steering column unlocked, could cause
the driver to lose control of the vehicle. Be sure the
steering column is locked before driving your ve-
hicle. Failure to follow this warning may result in
serious injury or death.
Tilt/Telescoping Lever
1 — Locked Position
2 — Unlocked Position
180 UNDERSTANDING THE FEATURES OF YOUR VEHICLE
Page 184 of 573

HEATED STEERING WHEEL — IF EQUIPPED
The steering wheel contains a heating element that helps
warm your hands in cold weather. The heated steering
wheel has only one temperature setting. Once the heated
steering wheel has been turned on it will operate for
approximately 58 to 70 minutes before automatically
shutting off. The heated steering wheel can shut off early
or may not turn on when the steering wheel is already
warm.
The heated steering wheel switch is located on the switch
bank below the climate controls.Press the switch to turn on the heated
steering wheel. The light on the switch
will illuminate to indicate the steering
wheel heater is on. Pressing the switch
a second time will turn off the heated
steering wheel and light indicator. NOTE:
The engine must be running for the heated
steering wheel to operate.
Vehicles Equipped With Remote Start
On models that are equipped with remote start, the
heated steering wheel can be programmed to come on
during a remote start. Refer to “Remote Starting System
— If Equipped” in “Things to Know Before Starting Your
Vehicle” for further information.
WARNING!
•Persons who are unable to feel pain to the skin
because of advanced age, chronic illness, diabetes,
spinal cord injury, medication, alcohol use, ex-
haustion, or other physical conditions must exer-
cise care when using the steering wheel heater. It
may cause burns even at low temperatures, espe-
cially if used for long periods.
(Continued)
3
UNDERSTANDING THE FEATURES OF YOUR VEHICLE 181
Page 185 of 573
WARNING! (Continued)
•Do not place anything on the steering wheel that
insulates against heat, such as a blanket or cush-
ion. This may cause the steering wheel heater to
overheat.
ADJUSTABLE PEDALS — IF EQUIPPED
The adjustable pedals system is designed to allow a
greater range of driver comfort for steering wheel tilt and
seat position. This feature allows the brake, accelerator,
and clutch pedals (if equipped) to move toward or away
from the driver to provide improved position with the
steering wheel.
The switch is located on the left side of the steering
column.Press the switch forward to move the pedals forward
(toward the front of the vehicle).
Press the switch rearward to move the pedals rearward
(toward the driver).
•The pedals can be adjusted with the ignition OFF.
Adjustable Pedal Switch
182 UNDERSTANDING THE FEATURES OF YOUR VEHICLE
Page 187 of 573

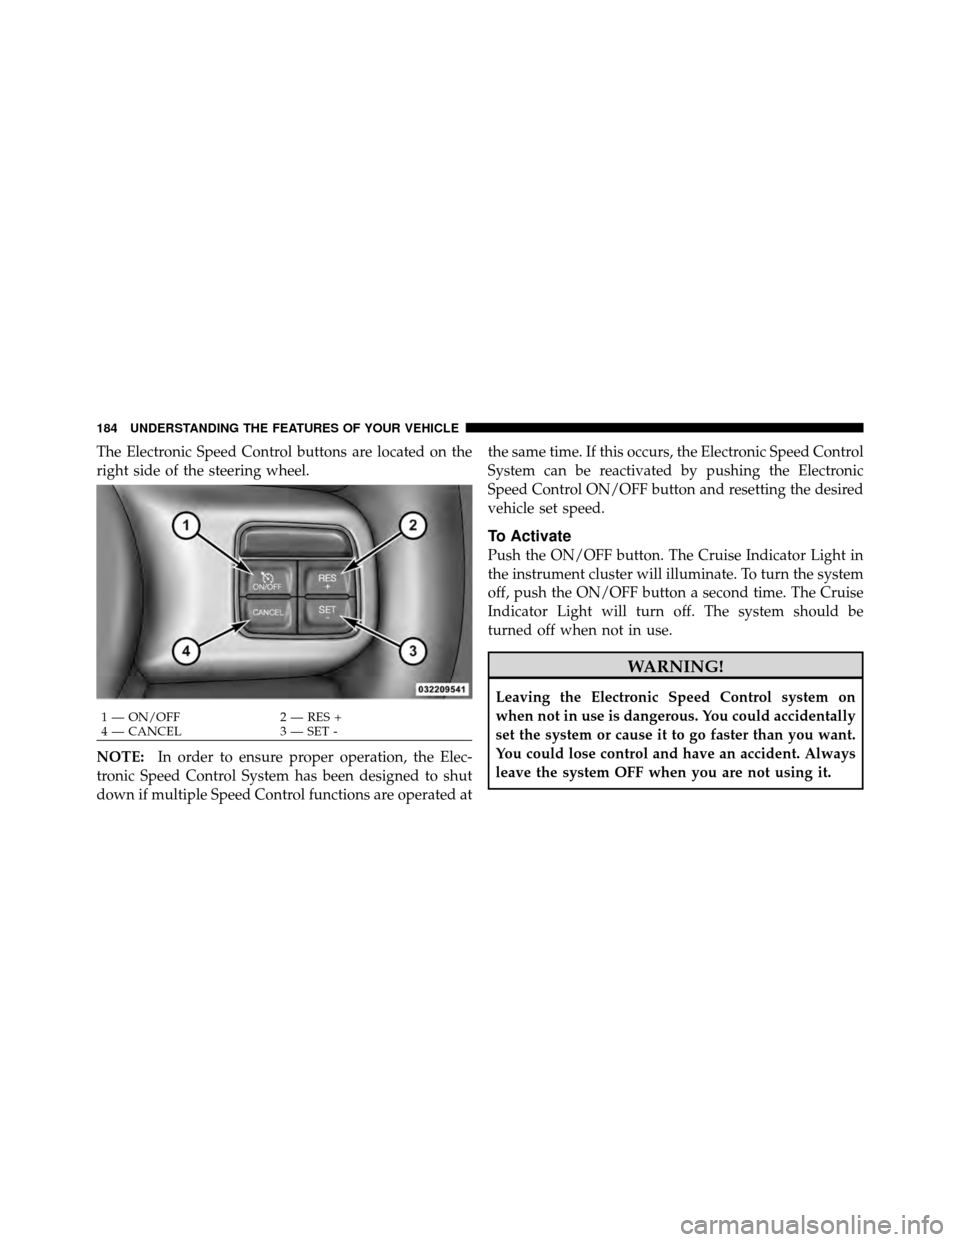
The Electronic Speed Control buttons are located on the
right side of the steering wheel.
NOTE:In order to ensure proper operation, the Elec-
tronic Speed Control System has been designed to shut
down if multiple Speed Control functions are operated at the same time. If this occurs, the Electronic Speed Control
System can be reactivated by pushing the Electronic
Speed Control ON/OFF button and resetting the desired
vehicle set speed.
To Activate
Push the ON/OFF button. The Cruise Indicator Light in
the instrument cluster will illuminate. To turn the system
off, push the ON/OFF button a second time. The Cruise
Indicator Light will turn off. The system should be
turned off when not in use.
WARNING!
Leaving the Electronic Speed Control system on
when not in use is dangerous. You could accidentally
set the system or cause it to go faster than you want.
You could lose control and have an accident. Always
leave the system OFF when you are not using it.
1 — ON/OFF
2 — RES +
4 — CANCEL 3 — SET -
184 UNDERSTANDING THE FEATURES OF YOUR VEHICLE
Page 252 of 573

▫Operating Instructions
(Uconnect™ Phone) — If Equipped ....... 317
� iPod�/USB/MP3 Control — If Equipped ..... 317
▫ Connecting The iPod� Or External USB
Device ............................ 318
▫ Using This Feature ................... 318
▫ Controlling The iPod� Or External USB
Device Using Radio Buttons ............. 319
▫ Play Mode ......................... 319
▫ List Or Browse Mode ................. 321
▫ Bluetooth Streaming Audio (BTSA) ........ 323
� Video Entertainment System (VES)™ —
If Equipped .......................... 324 �
Steering Wheel Audio Controls —
If Equipped .......................... 326
▫ Radio Operation ..................... 327
▫ CD Player ......................... 327
� CD/DVD Disc Maintenance .............. 327
� Radio Operation And Mobile Phones ....... 328
� Climate Controls ...................... 328
▫ Manual Heating And Air Conditioning
System — If Equipped ................. 328
▫ Three-Zone Temperature Control —
If Equipped ........................ 333
▫ Rear Manual Climate Control —
If Equipped ........................ 337
▫ Automatic Temperature Control
(ATC) — If Equipped ................. 340
4
UNDERSTANDING YOUR INSTRUMENT PANEL 249