2011 CHEVROLET SUBURBAN display
[x] Cancel search: displayPage 357 of 542
Black plate (69,1)Chevrolet Tahoe/Suburban Owner Manual - 2011
Driving and Operating 9-69
Rear Vision Camera Error
Messages
Service Rear Vision Camera
System:This message can display
when the system is not receiving
information it requires from other
vehicle systems.
If any other problem occurs or if a
problem persists, see your dealer.
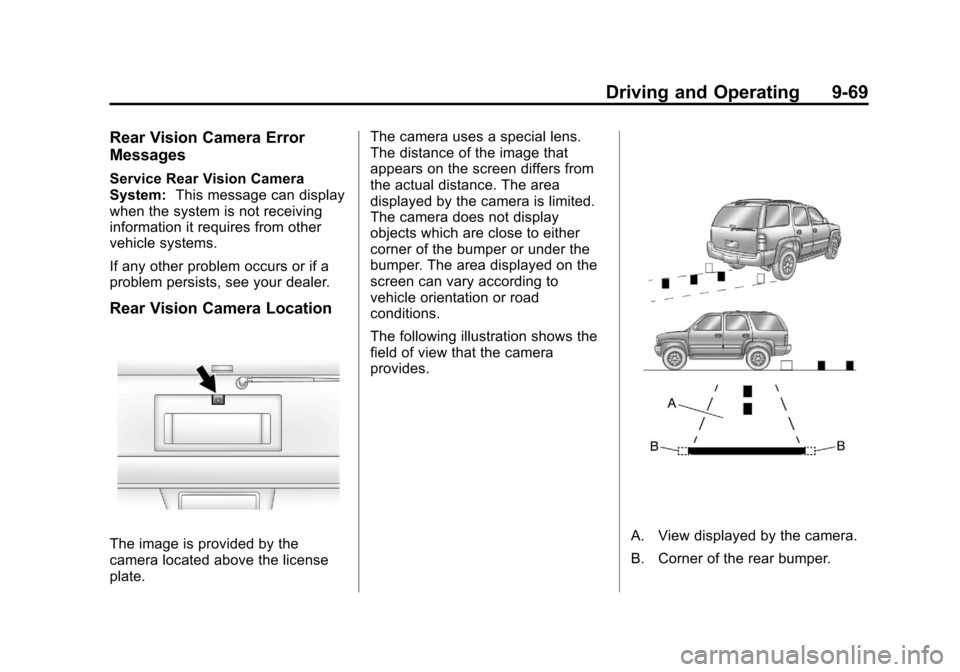
Rear Vision Camera Location
The image is provided by the
camera located above the license
plate. The camera uses a special lens.
The distance of the image that
appears on the screen differs from
the actual distance. The area
displayed by the camera is limited.
The camera does not display
objects which are close to either
corner of the bumper or under the
bumper. The area displayed on the
screen can vary according to
vehicle orientation or road
conditions.
The following illustration shows the
field of view that the camera
provides.A. View displayed by the camera.
B. Corner of the rear bumper.
Page 358 of 542

Black plate (70,1)Chevrolet Tahoe/Suburban Owner Manual - 2011
9-70 Driving and Operating
When the System Does Not
Seem To Work Properly
The rear vision camera system
might not work properly or display a
clear image if:
.The RVC is turned off. See
“Turning the Rear Camera
System On or Off”earlier in this
section.
.It is dark.
.The sun or the beam of
headlights is shining directly into
the camera lens.
.Ice, snow, mud, or anything else
builds up on the camera lens.
Clean the lens, rinse it with
water, and wipe it with a soft
cloth.
.The back of the vehicle is in an
accident, the position and
mounting angle of the camera
can change or the camera can
be affected. Be sure to have the
camera and its position and
mounting angle checked at your
dealer.
The rear vision camera system
display in the rearview mirror may
turn off or not appear as expected
due to one of the following
conditions. If this occurs the left
indicator light on the mirror will
flash.
.A slow flash may indicate a loss
of video signal, or no video
signal present during the reverse
cycle.
.A fast flash may indicate that the
display has been on for the
maximum allowable time during
a reverse cycle, or the display
has reached an Over
Temperature limit. The fast flash conditions are
used to protect the video device
from high temperature
conditions. Once conditions
return to normal the device will
reset and the green indicator will
stop flashing.
During any of these fault conditions,
the display will be blank and the
indicator will continue to flash as
long as the vehicle is in R (Reverse)
or until the conditions return to
normal.
Pressing and holding
zwhen the
left indicator light is flashing will turn
off the video display along with the
left indicator light.
Page 364 of 542
Black plate (76,1)Chevrolet Tahoe/Suburban Owner Manual - 2011
9-76 Driving and Operating
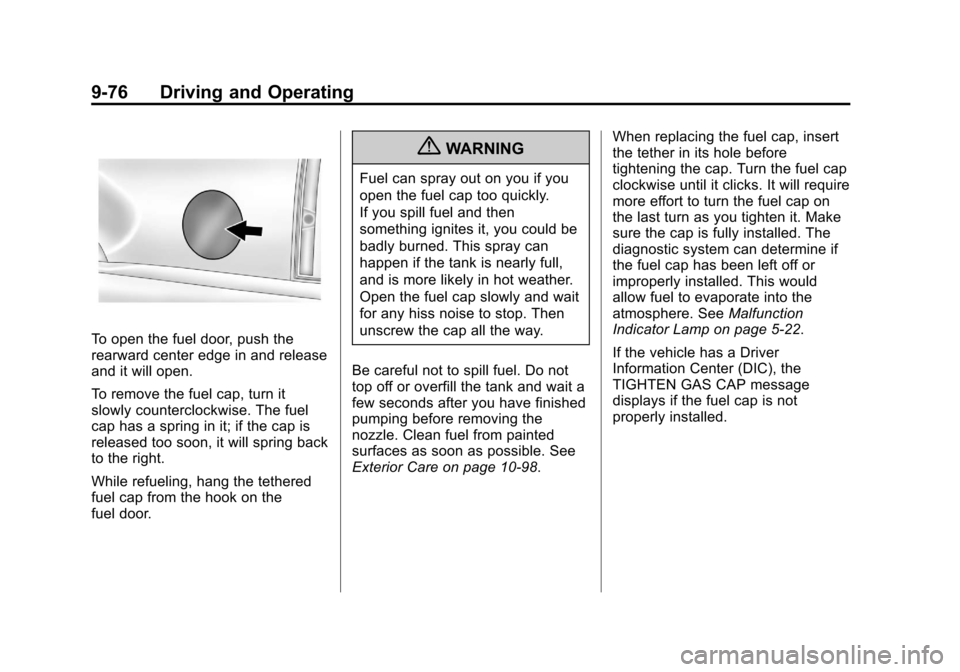
To open the fuel door, push the
rearward center edge in and release
and it will open.
To remove the fuel cap, turn it
slowly counterclockwise. The fuel
cap has a spring in it; if the cap is
released too soon, it will spring back
to the right.
While refueling, hang the tethered
fuel cap from the hook on the
fuel door.
{WARNING
Fuel can spray out on you if you
open the fuel cap too quickly.
If you spill fuel and then
something ignites it, you could be
badly burned. This spray can
happen if the tank is nearly full,
and is more likely in hot weather.
Open the fuel cap slowly and wait
for any hiss noise to stop. Then
unscrew the cap all the way.
Be careful not to spill fuel. Do not
top off or overfill the tank and wait a
few seconds after you have finished
pumping before removing the
nozzle. Clean fuel from painted
surfaces as soon as possible. See
Exterior Care on page 10‑98. When replacing the fuel cap, insert
the tether in its hole before
tightening the cap. Turn the fuel cap
clockwise until it clicks. It will require
more effort to turn the fuel cap on
the last turn as you tighten it. Make
sure the cap is fully installed. The
diagnostic system can determine if
the fuel cap has been left off or
improperly installed. This would
allow fuel to evaporate into the
atmosphere. See
Malfunction
Indicator Lamp on page 5‑22.
If the vehicle has a Driver
Information Center (DIC), the
TIGHTEN GAS CAP message
displays if the fuel cap is not
properly installed.
Page 381 of 542
Black plate (93,1)Chevrolet Tahoe/Suburban Owner Manual - 2011
Driving and Operating 9-93
Panel is used along with the Trailer
Brake Display Page on the DIC to
adjust and display power output to
the trailer brakes.
Trailer Brake DIC Display Page
The ITBC system displays
messages into the vehicle’s Driver
Information Center (DIC). See DIC
Warnings and Messageson
page 5‑29 for more information.
The display page indicates Trailer
Gain setting, power output to the
electric trailer brakes, trailer
connection and system operational
status. The Trailer Brake Display Page can
be displayed by performing any of
the following actions:
.Scrolling through the DIC menu
pages using the odometer trip
stem or the DIC Vehicle
Information button (if equipped).
.Pressing a Trailer Gain
button
–If the Trailer Brake
Display Page is not currently
displayed, pressing a Trailer
Gain button will first recall the
current Trailer Gain setting. After
the Trailer Brake Display Page is
displayed, each press and
release of the gain buttons will
then cause the Trailer Gain
setting to change.
.Activating the Manual Trailer
Brake Apply lever
.Connecting a trailer equipped
with electric trailer brakes All DIC warning and service
messages must first be
acknowledged by the driver by
pressing the odometer trip stem or
the DIC Vehicle Information button
(if equipped) before the Trailer
Brake Display Page can be
displayed and Trailer Gain can be
adjusted.
TRAILER GAIN
–This setting is
displayed anytime the Trailer Brake
Display Page is active. This setting
can be adjusted from 0.0 to 10.0
with either a trailer connected or
disconnected. To adjust the Trailer
Gain, press one of the Trailer Gain
adjustment buttons located on the
Trailer Brake Control Panel. Press
and hold a gain button to cause the
Trailer Gain to continuously adjust.
To turn the output to the trailer off,
adjust the Trailer Gain setting to
0.0 (zero).
Page 382 of 542
Black plate (94,1)Chevrolet Tahoe/Suburban Owner Manual - 2011
9-94 Driving and Operating
0.0 (zero) gain is the factory default
setting. To properly adjust trailer
gain, see the Trailer Gain
Adjustment Procedure later in this
section.
TRAILER OUTPUT–This is
displayed any time a trailer with
electric brakes is connected. Output
to the electric brakes is based on
the amount of vehicle braking
present and relative to the Trailer
Gain setting. Output is displayed
from 0 to 10 bars for each gain
setting.
The Trailer Output will indicate
“- - - - - -“ on the Trailer Brake
Display Page whenever the
following occur:
.No trailer is connected.
.A trailer without electric brakes
is connected (no DIC message
is displayed).
.A trailer with electric brakes
has become disconnected
(a CHECK TRAILER WIRING
message will also be displayed
on the DIC).
.There is a fault present in the
wiring to the electric trailer
brakes (a CHECK TRAILER
WIRING message will also be
displayed on the DIC).
.There is a fault in the ITBC
system (a SERVICE TRAILER
BRAKE SYSTEM message will
also be displayed in the DIC).
Manual Trailer Brake Apply
The Manual Trailer Brake Apply
Lever is located on the Trailer Brake
Control Panel and is used to apply
the trailer ’s electric brakes
independent of the vehicle’s brakes.
This lever is used in the Trailer Gain
Adjustment Procedure to properly
adjust the power output to the trailer
brakes. Sliding the lever to the left
will apply only the trailer brakes.
The power output to the trailer is
indicated in the Trailer Brake Display Page in the DIC. If the
vehicle’s service brakes are applied
while using the Manual Trailer Brake
Apply Lever, the trailer output power
will be the greater of the two.
The trailer and the vehicle's brake
lamps will come on when either
vehicle braking or manual trailer
brakes are applied.
Trailer Gain Adjustment Procedure
Trailer Gain should be set for a
specific trailering condition and must
be adjusted any time vehicle
loading, trailer loading or road
surface conditions change.
Setting the Trailer Gain properly is
needed for the best trailer stopping
performance. A trailer that is
over-gained may result in locked
trailer brakes. A trailer that is
under-gained may result in not
enough trailer braking. Both of these
conditions may result in poorer
stopping and stability of the vehicle
and trailer.
Page 383 of 542

Black plate (95,1)Chevrolet Tahoe/Suburban Owner Manual - 2011
Driving and Operating 9-95
Use the following procedure to
correctly adjust Trailer Gain for each
towing condition:
1. Make sure the trailer brakes arein proper working condition.
2. Connect a properly loaded trailer to the vehicle and make all
necessary mechanical and
electrical connections. See
Vehicle Load Limits on
page 9‑23 for more information.
3. After the electrical connection is made to a trailer equipped with
electric brakes:
.A TRAILER CONNECTED
message will be briefly
displayed on the DIC
display.
.The Trailer Brake Display
Page will appear on the
DIC showing TRAILER
GAIN and TRAILER
OUTPUT.
.In the Trailer Output display
on the DIC, “- - - - - -“will
disappear if there is no
error present. Connecting a
trailer without electric
brakes will not clear the six
dashed lines.
4. Adjust the Trailer Gain by using the gain adjustment (+ / -)
buttons on the Trailer Brake
Control Panel.
5. Drive the vehicle with the trailer attached on a level road surface
representative of the towing
condition and free of traffic at
about 32 to 40 km/h (20 to
25 mph) and fully apply the
Manual Trailer Brake Apply
lever.
Adjusting trailer gain at speeds
lower than 32 to 40 km/h (20 to
25 mph) may result in an
incorrect gain setting. 6. Adjust the Trailer Gain to just
below the point of trailer wheel
lock-up, indicated by trailer
wheel squeal or tire smoke when
a trailer wheel locks.
Trailer wheel lock-up may not
occur if towing a heavily loaded
trailer. In this case, adjust the
Trailer Gain to the highest
allowable setting for the towing
condition.
7. Re-adjust Trailer Gain any time vehicle loading, trailer loading or
road surface conditions change
or if trailer wheel lock-up is
noticed at any time while towing
Page 384 of 542
Black plate (96,1)Chevrolet Tahoe/Suburban Owner Manual - 2011
9-96 Driving and Operating
Other ITBC Related DIC Messages
In addition to displaying TRAILER
GAIN and TRAILER OUTPUT
through the DIC, trailer connection
and ITBC system status is displayed
in the DIC.
TRAILER CONNECTED–This
message will be briefly displayed
when a trailer with electric brakes is
first connected to the vehicle. This
message will automatically turn off
in about ten seconds. The driver
can also acknowledge this message
before it automatically turns off.
CHECK TRAILER WIRING –This
message will be displayed if:
1. The ITBC system first determines connection to a
trailer with electric brakes and
then the trailer harness becomes
disconnected from the vehicle. If the disconnect occurs while
the vehicle is stationary, this
message will automatically turn
off in about thirty seconds. This
message will also turn off if the
driver acknowledges this
message off or if the trailer
harness is re-connected.
If the disconnect occurs while
the vehicle is moving, this
message will continue until the
ignition is turned off. This
message will also turn off if the
driver acknowledges this
message off or if the trailer
harness is re-connected.
2. There is an electrical fault in the wiring to the electric trailer
brakes. This message will
continue as long as there is an
electrical fault in the trailer
wiring. This message will
also turn off if the driver
acknowledges this message off. To determine if the electrical fault is
on the vehicle side or trailer side of
the trailer wiring harness
connection, do the following:
1. Disconnect the trailer wiring
harness from the vehicle.
2. Turn the ignition OFF.
3. Wait ten seconds, then turn the ignition back to RUN.
4. If the CHECK TRAILER WIRING message re-appears, the
electrical fault is on the
vehicle side.
If the CHECK TRAILER WIRING
message only re-appears when
connecting the trailer wiring
harness to the vehicle, the
electrical fault is on the
trailer side.
SERVICE TRAILER BRAKE
SYSTEM –This message will be
displayed when there is a problem
with the ITBC system. If this
message persists over multiple
ignition cycles there is problem with
the ITBC system. Take the vehicle
Page 385 of 542
Black plate (97,1)Chevrolet Tahoe/Suburban Owner Manual - 2011
Driving and Operating 9-97
to an authorized GM dealer to have
the ITBC system diagnosed and
repaired.
If either the CHECK TRAILER
WIRING or SERVICE TRAILER
BRAKE SYSTEM message is
displayed while driving the vehicle,
power is no longer available to the
trailer brakes. When traffic
conditions allow, carefully pull the
vehicle over to the side of the road
and turn the ignition off. Check the
wiring connection to the trailer and
turn the ignition back on. If either of
these messages continues, either
the vehicle or trailer needs service.
An authorized GM dealer may be
able to diagnose and repair
problems with the trailer. However,
any diagnosis and repair of the
trailer is not covered under the
vehicle warranty. Please contact
your trailer dealer for assistance
with trailer repairs and trailer
warranty information.Conversions and
Add-Ons
Add-On Electrical
Equipment
Notice:Do not add anything
electrical to the vehicle unless
you check with your dealer first.
Some electrical equipment can
damage the vehicle and the
damage would not be covered by
the vehicle's warranty. Some
add-on electrical equipment can
keep other components from
working as they should.
Add-on equipment can drain the
vehicle's 12‐volt battery, even if the
vehicle is not operating.
The vehicle has an airbag system.
Before attempting to add anything
electrical to the vehicle, see
Servicing the Airbag-Equipped
Vehicle on page 3‑54 andAdding
Equipment to the Airbag-Equipped
Vehicle on page 3‑54.
Adding a Snow Plow or
Similar Equipment
Before installing a snow plow on
your vehicle, here are some things
you will need to know:
Notice: If your vehicle does not
have the snow plow prep
package, adding a plow can
damage your vehicle, and the
repairs would not be covered by
warranty. Unless your vehicle was
built to carry a snow plow, do not
add one to your vehicle. If your
vehicle has the snow plow prep
package, called RPO VYU, then
the payload your vehicle can
carry will be reduced when a
snow plow is installed. Your
vehicle can be damaged if either
the front or rear axle ratings or
the Gross Vehicle Weight (GVW)
are exceeded.
Some vehicles are built with a
special snow plow prep package,
called RPO VYU. If your vehicle has
this option, you can add a plow to it,
provided certain weights, such as