2011 CHEVROLET MALIBU engine
[x] Cancel search: enginePage 302 of 382
Black plate (60,1)Chevrolet Malibu Owner Manual - 2011
10-60 Vehicle Care
A rear blowout, particularly on a
curve, acts much like a skid and
may require the same correction
you would use in a skid. In any rear
blowout remove your foot from the
accelerator pedal. Get the vehicle
under control by steering the way
you want the vehicle to go. It may
be very bumpy and noisy, but you
can still steer. Gently brake to a
stop, well off the road, if possible.
{WARNING
Driving on a flat tire will cause
permanent damage to the tire.
Re-inflating a tire after it has been
driven on while severely
under-inflated or flat may cause a
blowout and a serious crash.
Never attempt to re-inflate a tire
that has been driven on while
severely under-inflated or flat.
Have your dealer or an authorized
tire service center repair or
replace the flat tire as soon as
possible.
{WARNING
Lifting a vehicle and getting under
it to do maintenance or repairs is
dangerous without the
appropriate safety equipment and
training. If a jack is provided with
the vehicle, it is designed only for
changing a flat tire. If it is used for
anything else, you or others could
be badly injured or killed if the
vehicle slips off the jack. If a jack
is provided with the vehicle, only
use it for changing a flat tire.
If a tire goes flat, avoid further tire
and wheel damage by driving slowly
to a level place, well off the road,
if possible. Turn on the hazard
warning flashers. See Hazard
Warning Flashers on page 6‑4.
{WARNING
Changing a tire can be
dangerous. The vehicle can slip
off the jack and roll over or fall on
you or other people. You and they
could be badly injured or even
killed. Find a level place to
change your tire. To help prevent
the vehicle from moving:
1. Set the parking brake firmly.
2. Put an automatic transmission shift lever in
P (Park), or shift a manual
transmission to 1 (First) or
R (Reverse).
3. Turn off the engine and do not restart while the vehicle
is raised.
4. Do not allow passengers to remain in the vehicle.
(Continued)
Page 303 of 382
Black plate (61,1)Chevrolet Malibu Owner Manual - 2011
Vehicle Care 10-61
WARNING (Continued)
To be certain the vehicle will not
move, put blocks at the front and
rear of the tire farthest away from
the one being changed. That
would be the tire on the other
side, at the opposite end of the
vehicle.
This vehicle may come with a jack
and spare tire or a tire sealant and
compressor kit. To use the jacking
equipment to change a spare tire
safely, follow the instructions below.
Then see Tire Changing
on
page 10‑68. To use the tire sealant
and compressor kit, see Tire
Sealant and Compressor Kit
on
page 10‑61.
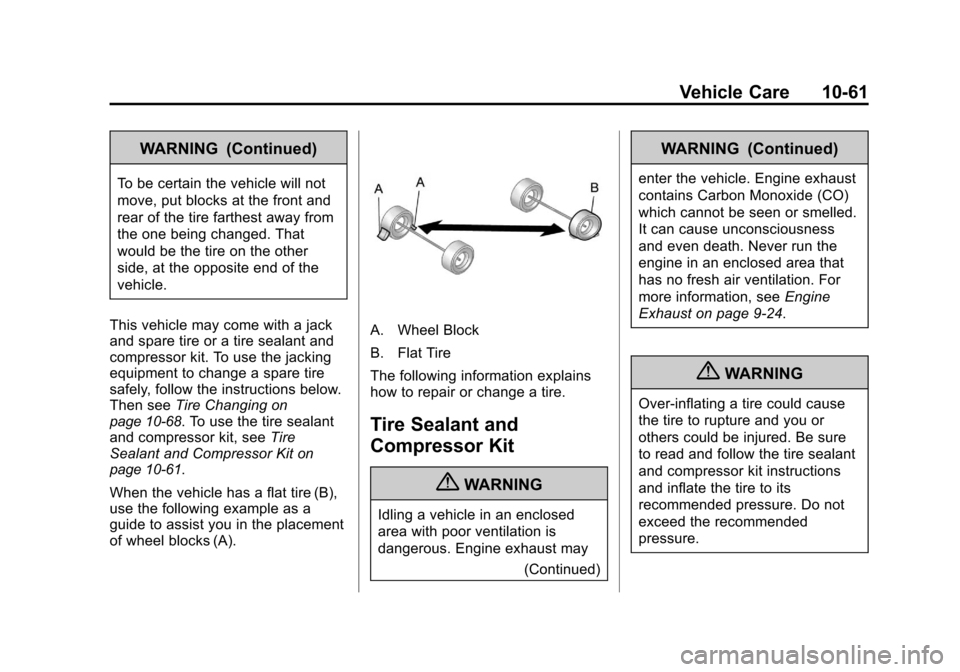
When the vehicle has a flat tire (B),
use the following example as a
guide to assist you in the placement
of wheel blocks (A).
A. Wheel Block
B. Flat Tire
The following information explains
how to repair or change a tire.
Tire Sealant and
Compressor Kit
{WARNING
Idling a vehicle in an enclosed
area with poor ventilation is
dangerous. Engine exhaust may (Continued)
WARNING (Continued)
enter the vehicle. Engine exhaust
contains Carbon Monoxide (CO)
which cannot be seen or smelled.
It can cause unconsciousness
and even death. Never run the
engine in an enclosed area that
has no fresh air ventilation. For
more information, seeEngine
Exhaust on page 9‑24.
{WARNING
Over-inflating a tire could cause
the tire to rupture and you or
others could be injured. Be sure
to read and follow the tire sealant
and compressor kit instructions
and inflate the tire to its
recommended pressure. Do not
exceed the recommended
pressure.
Page 322 of 382
Black plate (80,1)Chevrolet Malibu Owner Manual - 2011
10-80 Vehicle Care
4. Open the hoods and locate thebatteries. Find the positive (+)
and negative (−) terminal
locations on each vehicle. Your
vehicle's positive (+) terminal is
located under a red tethered cap
on the battery. The negative (–)
terminal is located under a black
tethered cap on the battery. See
Engine Compartment Overview
on page 10‑6for more
information on location. Flip the
caps up to access the
positive (+) and negative (–)
terminals.
{WARNING
An electric fan can start up even
when the engine is not running
and can injure you. Keep hands,
clothing and tools away from any
underhood electric fan.
{WARNING
Using a match near a battery can
cause battery gas to explode.
People have been hurt doing this,
and some have been blinded.
Use a flashlight if you need more
light.
Be sure the battery has enough
water. You do not need to add
water to the battery installed in
your new vehicle. But if a battery
has filler caps, be sure the right
amount of fluid is there. If it is low,
add water to take care of that
first. If you don't, explosive gas
could be present.
(Continued)
WARNING (Continued)
Battery fluid contains acid that
can burn you. Do not get it on
you. If you accidentally get it in
your eyes or on your skin, flush
the place with water and get
medical help immediately.
{WARNING
Fans or other moving engine
parts can injure you badly. Keep
your hands away from moving
parts once the engine is running.
5. Check that the jumper cables do not have loose or missing
insulation. If they do, you could
get a shock. The vehicles could
be damaged too.
Page 323 of 382
Black plate (81,1)Chevrolet Malibu Owner Manual - 2011
Vehicle Care 10-81
Before you connect the cables,
here are some things you should
know. Positive (+) will go to
positive (+) or to a remote
positive (+) terminal if the vehicle
has one. Negative (−) will go to a
heavy, unpainted metal engine
part or to a remote negative (−)
terminal if the vehicle has one.
Do not connect positive (+) to
negative (−) or you will get a
short that would damage the
battery and maybe other parts
too. And do not connect the
negative (−) cable to the
negative (−) terminal on the dead
battery because this can cause
sparks.
6. Connect the red positive (+) cable to the positive (+) terminal
of the dead battery. Use a
remote positive (+) terminal if the
vehicle has one. 7. Do not let the other end touch
metal. Connect it to the
positive (+) terminal of the good
battery. Use a remote
positive (+) terminal if the vehicle
has one.
8. Now connect the black negative (−) cable to the
negative (−) terminal of the good
battery. Use a remote
negative (−) terminal if the
vehicle has one.
Do not let the other end touch
anything until the next step. The
other end of the negative (−)
cable does not go to the dead
battery. It goes to a heavy,
unpainted metal engine part or
to a remote negative (−) terminal
on the vehicle with the dead
battery.
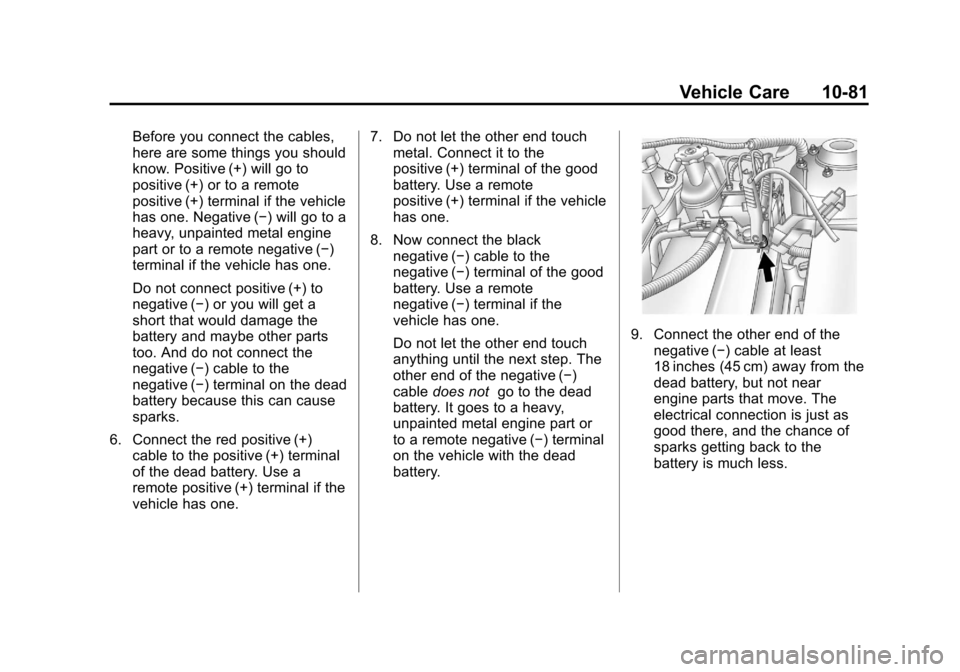
9. Connect the other end of the
negative (−) cable at least
18 inches (45 cm) away from the
dead battery, but not near
engine parts that move. The
electrical connection is just as
good there, and the chance of
sparks getting back to the
battery is much less.
Page 324 of 382
Black plate (82,1)Chevrolet Malibu Owner Manual - 2011
10-82 Vehicle Care
10. Now start the vehicle with thegood battery and run the
engine for a while.
11. Try to start the vehicle that had the dead battery. If it will not
start after a few tries, it
probably needs service.
Notice: If the jumper cables are
connected or removed in the
wrong order, electrical shorting
may occur and damage the
vehicle. The repairs would not be
covered by the vehicle warranty.
Always connect and remove the
jumper cables in the correct
order, making sure that the
cables do not touch each other or
other metal.
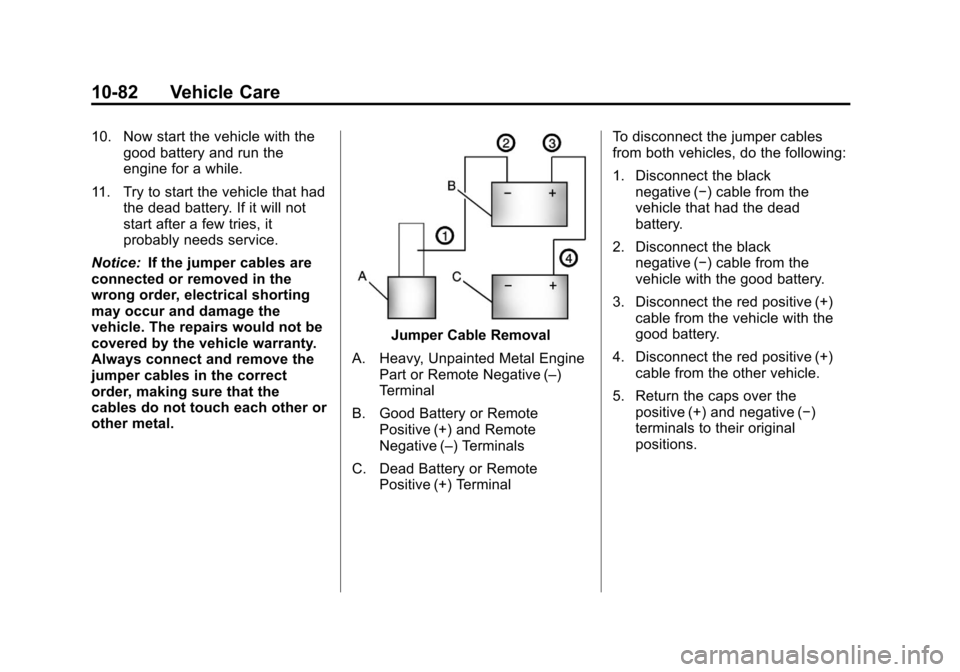
Jumper Cable Removal
A. Heavy, Unpainted Metal Engine Part or Remote Negative (–)
Terminal
B. Good Battery or Remote Positive (+) and Remote
Negative (–) Terminals
C. Dead Battery or Remote Positive (+) Terminal To disconnect the jumper cables
from both vehicles, do the following:
1. Disconnect the black
negative (−) cable from the
vehicle that had the dead
battery.
2. Disconnect the black negative (−) cable from the
vehicle with the good battery.
3. Disconnect the red positive (+) cable from the vehicle with the
good battery.
4. Disconnect the red positive (+) cable from the other vehicle.
5. Return the caps over the positive (+) and negative (−)
terminals to their original
positions.
Page 338 of 382
Black plate (2,1)Chevrolet Malibu Owner Manual - 2011
11-2 Service and Maintenance
{WARNING
Performing maintenance work can
be dangerous. Some jobs can
cause serious injury. Perform
maintenance work only if you
have the required know-how and
the proper tools and equipment.
If in doubt, see your dealer to
have a qualified technician do the
work. SeeDoing Your Own
Service Work on page 10‑4.
At your dealer, you can be certain
that you will receive the highest
level of service available. Your
dealer has specially trained service
technicians, uses genuine
replacement parts, as well as,
up‐to‐date tools and equipment to
ensure fast and accurate
diagnostics. The proper replacement parts,
fluids, and lubricants to use are
listed in
Recommended Fluids and
Lubricantson page 11‑6and
Maintenance Replacement Partson
page 11‑7. We recommend the use
of genuine parts from your dealer.
Rotation of New Tires
To maintain ride, handling, and
performance of the vehicle, it is
important that the first rotation
service for new tires be performed.
Tires should be rotated every
12 000 km/7,500 miles. See Tire
Rotation on page 10‑52.
Scheduled
Maintenance
When the Change Oil Soon
Message Displays
Change engine oil and filter. See
Engine Oilon page 10‑9. An
Emission Control Service.
When the CHANGE OIL SOON
message displays, service is
required for the vehicle as soon
as possible, within the next
1 000 km/600 miles. If driving
under the best conditions, the
engine oil life system might not
indicate the need for vehicle service
for more than a year. The engine
oil and filter must be changed at
least once a year and the oil life
system must be reset.
Page 339 of 382
Black plate (3,1)Chevrolet Malibu Owner Manual - 2011
Service and Maintenance 11-3
Your dealer has trained service
technicians who will perform this
work and reset the system. If the
engine oil life system is reset
accidentally, service the vehicle
within 5 000 km/3,000 miles since
the last service. Reset the oil life
system whenever the oil is changed.
SeeEngine Oil Life System
on
page 10‑12.
Every Engine Oil Change
.Change engine oil and filter.
Reset oil life system. See
Engine Oil
on page 10‑9and
Engine Oil Life Systemon
page 10‑12. An Emission Control
Service.
.Engine coolant level check. See
Engine Coolant on page 10‑16.
.Engine cooling system
inspection. Visual inspection of
hoses, pipes, fittings, and
clamps and replacement,
if needed.
.Windshield washer fluid level
check. See Washer Fluidon
page 10‑22.
.Windshield wiper blade
inspection for wear, cracking,
or contamination and windshield
and wiper blade cleaning, if contaminated. See
Exterior
Care
on page 10‑85. Worn or
damaged wiper blade
replacement. See Wiper Blade
Replacement on page 10‑27.
.Tire inflation pressures check.
See Tire Pressure on
page 10‑45.
.Tire wear inspection. See Tire
Inspection on page 10‑51.
.Rotate tires if necessary. See
Tire Rotation on page 10‑52.
.Fluids visual leak check (or
every 12 months, whichever
occurs first). A leak in any
system must be repaired and
the fluid level checked.
.Engine air cleaner filter
inspection. See Engine Air
Cleaner/Filter on page 10‑14.
.Brake system inspection (or
every 12 months, whichever
occurs first).
Page 340 of 382
Black plate (4,1)Chevrolet Malibu Owner Manual - 2011
11-4 Service and Maintenance
.Steering and suspension
inspection. Visual inspection for
damaged, loose, or missing
parts or signs of wear.
.Body hinges and latches, key
lock cylinders, folding seat
hardware, and rear compartment
hinges lubrication. See
Recommended Fluids and
Lubricants
on page 11‑6. More
frequent lubrication may be
required when the vehicle is
exposed to a corrosive
environment. Applying silicone
grease on weatherstrips with a
clean cloth makes them last
longer, seal better, and not stick
or squeak.
.Restraint system component
check. See Safety System
Check on page 3‑22.
.Fuel system inspection for
damage or leaks.
.Exhaust system and nearby heat
shields inspection for loose or
damaged components.
Additional Required Services
Every 12 000 km/7,500 Miles
.Rotate tires. Tires should be
rotated every 12 000 km/
7,500 miles. See Tire Rotation
on page 10‑52.
At Each Fuel Stop
.Engine oil level check. See
Engine Oil on page 10‑9.
.Engine coolant level check. See
Engine Coolant on page 10‑16.
.Windshield washer fluid level
check. See Washer Fluidon
page 10‑22.
Once a Month
.Tire inflation check. See Tire
Pressure on page 10‑45.
.Tire wear inspection. See Tire
Inspection on page 10‑51.
.Sunroof track and seal
inspection, if equipped. See
Sunroof on page 2‑19. Once a Year
.See
Starter Switch Checkon
page 10‑25.
.See Automatic Transmission
Shift Lock Control Function
Check on page 10‑26.
.See Ignition Transmission Lock
Check on page 10‑26.
.See Park Brake and P (Park)
Mechanism Checkon
page 10‑26.
.Accelerator pedal check for
damage, high effort, or binding.
Replace if needed.
.If the vehicle has a Tire Sealant
and Compressor Kit, check the
sealant expiration date printed
on the instruction label of the kit.
See Tire Sealant and
Compressor Kit on page 10‑61.
.Underbody flushing service.