2011 CHEVROLET IMPALA ECU
[x] Cancel search: ECUPage 107 of 376
Black plate (59,1)Chevrolet Impala Owner Manual - 2011
Seats and Restraints 3-59
Do not secure a child seat in a
position without a top tether anchor
if a national or local law requires
that the top tether be anchored, or if
the instructions that come with the
child restraint say that the top strap
must be anchored.
In Canada, the law requires that
forward-facing child restraints have
a top tether, and that the tether be
attached.
You will be using the lap-shoulder
belt to secure the child restraint in
this position. Follow the instructions
that came with the child restraint.
1. Move the seat as far back as itwill go before securing the
forward-facing child restraint.
When the passenger sensing
system has turned off the right
front passenger frontal airbag,
the off indicator on the
passenger airbag status
indicator should light and stay
lit when the vehicle is started.
See Passenger Airbag Status
Indicator on page 5‑16. 2. Put the child restraint on
the seat.
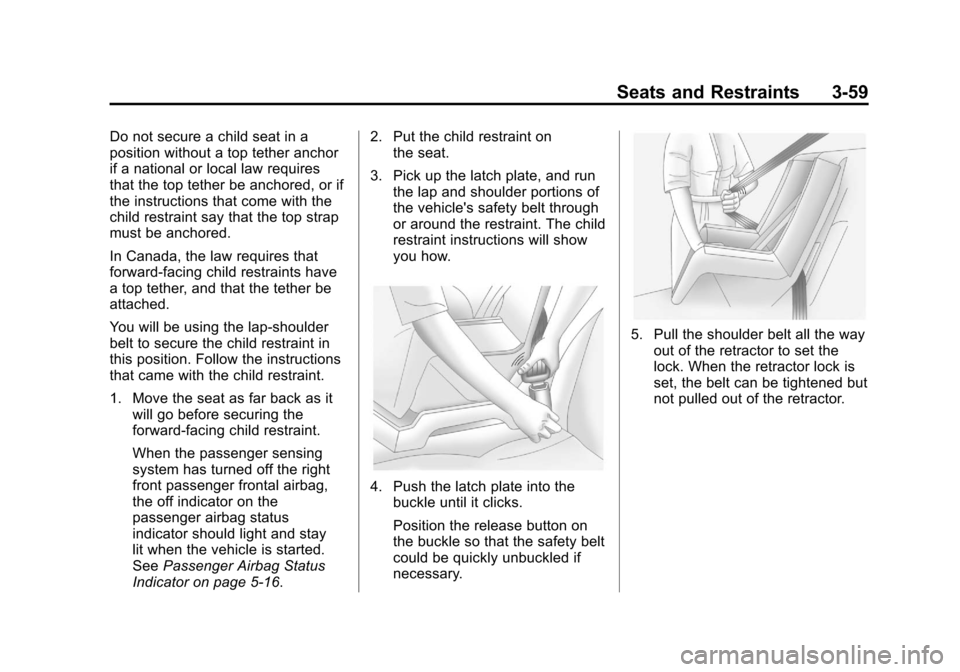
3. Pick up the latch plate, and run the lap and shoulder portions of
the vehicle's safety belt through
or around the restraint. The child
restraint instructions will show
you how.
4. Push the latch plate into thebuckle until it clicks.
Position the release button on
the buckle so that the safety belt
could be quickly unbuckled if
necessary.
5. Pull the shoulder belt all the wayout of the retractor to set the
lock. When the retractor lock is
set, the belt can be tightened but
not pulled out of the retractor.
Page 108 of 376
Black plate (60,1)Chevrolet Impala Owner Manual - 2011
3-60 Seats and Restraints
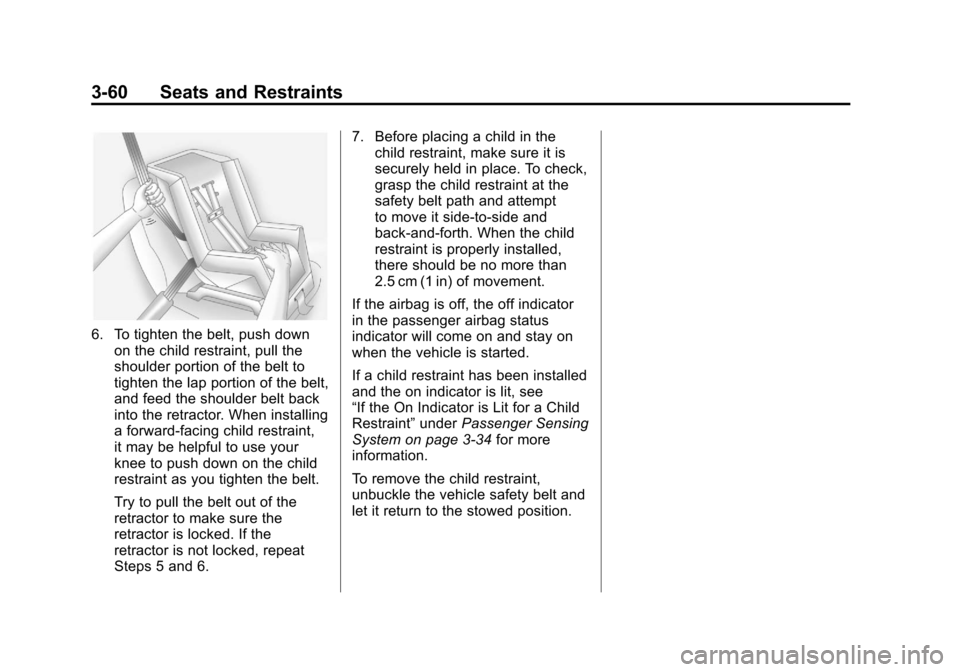
6. To tighten the belt, push downon the child restraint, pull the
shoulder portion of the belt to
tighten the lap portion of the belt,
and feed the shoulder belt back
into the retractor. When installing
a forward-facing child restraint,
it may be helpful to use your
knee to push down on the child
restraint as you tighten the belt.
Try to pull the belt out of the
retractor to make sure the
retractor is locked. If the
retractor is not locked, repeat
Steps 5 and 6. 7. Before placing a child in the
child restraint, make sure it is
securely held in place. To check,
grasp the child restraint at the
safety belt path and attempt
to move it side‐to‐side and
back‐and‐forth. When the child
restraint is properly installed,
there should be no more than
2.5 cm (1 in) of movement.
If the airbag is off, the off indicator
in the passenger airbag status
indicator will come on and stay on
when the vehicle is started.
If a child restraint has been installed
and the on indicator is lit, see
“If the On Indicator is Lit for a Child
Restraint” underPassenger Sensing
System on page 3‑34 for more
information.
To remove the child restraint,
unbuckle the vehicle safety belt and
let it return to the stowed position.
Page 111 of 376

Black plate (1,1)Chevrolet Impala Owner Manual - 2011
Instruments and Controls 5-1
Instruments and
Controls
Controls
Steering Wheel Adjustment . . . 5-2
Steering Wheel Controls . . . . . . 5-3
Horn . . . . . . . . . . . . . . . . . . . . . . . . . . 5-3
Windshield Wiper/Washer . . . . . 5-4
Compass . . . . . . . . . . . . . . . . . . . . . 5-5
Clock . . . . . . . . . . . . . . . . . . . . . . . . . 5-7
Power Outlets . . . . . . . . . . . . . . . . . 5-9
Cigarette Lighter . . . . . . . . . . . . . . 5-9
Ashtrays . . . . . . . . . . . . . . . . . . . . . 5-10
Warning Lights, Gauges, and
Indicators
Warning Lights, Gauges, andIndicators . . . . . . . . . . . . . . . . . . 5-10
Instrument Cluster . . . . . . . . . . . 5-11
Speedometer . . . . . . . . . . . . . . . . 5-12
Odometer . . . . . . . . . . . . . . . . . . . . 5-12
Tachometer . . . . . . . . . . . . . . . . . . 5-12
Fuel Gauge . . . . . . . . . . . . . . . . . . 5-12 Engine Coolant Temperature
Gauge . . . . . . . . . . . . . . . . . . . . . . 5-13
Safety Belt Reminders . . . . . . . 5-14
Airbag Readiness Light . . . . . . 5-15
Passenger Airbag Status Indicator . . . . . . . . . . . . . . . . . . . . 5-16
Charging System Light . . . . . . 5-16
Malfunction Indicator Lamp . . . . . . . . . . . . . 5-17
Brake System Warning Light . . . . . . . . . . . . . . . . . . . . . . . 5-19
Antilock Brake System (ABS) Warning Light . . . . . . . . . . . . . . 5-20
Electronic Stability Control (ESC) Indicator Light . . . . . . . 5-21
Traction Control System (TCS) Warning Light . . . . . . . 5-21
Engine Coolant Temperature Warning Light . . . . . . . . . . . . . . 5-22
Tire Pressure Light . . . . . . . . . . 5-22
Engine Oil Pressure Light . . . . 5-23
Security Light . . . . . . . . . . . . . . . . 5-23
High-Beam on Light . . . . . . . . . 5-24
Front Fog Lamp Light . . . . . . . . 5-24
Cruise Control Light . . . . . . . . . 5-24
Information Displays
Driver Information Center (DIC) . . . . . . . . . . . . . . . 5-24
Vehicle Messages
Vehicle Messages . . . . . . . . . . . 5-28
Battery Voltage and ChargingMessages . . . . . . . . . . . . . . . . . . 5-29
Brake System Messages . . . . 5-29
Door Ajar Messages . . . . . . . . . 5-29
Engine Cooling System Messages . . . . . . . . . . . . . . . . . . 5-30
Engine Oil Messages . . . . . . . . 5-31
Engine Power Messages . . . . 5-31
Fuel System Messages . . . . . . 5-32
Key and Lock Messages . . . . . 5-32
Lamp Messages . . . . . . . . . . . . . 5-32
Ride Control System Messages . . . . . . . . . . . . . . . . . . 5-32
Airbag System Messages . . . . 5-33
Anti-Theft Alarm System Messages . . . . . . . . . . . . . . . . . . 5-34
Service Vehicle Messages . . . 5-34
Tire Messages . . . . . . . . . . . . . . . 5-34
Transmission Messages . . . . . 5-35
Vehicle Reminder Messages . . . . . . . . . . . . . . . . . . 5-36
Washer Fluid Messages . . . . . 5-36
Page 133 of 376
Black plate (23,1)Chevrolet Impala Owner Manual - 2011
Instruments and Controls 5-23
A tire pressure message can
accompany the light. SeeTire
Messages on page 5‑34 for more
information. Stop as soon as
possible, and inflate the tires to the
pressure value shown on the Tire
and Loading Information Label.
See Tire Pressure on page 10‑44
for more information.
When the Light Flashes First and
Then is On Steady
This indicates that there may be a
problem with the Tire Pressure
Monitor System. The light flashes
for about a minute and stays on
steady for the remainder of the
ignition cycle. This sequence
repeats with every ignition cycle.
See Tire Pressure Monitor
Operation on page 10‑47 for
more information.Engine Oil Pressure Light
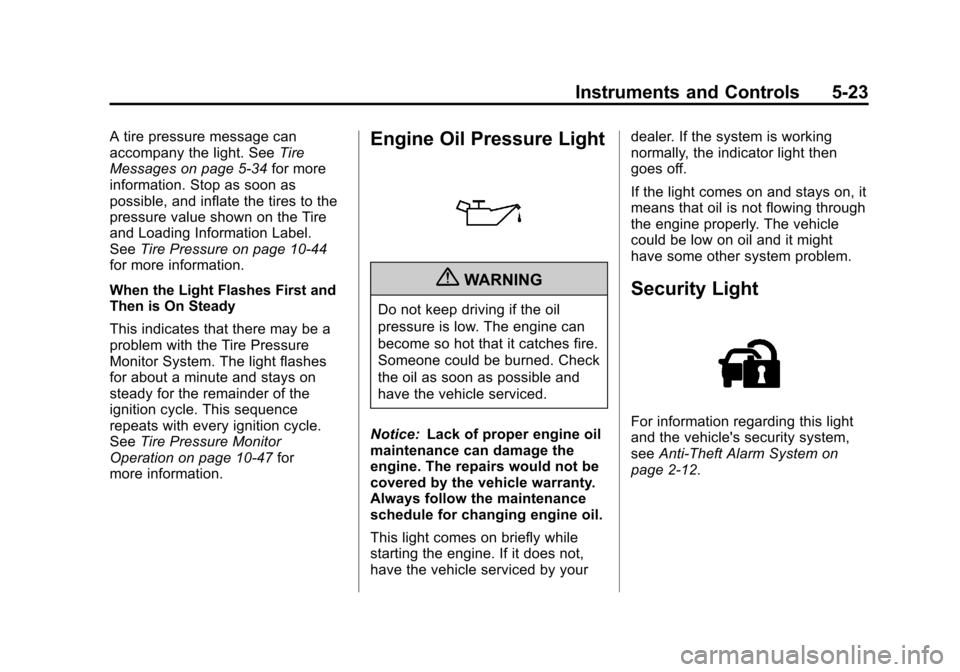
{WARNING
Do not keep driving if the oil
pressure is low. The engine can
become so hot that it catches fire.
Someone could be burned. Check
the oil as soon as possible and
have the vehicle serviced.
Notice: Lack of proper engine oil
maintenance can damage the
engine. The repairs would not be
covered by the vehicle warranty.
Always follow the maintenance
schedule for changing engine oil.
This light comes on briefly while
starting the engine. If it does not,
have the vehicle serviced by your dealer. If the system is working
normally, the indicator light then
goes off.
If the light comes on and stays on, it
means that oil is not flowing through
the engine properly. The vehicle
could be low on oil and it might
have some other system problem.
Security Light
For information regarding this light
and the vehicle's security system,
see
Anti-Theft Alarm System on
page 2‑12.
Page 152 of 376
Black plate (42,1)Chevrolet Impala Owner Manual - 2011
5-42 Instruments and Controls
Universal Remote
System
SeeRadio Frequency Statement on
page 13‑17 for information
regarding Part 15 of the Federal
Communications Commission (FCC)
rules and Industry Canada
Standards RSS-210/220/310.
Universal Remote System
Programming
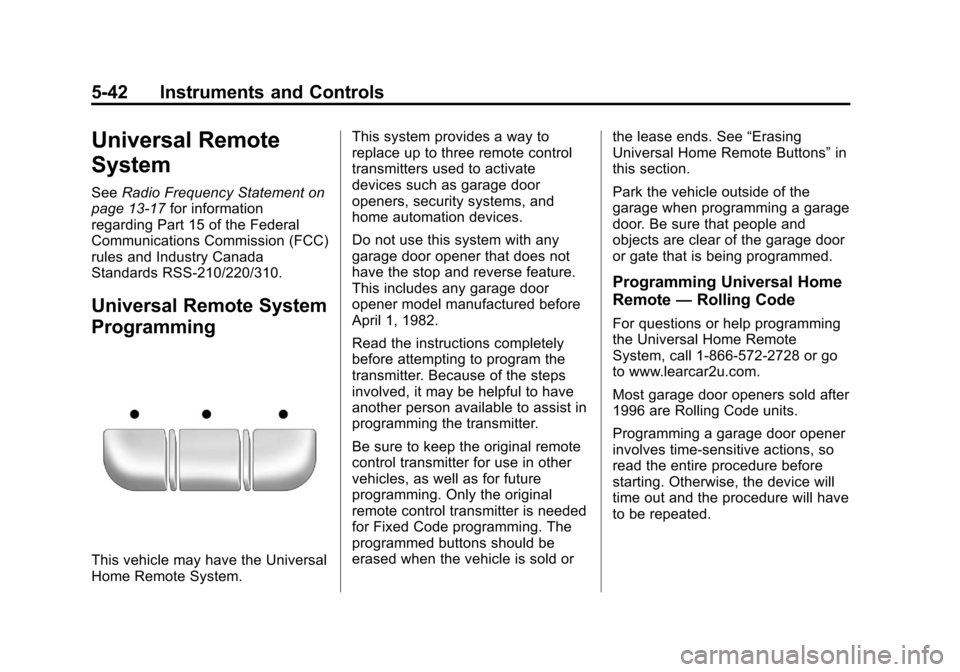
This vehicle may have the Universal
Home Remote System. This system provides a way to
replace up to three remote control
transmitters used to activate
devices such as garage door
openers, security systems, and
home automation devices.
Do not use this system with any
garage door opener that does not
have the stop and reverse feature.
This includes any garage door
opener model manufactured before
April 1, 1982.
Read the instructions completely
before attempting to program the
transmitter. Because of the steps
involved, it may be helpful to have
another person available to assist in
programming the transmitter.
Be sure to keep the original remote
control transmitter for use in other
vehicles, as well as for future
programming. Only the original
remote control transmitter is needed
for Fixed Code programming. The
programmed buttons should be
erased when the vehicle is sold or
the lease ends. See
“Erasing
Universal Home Remote Buttons” in
this section.
Park the vehicle outside of the
garage when programming a garage
door. Be sure that people and
objects are clear of the garage door
or gate that is being programmed.
Programming Universal Home
Remote —Rolling Code
For questions or help programming
the Universal Home Remote
System, call 1-866-572-2728 or go
to www.learcar2u.com.
Most garage door openers sold after
1996 are Rolling Code units.
Programming a garage door opener
involves time-sensitive actions, so
read the entire procedure before
starting. Otherwise, the device will
time out and the procedure will have
to be repeated.
Page 154 of 376
Black plate (44,1)Chevrolet Impala Owner Manual - 2011
5-44 Instruments and Controls
To program another Rolling Code
device such as an additional garage
door opener, a security device,
or home automation device, repeat
Steps 1 through 5, choosing a
different function button in
Step 3 than what was used for
the garage door opener.
If these instructions do not work,
the garage door opener is probably
a Fixed Code unit. Follow the
Programming instructions that
follow for a Fixed Code garage
door opener.
Programming Universal Home
Remote—Fixed Code
For questions or help programming
the Universal Home Remote
System, call 1-866-572-2728 or go
to www.learcar2u.com.
Most garage door openers sold
before 1996 are Fixed Code units. Programming a garage door opener
involves time-sensitive actions, so
read the entire procedure before
starting. Otherwise, the device will
time out and the procedure will have
to be repeated.
To program up to three devices:
1. To verify that the garage door
opener is a Fixed Code unit,
remove the battery cover on the
hand held transmitter supplied
by the manufacturer of the
garage door opener motor.
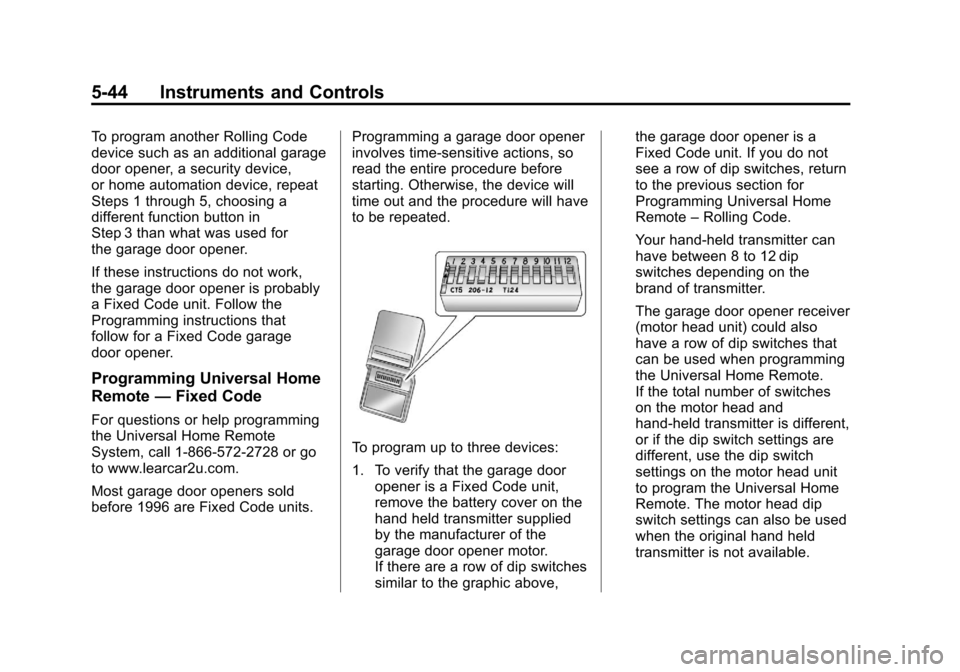
If there are a row of dip switches
similar to the graphic above, the garage door opener is a
Fixed Code unit. If you do not
see a row of dip switches, return
to the previous section for
Programming Universal Home
Remote
–Rolling Code.
Your hand-held transmitter can
have between 8 to 12 dip
switches depending on the
brand of transmitter.
The garage door opener receiver
(motor head unit) could also
have a row of dip switches that
can be used when programming
the Universal Home Remote.
If the total number of switches
on the motor head and
hand-held transmitter is different,
or if the dip switch settings are
different, use the dip switch
settings on the motor head unit
to program the Universal Home
Remote. The motor head dip
switch settings can also be used
when the original hand held
transmitter is not available.
Page 156 of 376
Black plate (46,1)Chevrolet Impala Owner Manual - 2011
5-46 Instruments and Controls
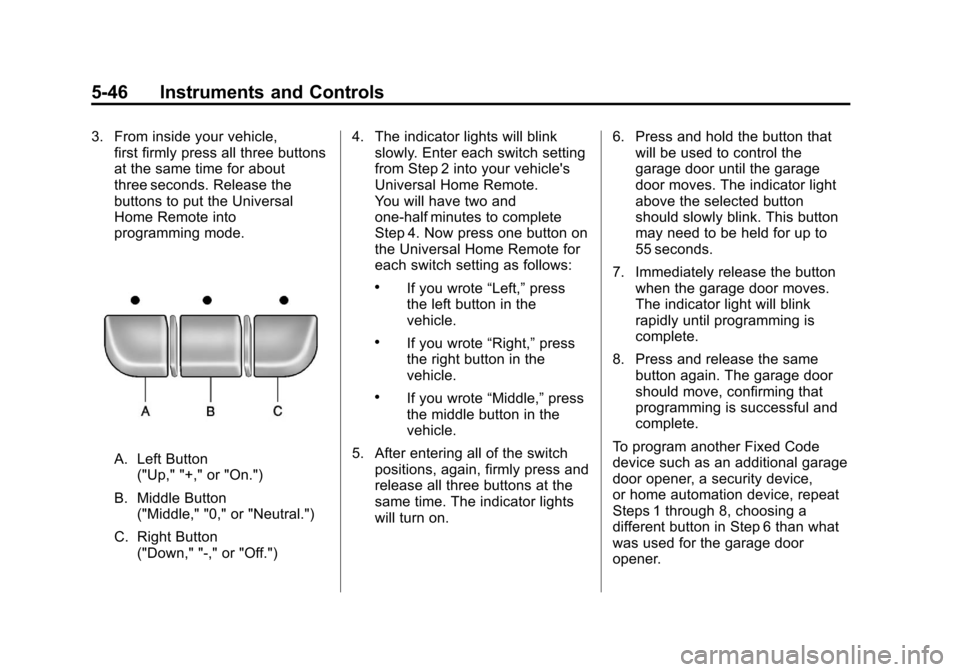
3. From inside your vehicle,first firmly press all three buttons
at the same time for about
three seconds. Release the
buttons to put the Universal
Home Remote into
programming mode.
A. Left Button
("Up," "+," or "On.")
B. Middle Button ("Middle," "0," or "Neutral.")
C. Right Button ("Down," "-," or "Off.") 4. The indicator lights will blink
slowly. Enter each switch setting
from Step 2 into your vehicle's
Universal Home Remote.
You will have two and
one-half minutes to complete
Step 4. Now press one button on
the Universal Home Remote for
each switch setting as follows:
.If you wrote “Left,”press
the left button in the
vehicle.
.If you wrote “Right,”press
the right button in the
vehicle.
.If you wrote “Middle,”press
the middle button in the
vehicle.
5. After entering all of the switch positions, again, firmly press and
release all three buttons at the
same time. The indicator lights
will turn on. 6. Press and hold the button that
will be used to control the
garage door until the garage
door moves. The indicator light
above the selected button
should slowly blink. This button
may need to be held for up to
55 seconds.
7. Immediately release the button when the garage door moves.
The indicator light will blink
rapidly until programming is
complete.
8. Press and release the same button again. The garage door
should move, confirming that
programming is successful and
complete.
To program another Fixed Code
device such as an additional garage
door opener, a security device,
or home automation device, repeat
Steps 1 through 8, choosing a
different button in Step 6 than what
was used for the garage door
opener.
Page 177 of 376

Black plate (11,1)Chevrolet Impala Owner Manual - 2011
Infotainment System 7-11
XM Radio Messages
XL (Explicit Language
Channels):These channels, or
any others, can be blocked at a
customer's request, by calling
1-800-929-2100.
XM Updating: The encryption code
in the receiver is being updated, and
no action is required. This process
should take no longer than
30 seconds.
No XM Signal: The system is
functioning correctly, but the vehicle
is in a location that is blocking the
XM signal. When the vehicle is
moved into an open area, the signal
should return.
Loading XM: The audio system is
acquiring and processing audio and
text data. No action is needed. This
message should disappear shortly.
Channel Off Air: This channel is
not currently in service. Tune in to
another channel. Channel Unauth :
This channel is
blocked or cannot be received with
your XM subscription package.
Channel Unavail: This previously
assigned channel is no longer
assigned. Tune to another station.
If this station was one of the
presets, choose another station for
that preset button.
No Artist Info: No artist
information is available at this time
on this channel. The system is
working properly.
No Title Info: No song title
information is available at this time
on this channel. The system is
working properly.
No CAT Info: No category
information is available at this time
on this channel. The system is
working properly.
No Information: No text or
informational messages are
available at this time on this
channel. The system is working
properly. No Subscription Please Renew:
XM subscription needs to be
reactivated. Contact XM at
xmradio.com or call
1-800-929-2100.
CAT Not Found:
There are no
channels available for the selected
category. The system is working
properly.
XM Theftlocked: The XM receiver
in the vehicle could have previously
been in another vehicle. For security
purposes, XM receivers cannot be
swapped between vehicles. If this
message is received after having
the vehicle serviced, check with
your dealer.
XM Radio ID: If tuned to channel 0,
this message alternates with the
XM Radio 8 digit radio ID label.
This label is needed to activate
the service.
Unknown: If this message is
received when tuned to channel 0,
there could be a receiver fault.
Consult with your dealer.