2011 CHEVROLET IMPALA steering
[x] Cancel search: steeringPage 113 of 376
Black plate (3,1)Chevrolet Impala Owner Manual - 2011
Instruments and Controls 5-3
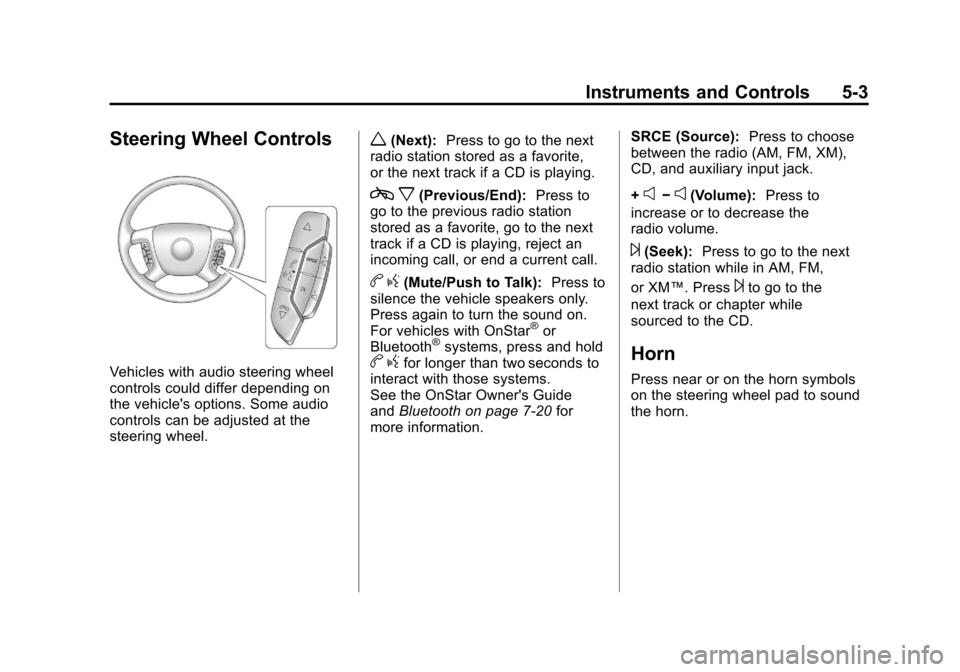
Steering Wheel Controls
Vehicles with audio steering wheel
controls could differ depending on
the vehicle's options. Some audio
controls can be adjusted at the
steering wheel.
w(Next):Press to go to the next
radio station stored as a favorite,
or the next track if a CD is playing.
c x(Previous/End): Press to
go to the previous radio station
stored as a favorite, go to the next
track if a CD is playing, reject an
incoming call, or end a current call.
b g(Mute/Push to Talk): Press to
silence the vehicle speakers only.
Press again to turn the sound on.
For vehicles with OnStar
®or
Bluetooth®systems, press and holdb gfor longer than two seconds to
interact with those systems.
See the OnStar Owner's Guide
and Bluetooth on page 7‑20 for
more information. SRCE (Source):
Press to choose
between the radio (AM, FM, XM),
CD, and auxiliary input jack.
+
e−e(Volume): Press to
increase or to decrease the
radio volume.
¨(Seek): Press to go to the next
radio station while in AM, FM,
or XM™. Press
¨to go to the
next track or chapter while
sourced to the CD.
Horn
Press near or on the horn symbols
on the steering wheel pad to sound
the horn.
Page 129 of 376
Black plate (19,1)Chevrolet Impala Owner Manual - 2011
Instruments and Controls 5-19
Emissions Inspection and
Maintenance Programs
Some state/provincial and local
governments may have programs to
inspect the on-vehicle emission
control equipment. For the
inspection, the emission system
test equipment is connected to
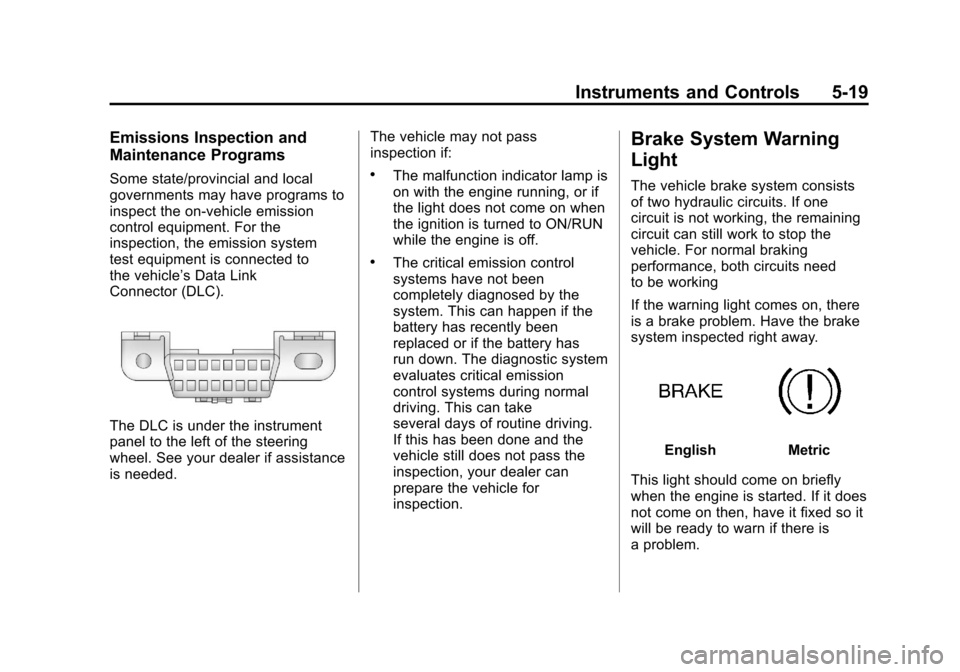
the vehicle’s Data Link
Connector (DLC).
The DLC is under the instrument
panel to the left of the steering
wheel. See your dealer if assistance
is needed. The vehicle may not pass
inspection if:
.The malfunction indicator lamp is
on with the engine running, or if
the light does not come on when
the ignition is turned to ON/RUN
while the engine is off.
.The critical emission control
systems have not been
completely diagnosed by the
system. This can happen if the
battery has recently been
replaced or if the battery has
run down. The diagnostic system
evaluates critical emission
control systems during normal
driving. This can take
several days of routine driving.
If this has been done and the
vehicle still does not pass the
inspection, your dealer can
prepare the vehicle for
inspection.
Brake System Warning
Light
The vehicle brake system consists
of two hydraulic circuits. If one
circuit is not working, the remaining
circuit can still work to stop the
vehicle. For normal braking
performance, both circuits need
to be working
If the warning light comes on, there
is a brake problem. Have the brake
system inspected right away.
EnglishMetric
This light should come on briefly
when the engine is started. If it does
not come on then, have it fixed so it
will be ready to warn if there is
a problem.
Page 144 of 376
Black plate (34,1)Chevrolet Impala Owner Manual - 2011
5-34 Instruments and Controls
Anti-Theft Alarm System
Messages
SERVICE THEFT SYSTEM
This message displays when there
is a problem with the theft-deterrent
system programmed in the key.
A fault has been detected in the
system which means that the
system is disabled and it is not
protecting the vehicle. The vehicle
usually restarts; however, you may
want to take the vehicle to your
dealer before turning off the engine.
SeeImmobilizer Operation on
page 2‑13 for more information.
THEFT ATTEMPTED
This message displays if the
content theft-deterrent system has
detected a break-in attempt while
you were away from your vehicle.
SeeAnti-Theft Alarm System on
page 2‑12 for more information.
Service Vehicle Messages
ERROR
This message displays while
viewing the odometer or trip
odometers if there is a problem
with the instrument panel cluster.
See your dealer for service.
SERVICE POWER STEERING
This message displays when a
problem is detected with the power
steering system. When this
message is displayed, you may
notice that the effort required to
steer the vehicle increases or feels
heavier, but you will still be able to
steer the vehicle. Have your vehicle
serviced by your dealer immediately.
SERVICE VEHICLE SOON
This message displays when a
non-emissions related malfunction
occurs. Have the vehicle serviced
by your dealer as soon as possible.
STARTING DISABLED
SERVICE THROTTLE
This message displays if the starting
of the engine is disabled due to the
electronic throttle control system.
Have your vehicle serviced by your
dealer immediately.
This message only appears while
the ignition is in ON/RUN, and
will not disappear until the problem
is resolved.
This message cannot be
acknowledged.
Tire Messages
SERVICE TIRE MONITOR
SYSTEM
On vehicles with the Tire Pressure
Monitor System (TPMS), this
message displays if a part on the
TPMS is not working properly.
The tire pressure light also flashes
and then remains on during the
same ignition cycle. See Tire
Pressure Light on page 5‑22.
Page 160 of 376

Black plate (2,1)Chevrolet Impala Owner Manual - 2011
6-2 Lighting
Exterior Lighting
Exterior Lamp Controls
The exterior lamps control is located
on the instrument panel to the left of
the steering wheel.It controls the following systems:
.Headlamps
.Taillamps
.Parking Lamps
.License Plate Lamps
.Instrument Panel Lights
.Fog Lamps (If Equipped)
The exterior lamps control has
four positions:
O(Off): Turns off the automatic
headlamps and daytime running
lamps (DRL). Turning the headlamp
control to the off position again will
turn the automatic headlamps or
DRL back on. For vehicles first sold
in Canada, the off position only
works when the vehicle is shifted
into the P (Park) position. AUTO (Automatic):
Automatically
turns on the headlamps at normal
brightness, together with the
following:
.Parking Lamps
.Instrument Panel Lights
.Taillamps
.License Plate Lamps
;(Parking Lamps): Turns on
the parking lamps together with
the following:
.Instrument Panel Lights
.Taillamps
.License Plate Lamps
Page 162 of 376

Black plate (4,1)Chevrolet Impala Owner Manual - 2011
6-4 Lighting
Daytime Running
Lamps (DRL)/Automatic
Headlamp System
Daytime Running Lamps (DRL) can
make it easier for others to see the
front of your vehicle during the day.
Fully functional daytime running
lamps are required on all vehicles
first sold in Canada.
The DRL system makes the
low-beam headlamps come on at a
reduced brightness when the
following conditions are met:
.The ignition is in the ON/RUN
position.
.The exterior lamps control is
in AUTO.
.The engine is running.When the DRL are on, the regular
headlamps, taillamps, sidemarker,
and other lamps are not on. The
instrument panel and cluster are
also not on.
The headlamps automatically
change from DRL to the regular
headlamps depending on the
darkness of the surroundings.
The other lamps that come on with
the headlamps will also come on.
When it is bright enough outside,
the headlamps go off and the
DRL come on.
The regular headlamp system
should be turned on when needed.
Do not cover the light sensor on top
of the instrument panel because it
works with the DRL.
Hazard Warning Flashers
The hazard warning flashers let
you warn others that you have a
problem.
The hazard warning flasher button
is located on top of the steering
column.
|:
Press to make the front and
rear turn signal lamps flash on and
off. Press the button again to turn
the flashers off.
When the hazard warning flashers
are on, the turn signals will
not work.
Page 163 of 376

Black plate (5,1)Chevrolet Impala Owner Manual - 2011
Lighting 6-5
Turn and Lane-Change
Signals
An arrow on the instrument panel
cluster will flash in the direction of
the turn or lane change.
Move the lever all the way up or
down to signal a turn.Raise or lower the lever until the
arrow starts to flash to signal a lane
change. Hold it there until the lane
change is completed. If the lever is
briefly pressed and released, the
turn signal flashes three times.
The lever returns to its starting
position whenever it is released.
If after signaling a turn or lane
change the arrow flashes rapidly or
does not come on, a signal bulb
might be burned out.
Have the bulbs replaced. If the bulb
is not burned out, check the fuse.
See
Fuses and Circuit Breakers on
page 10‑34.
Turn Signal On Chime
If either one of the turn signals are
left on and the vehicle has been
driven more than 1.2 km (0.75 mile),
a chime will sound.
Fog Lamps
#
(Fog Lamps): For vehicles with
fog lamps, the button is located on
the exterior lamps control. The
exterior lamps control is located on
the instrument panel to the left of
the steering column.
The ignition must be in the
ON/RUN position for the fog lamps
to come on.
Press
#to turn the fog lamps on or
off. A light will come on in the
instrument panel cluster.
When the headlamps are changed
to high beam, the fog lamps also
go off.
Some localities have laws that
require the headlamps to be on
along with the fog lamps.
Page 164 of 376
Black plate (6,1)Chevrolet Impala Owner Manual - 2011
6-6 Lighting
Interior Lighting
Instrument Panel
Illumination Control
D
(Instrument Panel
Brightness): The knob with this
symbol on it is located next to the
exterior lamps control to the left of
the steering wheel. Push the knob in
all the way until it extends out and
then turn the knob clockwise or
counterclockwise to brighten or dim
the lights. Push the knob back in
when finished.
Courtesy Lamps
When a door is opened, the
courtesy lamps automatically come
on. They make it easy for you to
enter and leave your vehicle. You
can also manually turn these lamps
on by fully turning the instrument
panel brightness control clockwise. The reading lamps, located on the
rearview mirror, can be turned on or
off independent of the automatic
courtesy lamps, when the doors
are closed.
Dome Lamps
The center mounted dome lamp
overhead comes on when a door is
opened. This lamp can also be
turned on by turning the instrument
panel brightness control clockwise.
Reading Lamps
The vehicle has reading lamps that
also act as the dome lamp. Press
the button near each lamp to turn
them on and off.
Map Lamps
The vehicle has map lamps on the
rearview mirror. Press the button
near each lamp on the mirror to turn
the map lamps on and off.
Lighting Features
Entry Lighting
For vehicles with courtesy lamps,
they come on and stay on for a set
time whenever the unlock symbol is
pressed on the Remote Keyless
Entry (RKE) transmitter.
If a door is opened, the lamps stay
on while it is open and then turn off
automatically about 20 seconds
after the door is closed. If the unlock
symbol is pressed and no door is
opened, the lamps turn off after
about 20 seconds.
Entry lighting includes a feature
called theater dimming. With theater
dimming, the lamps do not turn off
at the end of the delay time.
Instead, they slowly dim and then
go out. The delay time is canceled if
the ignition key is turned to ON/RUN
or the power door lock switch is
pressed. The lamps will dim
right away.
Page 173 of 376
Black plate (7,1)Chevrolet Impala Owner Manual - 2011
Infotainment System 7-7
.To scan preset stations in the
selected band, press and hold
©SEEK for four seconds until a
double beep sounds. The radio
goes to a stored preset, plays
for a few seconds, then goes
to the next stored preset. Press
©SEEK again to stop scanning
preset stations.
¨SEEK: Press to seek or scan
stations with a strong signal in the
selected band.
.To seek stations, press and
release
¨SEEK to go to the
next station and stay there.
.To scan stations, press and hold¨SEEK for a few seconds until
the radio beeps once. The radio
goes to a station, plays for a
few seconds, then goes to the
next station. Press
¨SEEK
again to stop scanning.
.To scan preset stations in the
selected band, press and
hold
¨SEEK for four seconds
until a double beep sounds. The radio goes to a stored
preset, plays for a few seconds,
then goes to the next stored
preset. Press
¨SEEK again to
stop scanning preset stations.
Storing Radio Stations
Drivers are encouraged to store
radio station while the vehicle is
parked, See Defensive Driving on
page 9‑2. Tune to stored radio
stations using the presets, favorites
button, and steering wheel controls,
if the vehicle has this feature.
Radios that have a FAV button store
radio stations as favorites, up to
36 stations can be programmed as
favorites using the 6 softkeys below
the radio station frequency tabs and
by using the FAV button. Press the
FAV button to go through up to
6 pages of favorites, each having
6 favorite stations available per
page. Each page of favorites can
contain any combination of AM, FM,
or XM, if equipped, stations. Radios that do not have a
FAV button store radio stations
as presets, up to 18 stations
(6 FM1, 6 FM2, and 6 AM), can be
programmed on the 6 numbered
pushbuttons.
Storing a Radio Station as a
Preset, Radio with CD (Base)
Radios that have numbered
pushbuttons store radio stations
as presets.
Up to 18 stations (6 FM1, 6 FM2,
and 6 AM), can be programmed on
the six numbered buttons.
To store preset stations:
1. Tune to a radio station.
2. Press and hold one of the
6 numbered pushbuttons for
3 seconds until a beep sounds.
3. Repeat Steps 1 and 2 to store additional radio stations.