2011 CHEVROLET HHR service
[x] Cancel search: servicePage 298 of 430
Black plate (22,1)Chevrolet HHR Owner Manual - 2011
Manual Transmission Fluid
It is not necessary to check the manual transmission
fluid level. A transmission fluid leak is the only reason
for fluid loss. If a leak occurs, take the vehicle to a
dealer for service. Have it repaired as soon as possible.
You may also have the fluid level checked by your
dealer when the oil is changed. SeeRecommended
Fluids and Lubricants
on page 7‑8for the proper fluid
to use.
Hydraulic Clutch
The hydraulic clutch linkage in your vehicle is
self-adjusting. This system does not have its own
reservoir. It receives fluid from the brake master cylinder
reservoir.
See Brakes
on page 6‑30for more information.
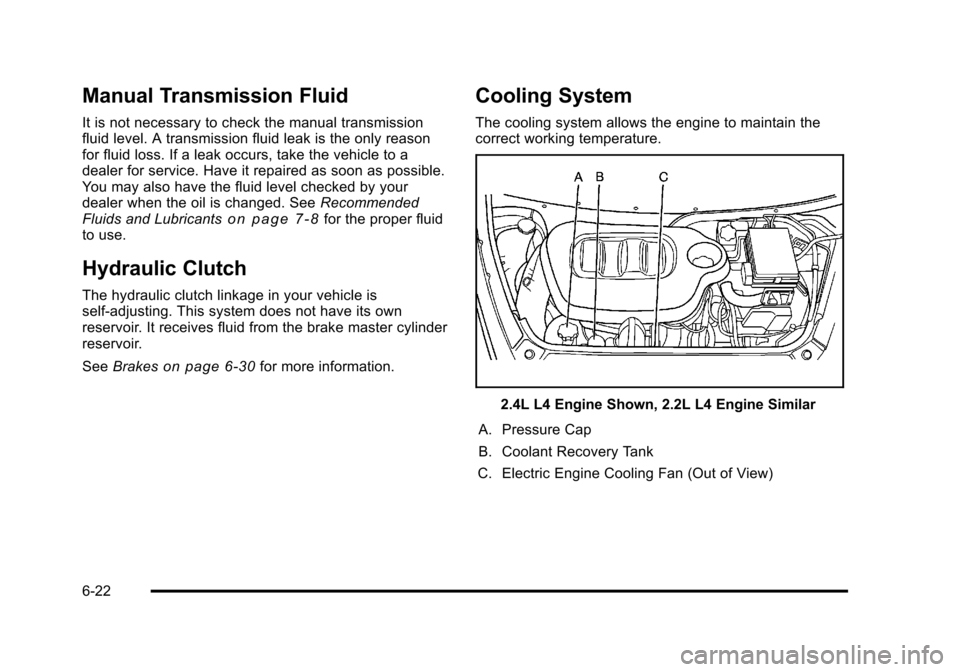
Cooling System
The cooling system allows the engine to maintain the
correct working temperature.
2.4L L4 Engine Shown, 2.2L L4 Engine Similar
A. Pressure Cap
B. Coolant Recovery Tank
C. Electric Engine Cooling Fan (Out of View)
6-22
Page 304 of 430
Black plate (28,1)Chevrolet HHR Owner Manual - 2011
8. By this time, the coolant level inside the radiatorfiller port may be lower. If the level is lower, add
more of the proper DEX-COOL coolant mixture
through the fill port until the level reaches the base
of the fill port.
9. Then replace the pressure cap. At any time during this procedure, if coolant begins to flow out of the
fill port, reinstall the pressure cap. Be sure the
pressure cap is hand-tight and fully seated.
10. When the engine has cooled, check the coolant in the coolant recovery tank. The level in the coolant
recovery tank should be at the COLD FILL line
when the engine is cold.
Engine Overheating
The vehicle has several indicators to warn of engine
overheating.
You will find a coolant temperature warning light and a
coolant temperature gauge on your vehicle's instrument
panel. See Engine Coolant Temperature Warning Light
on page 4‑32andEngine Coolant Temperature Gaugeon page 4‑32for more information.
You may decide not to lift the hood when this warning
appears, but instead get service help right away. See
Roadside Assistance Program on page 8‑6. If you do decide to lift the hood, make sure the vehicle
is parked on a level surface.
Then check to see if the engine cooling fans are
running. If the engine is overheating, both fans should
be running. If they are not, do not continue to run the
engine and have the vehicle serviced.
Notice:
Engine damage from running the engine
without coolant is not covered by the warranty.
Notice: If the engine catches fire because of being
driven with no coolant, your vehicle can be badly
damaged. The costly repairs would not be covered
by the vehicle warranty.
If Steam Is Coming from the Engine
Compartment
{WARNING:
Steam from an overheated engine can burn you
badly, even if you just open the hood. Stay away
from the engine if you see or hear steam coming
from it. Just turn it off and get everyone away from
the vehicle until it cools down. Wait until there is
no sign of steam or coolant before you open
the hood.
(Continued)
6-28
Page 308 of 430
Black plate (32,1)Chevrolet HHR Owner Manual - 2011
Brake Wear
This vehicle has front disc brakes and could have rear
drum brakes or rear disc brakes.
Disc brake pads have built-in wear indicators that make
a high-pitched warning sound when the brake pads are
worn and new pads are needed. The sound can come
and go or be heard all the time the vehicle is moving,
except when applying the brake pedal firmly.
{WARNING:
The brake wear warning sound means that soon
the brakes will not work well. That could lead to a
crash. When the brake wear warning sound is
heard, have the vehicle serviced.
Notice: Continuing to drive with worn-out brake
pads could result in costly brake repair.
Some driving conditions or climates can cause a brake
squeal when the brakes are first applied or lightly
applied. This does not mean something is wrong with
the brakes. Properly torqued wheel nuts are necessary to help
prevent brake pulsation. When tires are rotated, inspect
brake pads for wear and evenly tighten wheel nuts in
the proper sequence to torque specifications in
Capacities and Specifications on page 6‑107.
If the vehicle has rear drum brakes, they do not have
wear indicators, but if a rear brake rubbing noise is
heard, have the rear brake linings inspected
immediately. Rear brake drums should be removed and
inspected each time the tires are removed for rotation or
changing. When the front brake pads are replaced,
have the rear brakes inspected, too.
Brake linings should always be replaced as complete
axle sets.
Brake Pedal Travel
See your dealer if the brake pedal does not return to
normal height, or if there is a rapid increase in pedal
travel. This could be a sign that brake service might be
required.
Brake Adjustment
Every time the brakes are applied, with or without the
vehicle moving, the brakes adjust for wear.
6-32
Page 313 of 430
Black plate (37,1)Chevrolet HHR Owner Manual - 2011
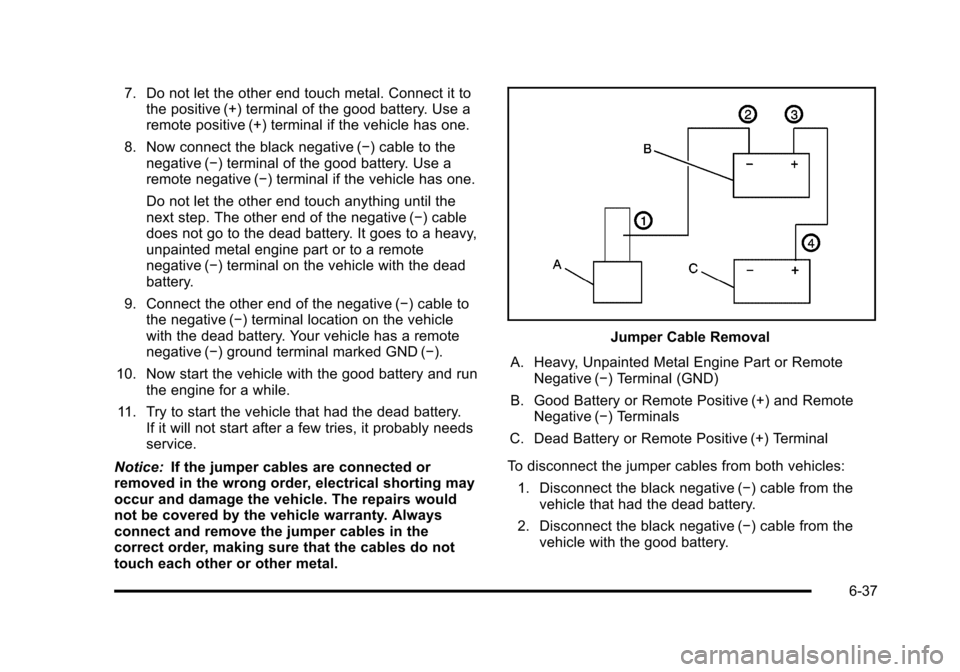
7. Do not let the other end touch metal. Connect it tothe positive (+) terminal of the good battery. Use a
remote positive (+) terminal if the vehicle has one.
8. Now connect the black negative (−) cable to the negative (−) terminal of the good battery. Use a
remote negative (−) terminal if the vehicle has one.
Do not let the other end touch anything until the
next step. The other end of the negative (−) cable
does not go to the dead battery. It goes to a heavy,
unpainted metal engine part or to a remote
negative (−) terminal on the vehicle with the dead
battery.
9. Connect the other end of the negative (−) cable to the negative (−) terminal location on the vehicle
with the dead battery. Your vehicle has a remote
negative (−) ground terminal marked GND (−).
10. Now start the vehicle with the good battery and run the engine for a while.
11. Try to start the vehicle that had the dead battery. If it will not start after a few tries, it probably needs
service.
Notice: If the jumper cables are connected or
removed in the wrong order, electrical shorting may
occur and damage the vehicle. The repairs would
not be covered by the vehicle warranty. Always
connect and remove the jumper cables in the
correct order, making sure that the cables do not
touch each other or other metal.
Jumper Cable Removal
A. Heavy, Unpainted Metal Engine Part or Remote Negative (−) Terminal (GND)
B. Good Battery or Remote Positive (+) and Remote Negative (−) Terminals
C. Dead Battery or Remote Positive (+) Terminal
To disconnect the jumper cables from both vehicles: 1. Disconnect the black negative (−) cable from the vehicle that had the dead battery.
2. Disconnect the black negative (−) cable from the vehicle with the good battery.
6-37
Page 314 of 430
Black plate (38,1)Chevrolet HHR Owner Manual - 2011
3. Disconnect the red positive (+) cable from thevehicle with the good battery.
4. Disconnect the red positive (+) cable from the other vehicle.
5. Return the positive (+) terminal cover to its original position.
Headlamp Aiming
The vehicle has a visual optical headlamp aiming
system. The aim has been preset at the factory and
should need no further adjustment.
However, if the vehicle is damaged in a crash, the
headlamp aim may be affected and adjustment may be
necessary.
If oncoming vehicles flash their high beams at you, this
may also mean the vertical aim needs to be adjusted.
It is recommended that the vehicle is taken to your
dealer for service if the headlamps need to be re-aimed.
It is possible however, to re-aim the headlamps as
described. The vehicle should:
.Be placed so the headlamps are 25 ft. (7.6 m) from
a light colored wall.
.Have all four tires on a level surface which is level
all the way to the wall.
.Be placed so it is perpendicular to the wall or other
flat surface.
.Not have any snow, ice, or mud on it.
.Be fully assembled and all other work stopped
while headlamp aiming is being performed.
.Normally loaded with a full tank of fuel and
one person or 160 lbs (75 kg) sitting on the
driver seat.
.Have all tires properly inflated.
.Have the spare tire is in its original location in the
vehicle.
Headlamp aiming is done with the vehicle's low-beam
headlamps. The high-beam headlamps will be correctly
aimed if the low-beam headlamps are aimed properly.
6-38
Page 322 of 430
Black plate (46,1)Chevrolet HHR Owner Manual - 2011
Windshield Wiper Blade
Replacement
Windshield wiper blades should be inspected for wear
or cracking. SeeScheduled Maintenanceon page 7‑3for more information on wiper blade inspection.
Replacement blades come in different types and are
removed in different ways. For the proper type and
length, seeMaintenance Replacement Parts
on
page 7‑10. Here's how to remove the wiper blade:
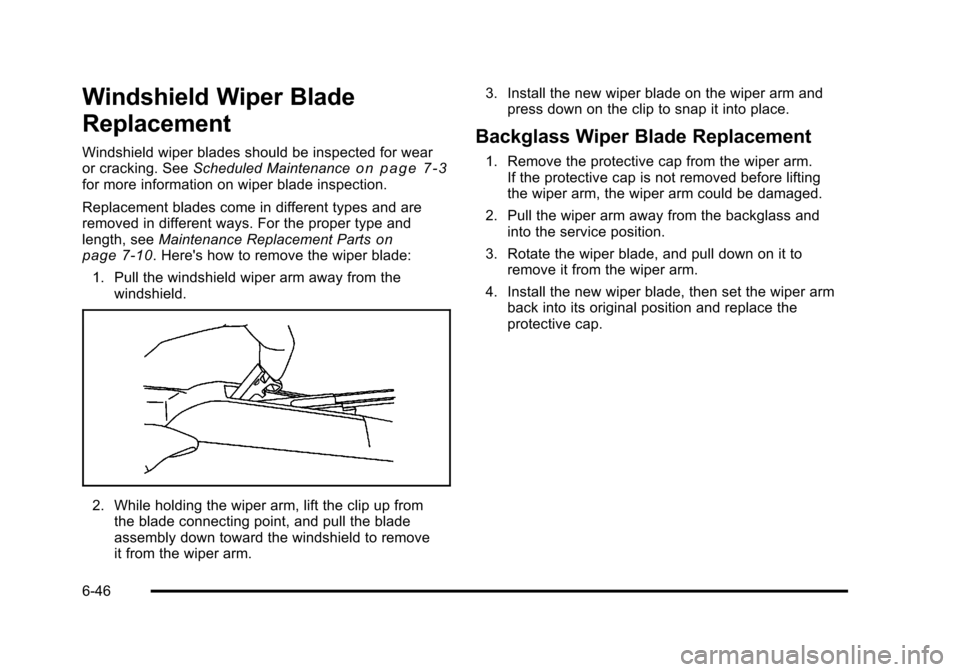
1. Pull the windshield wiper arm away from the windshield.
2. While holding the wiper arm, lift the clip up fromthe blade connecting point, and pull the blade
assembly down toward the windshield to remove
it from the wiper arm. 3. Install the new wiper blade on the wiper arm and
press down on the clip to snap it into place.
Backglass Wiper Blade Replacement
1. Remove the protective cap from the wiper arm.
If the protective cap is not removed before lifting
the wiper arm, the wiper arm could be damaged.
2. Pull the wiper arm away from the backglass and into the service position.
3. Rotate the wiper blade, and pull down on it to remove it from the wiper arm.
4. Install the new wiper blade, then set the wiper arm back into its original position and replace the
protective cap.
6-46
Page 323 of 430
Black plate (47,1)Chevrolet HHR Owner Manual - 2011
Tires
Your new vehicle comes with high-quality tires
made by a leading tire manufacturer. If you ever
have questions about your tire warranty and
where to obtain service, see your vehicle
Warranty booklet for details. For additional
information refer to the tire manufacturer.
{WARNING:
.Poorly maintained and improperly used tires
are dangerous.
.Overloading your tires can cause overheating
as a result of too much flexing. You could
have a blowout and a serious accident. See
Loading the Vehicle on page 5‑22.
.Under inflated tires pose the same danger as
overloaded tires. The resulting crash could
cause serious injury. Check all tires frequently
to maintain the recommended pressure. Tire
pressure should be checked when your tires
are cold.(Continued)
WARNING: (Continued)
.Over inflated tires are more likely to be
cut, punctured, or broken by a sudden
impact—such as when you hit a pothole.
Keep tires at the recommended pressure.
.Worn or old tires can cause a crash. If your
tread is badly worn, replace them.
.Replace any tires that have been damaged by
impacts with potholes, curbs, etc.
.Improperly repaired tires can cause a crash.
Only your dealer or an authorized tire service
center should repair, replace, dismount, and
mount the tires.
.Do not spin the tires in excess of 55 km/h
(35 mph) on slippery surfaces such as snow,
mud, ice, etc. Excessive spinning may cause
the tires to explode.
6-47
Page 324 of 430
Black plate (48,1)Chevrolet HHR Owner Manual - 2011
Tire Sidewall Labeling
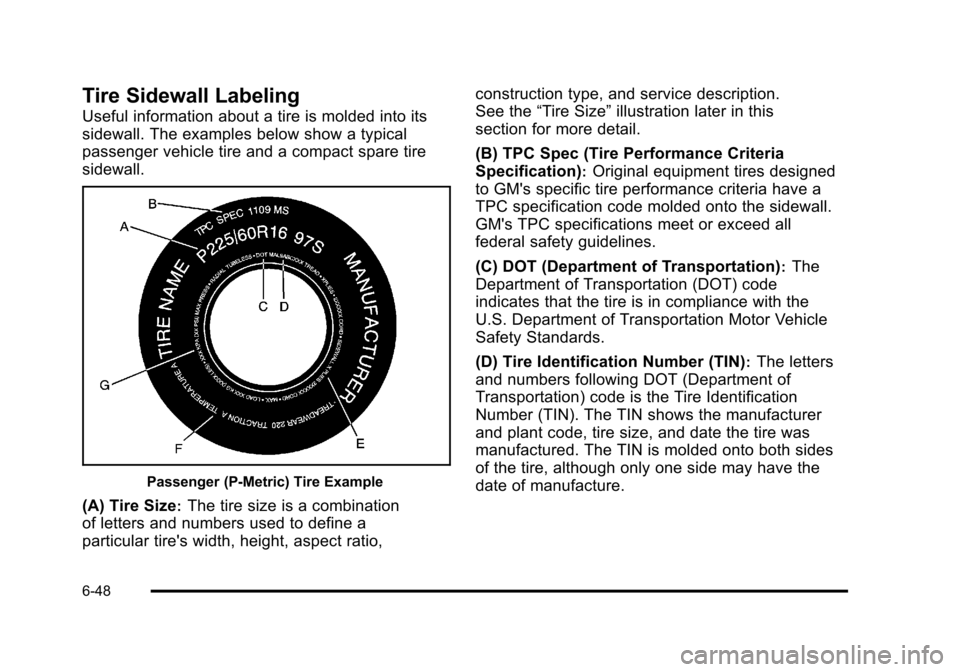
Useful information about a tire is molded into its
sidewall. The examples below show a typical
passenger vehicle tire and a compact spare tire
sidewall.
Passenger (P‐Metric) Tire Example
(A) Tire Size:The tire size is a combination
of letters and numbers used to define a
particular tire's width, height, aspect ratio, construction type, and service description.
See the
“Tire Size” illustration later in this
section for more detail.
(B) TPC Spec (Tire Performance Criteria
Specification)
:Original equipment tires designed
to GM's specific tire performance criteria have a
TPC specification code molded onto the sidewall.
GM's TPC specifications meet or exceed all
federal safety guidelines.
(C) DOT (Department of Transportation)
:The
Department of Transportation (DOT) code
indicates that the tire is in compliance with the
U.S. Department of Transportation Motor Vehicle
Safety Standards.
(D) Tire Identification Number (TIN)
:The letters
and numbers following DOT (Department of
Transportation) code is the Tire Identification
Number (TIN). The TIN shows the manufacturer
and plant code, tire size, and date the tire was
manufactured. The TIN is molded onto both sides
of the tire, although only one side may have the
date of manufacture.
6-48