2011 CHEVROLET HHR window
[x] Cancel search: windowPage 327 of 430

Black plate (51,1)Chevrolet HHR Owner Manual - 2011
(C) Aspect Ratio:A two‐digit number that
indicates the tire height‐to‐width measurements.
For example, if the tire size aspect ratio is 60, as
shown in item C of the illustration, it would mean
that the tire's sidewall is 60 percent as high as it
is wide.
(D) Construction Code
:A letter code is used to
indicate the type of ply construction in the tire.
The letter R means radial ply construction; the
letter D means diagonal or bias ply construction;
and the letter B means belted‐bias ply
construction.
(E) Rim Diameter
:Diameter of the wheel in
inches.
(F) Service Description
:These characters
represent the load index and speed rating of the
tire. The load index represents the load carrying
capacity a tire is certified to carry. The speed
rating is the maximum speed a tire is certified to
carry a load.
Tire Terminology and Definitions
Air Pressure:The amount of air inside the tire
pressing outward on each square inch of the tire.
Air pressure is expressed in pounds per square
inch (psi) or kilopascal (kPa).
Accessory Weight
:This means the combined
weight of optional accessories. Some examples of
optional accessories are, automatic transmission,
power steering, power brakes, power windows,
power seats, and air conditioning.
Aspect Ratio
:The relationship of a tire's height to
its width.
Belt
:A rubber coated layer of cords that is
located between the plies and the tread. Cords
may be made from steel or other reinforcing
materials.
Bead
:The tire bead contains steel wires wrapped
by steel cords that hold the tire onto the rim.
Bias Ply Tire
:A pneumatic tire in which the plies
are laid at alternate angles less than 90 degrees
to the centerline of the tread.
6-51
Page 349 of 430
Black plate (73,1)Chevrolet HHR Owner Manual - 2011
6. Plug the power plug (G) into the accessory poweroutlet in the vehicle. Unplug all items from other
accessory power outlets. See Accessory Power
Outlet(s) on page 4‑15.
If the vehicle has an accessory power outlet, do
not use the cigarette lighter.
If the vehicle only has a cigarette lighter, use the
cigarette lighter.
Do not pinch the power plug cord in the door or
window.
7. Start the vehicle. The vehicle must be running while using the air compressor.
8. Turn the selector switch (B) clockwise to the Sealant + Air position.
9. Press the on/off (A) button to turn the tire sealant and compressor kit on.
The compressor will inject sealant and air into
the tire.
The pressure gauge (D) will initially show a high
pressure while the compressor pushes the sealant
into the tire. Once the sealant is completely
dispersed into the tire, the pressure will quickly
drop and start to rise again as the tire inflates with
air only. 10. Inflate the tire to the recommended inflation
pressure using the pressure gauge (D). The
recommended inflation pressure can be found on
the Tire and Loading Information label. See
Inflation - Tire Pressure on page 6‑54.
The pressure gauge (D) may read higher than the
actual tire pressure while the compressor is on.
Turn the compressor off to get an accurate
pressure reading. The compressor may be turned
on/off until the correct pressure is reached.
Notice: If the recommended pressure cannot be
reached after approximately 25 minutes, the vehicle
should not be driven farther. The tire is too severely
damaged and the tire sealant and compressor kit
cannot inflate the tire. Remove the power plug from
the accessory power outlet and unscrew the
inflating hose from the tire valve. See Roadside
Assistance Program on page 8‑6.
11. Press the on/off button (A) to turn the tire sealant and compressor kit off.
The tire is not sealed and will continue to leak air
until the vehicle is driven and the sealant is
distributed in the tire, therefore, Steps 12 through
18 must be done immediately after Step 11.
Be careful while handling the tire sealant and
compressor kit as it could be warm after usage.
6-73
Page 352 of 430

Black plate (76,1)Chevrolet HHR Owner Manual - 2011
6. Plug the power plug (G) into the accessory poweroutlet in the vehicle. Unplug all items from other
accessory power outlets. See Accessory Power
Outlet(s) on page 4‑15.
If the vehicle has an accessory power outlet, do
not use the cigarette lighter.
If the vehicle only has a cigarette lighter, use the
cigarette lighter.
Do not pinch the power plug cord in the door or
window.
7. Start the vehicle. The vehicle must be running while using the air compressor.
8. Turn the selector switch (B) counterclockwise to the Air Only position.
9. Press the on/off (A) button to turn the compressor on.
The compressor will inflate the tire with air only.
10. Inflate the tire to the recommended inflation pressure using the pressure gauge (D). The
recommended inflation pressure can be found on
the Tire and Loading Information label. See
Inflation - Tire Pressure on page 6‑54. The pressure gauge (D) may read higher than the
actual tire pressure while the compressor is on.
Turn the compressor off to get an accurate
reading. The compressor may be turned on/off until
the correct pressure is reached.
11. Press the on/off button (A) to turn the tire sealant and compressor kit off.
Be careful while handling the tire sealant and
compressor kit as it could be warm after usage.
12. Unplug the power plug (G) from the accessory power outlet in the vehicle.
13. Disconnect the air only hose (E) from the tire valve stem, by turning it counterclockwise, and replace
the tire valve stem cap.
14. Replace the air only hose (E) and the power plug (G) and cord back in its original location.
15. Place the equipment in the original storage location in the vehicle.
6-76
Page 368 of 430
Black plate (92,1)Chevrolet HHR Owner Manual - 2011
Appearance Care
Interior Cleaning
The vehicle's interior will continue to look its best if it is
cleaned often. Although not always visible, dust and dirt
can accumulate on the upholstery. Dirt can damage
carpet, fabric, leather, and plastic surfaces. Regular
vacuuming is recommended to remove particles from
the upholstery. It is important to keep the upholstery
from becoming and remaining heavily soiled. Soils
should be removed as quickly as possible. The
vehicle's interior may experience extremes of heat that
could cause stains to set rapidly.
Lighter colored interiors may require more frequent
cleaning. Use care because newspapers and garments
that transfer color to home furnishings may also transfer
color to the vehicle's interior.
When cleaning the vehicle's interior, only use cleaners
specifically designed for the surfaces being cleaned.
Permanent damage may result from using cleaners on
surfaces for which they were not intended. Use glass
cleaner only on glass. Remove any accidental
over-spray from other surfaces immediately. To prevent
over-spray, apply cleaner directly to the cleaning cloth.Notice:
Using abrasive cleaners when cleaning
glass surfaces on the vehicle, could scratch the
glass and/or cause damage to the rear window
defogger. When cleaning the glass on the vehicle,
use only a soft cloth and glass cleaner.
Many cleaners contain solvents that may become
concentrated in the vehicle's breathing space. Before
using cleaners, read and adhere to all safety
instructions on the label. While cleaning the vehicle's
interior, maintain adequate ventilation by opening the
vehicle's doors and windows.
Dust may be removed from small buttons and knobs
using a small brush with soft bristles.
Products that remove odors from the vehicle's
upholstery and clean the vehicle's glass can be
obtained from your dealer.
Do not clean the vehicle using:
.A knife or any other sharp object to remove a soil
from any interior surface.
.A stiff brush. It can cause damage to the vehicle's
interior surfaces.
.Heavy pressure or aggressive rubbing with a
cleaning cloth. Use of heavy pressure can damage
the interior and does not improve the effectiveness
of soil removal.
6-92
Page 376 of 430
Black plate (100,1)Chevrolet HHR Owner Manual - 2011
Electrical System
Add-On Electrical Equipment
Notice:Do not add anything electrical to the vehicle
unless you check with your dealer first. Some
electrical equipment can damage the vehicle and
the damage would not be covered by the vehicle's
warranty. Some add-on electrical equipment can
keep other components from working as they
should.
Add-on equipment can drain the vehicle battery, even if
the vehicle is not operating.
The vehicle has an airbag system. Before attempting to
add anything electrical to the vehicle, see Servicing
Your Airbag-Equipped Vehicle
on page 2‑72and
Adding Equipment to Your Airbag-Equipped Vehicleon
page 2‑72.
Headlamp Wiring
The headlamp wiring is protected by fuses in the fuse
block. An electrical overload will cause the lamps to turn
off. If this happens, have the headlamp wiring checked
right away.
Windshield Wiper Fuses
The windshield wiper motor is protected by a circuit
breaker and a fuse. If the motor overheats due to heavy
snow, etc., the wiper will stop until the motor cools.
If the overload is caused by some electrical problem,
have it fixed.
Power Windows and Other Power
Options
Fuses in the fuse block protect the power windows.
When the current load is too heavy, the fuse opens
protecting the circuit until the problem is fixed.
6-100
Page 378 of 430
Black plate (102,1)Chevrolet HHR Owner Manual - 2011
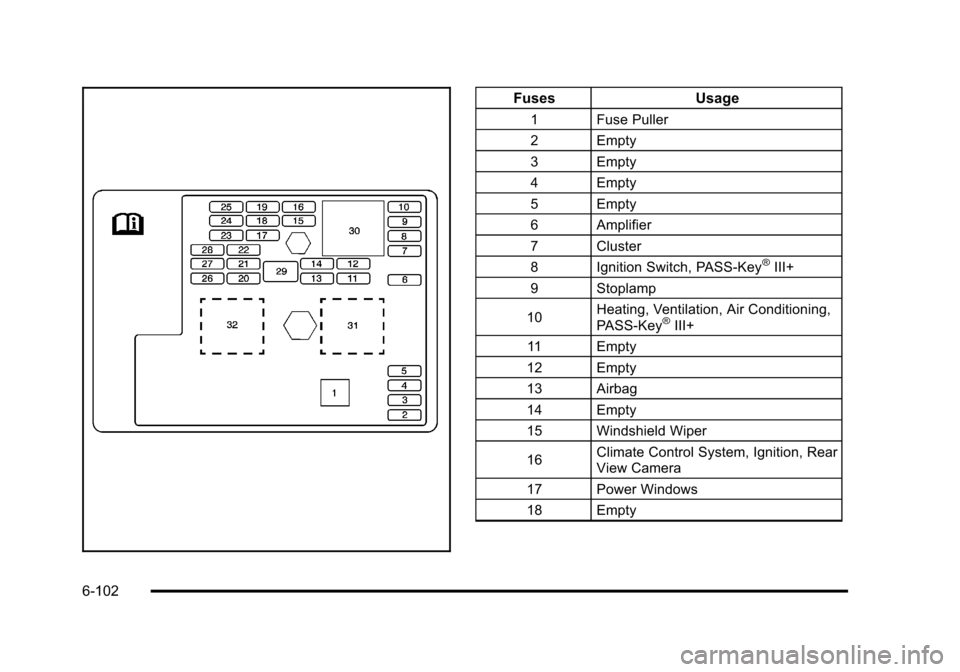
FusesUsage
1 Fuse Puller
2 Empty
3 Empty
4 Empty
5 Empty
6 Amplifier
7 Cluster
8 Ignition Switch, PASS-Key
®III+
9 Stoplamp
10 Heating, Ventilation, Air Conditioning,
PASS-Key
®III+
11 Empty
12 Empty
13 Airbag
14 Empty
15 Windshield Wiper
16 Climate Control System, Ignition, Rear
View Camera
17 Power Windows
18 Empty
6-102
Page 381 of 430
Black plate (105,1)Chevrolet HHR Owner Manual - 2011
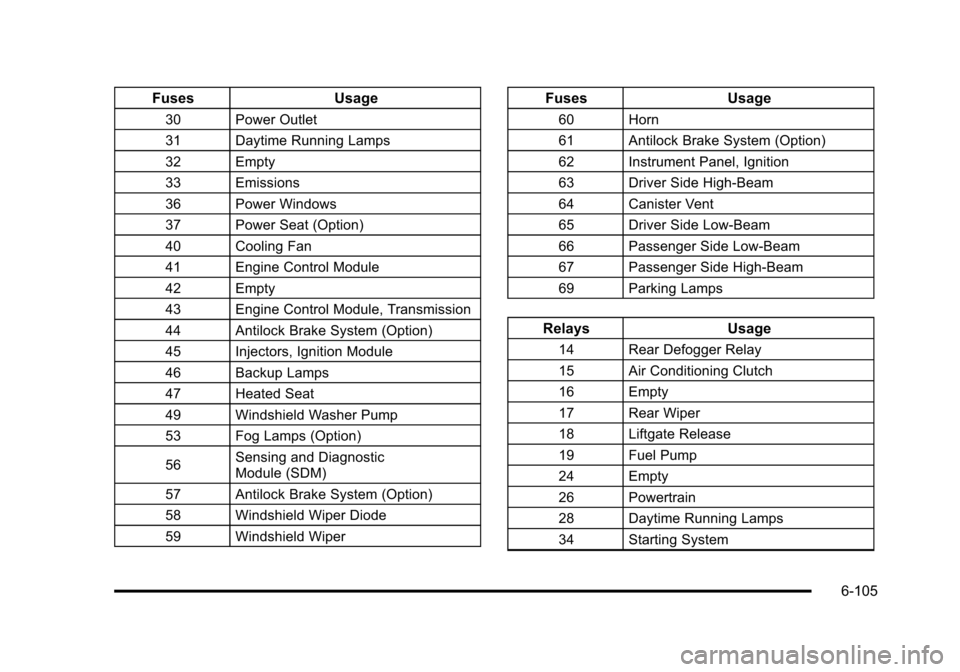
FusesUsage
30 Power Outlet
31 Daytime Running Lamps
32 Empty
33 Emissions
36 Power Windows
37 Power Seat (Option)
40 Cooling Fan
41 Engine Control Module
42 Empty
43 Engine Control Module, Transmission
44 Antilock Brake System (Option)
45 Injectors, Ignition Module
46 Backup Lamps
47 Heated Seat
49 Windshield Washer Pump
53 Fog Lamps (Option)
56Sensing and Diagnostic
Module (SDM)
57 Antilock Brake System (Option)
58 Windshield Wiper Diode
59 Windshield Wiper
Fuses Usage
60 Horn
61 Antilock Brake System (Option)
62 Instrument Panel, Ignition
63 Driver Side High-Beam
64 Canister Vent
65 Driver Side Low-Beam
66 Passenger Side Low-Beam
67 Passenger Side High-Beam
69 Parking Lamps
Relays Usage
14 Rear Defogger Relay
15 Air Conditioning Clutch
16 Empty
17 Rear Wiper
18 Liftgate Release
19 Fuel Pump
24 Empty
26 Powertrain
28 Daytime Running Lamps
34 Starting System
6-105
Page 389 of 430
Black plate (5,1)Chevrolet HHR Owner Manual - 2011
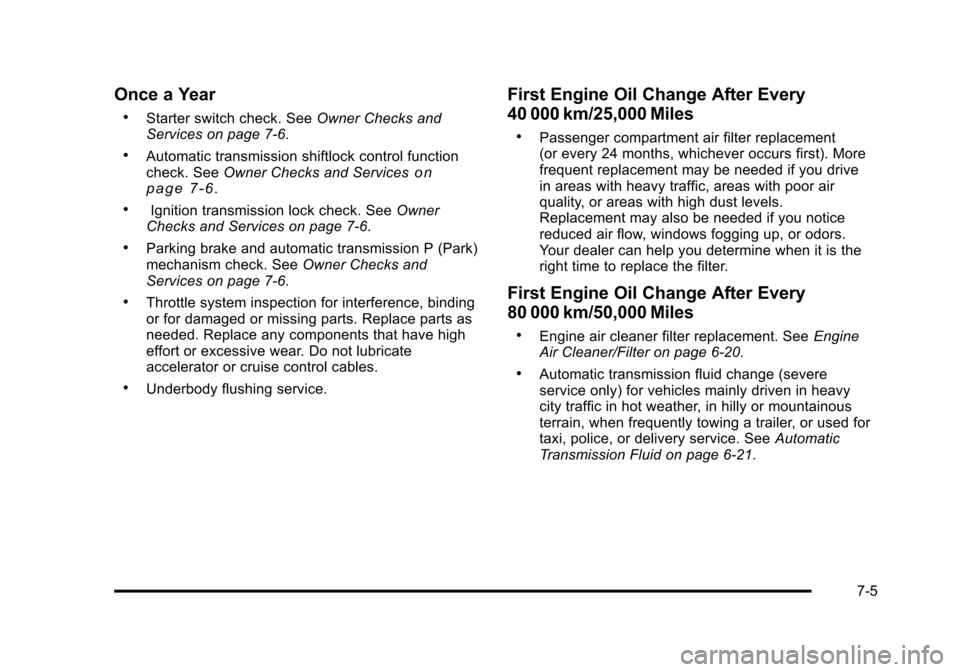
Once a Year
.Starter switch check. SeeOwner Checks and
Services on page 7‑6.
.Automatic transmission shiftlock control function
check. See Owner Checks and Serviceson
page 7‑6.
.Ignition transmission lock check. See Owner
Checks and Services on page 7‑6.
.Parking brake and automatic transmission P (Park)
mechanism check. See Owner Checks and
Services on page 7‑6.
.Throttle system inspection for interference, binding
or for damaged or missing parts. Replace parts as
needed. Replace any components that have high
effort or excessive wear. Do not lubricate
accelerator or cruise control cables.
.Underbody flushing service.
First Engine Oil Change After Every
40 000 km/25,000 Miles
.Passenger compartment air filter replacement
(or every 24 months, whichever occurs first). More
frequent replacement may be needed if you drive
in areas with heavy traffic, areas with poor air
quality, or areas with high dust levels.
Replacement may also be needed if you notice
reduced air flow, windows fogging up, or odors.
Your dealer can help you determine when it is the
right time to replace the filter.
First Engine Oil Change After Every
80 000 km/50,000 Miles
.Engine air cleaner filter replacement. See Engine
Air Cleaner/Filter on page 6‑20.
.Automatic transmission fluid change (severe
service only) for vehicles mainly driven in heavy
city traffic in hot weather, in hilly or mountainous
terrain, when frequently towing a trailer, or used for
taxi, police, or delivery service. See Automatic
Transmission Fluid on page 6‑21.
7-5