Page 315 of 430
Black plate (39,1)Chevrolet HHR Owner Manual - 2011
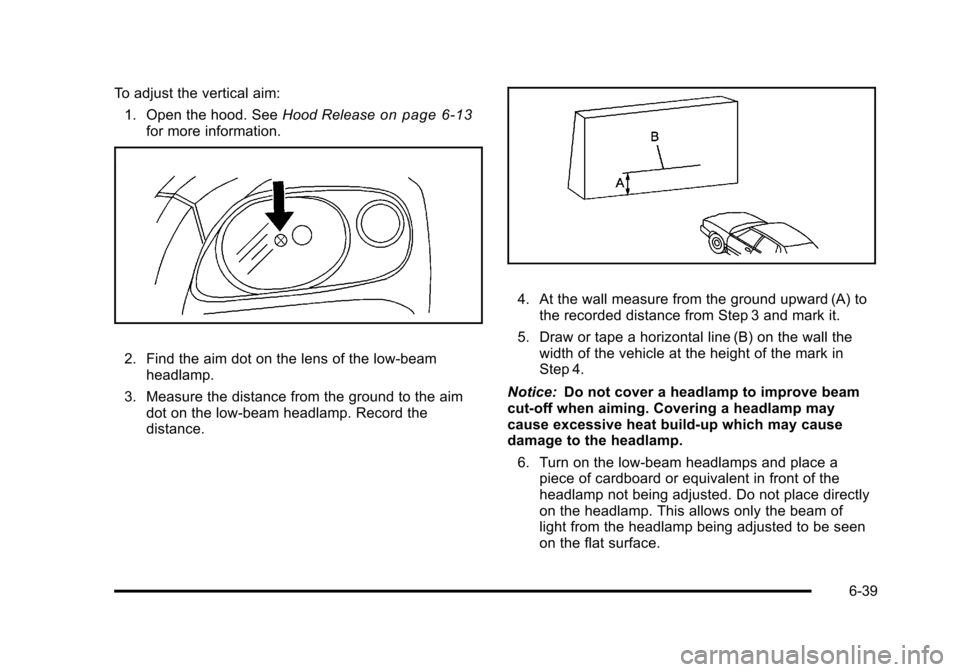
To adjust the vertical aim:1. Open the hood. See Hood Release
on page 6‑13for more information.
2. Find the aim dot on the lens of the low‐beam
headlamp.
3. Measure the distance from the ground to the aim dot on the low‐beam headlamp. Record the
distance.
4. At the wall measure from the ground upward (A) tothe recorded distance from Step 3 and mark it.
5. Draw or tape a horizontal line (B) on the wall the width of the vehicle at the height of the mark in
Step 4.
Notice: Do not cover a headlamp to improve beam
cut-off when aiming. Covering a headlamp may
cause excessive heat build-up which may cause
damage to the headlamp.
6. Turn on the low-beam headlamps and place a piece of cardboard or equivalent in front of the
headlamp not being adjusted. Do not place directly
on the headlamp. This allows only the beam of
light from the headlamp being adjusted to be seen
on the flat surface.
6-39
Page 316 of 430
Black plate (40,1)Chevrolet HHR Owner Manual - 2011
Driver Side Shown
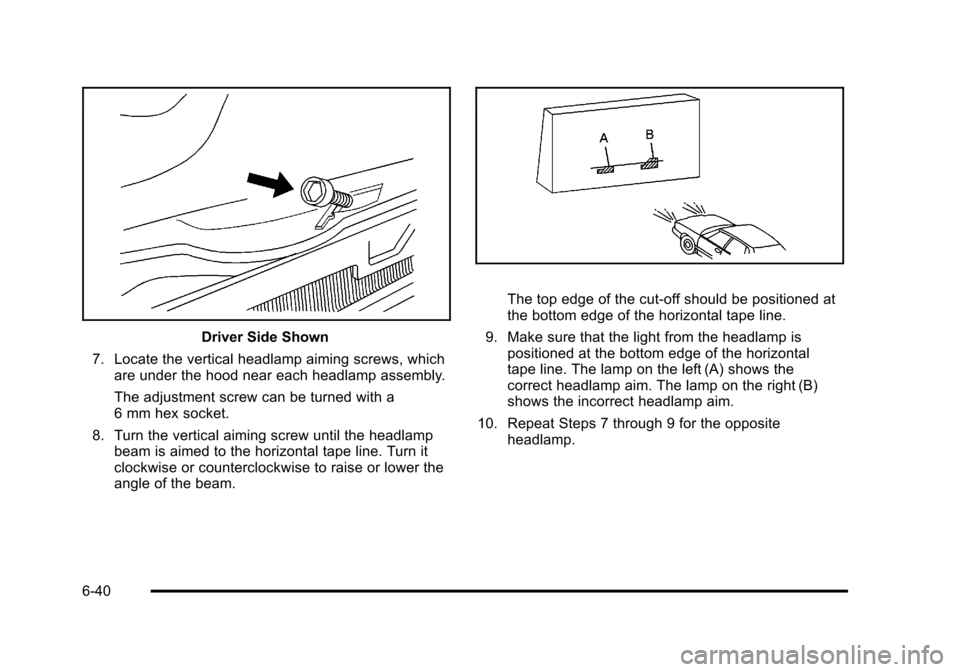
7. Locate the vertical headlamp aiming screws, which are under the hood near each headlamp assembly.
The adjustment screw can be turned with a
6 mm hex socket.
8. Turn the vertical aiming screw until the headlamp beam is aimed to the horizontal tape line. Turn it
clockwise or counterclockwise to raise or lower the
angle of the beam.
The top edge of the cut-off should be positioned at
the bottom edge of the horizontal tape line.
9. Make sure that the light from the headlamp is positioned at the bottom edge of the horizontal
tape line. The lamp on the left (A) shows the
correct headlamp aim. The lamp on the right (B)
shows the incorrect headlamp aim.
10. Repeat Steps 7 through 9 for the opposite headlamp.
6-40
Page 317 of 430
Black plate (41,1)Chevrolet HHR Owner Manual - 2011
Bulb Replacement
For the proper type of replacement bulbs, see
Replacement Bulbs on page 6‑45.
For any bulb changing procedure not listed in this
section, contact your dealer.
Halogen Bulbs
{WARNING:
Halogen bulbs have pressurized gas inside and
can burst if you drop or scratch the bulb. You or
others could be injured. Be sure to read and
follow the instructions on the bulb package.
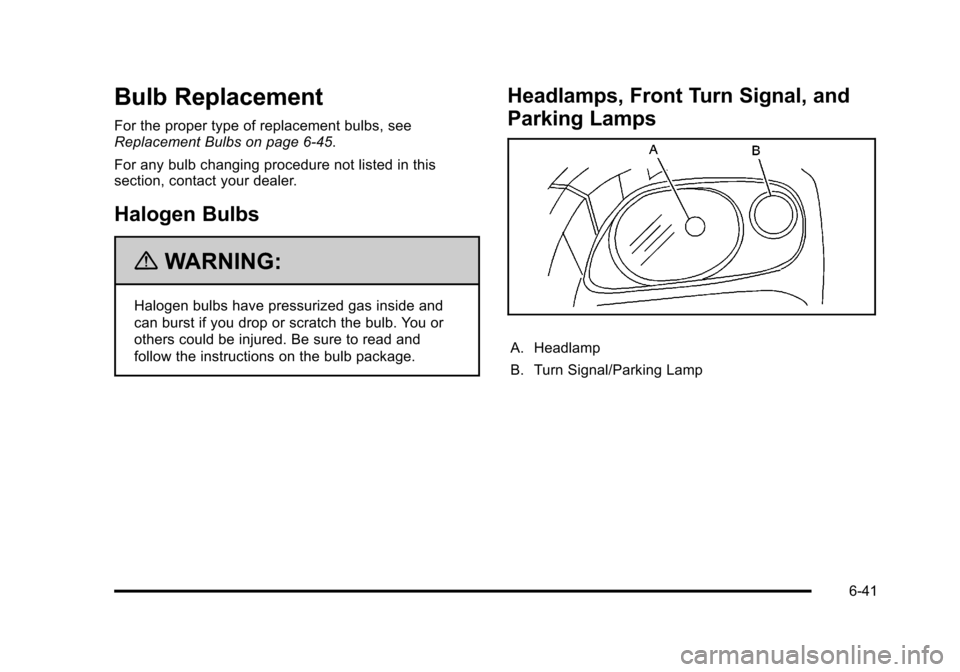
Headlamps, Front Turn Signal, and
Parking Lamps
A. Headlamp
B. Turn Signal/Parking Lamp
6-41
Page 318 of 430
Black plate (42,1)Chevrolet HHR Owner Manual - 2011
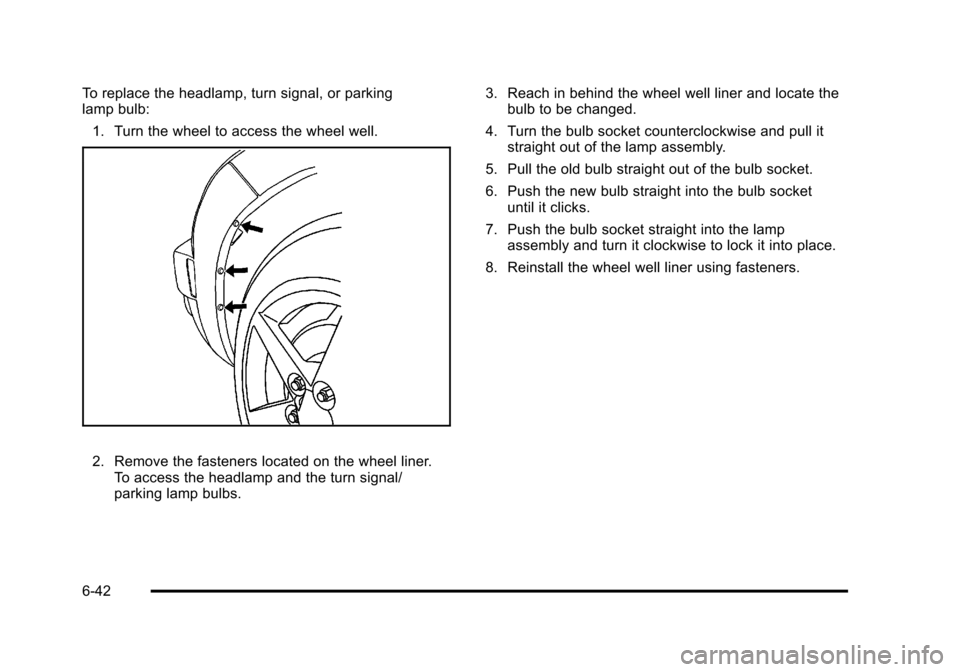
To replace the headlamp, turn signal, or parking
lamp bulb:1. Turn the wheel to access the wheel well.
2. Remove the fasteners located on the wheel liner. To access the headlamp and the turn signal/
parking lamp bulbs. 3. Reach in behind the wheel well liner and locate the
bulb to be changed.
4. Turn the bulb socket counterclockwise and pull it straight out of the lamp assembly.
5. Pull the old bulb straight out of the bulb socket.
6. Push the new bulb straight into the bulb socket until it clicks.
7. Push the bulb socket straight into the lamp assembly and turn it clockwise to lock it into place.
8. Reinstall the wheel well liner using fasteners.
6-42
Page 321 of 430
Black plate (45,1)Chevrolet HHR Owner Manual - 2011
6. Push the bulb socket straight into the lampassembly and turn it clockwise to lock it into place.
7. Reinstall the cover.
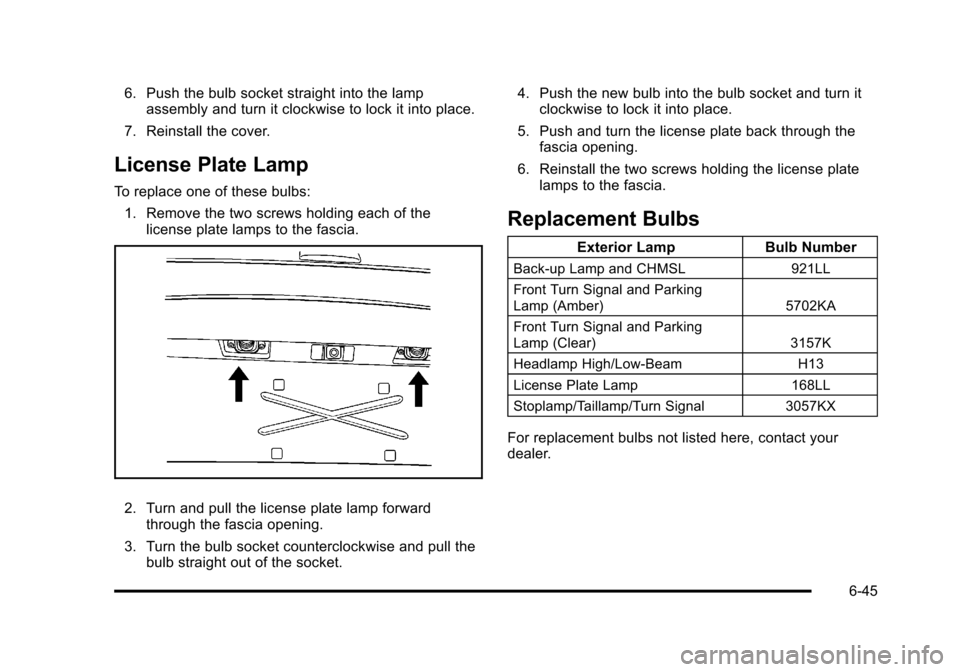
License Plate Lamp
To replace one of these bulbs: 1. Remove the two screws holding each of the license plate lamps to the fascia.
2. Turn and pull the license plate lamp forwardthrough the fascia opening.
3. Turn the bulb socket counterclockwise and pull the bulb straight out of the socket. 4. Push the new bulb into the bulb socket and turn it
clockwise to lock it into place.
5. Push and turn the license plate back through the fascia opening.
6. Reinstall the two screws holding the license plate lamps to the fascia.
Replacement Bulbs
Exterior Lamp Bulb Number
Back-up Lamp and CHMSL 921LL
Front Turn Signal and Parking
Lamp (Amber) 5702KA
Front Turn Signal and Parking
Lamp (Clear) 3157K
Headlamp High/Low-Beam H13
License Plate Lamp 168LL
Stoplamp/Taillamp/Turn Signal 3057KX
For replacement bulbs not listed here, contact your
dealer.
6-45
Page 343 of 430
Black plate (67,1)Chevrolet HHR Owner Manual - 2011
Wheel Alignment and Tire Balance
The tires and wheels on your vehicle were aligned and
balanced carefully at the factory to give you the longest
tire life and best overall performance. Adjustments to
wheel alignment and tire balancing will not be
necessary on a regular basis. However, if you notice
unusual tire wear or your vehicle pulling to one side or
the other, the alignment might need to be checked.
If you notice your vehicle vibrating when driving on a
smooth road, the tires and wheels might need to be
rebalanced. See your dealer for proper diagnosis.
Wheel Replacement
Replace any wheel that is bent, cracked, or badly
rusted or corroded. If wheel nuts keep coming loose,
the wheel, wheel bolts, and wheel nuts should be
replaced. If the wheel leaks air, replace it (except some
aluminum wheels, which can sometimes be repaired).
See your dealer if any of these conditions exist.
Your dealer will know the kind of wheel you need.
Each new wheel should have the same load-carrying
capacity, diameter, width, offset, and be mounted the
same way as the one it replaces.If you need to replace any of your wheels, wheel bolts,
wheel nuts, or Tire Pressure Monitor System (TPMS)
sensors, replace them only with new GM original
equipment parts. This way, you will be sure to have the
right wheel, wheel bolts, wheel nuts, and TPMS sensors
for your vehicle.
{WARNING:
Using the wrong replacement wheels, wheel bolts,
or wheel nuts on your vehicle can be dangerous.
It could affect the braking and handling of your
vehicle, make your tires lose air and make you
lose control. You could have a collision in which
you or others could be injured. Always use the
correct wheel, wheel bolts, and wheel nuts for
replacement.
Notice: The wrong wheel can also cause problems
with bearing life, brake cooling, speedometer or
odometer calibration, headlamp aim, bumper height,
vehicle ground clearance, and tire or tire chain
clearance to the body and chassis.
See Changing a Flat Tire
on page 6‑78for more
information.
6-67
Page 376 of 430
Black plate (100,1)Chevrolet HHR Owner Manual - 2011
Electrical System
Add-On Electrical Equipment
Notice:Do not add anything electrical to the vehicle
unless you check with your dealer first. Some
electrical equipment can damage the vehicle and
the damage would not be covered by the vehicle's
warranty. Some add-on electrical equipment can
keep other components from working as they
should.
Add-on equipment can drain the vehicle battery, even if
the vehicle is not operating.
The vehicle has an airbag system. Before attempting to
add anything electrical to the vehicle, see Servicing
Your Airbag-Equipped Vehicle
on page 2‑72and
Adding Equipment to Your Airbag-Equipped Vehicleon
page 2‑72.
Headlamp Wiring
The headlamp wiring is protected by fuses in the fuse
block. An electrical overload will cause the lamps to turn
off. If this happens, have the headlamp wiring checked
right away.
Windshield Wiper Fuses
The windshield wiper motor is protected by a circuit
breaker and a fuse. If the motor overheats due to heavy
snow, etc., the wiper will stop until the motor cools.
If the overload is caused by some electrical problem,
have it fixed.
Power Windows and Other Power
Options
Fuses in the fuse block protect the power windows.
When the current load is too heavy, the fuse opens
protecting the circuit until the problem is fixed.
6-100
Page 382 of 430
Black plate (106,1)Chevrolet HHR Owner Manual - 2011
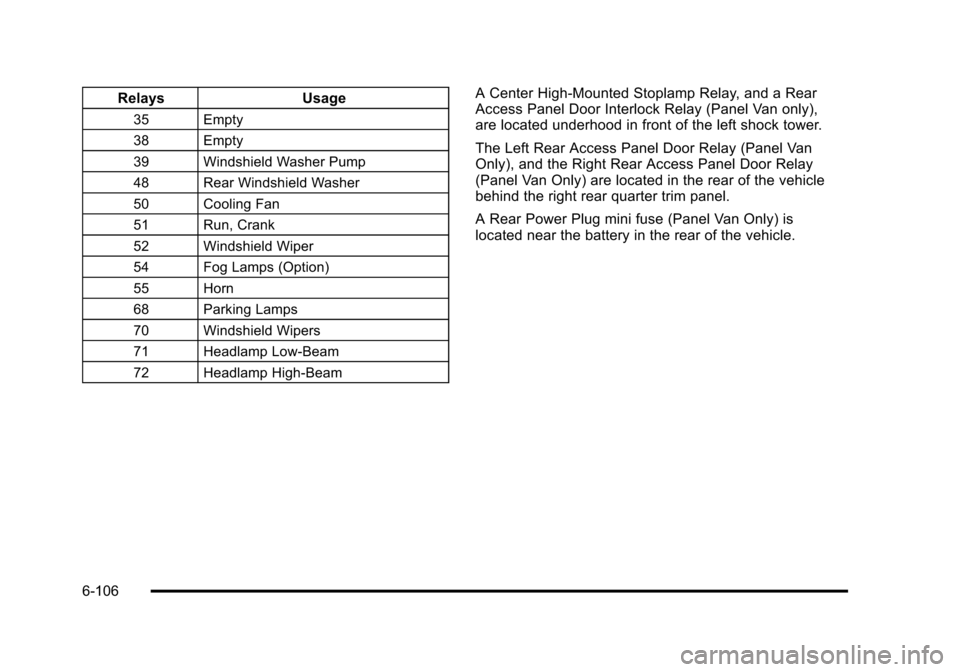
RelaysUsage
35 Empty
38 Empty
39 Windshield Washer Pump
48 Rear Windshield Washer
50 Cooling Fan
51 Run, Crank
52 Windshield Wiper
54 Fog Lamps (Option)
55 Horn
68 Parking Lamps
70 Windshield Wipers
71 Headlamp Low-Beam
72 Headlamp High-Beam
A Center High-Mounted Stoplamp Relay, and a Rear
Access Panel Door Interlock Relay (Panel Van only),
are located underhood in front of the left shock tower.
The Left Rear Access Panel Door Relay (Panel Van
Only), and the Right Rear Access Panel Door Relay
(Panel Van Only) are located in the rear of the vehicle
behind the right rear quarter trim panel.
A Rear Power Plug mini fuse (Panel Van Only) is
located near the battery in the rear of the vehicle.
6-106