2011 CHEVROLET CRUZE engine
[x] Cancel search: enginePage 251 of 394
Black plate (51,1)Chevrolet Cruze Owner Manual - 2011
Driving and Operating 9-51
After loading the trailer, weigh the
trailer and then the tongue,
separately, to see if the weights are
proper. If they are not, adjustments
might be made by moving some
items around in the trailer.
Total Weight on Your Vehicle's
Tires
Be sure the vehicle's tires are
inflated to the upper limit for cold
tires. These numbers can be found
on the Tire-Loading Information
label. SeeVehicle Load Limits on
page 9‑12. Make sure not to go over
the GVW limit for the vehicle,
including the weight of the trailer
tongue.
Trailer Towing (Fuel
Economy Model)
The vehicle is neither designed nor
intended to tow a trailer.
Towing Equipment
Hitches
Use the correct hitch equipment.
See your dealer or a hitch dealer for
assistance.
.The rear bumper on the vehicle
is not intended for hitches. Do
not attach rental hitches or other
bumper-type hitches to it. Use
only a frame-mounted hitch that
does not attach to the bumper.
.Will any holes be made in the
body of the vehicle when the
trailer hitch is installed? If there
are, seal the holes when the
hitch is removed. If the holes are
not sealed, dirt, water, and
deadly carbon monoxide (CO)
from the exhaust can get into the
vehicle. See Engine Exhaust on
page 9‑24.
Safety Chains
Always attach chains between the
vehicle and the trailer. Cross the
safety chains under the tongue of
the trailer to help prevent the tongue
from contacting the road if it
becomes separated from the hitch.
Leave enough slack so the rig can
turn. Never allow safety chains to
drag on the ground.
Trailer Brakes
Does the trailer have its own
brakes? Be sure to read and follow
the instructions for the trailer brakes
so they are installed, adjusted, and
maintained properly.
Because the vehicle has antilock
brakes, do not tap into the vehicle's
brake system. If this is done, both
brake systems will not work well,
or at all.
Page 253 of 394
Black plate (1,1)Chevrolet Cruze Owner Manual - 2011
Vehicle Care 10-1
Vehicle Care
General Information
General Information . . . . . . . . . . 10-2
California Proposition65 Warning . . . . . . . . . . . . . . . . . 10-3
California Perchlorate Materials Requirements . . . . 10-3
Accessories and Modifications . . . . . . . . . . . . . . . 10-3
Vehicle Checks
Doing Your OwnService Work . . . . . . . . . . . . . . . 10-4
Hood . . . . . . . . . . . . . . . . . . . . . . . . 10-4
Engine Compartment Overview . . . . . . . . . . . . . . . . . . . 10-6
Engine Oil . . . . . . . . . . . . . . . . . . . 10-9
Engine Oil Life System . . . . . 10-12
Automatic Transmission Fluid . . . . . . . . . . . . . . . . . . . . . . 10-13
Manual Transmission Fluid . . . . . . . . . . . . . . . . . . . . . . 10-14
Hydraulic Clutch . . . . . . . . . . . . 10-14
Engine Air Cleaner/Filter . . . . 10-15
Cooling System . . . . . . . . . . . . 10-16
Engine Coolant . . . . . . . . . . . . . 10-17
Engine Overheating . . . . . . . . 10-20 Overheated Engine
Protection
Operating Mode . . . . . . . . . . . 10-22
Power Steering Fluid . . . . . . . 10-22
Washer Fluid . . . . . . . . . . . . . . . 10-22
Brakes . . . . . . . . . . . . . . . . . . . . . 10-23
Brake Fluid . . . . . . . . . . . . . . . . . 10-24
Battery . . . . . . . . . . . . . . . . . . . . . 10-26
Starter Switch Check . . . . . . . 10-26
Automatic Transmission Shift Lock Control Function
Check . . . . . . . . . . . . . . . . . . . . . 10-27
Ignition Transmission Lock Check . . . . . . . . . . . . . . . . . . . . . 10-28
Park Brake and P (Park) Mechanism Check . . . . . . . . 10-28
Wiper Blade Replacement . . . . . . . . . . . . . . 10-29
Windshield Replacement . . . 10-29
Headlamp Aiming
Headlamp Aiming . . . . . . . . . . 10-30
Bulb Replacement
Bulb Replacement . . . . . . . . . . 10-30
Headlamps, Front Turn Signal, Sidemarker, and
Parking Lamps . . . . . . . . . . . . 10-30 Taillamps, Turn Signal,
Sidemarker, Stoplamps,
and Back-Up Lamps . . . . . . 10-32
License Plate Lamp . . . . . . . . 10-35
Replacement Bulbs . . . . . . . . . 10-36
Electrical System
Electrical System Overload . . . . . . . . . . . . . . . . . . 10-36
Fuses and Circuit Breakers . . . . . . . . . . . . . . . . . . 10-37
Engine Compartment Fuse Block . . . . . . . . . . . . . . . . . . . . . 10-37
Instrument Panel Fuse Block . . . . . . . . . . . . . . . . . . . . . 10-41
Wheels and Tires
Tires . . . . . . . . . . . . . . . . . . . . . . . . 10-42
Winter Tires . . . . . . . . . . . . . . . . 10-43
Low-Profile Tires . . . . . . . . . . . 10-44
Tire Sidewall Labeling . . . . . . 10-44
Tire Designations . . . . . . . . . . . 10-47
Tire Terminology andDefinitions . . . . . . . . . . . . . . . . 10-47
Tire Pressure . . . . . . . . . . . . . . . 10-50
Tire Pressure Monitor System . . . . . . . . . . . . . . . . . . . 10-52
Tire Pressure Monitor Operation . . . . . . . . . . . . . . . . . 10-53
Page 255 of 394
Black plate (3,1)Chevrolet Cruze Owner Manual - 2011
Vehicle Care 10-3
California Proposition
65 Warning
Most motor vehicles, including this
one, contain and/or emit chemicals
known to the State of California to
cause cancer and birth defects or
other reproductive harm. Engine
exhaust, many parts and systems,
many fluids, and some component
wear by-products contain and/or
emit these chemicals.
California Perchlorate
Materials Requirements
Certain types of automotive
applications, such as airbag
initiators, seat belt pretensioners,
and lithium batteries contained in
Remote Keyless Entry transmitters,
may contain perchlorate materials.
Special handling may be necessary.
For additional information, see
www.dtsc.ca.gov/hazardouswaste/
perchlorate.
Accessories and
Modifications
Adding non‐dealer accessories to
the vehicle can affect vehicle
performance and safety, including
such things as airbags, braking,
stability, ride and handling,
emissions systems, aerodynamics,
durability, and electronic systems
like antilock brakes, traction control,
and stability control. Some of these
accessories could even cause
malfunction or damage not covered
by the vehicle warranty.
Damage to vehicle components
resulting from the installation or use
of non‐GM certified parts, including
control module modifications, is not
covered under the terms of the
vehicle warranty and may affect
remaining warranty coverage for
affected parts.GM Accessories are designed to
complement and function with other
systems on the vehicle. Your GM
dealer can accessorize the vehicle
using genuine GM Accessories.
When you go to your GM dealer and
ask for GM Accessories, you will
know that GM-trained and
supported service technicians will
perform the work using genuine GM
Accessories.
Also, see
Adding Equipment to the
Airbag-Equipped Vehicle on
page 3‑38.
Page 258 of 394
Black plate (6,1)Chevrolet Cruze Owner Manual - 2011
10-6 Vehicle Care
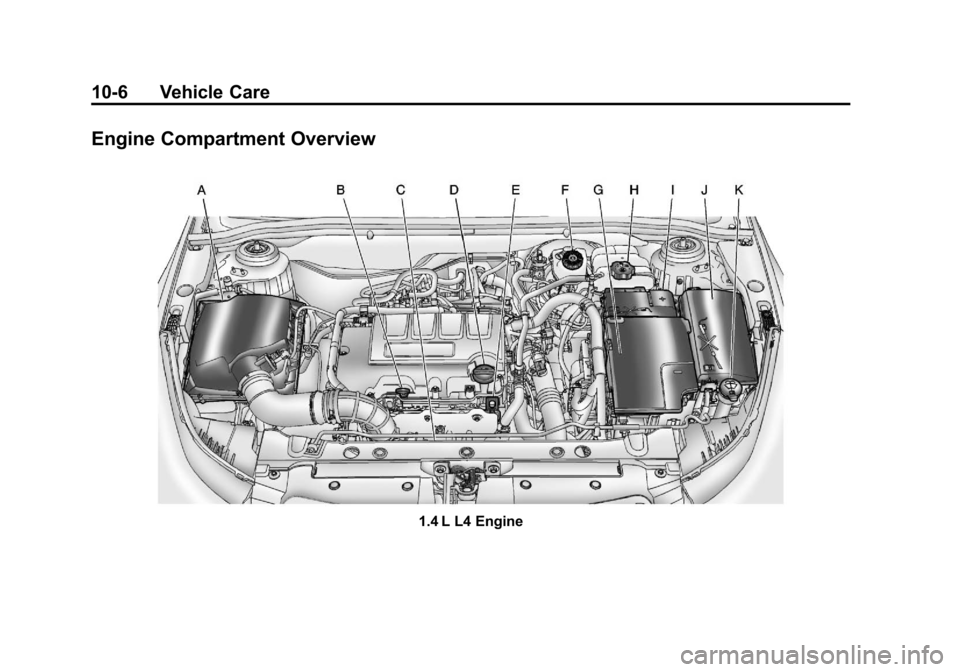
Engine Compartment Overview
1.4 L L4 Engine
Page 259 of 394

Black plate (7,1)Chevrolet Cruze Owner Manual - 2011
Vehicle Care 10-7
A.Engine Air Cleaner/Filter on
page 10‑15.
B. Engine Oil Dipstick. See “Checking Engine Oil” under
Engine Oil on page 10‑9.
C. Electric Engine Cooling Fans (Out of View). See Cooling
System on page 10‑16.
D. Engine Oil Fill Cap. See “When
to Add Engine Oil” under
Engine Oil on page 10‑9. E. Remote Negative (-) Terminal.
See Jump Starting on
page 10‑84.
F. Brake/Clutch Fluid Reservoir. See “Brake Fluid” underBrakes
on page 10‑23 andHydraulic
Clutch on page 10‑14.
G. Battery on page 10‑26 (Under
Cover).
H. Engine Coolant Surge Tank and Pressure Cap. See Engine
Coolant on page 10‑17. I. Remote Positive (+) Terminal.
See Jump Starting on
page 10‑84.
J. Engine Compartment Fuse
Block on page 10‑37.
K. Windshield Washer Fluid Reservoir. See “Adding Washer
Fluid” under Washer Fluid on
page 10‑22.
Page 260 of 394
Black plate (8,1)Chevrolet Cruze Owner Manual - 2011
10-8 Vehicle Care
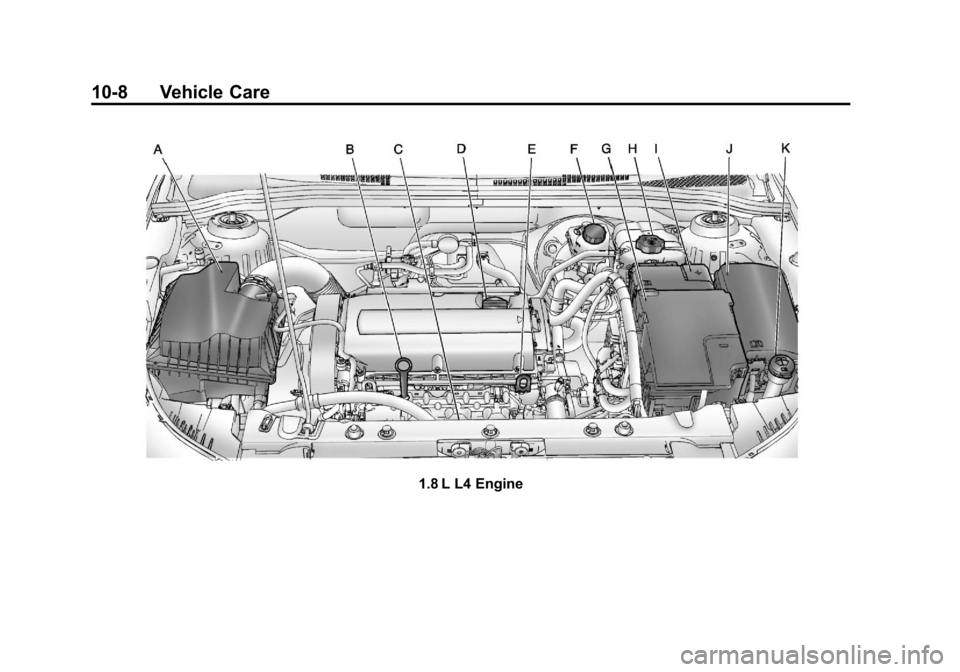
1.8 L L4 Engine
Page 261 of 394
Black plate (9,1)Chevrolet Cruze Owner Manual - 2011
Vehicle Care 10-9
A.Engine Air Cleaner/Filter on
page 10‑15.
B. Engine Oil Dipstick. See “Checking Engine Oil” under
Engine Oil on page 10‑9.
C. Engine Cooling Fans (Out of View). See Cooling System on
page 10‑16.
D. Engine Oil Fill Cap. See “When
to Add Engine Oil” under
Engine Oil on page 10‑9.
E. Remote Negative (-) Terminal. See Jump Starting on
page 10‑84.
F. Brake/Clutch Fluid Reservoir. See “Brake Fluid” underBrakes
on page 10‑23 andHydraulic
Clutch on page 10‑14. G.
Battery on page 10‑26 (Under
Cover).
H. Engine Coolant Surge Tank and Pressure Cap. See Cooling
System on page 10‑16.
I. Remote Positive (+) Terminal. See Jump Starting on
page 10‑84.
J. Engine Compartment Fuse
Block on page 10‑37.
K. Windshield Washer Fluid Reservoir. See “Adding Washer
Fluid” under Washer Fluid on
page 10‑22.Engine Oil
To ensure proper engine
performance and long life, careful
attention must be paid to engine oil.
Following these simple, but
important steps will help protect
your investment:
.Always use engine oil approved
to the proper specification and of
the proper viscosity grade. See
“Selecting the Right Engine Oil”
in this section.
.Check the engine oil level
regularly and maintain the
proper oil level. See “Checking
Engine Oil” and“When to Add
Engine Oil” in this section.
.Change the engine oil at the
appropriate time. See Engine Oil
Life System on page 10‑12.
.Always dispose of engine oil
properly. See “What to Do With
Used Oil” in this section.
Page 262 of 394
Black plate (10,1)Chevrolet Cruze Owner Manual - 2011
10-10 Vehicle Care
Checking Engine Oil
It is a good idea to check the engine
oil level at each fuel fill. In order to
get an accurate reading, the vehicle
must be on level ground. The
engine oil dipstick handle is a yellow
loop. SeeEngine Compartment
Overview on page 10‑6 for the
location of the engine oil dipstick.
Obtaining an accurate oil level
reading is essential:
1. If the engine has been running recently, turn off the engine and
allow several minutes for the oil
to drain back into the oil pan.
Checking the oil level too soon
after engine shut off will not
provide an accurate oil level
reading.
2. Pull out the dipstick and clean it with a paper towel or cloth, then
push it back in all the way.
Remove it again, keeping the tip
down, and check the level.
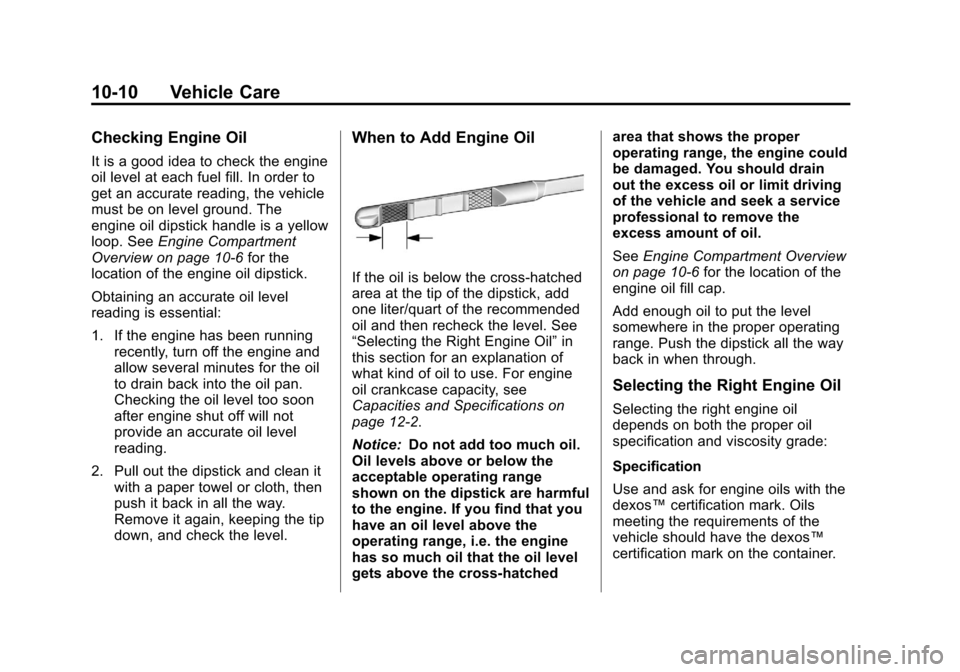
When to Add Engine Oil
If the oil is below the cross-hatched
area at the tip of the dipstick, add
one liter/quart of the recommended
oil and then recheck the level. See
“Selecting the Right Engine Oil” in
this section for an explanation of
what kind of oil to use. For engine
oil crankcase capacity, see
Capacities and Specifications on
page 12‑2.
Notice: Do not add too much oil.
Oil levels above or below the
acceptable operating range
shown on the dipstick are harmful
to the engine. If you find that you
have an oil level above the
operating range, i.e. the engine
has so much oil that the oil level
gets above the cross-hatched area that shows the proper
operating range, the engine could
be damaged. You should drain
out the excess oil or limit driving
of the vehicle and seek a service
professional to remove the
excess amount of oil.
See
Engine Compartment Overview
on page 10‑6 for the location of the
engine oil fill cap.
Add enough oil to put the level
somewhere in the proper operating
range. Push the dipstick all the way
back in when through.
Selecting the Right Engine Oil
Selecting the right engine oil
depends on both the proper oil
specification and viscosity grade:
Specification
Use and ask for engine oils with the
dexos™ certification mark. Oils
meeting the requirements of the
vehicle should have the dexos™
certification mark on the container.