2011 CHEVROLET CRUZE buttons
[x] Cancel search: buttonsPage 9 of 394

Black plate (3,1)Chevrolet Cruze Owner Manual - 2011
In Brief 1-3
A.Exterior Lamp Controls on
page 6‑1.
Front Fog Lamps on page 6‑4
(If Equipped).
Instrument Panel Illumination
Control on page 6‑5.
B. Air Vents on page 8‑6.
C. Headlamps High-Low Beam. See Headlamps High-Low
Beam on page 6‑2.
Turn and Lane‐Change Lever.
See Turn and Lane-Change
Signals on page 6‑4.
Driver Information Center (DIC)
Buttons. See Driver Information
Center (DIC) on page 5‑24.
D. Instrument Cluster on page 5‑8.
E. Horn on page 5‑3.
F. Driver Information Center (DIC)
on page 5‑24.
G. Steering Wheel Controls on
page 5‑2. H.
Windshield Wiper/Washer on
page 5‑3.
I. Infotainment on page 7‑1.
Satellite Radio on page 7‑13
(If Equipped).
J. Infotainment Display Screen.
K. Light Sensor. See Automatic
Headlamp System on page 6‑3.
L. Passenger Airbag. See Where
Are the Airbags? on page 3‑27.
M. Hood Release. See Hood on
page 10‑4.
N. Data Link Connector (DLC). See Malfunction Indicator Lamp
on page 5‑13.
O. Instrument Panel Fuse Block on
page 10‑41.
P. Cruise Control on page 9‑36. Q.
Steering Wheel Adjustment on
page 5‑2.
R. Driver Airbag. See Where Are
the Airbags? on page 3‑27.
S. Ignition Switch. See Ignition
Positions on page 9‑18.
T. Driver Knee Airbag. See Where
Are the Airbags? on page 3‑27.
U. Power Door Locks on page 2‑7.
V. Hazard Warning Flashers on
page 6‑3.
W. Shift Lever. See Automatic
Transmission on page 9‑26 or
Manual Transmission on
page 9‑29.
X. Traction Control System (TCS)
on page 9‑33.
StabiliTrak
®System on
page 9‑34.
Page 22 of 394
Black plate (16,1)Chevrolet Cruze Owner Manual - 2011
1-16 In Brief
Vehicle Features
Radio(s)
O
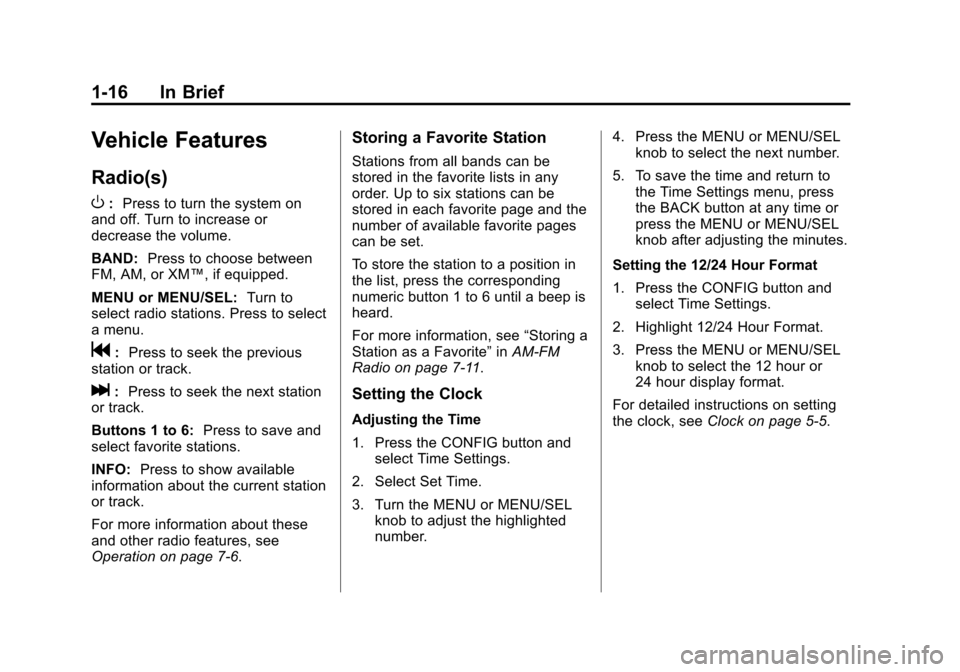
:Press to turn the system on
and off. Turn to increase or
decrease the volume.
BAND: Press to choose between
FM, AM, or XM™, if equipped.
MENU or MENU/SEL: Turn to
select radio stations. Press to select
a menu.
g: Press to seek the previous
station or track.
l: Press to seek the next station
or track.
Buttons 1 to 6: Press to save and
select favorite stations.
INFO: Press to show available
information about the current station
or track.
For more information about these
and other radio features, see
Operation on page 7‑6.
Storing a Favorite Station
Stations from all bands can be
stored in the favorite lists in any
order. Up to six stations can be
stored in each favorite page and the
number of available favorite pages
can be set.
To store the station to a position in
the list, press the corresponding
numeric button 1 to 6 until a beep is
heard.
For more information, see “Storing a
Station as a Favorite” inAM-FM
Radio on page 7‑11.
Setting the Clock
Adjusting the Time
1. Press the CONFIG button and select Time Settings.
2. Select Set Time.
3. Turn the MENU or MENU/SEL knob to adjust the highlighted
number. 4. Press the MENU or MENU/SEL
knob to select the next number.
5. To save the time and return to the Time Settings menu, press
the BACK button at any time or
press the MENU or MENU/SEL
knob after adjusting the minutes.
Setting the 12/24 Hour Format
1. Press the CONFIG button and select Time Settings.
2. Highlight 12/24 Hour Format.
3. Press the MENU or MENU/SEL knob to select the 12 hour or
24 hour display format.
For detailed instructions on setting
the clock, see Clock on page 5‑5.
Page 30 of 394
Black plate (24,1)Chevrolet Cruze Owner Manual - 2011
1-24 In Brief
hardware. The vehicle has to have a
working electrical system and
adequate battery power for the
OnStar equipment to operate.
OnStar service may not work if the
OnStar equipment isn’t properly
installed or you haven’t maintained
it and the vehicle is in good working
order and in compliance with all
government regulations. If you try to
add, connect, or modify any
equipment or software in the
vehicle, OnStar service may not
work. Other problems OnStar can’t
control may prevent service to you,
such as hills, tall buildings, tunnels,
weather, electrical system design
and architecture of the vehicle,
damage to important parts of the
vehicle in a crash, or wireless phone
network congestion or jamming.See
Radio Frequency Statement on
page 13‑16 for information
regarding Part 15 of the Federal
Communications Commission (FCC)
rules and Industry Canada
Standards RSS-210/220/310.
OnStar Steering Wheel
Controls
This vehicle may have ab g/$
i
Talk/Mute button that can be
used to interact with OnStar
Hands-Free calling. See Steering
Wheel Controls on page 5‑2 for
more information.
On some vehicles, the
$ ito dial
phone extensions. See the OnStar
Owner's Guide for more information.
Your Responsibility
Increase the volume of the radio if
the OnStar Advisor cannot be
heard.
If the light next to the OnStar
buttons is red, the system may not
be functioning properly. Push the
Q
button and request a vehicle
diagnostic. If the light appears clear
(no light appears), your OnStar
subscription has expired and all
services have been deactivated.
Push the
Qbutton to confirm that
the OnStar equipment is active.
Page 43 of 394

Black plate (13,1)Chevrolet Cruze Owner Manual - 2011
Keys, Doors and Windows 2-13
Automatic Dimming
Rearview Mirror
The vehicle may have an automatic
dimming inside rearview mirror.
Automatic dimming reduces the
glare from the headlamps of the
vehicle behind you. The dimming
feature and the indicator light come
on each time the vehicle is started.
Vehicles with OnStar
®have three
additional control buttons located at
the bottom of the mirror. See your
dealer for more information about
OnStar and how to subscribe to it.
See the OnStar Owner's Guide for
more information about the services
OnStar provides.
Cleaning the Mirror
Do not spray glass cleaner directly
on the mirror. Use a soft towel
dampened with water.
Windows
{WARNING
Leaving children, helpless adults,
or pets in a vehicle with the
windows closed is dangerous.
They can be overcome by the
extreme heat and suffer
permanent injuries or even death
from heat stroke. Never leave a
child, a helpless adult, or a pet
alone in a vehicle, especially with
the windows closed in warm or
hot weather.
The vehicle aerodynamics are
designed to improve fuel economy
performance. This may result in a
pulsing sound when either rear
window is down and the front
windows are up. To reduce the
sound, open either a front window
or the sunroof (if equipped).
Page 103 of 394
Black plate (55,1)Chevrolet Cruze Owner Manual - 2011
Seats and Restraints 3-55
Head Restraint Removal and
Reinstallation
The rear outboard head restraints
can be removed if they interfere with
the proper installation of the child
restraint.
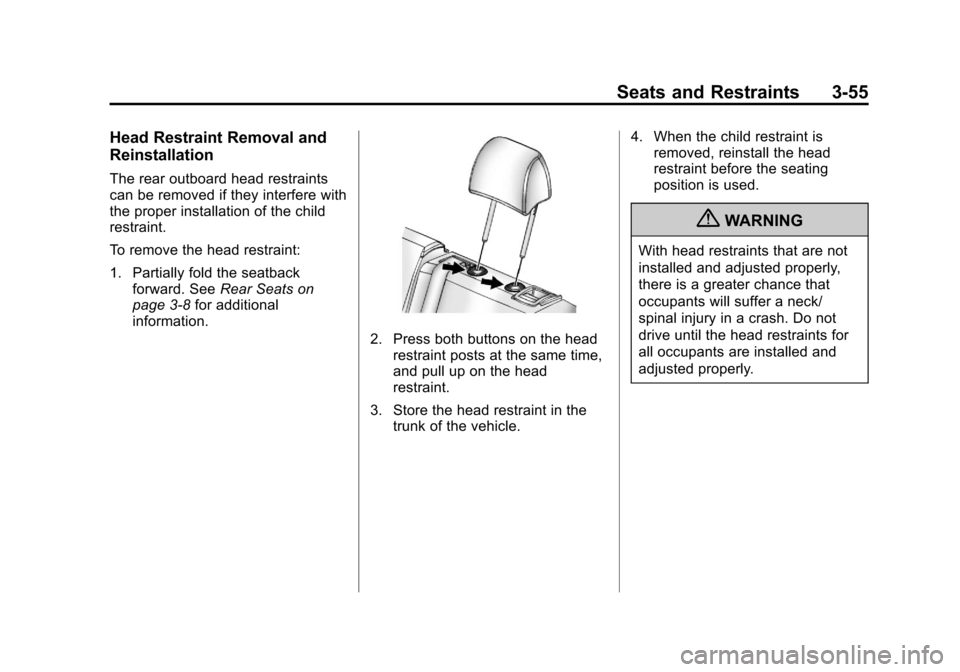
To remove the head restraint:
1. Partially fold the seatbackforward. See Rear Seats on
page 3‑8 for additional
information.
2. Press both buttons on the head restraint posts at the same time,
and pull up on the head
restraint.
3. Store the head restraint in the trunk of the vehicle. 4. When the child restraint is
removed, reinstall the head
restraint before the seating
position is used.
{WARNING
With head restraints that are not
installed and adjusted properly,
there is a greater chance that
occupants will suffer a neck/
spinal injury in a crash. Do not
drive until the head restraints for
all occupants are installed and
adjusted properly.
Page 136 of 394
Black plate (24,1)Chevrolet Cruze Owner Manual - 2011
5-24 Instruments and Controls
Door Ajar Light
For vehicles equipped with this light,
it comes on when a door is open or
not secured. Vehicles not equipped
with a light display a DIC message.
SeeDoor Ajar Messages on
page 5‑29 for more information.
Information Displays
Driver Information
Center (DIC)
The vehicle may have a Driver
Information Center (DIC). The DIC
displays information about your
vehicle. It also displays warning
messages if a system problem is
detected. See Vehicle Messages
(Canada Base Level) on page 5‑27
or Vehicle Messages (Canada
Uplevel and United States) on
page 5‑28 for more information. All
messages appear in the DIC display
located in the center of the
instrument panel cluster.
DIC Operation and Displays
The DIC has different displays
which can be accessed by using the
DIC buttons located on the turn
signal lever located on the left side
of the steering wheel. The DIC
displays trip, fuel, and warning
messages if a system problem is
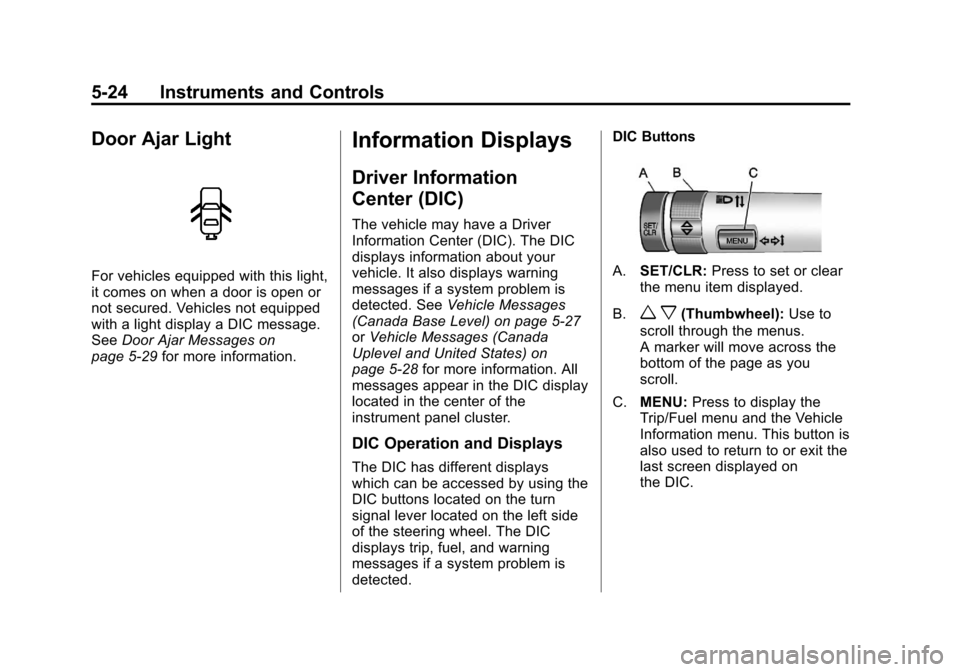
detected. DIC Buttons
A.
SET/CLR: Press to set or clear
the menu item displayed.
B.
w x(Thumbwheel): Use to
scroll through the menus.
A marker will move across the
bottom of the page as you
scroll.
C. MENU: Press to display the
Trip/Fuel menu and the Vehicle
Information menu. This button is
also used to return to or exit the
last screen displayed on
the DIC.
Page 139 of 394
Black plate (27,1)Chevrolet Cruze Owner Manual - 2011
Instruments and Controls 5-27
When the remaining oil life is low,
the CHANGE ENGINE OIL SOON
message will appear on the display.
SeeEngine Oil Messages on
page 5‑30. The oil should be
changed as soon as possible. See
Engine Oil on page 10‑9. In addition
to the engine oil life system
monitoring the oil life, additional
maintenance is recommended in the
Maintenance Schedule in this
manual. See Scheduled
Maintenance on page 11‑2 for more
information.
Remember, the Oil Life display must
be reset after each oil change. It will
not reset itself. Also, be careful not
to reset the Oil Life display
accidentally at any time other than
when the oil has just been changed.
It cannot be reset accurately until
the next oil change. To reset the
engine oil life system press the SET
button while the Oil Life display is
active. See Engine Oil Life System
on page 10‑12. Battery Voltage
This display, available on some
vehicles, shows the current battery
voltage. If the voltage is in the
normal range, the value will display.
For example, the display may read
Battery Voltage 15.0 Volts. The
vehicle's charging system regulates
voltage based on the state of the
battery. The battery voltage can
fluctuate while viewing this
information on the DIC. This is
normal. See
Charging System Light
on page 5‑13 for more information.
If there is a problem with the battery
charging system, the DIC will
display a message. See Battery
Voltage and Charging Messages on
page 5‑28.
Blank Display
This display shows no information.Vehicle Messages
Vehicle Messages
(Canada Base Level)
DIC messages display when the
status of the vehicle has changed
and action may be needed to
correct the condition. Multiple
messages appear one after another.
Press any of the DIC buttons on the
turn signal lever to acknowledge
and clear them from the display.
More urgent messages cannot be
cleared from the DIC display. All
messages should be taken
seriously. Clearing messages will
not correct the problem.
Page 140 of 394
Black plate (28,1)Chevrolet Cruze Owner Manual - 2011
5-28 Instruments and Controls
On the Canadian base level cluster,
vehicle messages appear as code
numbers.
25:Left front turn indicator failure
26: Left rear turn indicator failure
27: Right front turn indicator failure
28: Right rear turn indicator failure
35: Replace battery in radio remote
control
53: Tighten gas cap
68: Service power steering
75: Service air conditioner
82: Change engine oil soon
84: Engine power is reduced
95: Service airbagVehicle Messages
(Canada Uplevel and
United States)
DIC messages display when the
status of the vehicle has changed
and action may be needed to
correct the condition. Multiple
messages appear one after another.
Press any of the DIC buttons on the
turn signal lever to acknowledge
and clear them from the display.
More urgent messages cannot be
cleared from the DIC display. All
messages should be taken
seriously. Clearing messages will
not correct the problem.
On the Canadian uplevel cluster
and on vehicles sold in the United
States, vehicle messages are
displayed as text. The messages
and information about them follow.
Battery Voltage and
Charging Messages
BATTERY SAVER ACTIVE
This message displays when the
vehicle has detected that the battery
voltage is dropping beyond a
reasonable point. The battery saver
system starts reducing certain
features of the vehicle that you may
be able to notice. At the point that
features are disabled, this message
is displayed. It means that the
vehicle is trying to save the charge
in the battery. Turn off unnecessary
accessories to allow the battery to
recharge.
LOW BATTERY
This message is displayed when the
battery voltage is low. See Battery
on page 10‑26 for more information.