2011 CHEVROLET CORVETTE turn signal
[x] Cancel search: turn signalPage 9 of 428

Black plate (3,1)Chevrolet Corvette Owner Manual - 2011
In Brief 1-3
A.Air Vents on page 8‑6.
B. Head-Up Display (HUD) on
page 5‑31 (If Equipped).
C. Turn and Lane‐Change Lever. See Turn and Lane-Change
Signals (Auto Signal) on
page 6‑4.
Cruise Control on page 9‑44.
Fog Lamps on page 6‑5.
Exterior Lamp Controls on
page 6‑1.
D. Manual Shift Paddles (If Equipped). See Automatic
Transmission on page 9‑28.
E. Driver Information Center (DIC)
on page 5‑25.
F. Instrument Cluster on page 5‑9.
G. Windshield Wiper/Washer on
page 5‑4.
H. Driver Information Center (DIC) Buttons. See Driver Information
Center (DIC) on page 5‑25.
I. Hazard Warning Flashers on
page 6‑4. J.
AM-FM Radio on page 7‑5.
K. Dual Automatic Climate Control
System on page 8‑1.
L. Fuel Door Release Button. See Filling the Tank on page 9‑51.
Hatch/Trunk Release Button.
See “Hatch/Trunk Lid Release”
under Hatch on page 2‑10.
M. Instrument Panel Illumination
Control on page 6‑5.
N. Data Link Connector (DLC). See Malfunction Indicator Lamp
on page 5‑18.
O. Power Folding Top Switch (If Equipped). See Convertible
Top on page 2‑22.
P. Bluetooth on page 7‑18
(If Equipped).
Steering Wheel Controls on
page 5‑3 (If Equipped).
Q. Steering Wheel Adjustment on
page 5‑2.
R. Horn on page 5‑4. S. Telescopic Wheel Button
(If Equipped). See Steering
Wheel Adjustment on page 5‑2.
T. Ignition Positions on page 9‑20.
U. Heated Front Seats on page 3‑8
(If Equipped).
V. Shift Lever (Automatic Shown). See Automatic Transmission on
page 9‑28 orManual
Transmission on page 9‑32.
W. Active Handling System on
page 9‑37.
X. Power Outlets on page 5‑6.
Y. Selective Ride Control on
page 9‑42.
Z. Cupholders on page 4‑1.
AA. Ashtrays on page 5‑8.
Cigarette Lighter on page 5‑7.
AB. Parking Brake on page 9‑35.
AC. Glove Box on page 4‑1.
AD. Instrument Panel Fuse Block on
page 10‑55.
Page 19 of 428

Black plate (13,1)Chevrolet Corvette Owner Manual - 2011
In Brief 1-13
Exterior Lighting
Exterior Lamps
The exterior lamp control is located
to the left of the steering wheel, on
the multifunction lever.
O:Turn the band with this symbol
on it to operate the exterior lamps.
O: Turns off all lamps.
AUTO: Sets the exterior lamps
to automatic mode. AUTO mode
turns the exterior lamps on and off
depending on how much light is
available outside the vehicle.
;: Turns on the parking lamps
together with the sidemarker lamps,
taillamps, license plate lamps and
instrument panel lights.
5: Turns on the headlamps
together with the parking lamps,
sidemarker lamps, taillamps, license
plate lamps and instrument panel
lights.
Turn and Lane-Change Signal
The turn signal lever has two
upward and downward positions
to signal a lane change or a turn.
.For a lane change, raise or
lower the lever. The signal
automatically flashes three
times.
.For a turn, raise or lower the
lever all of the way up or down.
The turn signal will stop flashing
when the turn is completed.
For more information, see:
.Exterior Lamp Controls on
page 6‑1.
.Turn and Lane-Change Signals
(Auto Signal) on page 6‑4.
Windshield Wiper/Washer
The windshield wiper lever is
located on the right side of the
steering column.
1: Fast wipes.
6:Slow wipes.
&:Use to set a delay between
wipes.
x: Use for a delayed wiping
cycle. Turn the intermittent adjust
band down for a longer delay or up
for a shorter delay.
Page 123 of 428

Black plate (3,1)Chevrolet Corvette Owner Manual - 2011
Instruments and Controls 5-3
The telescopic steering column
position can be stored with your
memory settings. See“Memory
Seat, Mirrors and Steering Wheel”
under Power Seat Adjustment on
page 3‑3 for more information.
Steering Wheel Controls
For vehicles with steering wheel
controls, some audio controls can
be adjusted at the steering wheel.
bg(Mute/Push to Talk): Press to
silence the vehicle speakers only.
Press again to turn the sound on.
For vehicles with Bluetooth or
OnStar
®systems press and
hold
b gfor longer than 2 seconds
to interact with those systems.
See Bluetooth on page 7‑18 and
the OnStar Owner's Guide for
more information.
c(Phone On Hook): Press to
reject an incoming call, or end a
current call.
w x(Next/Previous) : Press to
change radio stations or select
tracks on a CD. To change radio stations:
.Pressworxto go to the
next or to the previous radio
station and stay there. The
radio only seeks stations with
a strong signal that are in the
selected band.
.Press and holdworxfor
2 seconds until SCAN displays
and a beep sounds to scan
stations. The radio goes to a
station, plays for a few seconds,
then goes to the next station.
Press again to stop scanning.
.Press and holdworxfor
4 seconds until PRESET SCAN
displays and a beep sounds to
scan presets. The radio goes
to a station, plays for a few
seconds, then goes to the
next station. Press again to
stop scanning.
Page 151 of 428

Black plate (31,1)Chevrolet Corvette Owner Manual - 2011
Instruments and Controls 5-31
Head-Up Display (HUD)
{WARNING
If the HUD image is too bright,
or too high in your field of view, it
may take you more time to see
things you need to see when it is
dark outside. Be sure to keep the
HUD image dim and placed low in
your field of view.
For vehicles with the Head-Up
Display (HUD), you can see some
of the driver information that
appears on the instrument panel
cluster. The information may be displayed
in English or metric units and
appears as an image focused
out toward the front of the vehicle.
The HUD consists of the following
information:
.Speedometer
.Turn Signal Indicators
.High-Beam Indicator Symbol
.Tachometer
.Manual Paddle Shift Gear
Indicator (If Equipped)
These displays on the HUD are
for use when using the manual
paddle shift controls to shift the
transmission. See
“Manual
Paddle Shift” inAutomatic
Transmission on page 9‑28.
.Shift Light
This light is used for
performance driving to
indicate that the vehicle's
best performance level has
been reached to shift the transmission into the next higher
gear. An arrow pointing up will
light up on the display just prior
to reaching the engine fuel
cut-off mode. This cut-off is
about 6,500 RPM for the
LS3 engine, 6,600 RPM for
the LS9 & ZR1 engines and
7,000 RPM for the LS7 engine.
.Check Gauges Warning
.Engine Coolant Temperature
Gauge
.Transmission Fluid Temperature
Gauge, (Automatic Transmission
Vehicles Only)
.Engine Oil Temperature Gauge
.Engine Oil Pressure Gauge
.G-Force Gauge
.Boost Gauge (If Equipped)
.Audio Functions, Street
Mode Only
.Navigation, Only with Navigation
Radio, Turn-by-Turn Guidance
Page 163 of 428

Black plate (43,1)Chevrolet Corvette Owner Manual - 2011
Instruments and Controls 5-43
.The vehicle is experiencing
Electromagnetic
Interference (EMI). Some
locations, such as airports,
automatic toll booths, and some
gas stations have EMI fields
which may interfere with the
keyless access transmitter.
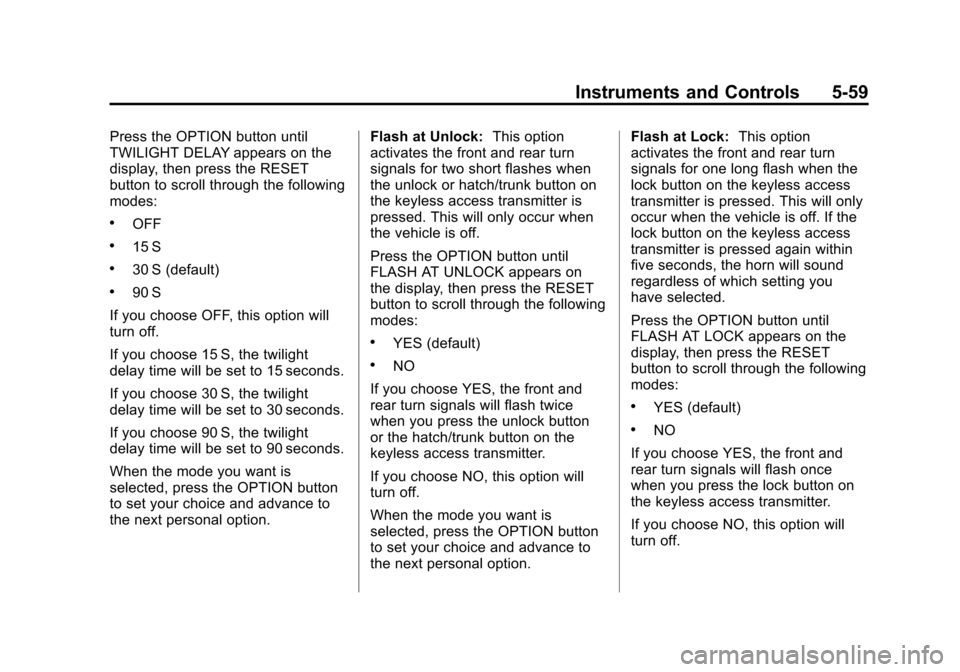
If moving the transmitter to
different locations within the
vehicle does not help, place
the transmitter in the glove
box transmitter pocket with the
buttons facing to the right and
then press the START button.
.The vehicle's battery voltage is
low. The battery voltage must be
above 10 volts for the keyless
access transmitter to be
detected properly.
NO FOB - OFF OR RUN?
This message displays when the
keyless access transmitter is not
detected inside the vehicle while
you are trying to turn the ignition
off. The vehicle may be near a
strong radio antenna signal causing
the keyless access system to be
jammed. The vehicle will remain
in ACCESSORY until the vehicle
is turned off or is restarted,
or five minutes has expired. If you
turn the ignition off and you cannot
find the keyless access transmitter,
you will not be able to restart the
vehicle. The keyless access
transmitter needs to be inside of the
vehicle in order for the vehicle to
start. SeeStarting the Engine on
page 9‑21 for more information.
OFF–ACCESSORY TO LEARN
See“Matching Transmitter(s) to
Your Vehicle” underRemote
Keyless Entry (RKE) System
Operation on page 2‑3.
READY FOR FOB #X
See “Matching Transmitter(s) to
Your Vehicle” underRemote
Keyless Entry (RKE) System
Operation on page 2‑3.
Page 164 of 428

Black plate (44,1)Chevrolet Corvette Owner Manual - 2011
5-44 Instruments and Controls
Lamp Messages
HEADLAMPS SUGGESTED
This message displays if it is dark
enough outside and the headlamps
and the Twilight Sentinel
®controls
are off. This message informs the
driver that turning on the exterior
lamps is recommended. It has
become dark enough outside to
require the headlamps and/or other
exterior lamps.
TURN SIGNAL ON
This message displays and a
sound will be heard if a turn signal
is left on for 1.2 km (three-quarters
of a mile). Move the turn signal/
multifunction lever to the off
position.
To acknowledge this message,
press the RESET button.
Ride Control System
Messages
ACTIVE HANDLING
This message displays when
the Active Handling System is
operating. The Active Handling
System is a computer controlled
system that assists the driver in
controlling the vehicle in difficult
driving conditions. You may feel
or hear the system working and
see the ACTIVE HANDLING
message displayed in the DIC.
This message stays on for a few
seconds following the active
handling event. This is normal when
the system is operating. See Active
Handling System on page 9‑37 and
Braking on page 9‑3.
ACTIVE HANDLING READY
This message displays when the
functional check of the Active
Handling System has been
completed. See Active Handling
System on page 9‑37 for more
information.
COMPETITIVE DRIVING MODE
This message displays and a
sound will be heard when the
Competitive Driving mode is
selected. The instrument panel
cluster light will be on when the
Competitive Driving mode is
selected. If your vehicle is equipped
with a manual transmission, Launch
Control is available when this
mode selected. The Traction
Control System (TCS) will not
be operating while in the
Competitive Driving mode. Adjust
your driving accordingly. This
system is available on all models
except ZR1. See Competitive
Driving Mode on page 9‑38,
including the “Launch Control”
information.
Page 179 of 428

Black plate (59,1)Chevrolet Corvette Owner Manual - 2011
Instruments and Controls 5-59
Press the OPTION button until
TWILIGHT DELAY appears on the
display, then press the RESET
button to scroll through the following
modes:
.OFF
.15 S
.30 S (default)
.90 S
If you choose OFF, this option will
turn off.
If you choose 15 S, the twilight
delay time will be set to 15 seconds.
If you choose 30 S, the twilight
delay time will be set to 30 seconds.
If you choose 90 S, the twilight
delay time will be set to 90 seconds.
When the mode you want is
selected, press the OPTION button
to set your choice and advance to
the next personal option. Flash at Unlock:
This option
activates the front and rear turn
signals for two short flashes when
the unlock or hatch/trunk button on
the keyless access transmitter is
pressed. This will only occur when
the vehicle is off.
Press the OPTION button until
FLASH AT UNLOCK appears on
the display, then press the RESET
button to scroll through the following
modes:
.YES (default)
.NO
If you choose YES, the front and
rear turn signals will flash twice
when you press the unlock button
or the hatch/trunk button on the
keyless access transmitter.
If you choose NO, this option will
turn off.
When the mode you want is
selected, press the OPTION button
to set your choice and advance to
the next personal option. Flash at Lock:
This option
activates the front and rear turn
signals for one long flash when the
lock button on the keyless access
transmitter is pressed. This will only
occur when the vehicle is off. If the
lock button on the keyless access
transmitter is pressed again within
five seconds, the horn will sound
regardless of which setting you
have selected.
Press the OPTION button until
FLASH AT LOCK appears on the
display, then press the RESET
button to scroll through the following
modes:
.YES (default)
.NO
If you choose YES, the front and
rear turn signals will flash once
when you press the lock button on
the keyless access transmitter.
If you choose NO, this option will
turn off.
Page 189 of 428

Black plate (69,1)Chevrolet Corvette Owner Manual - 2011
Instruments and Controls 5-69
.If you wrote“Right,”press
the right button in the
vehicle.
.If you wrote “Middle,”press
the middle button in the
vehicle.
6. After entering all of the switch positions, again, firmly press and
release all three buttons at the
same time. The indicator lights
turn on.
7. Press and hold the button that will be used to control the
garage door until the garage
door moves. The indicator
light above the selected button
should slowly blink. This button
may need to be held for up to
55 seconds. 8. Immediately release the button
when the garage door moves.
The indicator light blinks rapidly
until programming is complete.
9. Press and release the same button again. The garage door
should move, confirming that
programming is successful and
complete.
To program another Fixed Code
device such as an additional garage
door opener, a security device,
or home automation device, repeat
Steps 1-9, choosing a different
button in Step 7 than what was
used for the garage door opener.
Universal Remote System
Operation
Press and hold the appropriate
button for at least half of a second.
The indicator light comes on while
the signal is being transmitted.
Operation can occur:
.If the vehicle is in
accessory mode.
.If the vehicle is in running.
.If the vehicle is in Retained
Accessory Mode (RAP).
See Retained Accessory
Power (RAP) on page 9‑21 for
more information.
.Up to an additional 10 minutes
after RAP finishes.
.Up to 10 minutes after any door
is opened.