Page 327 of 428
Black plate (43,1)Chevrolet Corvette Owner Manual - 2011
Vehicle Care 10-43
Notice:
.Using the wrong fluid
can badly damage brake
hydraulic system parts.
For example, just a few
drops of mineral-based oil,
such as engine oil, in the
brake hydraulic system can
damage brake hydraulic
system parts so badly that
they will have to be replaced.
Do not let someone put in
the wrong kind of fluid.
.If brake fluid is spilled on the
vehicle's painted surfaces,
the paint finish can be
damaged. Be careful not
to spill brake fluid on the
vehicle. If you do, wash it
off immediately.
Battery
Refer to the replacement number
on the original battery label when a
new battery is needed.For battery replacement, see
your dealer or the service manual.
To purchase a service manual, see
Service Publications Ordering
Information on page 13‑15.
{DANGER
Battery posts, terminals, and
related accessories contain lead
and lead compounds, chemicals
known to the State of California to
cause cancer and reproductive
harm. Wash hands after handling.
Vehicle Storage
{WARNING
Batteries have acid that can burn
you and gas that can explode.
You can be badly hurt if you are
not careful. See
Jump Starting on
page 10‑82 for tips on working
around a battery without
getting hurt. Some vehicles have a built-in
battery charger that can be
plugged in to keep the battery
charged when the vehicle is not
in use. For vehicles without a
battery charger, see the following
information.
Infrequent Usage: Remove the
black, negative (−) cable from the
battery to keep the battery from
running down.
See
“Power Window Initialization” in
Power Windows on page 2‑17.
Extended Storage: Remove the
black, negative (−) cable from the
battery or use a battery trickle
charger.
Page 328 of 428
Black plate (44,1)Chevrolet Corvette Owner Manual - 2011
10-44 Vehicle Care
Rear Axle
When to Check Lubricant
It is not necessary to regularly
check rear axle fluid unless a leak
is suspected or an unusual noise is
heard. A fluid loss could indicate a
problem. Have it inspected and
repaired.
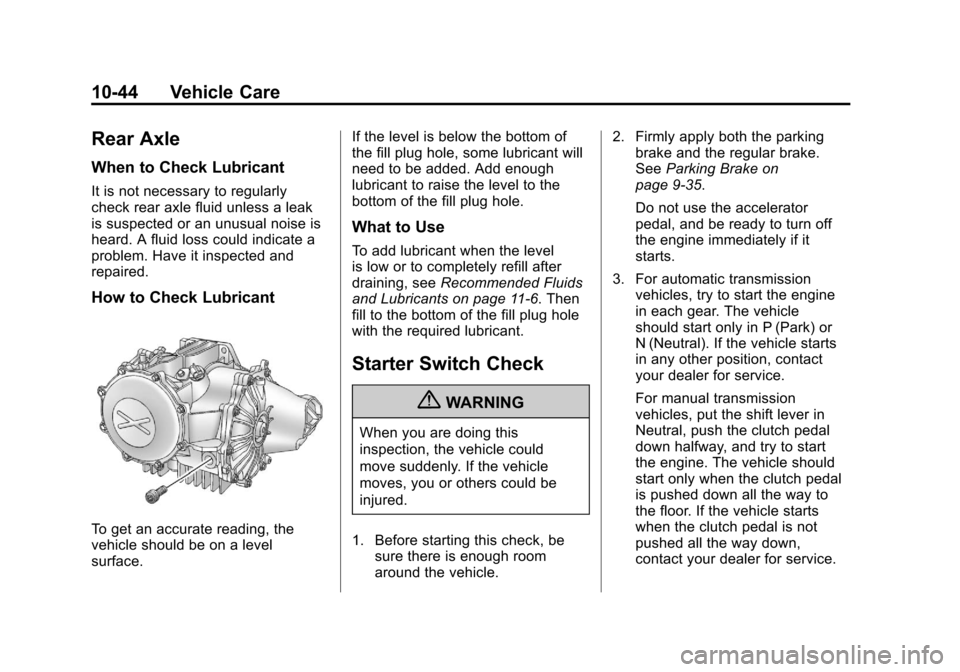
How to Check Lubricant
To get an accurate reading, the
vehicle should be on a level
surface.If the level is below the bottom of
the fill plug hole, some lubricant will
need to be added. Add enough
lubricant to raise the level to the
bottom of the fill plug hole.
What to Use
To add lubricant when the level
is low or to completely refill after
draining, see
Recommended Fluids
and Lubricants on page 11‑6. Then
fill to the bottom of the fill plug hole
with the required lubricant.
Starter Switch Check
{WARNING
When you are doing this
inspection, the vehicle could
move suddenly. If the vehicle
moves, you or others could be
injured.
1. Before starting this check, be sure there is enough room
around the vehicle. 2. Firmly apply both the parking
brake and the regular brake.
See Parking Brake on
page 9‑35.
Do not use the accelerator
pedal, and be ready to turn off
the engine immediately if it
starts.
3. For automatic transmission vehicles, try to start the engine
in each gear. The vehicle
should start only in P (Park) or
N (Neutral). If the vehicle starts
in any other position, contact
your dealer for service.
For manual transmission
vehicles, put the shift lever in
Neutral, push the clutch pedal
down halfway, and try to start
the engine. The vehicle should
start only when the clutch pedal
is pushed down all the way to
the floor. If the vehicle starts
when the clutch pedal is not
pushed all the way down,
contact your dealer for service.
Page 329 of 428
Black plate (45,1)Chevrolet Corvette Owner Manual - 2011
Vehicle Care 10-45
Automatic Transmission
Shift Lock Control
Function Check
{WARNING
When you are doing this
inspection, the vehicle could
move suddenly. If the vehicle
moves, you or others could be
injured.
1. Before starting this check, be sure there is enough room
around the vehicle. It should
be parked on a level surface.
2. Firmly apply the parking brake. See Parking Brake on
page 9‑35.
Be ready to apply the regular
brake immediately if the vehicle
begins to move. 3. With the engine off, turn the
ignition to ON/RUN, but do
not start the engine. Without
applying the regular brake,
try to move the shift lever out of
P (Park) with normal effort. If the
shift lever moves out of P (Park),
contact your dealer for service.
Park Brake and P (Park)
Mechanism Check
{WARNING
When you are doing this check,
the vehicle could begin to move.
You or others could be injured
and property could be damaged.
Make sure there is room in front
of the vehicle in case it begins to
roll. Be ready to apply the regular
brake at once should the vehicle
begin to move. Park on a fairly steep hill, with the
vehicle facing downhill. Keeping
your foot on the regular brake, set
the parking brake.
.To check the parking brake's
holding ability: With the engine
running and the transmission in
N (Neutral), slowly remove foot
pressure from the regular brake
pedal. Do this until the vehicle is
held by the parking brake only.
.To check the P (Park)
mechanism's holding ability:
With the engine running, shift
to P (Park). Then release the
parking brake followed by the
regular brake.
Contact your dealer if service is
required.
Page 336 of 428
Black plate (52,1)Chevrolet Corvette Owner Manual - 2011
10-52 Vehicle Care
Engine Compartment
Fuse Block
There is one fuse block in the
engine compartment located on
the passenger side of the vehicle.
SeeEngine Compartment Overview
on page 10‑10 for more information
on location.
Notice: Spilling liquid on any
electrical component on the
vehicle may damage it. Always
keep the covers on any electrical
component.
For ZR1 models, the Fuel System
fuse is located at the battery.
The vehicle may not be equipped
with all of the fuses and features
shown. Fuse Usage
1 Transmission
Control Module/
Transmission
2 Horn, Alternator
Sense
3 Antilock Braking
System (ABS)/Real
Time Damping
Page 337 of 428
Black plate (53,1)Chevrolet Corvette Owner Manual - 2011
Vehicle Care 10-53
FuseUsage
4 Wiper
5 Stoplamps/
Back-Up Lamps
6 Oxygen Sensor
7 Battery Main 5
8 Parking Lamps
9 Powertrain Relay
Input/Electronic
Throttle Control
10 Manual
Transmission
Solenoids
11 Antilock Braking
System Fuse
Usage
12 Odd Numbered
Fuel Injectors
13 Electronic
Suspension
Control (Option)
14 Canister Purge
Solenoid, Mass Air
Flow Sensor
15 Air Conditioner
Compressor
16 Even Numbered
Fuel Injectors
17 Windshield Washer
18 Headlamp Washer
19 Passenger Side
Low-Beam
Headlamp Fuse
Usage
20 Fuel Pump
(except ZR1)
21 Driver Side
Low-Beam
Headlamp
22 Front Fog Lamp
23 Passenger Side
High-Beam
Headlamp
24 Driver Side
High-Beam
Headlamp
56 Engine Control
Module (ECM)/
Transmission
Control
Module (TCM)/
Easy Key Module
Page 340 of 428

Black plate (56,1)Chevrolet Corvette Owner Manual - 2011
10-56 Vehicle Care
FusesUsage
CRUISE
SWITCH Cruise Control
Switch
CTSY/LAMP Courtesy Lamp
DR LCK Door Locks
DRIV DR
SWITCH Driver Door Switch
ECM Engine Control
Module (ECM)
EXH MDL Exhaust Module
(Z06 & ZR1),
Spare (Coupe and
Convertible)
GM LAN
RUN/CRNK GM LAN Devices
HTD SEAT/
WPR RLY Heated Seat,
Wiper Relays Fuses
Usage
HVAC/
PWR SND Heating.
Ventilation/Air
Conditioning,
Power Sounder
IGN SWTCH/
INTR SNSR Ignition Switch,
Intrusion Sensor
ISRVM/HVAC Electric Inside
Rearview Mirror,
Heating,
Ventilation,
Air Conditioning
ONSTAR OnStar
®
(if equipped)
RDO/
S‐BAND Radio, S‐Band
REAR FOG/
ALDL/TOP
SWTCH Rear Fog Lamp,
Assembly Line
Diagnostic Link
Connector,
Convertible Top
Switch Fuses Usage
REVERSE
LAMPS Reverse Lamps
RUN CRNK Run/Crank Relay
SDM/AOS
SWTCH
AIRBAG Sensing and
Diagnostic Module,
Automatic
Occupant Sensing
Module, Airbag
SPARE Spare
SPARE Spare
SPARE Spare
SPARE Spare
STOP LAMP Stop Lamp
SWC DM Steering Wheel
Dimming
TELE
SWTCH/
MSM Telescope Switch,
Memory Seat
Module
Page 346 of 428
Black plate (62,1)Chevrolet Corvette Owner Manual - 2011
10-62 Vehicle Care
(D) Tire Identification Number
(TIN)
:The letters and numbers
following DOT code are the Tire
Identification Number (TIN). The
TIN shows the manufacturer and
plant code, tire size, and date
the tire was manufactured.
The TIN is molded onto both
sides of the tire, although only
one side may have the date of
manufacture.
(E) Tire Ply Material
:The type
of cord and number of plies in
the sidewall and under the tread.
(F) Uniform Tire Quality
Grading (UTQG)
:Tire
manufacturers are required
to grade tires based on three
performance factors: treadwear,
traction and temperature
resistance. For more information
see Uniform Tire Quality
Grading on page 10‑76. (G) Maximum Cold Inflation
Load Limit
:Maximum load
that can be carried and the
maximum pressure needed to
support that load.
Tire Designations
Tire Size
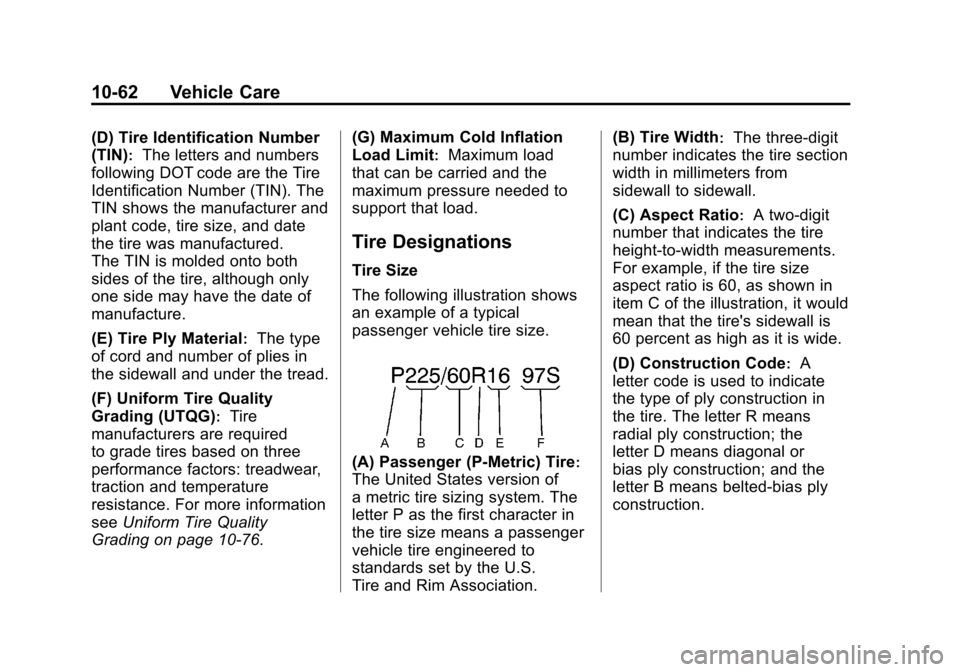
The following illustration shows
an example of a typical
passenger vehicle tire size.
(A) Passenger (P‐Metric) Tire:
The United States version of
a metric tire sizing system. The
letter P as the first character in
the tire size means a passenger
vehicle tire engineered to
standards set by the U.S.
Tire and Rim Association. (B) Tire Width
:The three‐digit
number indicates the tire section
width in millimeters from
sidewall to sidewall.
(C) Aspect Ratio
:A two‐digit
number that indicates the tire
height‐to‐width measurements.
For example, if the tire size
aspect ratio is 60, as shown in
item C of the illustration, it would
mean that the tire's sidewall is
60 percent as high as it is wide.
(D) Construction Code
:A
letter code is used to indicate
the type of ply construction in
the tire. The letter R means
radial ply construction; the
letter D means diagonal or
bias ply construction; and the
letter B means belted‐bias ply
construction.
Page 367 of 428
Black plate (83,1)Chevrolet Corvette Owner Manual - 2011
Vehicle Care 10-83
3. Turn off the ignition on bothvehicles. Unplug unnecessary
accessories plugged into the
cigarette lighter or the accessory
power outlet. Turn off the radio
and all lamps that are not
needed. This will avoid sparks
and help save both batteries.
And it could save the radio!
4. Open the hoods and locate the positive (+) and negative (−)
terminal locations on each
vehicle.
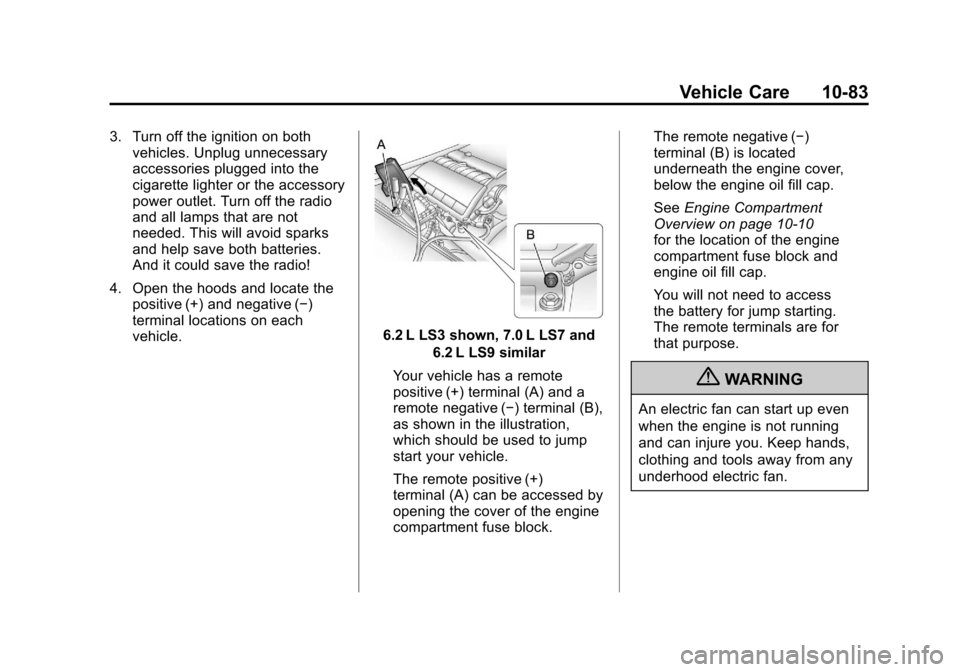
6.2 L LS3 shown, 7.0 L LS7 and
6.2 L LS9 similar
Your vehicle has a remote
positive (+) terminal (A) and a
remote negative (−) terminal (B),
as shown in the illustration,
which should be used to jump
start your vehicle.
The remote positive (+)
terminal (A) can be accessed by
opening the cover of the engine
compartment fuse block. The remote negative (−)
terminal (B) is located
underneath the engine cover,
below the engine oil fill cap.
See
Engine Compartment
Overview on page 10‑10
for the location of the engine
compartment fuse block and
engine oil fill cap.
You will not need to access
the battery for jump starting.
The remote terminals are for
that purpose.
{WARNING
An electric fan can start up even
when the engine is not running
and can injure you. Keep hands,
clothing and tools away from any
underhood electric fan.