2011 CHEVROLET CORVETTE air filter
[x] Cancel search: air filterPage 223 of 428
Black plate (1,1)Chevrolet Corvette Owner Manual - 2011
Climate Controls 8-1
Climate Controls
Climate Control Systems
Dual Automatic Climate ControlSystem . . . . . . . . . . . . . . . . . . . . . . 8-1
Air Vents
Air Vents . . . . . . . . . . . . . . . . . . . . . . 8-6
Maintenance
Passenger Compartment AirFilter . . . . . . . . . . . . . . . . . . . . . . . . . 8-7
Climate Control Systems
Dual Automatic Climate Control System
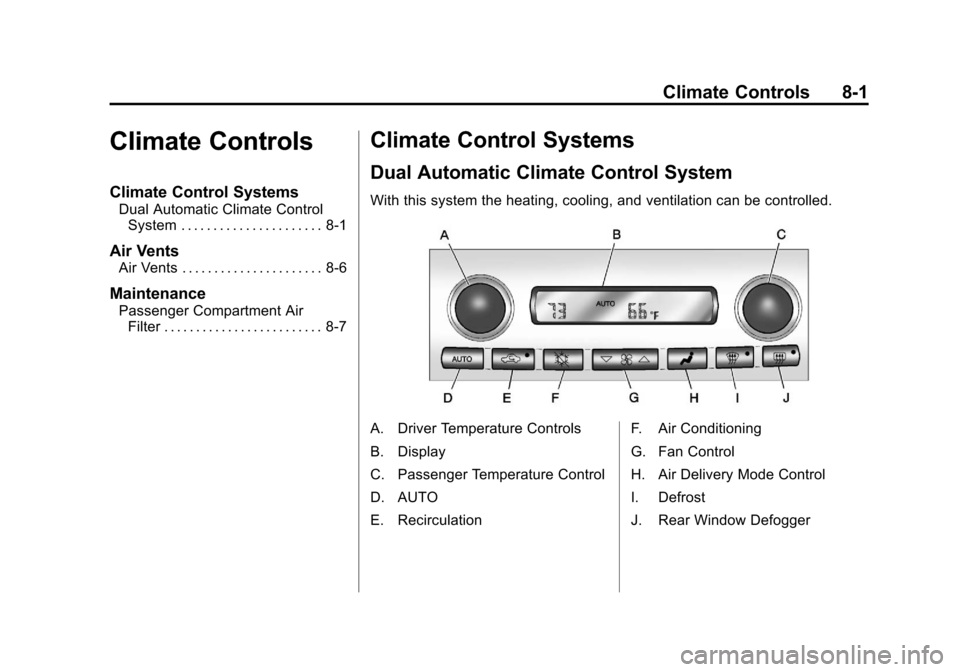
With this system the heating, cooling, and ventilation can be controlled.
A. Driver Temperature Controls
B. Display
C. Passenger Temperature Control
D. AUTO
E. Recirculation F. Air Conditioning
G. Fan Control
H. Air Delivery Mode Control
I. Defrost
J. Rear Window Defogger
Page 225 of 428
Black plate (3,1)Chevrolet Corvette Owner Manual - 2011
Climate Controls 8-3
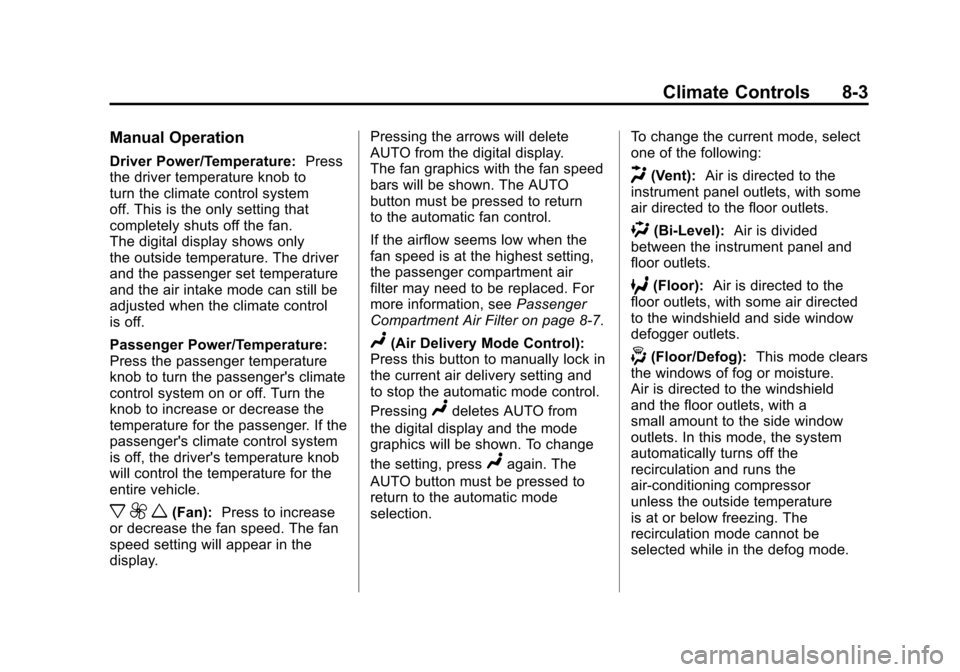
Manual Operation
Driver Power/Temperature:Press
the driver temperature knob to
turn the climate control system
off. This is the only setting that
completely shuts off the fan.
The digital display shows only
the outside temperature. The driver
and the passenger set temperature
and the air intake mode can still be
adjusted when the climate control
is off.
Passenger Power/Temperature:
Press the passenger temperature
knob to turn the passenger's climate
control system on or off. Turn the
knob to increase or decrease the
temperature for the passenger. If the
passenger's climate control system
is off, the driver's temperature knob
will control the temperature for the
entire vehicle.
x 9 w(Fan): Press to increase
or decrease the fan speed. The fan
speed setting will appear in the
display. Pressing the arrows will delete
AUTO from the digital display.
The fan graphics with the fan speed
bars will be shown. The AUTO
button must be pressed to return
to the automatic fan control.
If the airflow seems low when the
fan speed is at the highest setting,
the passenger compartment air
filter may need to be replaced. For
more information, see
Passenger
Compartment Air Filter on page 8‑7.
N(Air Delivery Mode Control):
Press this button to manually lock in
the current air delivery setting and
to stop the automatic mode control.
Pressing
Ndeletes AUTO from
the digital display and the mode
graphics will be shown. To change
the setting, press
Nagain. The
AUTO button must be pressed to
return to the automatic mode
selection. To change the current mode, select
one of the following:
H(Vent):
Air is directed to the
instrument panel outlets, with some
air directed to the floor outlets.
%(Bi-Level): Air is divided
between the instrument panel and
floor outlets.
6(Floor): Air is directed to the
floor outlets, with some air directed
to the windshield and side window
defogger outlets.
-(Floor/Defog): This mode clears
the windows of fog or moisture.
Air is directed to the windshield
and the floor outlets, with a
small amount to the side window
outlets. In this mode, the system
automatically turns off the
recirculation and runs the
air-conditioning compressor
unless the outside temperature
is at or below freezing. The
recirculation mode cannot be
selected while in the defog mode.
Page 229 of 428
Black plate (7,1)Chevrolet Corvette Owner Manual - 2011
Climate Controls 8-7
Maintenance
Passenger Compartment
Air Filter
The passenger compartment air
filter removes certain particles from
the air including pollen and dust
particles. Reductions in airflow,
which may occur more often in
dusty areas, indicate that the
filter may need to be replaced.
SeeMaintenance Replacement
Parts on page 11‑8.
Notice: Driving without a
passenger compartment air filter
in place can cause water and
small particles, like paper and
leaves, to be pulled into your
climate control system which may
cause damage to it. Make sure
you always replace the old filter
with a new one. The passenger compartment air
filter is located on the passenger
side of the engine compartment
near the battery. See
Engine
Compartment Overview on
page 10‑10.
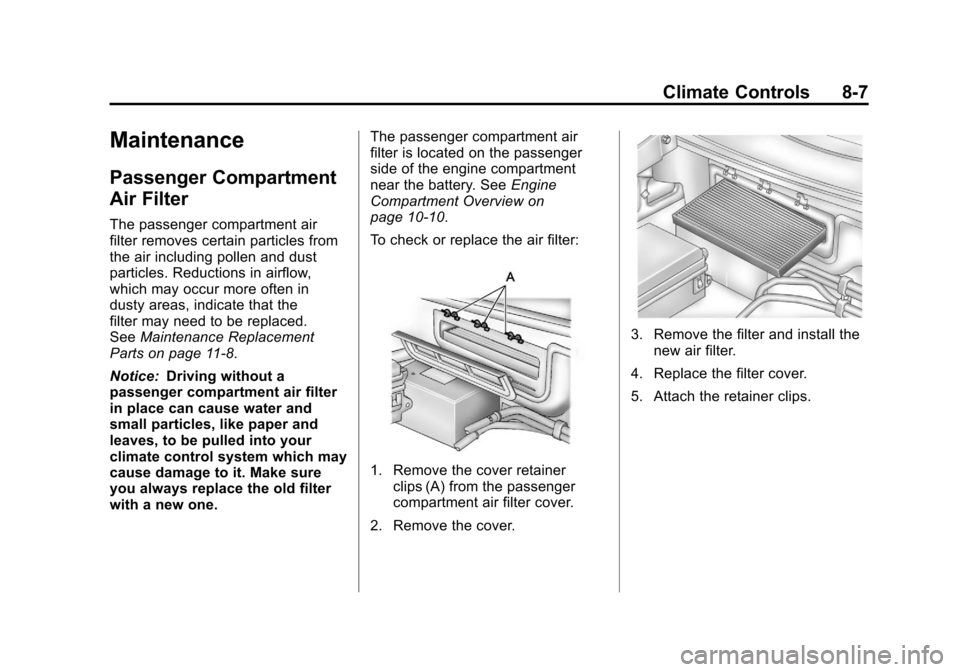
To check or replace the air filter:
1. Remove the cover retainer clips (A) from the passenger
compartment air filter cover.
2. Remove the cover.
3. Remove the filter and install the new air filter.
4. Replace the filter cover.
5. Attach the retainer clips.
Page 285 of 428

Black plate (1,1)Chevrolet Corvette Owner Manual - 2011
Vehicle Care 10-1
Vehicle Care
General Information
General Information . . . . . . . . . . 10-3
California Proposition65 Warning . . . . . . . . . . . . . . . . . 10-3
California Perchlorate Materials Requirements . . . . 10-3
Accessories and Modifications . . . . . . . . . . . . . . . 10-4
Lifting the Vehicle . . . . . . . . . . . . 10-5
Vehicle Checks
Doing Your Own Service Work . . . . . . . . . . . . . . . 10-8
Hood . . . . . . . . . . . . . . . . . . . . . . . . 10-9
Engine Compartment Overview . . . . . . . . . . . . . . . . . . 10-10
Engine Oil . . . . . . . . . . . . . . . . . . 10-15
Engine Oil Life System . . . . . 10-22
Automatic Transmission Fluid . . . . . . . . . . . . . . . . . . . . . . 10-23 Manual Transmission
Fluid . . . . . . . . . . . . . . . . . . . . . . 10-23
Hydraulic Clutch . . . . . . . . . . . . 10-24
Engine Air Cleaner/Filter . . . . 10-24
Cooling System (Engine) . . . 10-28
Cooling System (Intercooler) . . . . . . . . . . . . . . . 10-29
Engine Coolant . . . . . . . . . . . . . 10-29
Engine Overheating . . . . . . . . 10-34
Overheated Engine Protection
Operating Mode . . . . . . . . . . . 10-35
Power Steering Fluid . . . . . . . 10-36
Washer Fluid . . . . . . . . . . . . . . . 10-37
Brakes . . . . . . . . . . . . . . . . . . . . . 10-38
Brake Fluid . . . . . . . . . . . . . . . . . 10-41
Battery . . . . . . . . . . . . . . . . . . . . . 10-43
Rear Axle . . . . . . . . . . . . . . . . . . 10-44
Starter Switch Check . . . . . . . 10-44
Automatic Transmission Shift Lock Control Function
Check . . . . . . . . . . . . . . . . . . . . . 10-45 Park Brake and P (Park)
Mechanism Check . . . . . . . . 10-45
Wiper Blade Replacement . . . . . . . . . . . . . . 10-46
Windshield Replacement . . . 10-47
Headlamp Aiming
Headlamp Aiming . . . . . . . . . . 10-48
Bulb Replacement
Bulb Replacement . . . . . . . . . . 10-48
Halogen Bulbs . . . . . . . . . . . . . . 10-48
High Intensity Discharge
(HID) Lighting . . . . . . . . . . . . . 10-48
Headlamps, Front Turn Signal and Parking
Lamps . . . . . . . . . . . . . . . . . . . . 10-49
Taillamps, Turn Signal, and Stoplamps . . . . . . . . . . . . . . . . 10-50
Replacement Bulbs . . . . . . . . . 10-50
Page 295 of 428
Black plate (11,1)Chevrolet Corvette Owner Manual - 2011
Vehicle Care 10-11
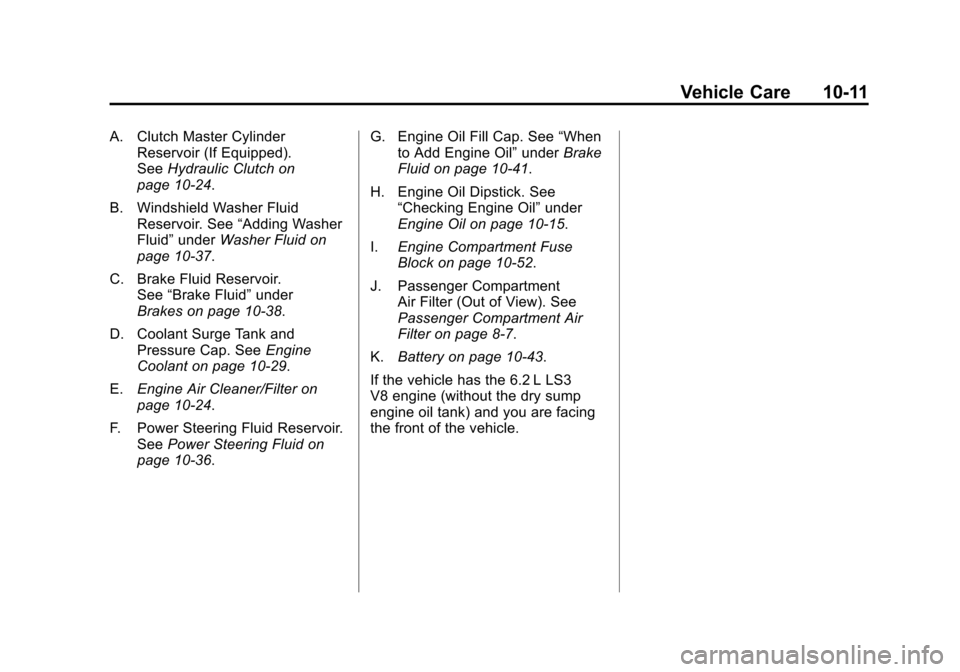
A. Clutch Master CylinderReservoir (If Equipped).
See Hydraulic Clutch on
page 10‑24.
B. Windshield Washer Fluid Reservoir. See “Adding Washer
Fluid” under Washer Fluid on
page 10‑37.
C. Brake Fluid Reservoir. See “Brake Fluid” under
Brakes on page 10‑38.
D. Coolant Surge Tank and Pressure Cap. See Engine
Coolant on page 10‑29.
E. Engine Air Cleaner/Filter on
page 10‑24.
F. Power Steering Fluid Reservoir. See Power Steering Fluid on
page 10‑36. G. Engine Oil Fill Cap. See
“When
to Add Engine Oil” underBrake
Fluid on page 10‑41.
H. Engine Oil Dipstick. See “Checking Engine Oil” under
Engine Oil on page 10‑15.
I. Engine Compartment Fuse
Block on page 10‑52.
J. Passenger Compartment Air Filter (Out of View). See
Passenger Compartment Air
Filter on page 8‑7.
K. Battery on page 10‑43.
If the vehicle has the 6.2 L LS3
V8 engine (without the dry sump
engine oil tank) and you are facing
the front of the vehicle.
Page 297 of 428
Black plate (13,1)Chevrolet Corvette Owner Manual - 2011
Vehicle Care 10-13
A. Intercooler. SeeCooling System
(Engine) on page 10‑28 or
Cooling System (Intercooler) on
page 10‑29.
B. Engine Air Cleaner/Filter on
page 10‑24.
C. Power Steering Fluid Reservoir and Cap. See Power Steering
Fluid on page 10‑36.
D. Coolant Surge Tank and Pressure Cap. See Engine
Coolant on page 10‑29.
E. Windshield Washer Fluid Reservoir. See “Adding Washer
Fluid” under Washer Fluid on
page 10‑37.
F. Clutch Master Cylinder Reservoir (If Equipped).
See Hydraulic Clutch on
page 10‑24.
G. Brake Fluid Reservoir. See “Brake Fluid” under
Brakes on page 10‑38. H. Passenger Compartment
Air Filter (Out of View).
See Passenger Compartment
Air Filter on page 8‑7.
I. Engine Oil Fill Cap. See “When
to Add Engine Oil” under
Engine Oil on page 10‑15.
J. Dry Sump Engine Oil Tank. See “Changing Engine Oil
and Filter” Brake Fluid on
page 10‑41.
K. Engine Oil Dipstick. See “Checking Engine Oil” under
Engine Oil on page 10‑15.
L. Remote Positive (+) Terminal (Out of View). See Jump
Starting on page 10‑82.
M. Engine Compartment Fuse
Block on page 10‑52.
If the vehicle has the 6.2 L LS9
Supercharged V8 engine and you
are facing the front of the vehicle.
Page 299 of 428
Black plate (15,1)Chevrolet Corvette Owner Manual - 2011
Vehicle Care 10-15
A.Engine Air Cleaner/Filter on
page 10‑24.
B. Power Steering Fluid Reservoir. See Power Steering Fluid on
page 10‑36.
C. Engine Compartment Fuse
Block on page 10‑52.
D. Remote Positive (+) Terminal (Out of View). See Jump
Starting on page 10‑82.
E. Engine Oil Dipstick. See “Checking Engine Oil” under
Engine Oil on page 10‑15.
F. Dry Sump Engine Oil Tank. See “Changing Engine Oil and Filter”
Engine Oil on page 10‑15.
G. Engine Oil Fill Cap. See “When
to Add Engine Oil” under
Engine Oil on page 10‑15. H. Coolant Surge Tank and
Pressure Cap. See Engine
Coolant on page 10‑29.
I. Windshield Washer Fluid Reservoir. See “Adding Washer
Fluid” under Washer Fluid on
page 10‑37.
J. Brake Fluid Reservoir. See “Brake Fluid” under
Brake Fluid on page 10‑41.
K. Clutch Master Cylinder Reservoir. See Hydraulic
Clutch on page 10‑24.
If the vehicle has the 6.2 L LS3
V8 engine with the manual
transmission (with the dry sump
engine oil tank) or the 7.0 L LS7
V8 engine and you are facing the
driver side of the vehicle.Engine Oil
To ensure proper engine
performance and long life,
careful attention must be paid
to engine oil. Following these
simple, but important steps will
help protect your investment:
.Always use engine oil approved
to the proper specification and
of the proper viscosity grade.
See “Selecting the Right
Engine Oil.”
.Check the engine oil level
regularly and maintain the
proper oil level. See “Checking
Engine Oil” and“When to Add
Engine Oil.”
.Change the engine oil at the
appropriate time. See Engine Oil
Life System on page 10‑22.
.Always dispose of engine oil
properly. See “What to Do With
Used Oil.”
Page 307 of 428
Black plate (23,1)Chevrolet Corvette Owner Manual - 2011
Vehicle Care 10-23
Automatic Transmission
Fluid
How to Check Automatic
Transmission Fluid
It is not necessary to check
the transmission fluid level.
A transmission fluid leak is the
only reason for fluid loss. If a leak
occurs, take the vehicle to the
dealer service department and have
it repaired as soon as possible.
The vehicle is not equipped with a
transmission fluid level dipstick.
There is a special procedure
for checking and changing the
transmission fluid. Because this
procedure is difficult, this should
be done at the dealer service
department. Contact the dealer
for additional information or theprocedure can be found in the
service manual. To purchase a
service manual, see
Service
Publications Ordering Information
on page 13‑15.
Notice: Use of the incorrect
automatic transmission fluid may
damage the vehicle, and the
damages may not be covered by
the vehicle's warranty. Always
use the automatic transmission
fluid listed in Recommended
Fluids and Lubricants on
page 11‑6.
Change the fluid and filter at the
intervals listed in Scheduled
Maintenance on page 11‑2, and
be sure to use the fluid listed in
Recommended Fluids and
Lubricants on page 11‑6.
Manual Transmission
Fluid
It is not necessary to check the
manual transmission fluid level.
A transmission fluid leak is the
only reason for fluid loss. If a leak
occurs, take the vehicle to the
dealer service department and
have it repaired as soon as
possible. See Recommended Fluids
and Lubricants on page 11‑6 for
the proper fluid to use.