2011 CHEVROLET CORVETTE display
[x] Cancel search: displayPage 300 of 428
Black plate (16,1)Chevrolet Corvette Owner Manual - 2011
10-16 Vehicle Care
Checking Engine Oil (Except
ZO6, ZR1, and Grand Sport)
If the CHECK OIL LEVEL message
displays on the Driver Information
Center (DIC), check the engine
oil level right away. For more
information, seeEngine Oil
Messages on page 5‑40. Check
the engine oil level regularly;
this is an added reminder.
It is a good idea to check the engine
oil level at each fuel fill. In order
to get an accurate reading, the
vehicle must be on level ground.
The engine oil dipstick handle
is a yellow loop. See Engine
Compartment Overview on
page 10‑10 for the location
of the engine oil dipstick. Obtaining an accurate oil level
reading is essential:
1. If the engine has been running
recently, turn off the engine and
allow several minutes for the oil
to drain back into the oil pan.
Checking your oil level too soon
after engine shut off will not
provide an accurate oil level
reading.
2. Pull the dipstick and clean it with a paper towel or cloth, then push
it back in all the way. Remove it
again, keeping the tip down, and
check the level.
When to Add Engine Oil
(Except ZO6, ZR1, and Grand
Sport)
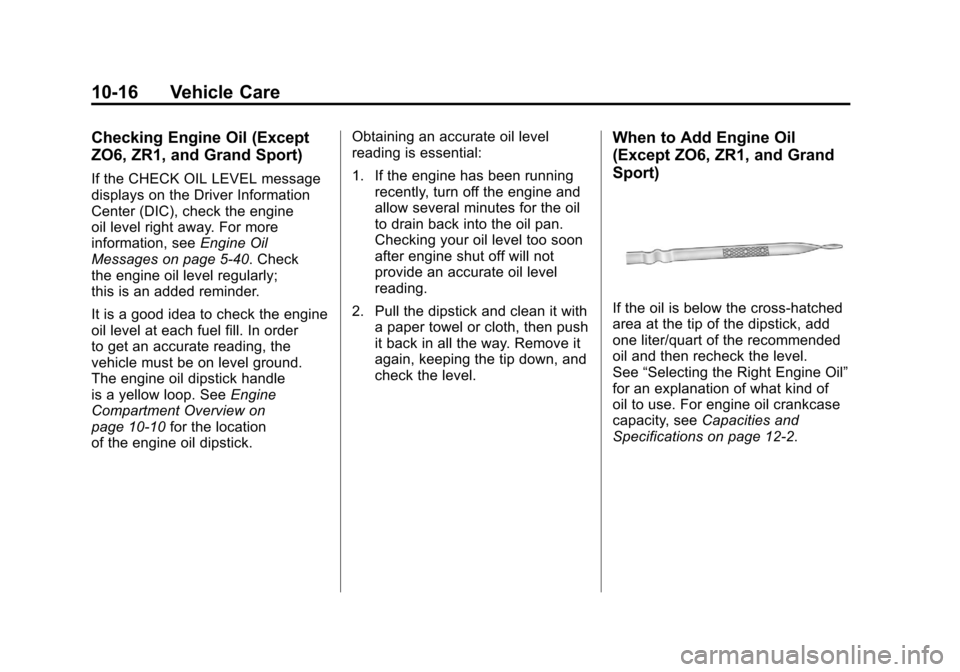
If the oil is below the cross-hatched
area at the tip of the dipstick, add
one liter/quart of the recommended
oil and then recheck the level.
See “Selecting the Right Engine Oil”
for an explanation of what kind of
oil to use. For engine oil crankcase
capacity, see Capacities and
Specifications on page 12‑2.
Page 304 of 428
Black plate (20,1)Chevrolet Corvette Owner Manual - 2011
10-20 Vehicle Care
8. Start the engine and let it runat idle for at least 15 seconds.
This will circulate the fresh
engine oil through the lubrication
system.
9. Shut off the engine and check the oil level as described under
“Checking Engine Oil (ZO6,
ZR1, and Grand Sport).”
Selecting the Right Engine Oil
Selecting the right engine oil
depends on both the proper oil
specification and viscosity grade:
Specification
Use and ask for engine oils with
the dexos™ certification mark.
Oils meeting the requirements
of your vehicle should have the
dexos™ certification mark on the
container. This certification mark
indicates that the oil has been
approved to the dexos™
specification.
Your vehicle was filled at the factory
with dexos™ approved engine oil.
Notice: Use only engine oil
that is approved to the dexos™
specification or an equivalent
engine oil of the appropriate
viscosity grade. Engine oils
approved to the dexos™
specification will show the
dexos™ symbol on the container.
Failure to use the recommended
engine oil or equivalent can result
in engine damage not covered
by the vehicle warranty. If you
are unsure whether your oil
is approved to the dexos™
specification, ask your service
provider. It is recommended to use
Mobil 1
®engine oils that meet
the requirements of the dexos™
specification.
Use of Substitute Engine Oils if
dexos™ is unavailable: In the
event that dexos™ approved engine
oil is not available at an oil change
or for maintaining proper oil level,
you may use substitute engine oil
displaying the API Starburst symbol
and of SAE 5W-30 viscosity grade.
Use of oils that do not meet the
dexos™ specification, however,
may result in reduced performance
under certain circumstances.
Viscosity Grade
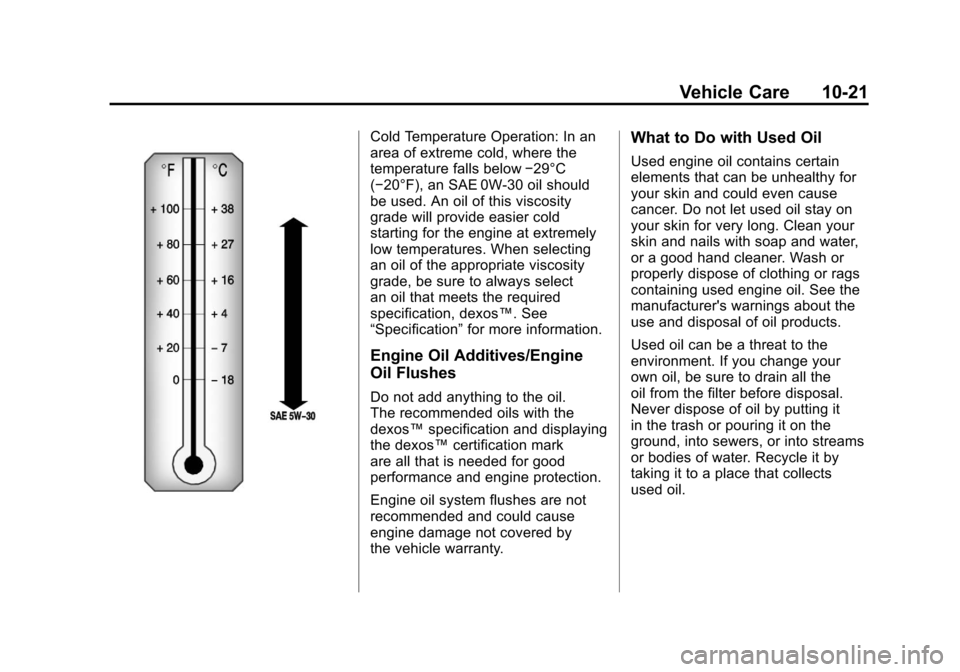
SAE 5W-30 is the best viscosity
grade for the vehicle. Do not
use other viscosity oils such as
SAE 10W‐30, 10W‐40, or 20W-50.
Page 305 of 428
Black plate (21,1)Chevrolet Corvette Owner Manual - 2011
Vehicle Care 10-21
Cold Temperature Operation: In an
area of extreme cold, where the
temperature falls below−29°C
(−20°F), an SAE 0W-30 oil should
be used. An oil of this viscosity
grade will provide easier cold
starting for the engine at extremely
low temperatures. When selecting
an oil of the appropriate viscosity
grade, be sure to always select
an oil that meets the required
specification, dexos™. See
“Specification” for more information.
Engine Oil Additives/Engine
Oil Flushes
Do not add anything to the oil.
The recommended oils with the
dexos™specification and displaying
the dexos™ certification mark
are all that is needed for good
performance and engine protection.
Engine oil system flushes are not
recommended and could cause
engine damage not covered by
the vehicle warranty.
What to Do with Used Oil
Used engine oil contains certain
elements that can be unhealthy for
your skin and could even cause
cancer. Do not let used oil stay on
your skin for very long. Clean your
skin and nails with soap and water,
or a good hand cleaner. Wash or
properly dispose of clothing or rags
containing used engine oil. See the
manufacturer's warnings about the
use and disposal of oil products.
Used oil can be a threat to the
environment. If you change your
own oil, be sure to drain all the
oil from the filter before disposal.
Never dispose of oil by putting it
in the trash or pouring it on the
ground, into sewers, or into streams
or bodies of water. Recycle it by
taking it to a place that collects
used oil.
Page 306 of 428
Black plate (22,1)Chevrolet Corvette Owner Manual - 2011
10-22 Vehicle Care
Engine Oil Life System
When to Change Engine Oil
This vehicle has a computer that
indicates when to change the
engine oil and filter. This is based
on engine revolutions and engine
temperature, and not on mileage.
Based on driving conditions, the
mileage at which an oil change is
indicated can vary considerably.
For the oil life system to work
properly, the system must be reset
every time the oil is changed.
Z06, ZR1, and Grand Sport models
have a racetrack‐ready dry sump
engine lubrication system. This
high‐performance system operates
differently than a standard engine
lubrication system and requires a
special procedure when changing
the engine oil and filter. SeeEngine
Oil on page 10‑15. When the system has calculated
that oil life has been diminished,
it indicates that an oil change is
necessary. A CHANGE ENGINE
OIL message comes on. Change
the oil as soon as possible within
the next 1 000 km (600 miles). It is
possible that, if driving under the
best conditions, the oil life system
might indicate that an oil change
is not necessary for up to a year.
The engine oil and filter must be
changed at least once a year and,
at this time, the system must be
reset. Your dealer has trained
service people who will perform this
work and reset the system. It is also
important to check the oil regularly
over the course of an oil drain
interval and keep it at the proper
level.
If the system is ever reset
accidentally, the oil must be
changed at 5 000 km (3,000 miles)
since the last oil change.
Remember to reset the oil life
system whenever the oil is changed.
How to Reset the Engine Oil
Life System
Reset the system whenever the
engine oil is changed so that the
system can calculate the next
engine oil change. To reset the
system:
1. Press the TRIP button so
the OIL LIFE percentage is
displayed.
2. Press RESET and hold for two seconds. OIL LIFE
REMAINING 100% will appear.
If the CHANGE ENGINE OIL
message comes back on when the
vehicle is started, the engine oil life
system has not reset. Repeat the
procedure.
Page 318 of 428
Black plate (34,1)Chevrolet Corvette Owner Manual - 2011
10-34 Vehicle Care
Engine Overheating
The vehicle has several indicators
to warn of engine overheating.
There is an engine coolant
temperature gauge on the
instrument panel cluster.
SeeEngine Coolant Temperature
Gauge on page 5‑15. The vehicle
may also display a COOLANT
OVER TEMPERATURE message
on the Driver Information
Center (DIC). See Engine Cooling
System Messages on page 5‑39
for more information.
If the decision is made not to lift the
hood but to get service help right
away. See Roadside Assistance
Program (United States and
Canada) on page 13‑8 orRoadside
Assistance Program (Mexico) on
page 13‑10.
If the decision is made to lift the
hood, make sure the vehicle is
parked on a level surface. Then check to see if the engine
cooling fan is running. If the engine
is overheating, the fan should be
running. If it is not, do not continue
to run the engine and have the
vehicle serviced.
Notice:
Engine damage from
running your engine without
coolant is not covered by the
vehicle warranty. See Overheated
Engine Protection Operating
Mode for information on driving
to a safe place in an emergency.
Notice: If the engine catches fire
while driving with no coolant, the
vehicle can be badly damaged.
The costly repairs would not be
covered by the vehicle warranty.
See Overheated Engine
Protection Operating Mode on
page 10‑35 for information on
driving to a safe place in an
emergency.
If Steam is Coming from the
Engine
{WARNING
Steam from an overheated engine
can burn you badly, even if you
just open the hood. Stay away
from the engine if you see or
hear steam coming from it. Turn it
off and get everyone away from
the vehicle until it cools down.
Wait until there is no sign of
steam or coolant before you
open the hood.
If you keep driving when the
vehicles engine is overheated,
the liquids in it can catch fire.
You or others could be badly
burned. Stop the engine if it
overheats, and get out of the
vehicle until the engine is cool.
(Continued)
Page 319 of 428
Black plate (35,1)Chevrolet Corvette Owner Manual - 2011
Vehicle Care 10-35
WARNING (Continued)
SeeOverheated Engine
Protection Operating Mode on
page 10‑35 for information on
driving to a safe place in an
emergency.
If No Steam is Coming from
the Engine
If an engine overheat warning is
displayed but no steam can be seen
or heard, the problem may not be
too serious. Sometimes the engine
can get a little too hot when the
vehicle:
.Climbs a long hill on a hot day
.Stops after high-speed driving
.Idles for long periods in traffic If the overheat warning is displayed
with no sign of steam:
1. Turn the air conditioning off.
2. Turn the heater on to the highest
temperature and to the highest
fan speed. Open the windows as
necessary.
3. If in a traffic jam, shift to N (Neutral) while stopped. If it is
safe to do so, pull off the road,
shift to P (Park) or N (Neutral)
and let the engine idle.
If the temperature overheat gauge
is no longer in the overheat zone
or an overheat warning no longer
displays, the vehicle can be driven.
Continue to drive the vehicle slowly
for about 10 minutes. Keep a safe
vehicle distance from the vehicle in
front. If the warning does not come
back on, continue to drive normally.
If the warning continues, pull
over, stop, and park the vehicle
right away. If there is no sign of steam, idle
the engine for three minutes
while parked. If the warning is still
displayed, turn off the engine until it
cools down. Also, see
“Overheated
Engine Protection Operating Mode”
next in this section.
Overheated Engine
Protection
Operating Mode
This emergency operating mode
lets the vehicle be driven to a
safe place, up to 80 km (50 mi),
in an emergency situation. If an
overheated engine condition exists
and the messages COOLANT
OVER TEMPERATURE and
REDUCED ENGINE POWER are
displayed, along with the check
engine light, an overheat protection
mode which alternates firing groups
of cylinders helps prevent engine
damage. In this mode, there is a
significant loss in power and engine
performance.
Page 323 of 428

Black plate (39,1)Chevrolet Corvette Owner Manual - 2011
Vehicle Care 10-39
Front
.Brake pads can be visually
inspected through the wheel by
inspecting the outer brake pads
at each wheel.
.Brake pads should be replaced
when worn to two mm of pad
thickness. New pads are 10 mm
thick.
.In addition, brake pad inspection
is required any time the tires are
removed.
The ZR1 also has an electronic
brake pad wear sensor system.
When pads are worn, the CHANGE
BRAKE PADS message displays
in the Driver Information Center.
SeeBrake System Messages on
page 5‑36.
Some driving conditions or climates
can cause a brake squeal when the
brakes are first applied or lightly
applied. This does not mean
something is wrong with the brakes.
Brake linings should always be
replaced as complete axle sets. Brake Rotor Wear
ZR1 models have ceramic brake
rotors. Rotors should be visually
inspected whenever the brake pads
are replaced. Rotors also need to
be weighed before brake pads are
replaced to confirm that the rotor
mass is greater than the wear‐out
mass printed on the rotor. The rotor
can be reused if the weight of the
rotor is above the mass limit. Rotor
inspection and weighing methods
can be found in the service manual.
See
Service Publications Ordering
Information on page 13‑15.
Page 331 of 428
Black plate (47,1)Chevrolet Corvette Owner Manual - 2011
Vehicle Care 10-47
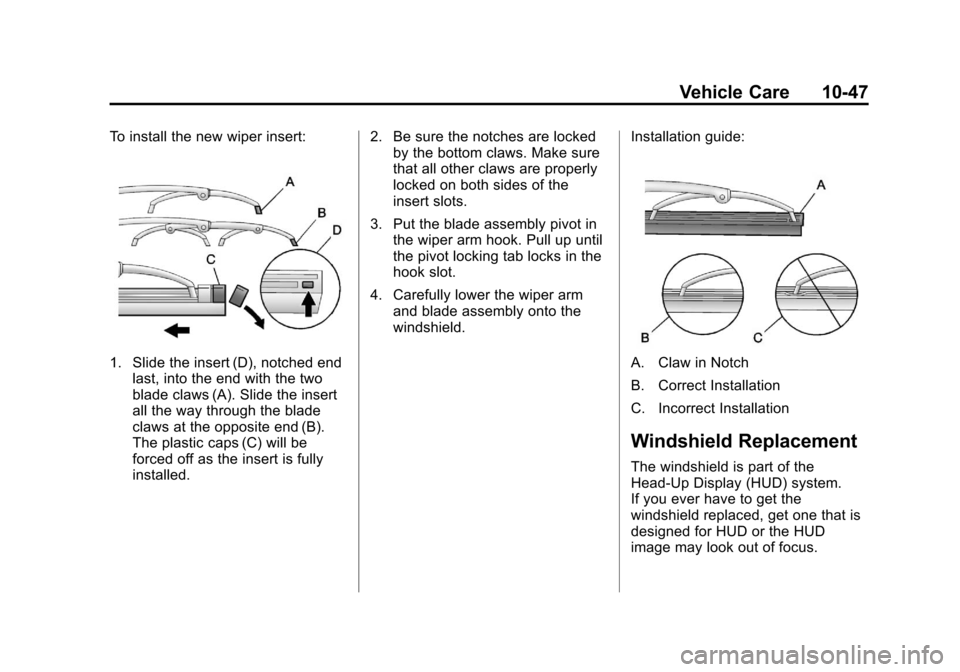
To install the new wiper insert:
1. Slide the insert (D), notched endlast, into the end with the two
blade claws (A). Slide the insert
all the way through the blade
claws at the opposite end (B).
The plastic caps (C) will be
forced off as the insert is fully
installed. 2. Be sure the notches are locked
by the bottom claws. Make sure
that all other claws are properly
locked on both sides of the
insert slots.
3. Put the blade assembly pivot in the wiper arm hook. Pull up until
the pivot locking tab locks in the
hook slot.
4. Carefully lower the wiper arm and blade assembly onto the
windshield. Installation guide:A. Claw in Notch
B. Correct Installation
C. Incorrect Installation
Windshield Replacement
The windshield is part of the
Head-Up Display (HUD) system.
If you ever have to get the
windshield replaced, get one that is
designed for HUD or the HUD
image may look out of focus.