Page 225 of 528

Black plate (39,1)Cadillac STS Owner Manual - 2011
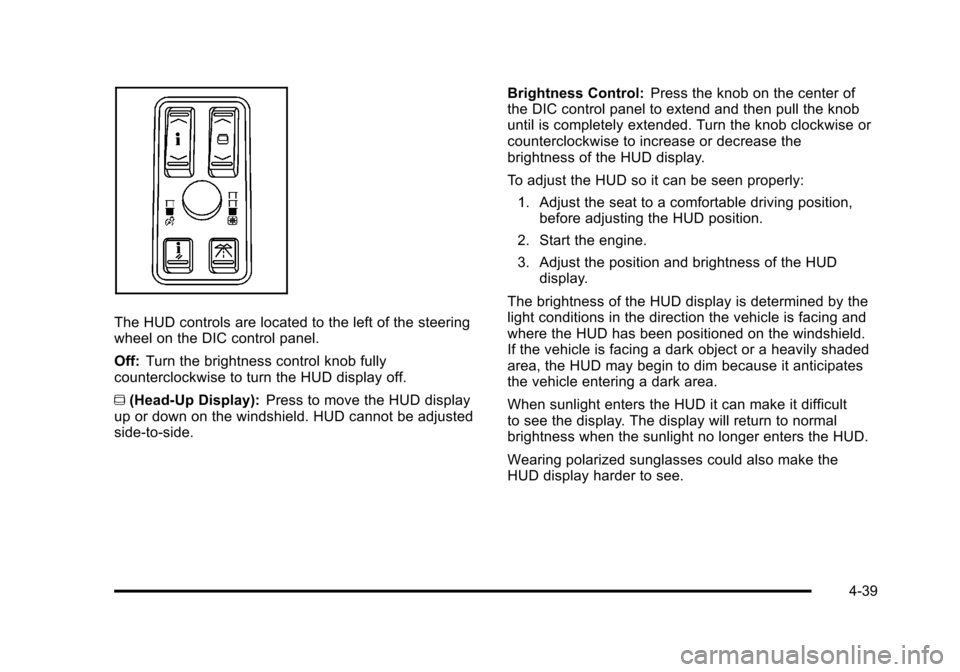
The HUD controls are located to the left of the steering
wheel on the DIC control panel.
Off:Turn the brightness control knob fully
counterclockwise to turn the HUD display off.
~ (Head-Up Display): Press to move the HUD display
up or down on the windshield. HUD cannot be adjusted
side‐to‐side. Brightness Control:
Press the knob on the center of
the DIC control panel to extend and then pull the knob
until is completely extended. Turn the knob clockwise or
counterclockwise to increase or decrease the
brightness of the HUD display.
To adjust the HUD so it can be seen properly:
1. Adjust the seat to a comfortable driving position, before adjusting the HUD position.
2. Start the engine.
3. Adjust the position and brightness of the HUD display.
The brightness of the HUD display is determined by the
light conditions in the direction the vehicle is facing and
where the HUD has been positioned on the windshield.
If the vehicle is facing a dark object or a heavily shaded
area, the HUD may begin to dim because it anticipates
the vehicle entering a dark area.
When sunlight enters the HUD it can make it difficult
to see the display. The display will return to normal
brightness when the sunlight no longer enters the HUD.
Wearing polarized sunglasses could also make the
HUD display harder to see.
4-39
Page 226 of 528
Black plate (40,1)Cadillac STS Owner Manual - 2011
The Ignition is On and the HUD Image
Cannot Be Seen
Check to see if:
.The HUD unit is covered.
.The brightness is adjusted properly.
.The HUD display is adjusted to the proper height.
.Ambient light in the direction the vehicle is facing
is low.
.A fuse is blown. SeeFuses and Circuit Breakerson page 6‑115.
The windshield is part of the HUD system. See
Windshield Replacement on page 6‑48.
The following messages may appear in the HUD:
SPEED ALERT
Posted SpeedAdvisory Speed
When the Speed Advisor feature is turned on, HUD
displays either the posted or advisory speed as
determined by the information on the map disc in the
navigation system. To turn the Speed Advisor on or off,
see DIC Operation and Displays on page 4‑70.
4-40
Page 227 of 528

Black plate (41,1)Cadillac STS Owner Manual - 2011
The Speed Advisor can be set to show a speed alert
when the vehicle speed exceeds the speed alert limit as
set in the DIC menu. Depending on the level of the
HUD on the vehicle, your HUD may work like either of
the following:
.The HUD speedometer will turn red when the
vehicle speed exceeds the speed alert limit.
When the vehicle speed is at or below the alert
limit and above the posted speed or advisory
speed, the speedometer turns yellow. If the Speed
Alert setting in the DIC is set to AT LIMIT, the
speedometer will not turn yellow. When the vehicle
speed is at or below the posted speed or advisory
speed, the speedometer remains green.
.The HUD speedometer will turn yellow when the
vehicle speed exceeds the speed alert limit. When
the vehicle speed is at or below the alert limit, the
speedometer remains green.
PEDAL APPLIED ACC OVERRIDE
When the PEDAL APPLIED ACC OVERRIDE message
displays, the accelerator pedal is being pressed and
the Adaptive Cruise Control is overridden and cannot
automatically apply the brakes. Once the accelerator
pedal is released, the Adaptive Cruise Control will
return to normal operation and be able to apply the
brakes, if needed.
An Adaptive Cruise Control active symbol, alert symbol
or vehicle ahead symbol may also appear. See
Adaptive Cruise Control
on page 4‑15for more
information.
Care of the HUD
Clean the inside of the windshield as needed to remove
any dirt or film that reduces the sharpness or clarity of
the HUD display.
To clean the HUD, spray household glass cleaner on a
soft, clean cloth. Wipe the HUD lens gently, then dry.
Notice: When cleaning, be careful not to scratch the
HUD or camera lenses. Do not sprayglass cleaner
directly on the HUD lens because the cleaner could
leak inside the unitand cause damage.
4-41
Page 228 of 528

Black plate (42,1)Cadillac STS Owner Manual - 2011
Accessory Power Outlet(s)
Accessory power outlets can be used to plug in
electrical equipment, such as a cell phone or MP3
player.
The vehicle has one outlet in front of the center
console, one in the center console lid and there may be
an additional outlet in the rear of the center console.
The vehicle may have a small cap that must be
removed to access the accessory power outlet.
Replace the cap when not in use. use.
{WARNING:
Power is always supplied to the outlets. Do not
leave electrical equipment plugged in when the
vehicle is not in use because the vehicle could
catch fire and cause injury or death.Notice:
Leaving electrical equipment plugged in for
an extended period of time while the vehicle is off
will drain the battery. Always unplug electrical
equipment when not in use and do not plug in
equipment that exceeds the maximum 20 ampere
rating.
Certain accessory power plugs may not be compatible
to the accessory power outlet and could overload
vehicle and adapter fuses. If a problem is experienced,
see your dealer.
When adding electrical equipment, be sure to follow
the proper installation instructions included with the
equipment. See Add-On Electrical Equipment
on
page 6‑114.
Notice: Hanging heavy equipment from the power
outlet can cause damage not covered by the vehicle
warranty. The power outlets are designed for
accessory power plugs only, such as cell phone
charge cords.
4-42
Page 229 of 528

Black plate (43,1)Cadillac STS Owner Manual - 2011
Climate Controls
Dual Climate Control System
The heating, cooling, and ventilation can be controlled
for the vehicle with this system.
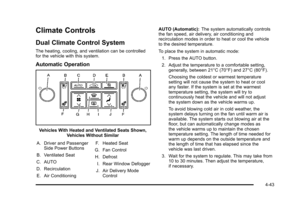
Automatic Operation
Vehicles With Heated and Ventilated Seats Shown,Vehicles Without Similar
A. Driver and Passenger Side Power Buttons
B. Ventilated Seat
C. AUTO
D. Recirculation E. Air Conditioning F. Heated Seat
G. Fan Control H. Defrost I. Rear Window Defogger
J. Air Delivery Mode Control AUTO (Automatic):
The system automatically controls
the fan speed, air delivery, air conditioning and
recirculation modes in order to heat or cool the vehicle
to the desired temperature.
To place the system in automatic mode:
1. Press the AUTO button.
2. Adjust the temperature to a comfortable setting, generally, between 21°C (70°F) and 27°C (80°F).
Choosing the coldest or warmest temperature
setting will not cause the system to heat or cool
any faster. If the system is set at the warmest
temperature setting, the system will try to
continuously heat the vehicle and will not adjust
the system down as the vehicle warms up.
To avoid blowing cold air in cold weather, the
system delays turning on the fan until warm air is
available. The system starts out blowing air at the
floor, but can automatically change modes as
the vehicle warms up to maintain the chosen
temperature setting. The length of time needed for
warm up depends on the outside temperature and
the length of time that has elapsed since the
vehicle was last driven.
3. Wait for the system to regulate. This may take from 10 to 30 minutes. Then adjust the temperature,
if necessary.
4-43
Page 230 of 528

Black plate (44,1)Cadillac STS Owner Manual - 2011
The display can be changed from English to metric
units through the Driver Information Center (DIC). See
DIC Operation and Displays on page 4‑70.
Manual Operation
O(Driver's Temperature Control): Press to turn the
entire climate control system on or off. Turn the knob to
increase or decrease the temperature inside the
vehicle.
O (Passenger's Temperature Control): Press to turn
the passenger climate control system on. Turn the knob
to increase or decrease the temperature for the front
passenger only. The passenger side power button does
not turn off the climate control system. The system is
set to the same setting as the driver.
y A z (Fan Control): Press to increase or decrease
the fan speed. This cancels automatic operation and
lets the amount of airflow be adjusted manually. Press
AUTO to return to automatic operation.
If the airflow seems low when the fan speed is at the
highest setting, the passenger compartment air filter
may need to be replaced. For more information, see
Passenger Compartment Air Filter
on page 4‑50and
Scheduled Maintenance on page 7‑3. yN
z(Air Delivery Mode): Press to change the
direction of the airflow in the vehicle. This cancels
automatic operation and lets the air delivery mode be
adjusted manually. Press AUTO to return to automatic
operation.
The outboard air outlets always receive airflow
regardless of the mode selected. See Outlet Adjustment
on page 4‑48to change this airflow from the outboard
outlets.
To change the current mode, select one of the following:
Y (Vent): Air is directed to the instrument panel outlets.
\ (Bi-Level): Air is divided between the instrument
panel outlets and the floor outlets. In automatic
operation, cooler air is directed to the upper outlets
and warmer air to the floor outlets.
[ (Floor): Air is directed to the floor outlets, with some
air directed to the windshield and side windows.
4-44
Page 231 of 528

Black plate (45,1)Cadillac STS Owner Manual - 2011
-(Defog): This mode clears the windows of fog or
moisture. Air is directed to the windshield and floor
outlets, with some air directed to the side windows
and outboard panel outlets. When this mode is
selected, the system turns off recirculation and runs
the air-conditioning compressor unless the outside
temperature is at or below freezing. If recirculation is
selected while in the defog mode, it is cancelled after
10 minutes.
If there is fogging on the side windows, remain in defog
or defrost mode until they clear.
0 (Defrost): This mode clears the windshield of fog or
frost more quickly. Air is directed to the windshield, with
some air directed to the side windows and outboard
panel outlets. The air-conditioning compressor runs
automatically in this setting, unless the outside
temperature is at or below freezing. Recirculation
cannot be selected while in the defrost mode.
This mode can also cause the fan speed and air
temperature to increase. ^
(Air Conditioning): Press to turn the air conditioning
off. Press AUTO to return to automatic operation. To
limit fogging on the windshield, the air conditioning
compressor cannot be off while in the defrost mode.
h (Recirculation): Press once to select recirculation
mode or twice to select outside air. If in AUTO mode,
press
honce to select recirculation. This mode
recirculates and helps to quickly cool the air inside the
vehicle. It can be used to prevent outside air and odors
from entering the vehicle.
Recirculation is not available in the defrost mode and
shuts off when defog mode is selected. Both of these
features are designed to limit fogging in the vehicle.
If recirculation is selected during defog mode, it
automatically turns off after 10 minutes.
Using the recirculation for long periods of time might
cause the air inside the vehicle to become too dry or
stuffy. To prevent this from happening, after the air in
the vehicle has cooled, press the recirculation button
again to select outside air or press the AUTO button.
4-45
Page 232 of 528

Black plate (46,1)Cadillac STS Owner Manual - 2011
Rear Window Defogger
The rear window defogger uses a warming grid to
remove fog or frost from the rear window.
The defogger only works when the ignition is on or
during remote start, if programmed. See“Personal
Settings Menu” underVehicle Personalization
on
page 3‑59for additional information.
= (Rear Window Defogger): Press to turn the rear
window defogger on or off. The rear window defogger
stays on for 10 minutes, before turning off.
If the vehicle's speed is above 48 km/h (30 mph), the
rear defogger stays on continuously. If turned on again,
the defogger only runs for about five minutes before
turning off. The defogger can also be turned off by
turning off the engine. The heated outside rearview mirrors also heat to help
clear fog or frost from the surface of the mirror when
the rear window defogger is on. See
Outside Heated
Mirrors on page 3‑40.
Notice: Do not use a razor blade or sharp object
to clear the inside rear window. Do not adhere
anything to the defogger grid lines in the rear glass.
These actions may damage the rear defogger.
Repairs would not be covered by your warranty.
{ (Ventilated Seat): If the vehicle has this feature,
press to turn the driver or passenger side ventilated
seat on. See Heated and Ventilated Seats
on
page 2‑5.
J (Heated Seat): If the vehicle has this feature, press
to turn the driver or passenger side heated seat and
seatback on. See Heated and Ventilated Seats
on
page 2‑5.
4-46