Page 368 of 498

Black plate (30,1)Cadillac SRX Owner Manual - 2011
10-30 Vehicle Care
Ignition Transmission
Lock Check
While parked, and with the parking
brake set, try to turn the ignition
to LOCK/OFF in each shift lever
position.
.The ignition should turn to
LOCK/OFF only when the
shift lever is in P (Park).
Contact your dealer if service is
required.
Park Brake and P (Park)
Mechanism Check
{WARNING
When you are doing this check,
the vehicle could begin to move.
You or others could be injured
and property could be damaged.
Make sure there is room in front
of the vehicle in case it begins to
roll. Be ready to apply the regular
brake at once should the vehicle
begin to move. Park on a fairly steep hill, with the
vehicle facing downhill. Keeping
your foot on the regular brake, set
the parking brake.
.To check the parking brake's
holding ability: With the engine
running and the transmission in
N (Neutral), slowly remove foot
pressure from the regular brake
pedal. Do this until the vehicle is
held by the parking brake only.
.To check the P (Park)
mechanism's holding ability:
With the engine running, shift
to P (Park). Then release the
parking brake followed by the
regular brake.
Contact your dealer if service is
required.
Page 378 of 498

Black plate (40,1)Cadillac SRX Owner Manual - 2011
10-40 Vehicle Care
8. Install the cap with the downarrow pointing down in the back
of the headlamp assembly.
9. For driver side, reinstall the underhood electrical center
cover by latching three clips.
10. For passenger side, reinstall the air filter/cleaner assembly
base by pushing to seat. Verify
the base is seated securely,
then install the engine air
filter/cleaner assembly.
High/Low‐Beam Headlamps
(Up-Level)
The high/low beam headlamps on
the up-level are High Intensity
Discharge (HID) and should be
replaced at the dealer.
Daytime Running Lamp (DRL)
(Up-Level)
1. From the back side of theheadlamp assembly, remove
the bottom cap to replace the
DRL bulb.
2. Disconnect electrical connector. 3. Remove the DRL bulb socket
from the headlamp assembly.
4. Replace the bulb in the bulb socket.
5. Install the bulb socket in the headlamp assembly.
6. Connect the electrical connector.
7. Install the cap with the down arrow pointing down in the back
of the headlamp assembly.
8. For driver side, reinstall the underhood electrical center
cover by latching three clips.
9. For passenger side, reinstall the air filter/cleaner assembly base
by pushing to seat. Verify the
base is seated securely, then
install the engine air filter/
cleaner assembly.
Page 379 of 498

Black plate (41,1)Cadillac SRX Owner Manual - 2011
Vehicle Care 10-41
Front Turn Signal Lamp
(Base and Up-Level)
To replace the Front Turn
Signal Lamp:
1. Remove the turn signal lampbulb socket from the headlamp
assembly.
2. Remove the turn signal lamp bulb from the socket.
3. Replace the bulb in the bulb socket.
4. Install the bulb socket in the headlamp assembly.
5. For driver side, reinstall the underhood electrical center
cover by latching three clips.
6. For passenger side, reinstall the air filter/cleaner assembly base
by pushing to seat. Verify the
base is seated securely, then
install the engine air filter/
cleaner assembly.
Fog Lamps
To replace the fog lamp bulb:
1. Locate the bulb assembly underthe front fascia.
2. Disconnect the electrical connector from the bulb
assembly.
3. Remove the bulb by turning it counterclockwise and pulling it
straight out of the assembly.
4. Install the new bulb by turning it clockwise into the assembly.
5. Reconnect the electrical connector to the bulb assembly.
Turn Signal Lamps
To replace one of these bulbs:
1. Open the liftgate. See Liftgate
(Manual) on page 2‑14 or
Liftgate (Power) on page 2‑15.
A. Push Pin
B. Taillamp Cover
2. Pull on push pin (A) to release the taillamp cover (B).
3. Remove the taillamp cover from the lamp assembly by pulling
rearward from the top to
unfasten from snap tabs.
Page 384 of 498

Black plate (46,1)Cadillac SRX Owner Manual - 2011
10-46 Vehicle Care
Windshield Wipers
If the wiper motor overheats due to
heavy snow or ice, the windshield
wipers will stop until the motor cools
and will then restart.
Although the circuit is protected
from electrical overload, overload
due to heavy snow or ice may
cause wiper linkage damage.
Always clear ice and heavy snow
from the windshield before using
the windshield wipers.
If the overload is caused by an
electrical problem and not snow
or ice, be sure to get it fixed.
Fuses and Circuit
Breakers
The wiring circuits in the vehicle are
protected from short circuits by a
combination of fuses and circuit
breakers. This greatly reduces
the chance of damage caused
by electrical problems.
To check a fuse, look at the
silver-colored band inside the fuse.
If the band is broken or melted,
replace the fuse. Be sure to replace
a bad fuse with a new one of the
identical size and rating.
Fuses of the same amperage can
be temporarily borrowed from
another fuse location, if a fuse goes
out. Replace the fuse as soon as
you can.To identify and check fuses,
circuit breakers, and relays, see
Engine Compartment Fuse Block on
page 10‑46
andRear Compartment
Fuse Block on page 10‑51.
Engine Compartment
Fuse Block
To remove the fuse block cover,
press the clips on the cover and lift
it straight up.
Notice: Spilling liquid on any
electrical component on the
vehicle may damage it. Always
keep the covers on any electrical
component.
Page 385 of 498
Black plate (47,1)Cadillac SRX Owner Manual - 2011
Vehicle Care 10-47
Engine Compartment Fuse Block
The vehicle may not be equipped
with all of the fuses, relays, and
features shown. J-CaseFuses Usage
6 Wiper
12 Vacuum Pump J-Case
Fuses Usage
24 Anitlock Brake
System Pump
25 Rear Electrical
Center 1 J-Case
Fuses Usage
26 Rear Electrical
Center 2
27 Not Used
41 Cooling Fan 2 (LF1)
42 Starter
43 Not Used
44 Not Used
45 Cooling Fan 1 (LF1)
59 Secondary
AIR Pump
Mini Fuses Usage 1 Engine Control
Module Battery
2 Transmission
Control Module
Battery
3 Mass Air Flow
Sensor
Page 386 of 498

Black plate (48,1)Cadillac SRX Owner Manual - 2011
10-48 Vehicle Care
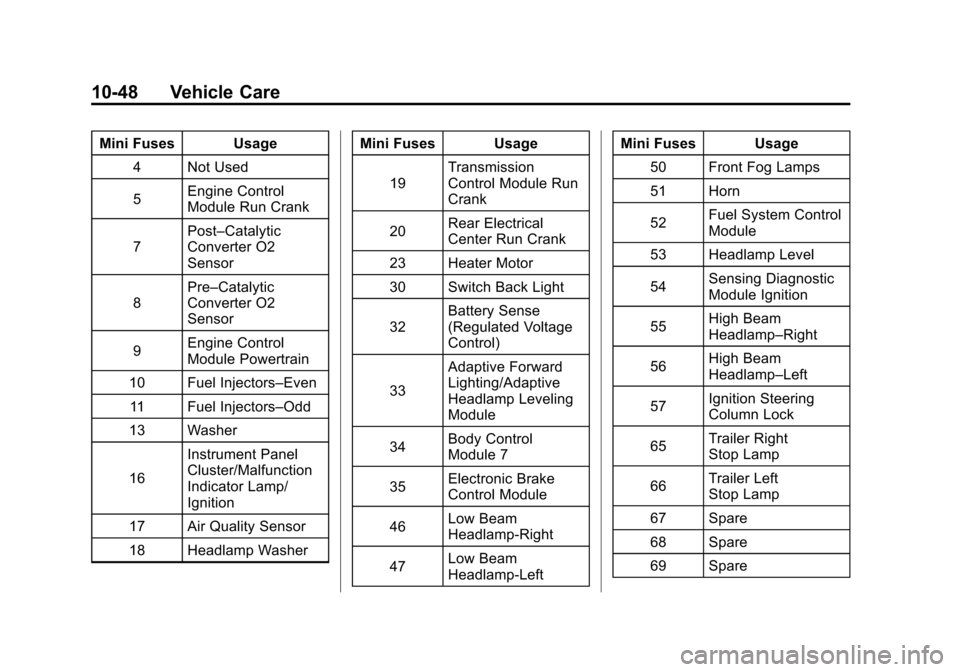
Mini Fuses Usage4 Not Used
5 Engine Control
Module Run Crank
7 Post–Catalytic
Converter O2
Sensor
8 Pre–Catalytic
Converter O2
Sensor
9 Engine Control
Module Powertrain
10 Fuel Injectors–Even 11 Fuel Injectors–Odd
13 Washer
16 Instrument Panel
Cluster/Malfunction
Indicator Lamp/
Ignition
17 Air Quality Sensor
18 Headlamp Washer Mini Fuses Usage
19 Transmission
Control Module Run
Crank
20 Rear Electrical
Center Run Crank
23 Heater Motor
30 Switch Back Light
32 Battery Sense
(Regulated Voltage
Control)
33 Adaptive Forward
Lighting/Adaptive
Headlamp Leveling
Module
34 Body Control
Module 7
35 Electronic Brake
Control Module
46 Low Beam
Headlamp‐Right
47 Low Beam
Headlamp‐Left Mini Fuses Usage
50 Front Fog Lamps
51 Horn
52 Fuel System Control
Module
53 Headlamp Level
54 Sensing Diagnostic
Module Ignition
55 High Beam
Headlamp–Right
56 High Beam
Headlamp–Left
57 Ignition Steering
Column Lock
65 Trailer Right
Stop Lamp
66 Trailer Left
Stop Lamp
67 Spare
68 Spare
69 Spare
Page 395 of 498

Black plate (57,1)Cadillac SRX Owner Manual - 2011
Vehicle Care 10-57
(D) Maximum Cold Inflation
Load Limit
:Maximum load
that can be carried and the
maximum pressure needed
to support that load.
(E) Tire Inflation
:The
temporary use tire or compact
spare tire should be inflated
to 420 kPa (60 psi). For more
information on tire pressure and
inflation see Tire Pressure on
page 10‑61.
(F) Tire Size
:A combination of
letters and numbers define a
tire's width, height, aspect ratio,
construction type, and service
description. The letter T as the
first character in the tire size
means the tire is for temporary
use only.
(G) TPC Spec (Tire
Performance Criteria
Specification)
:Original
equipment tires designed to
GM's specific tire performance criteria have a TPC specification
code molded onto the sidewall.
GM's TPC specifications meet
or exceed all federal safety
guidelines.
Tire Designations
Tire Size
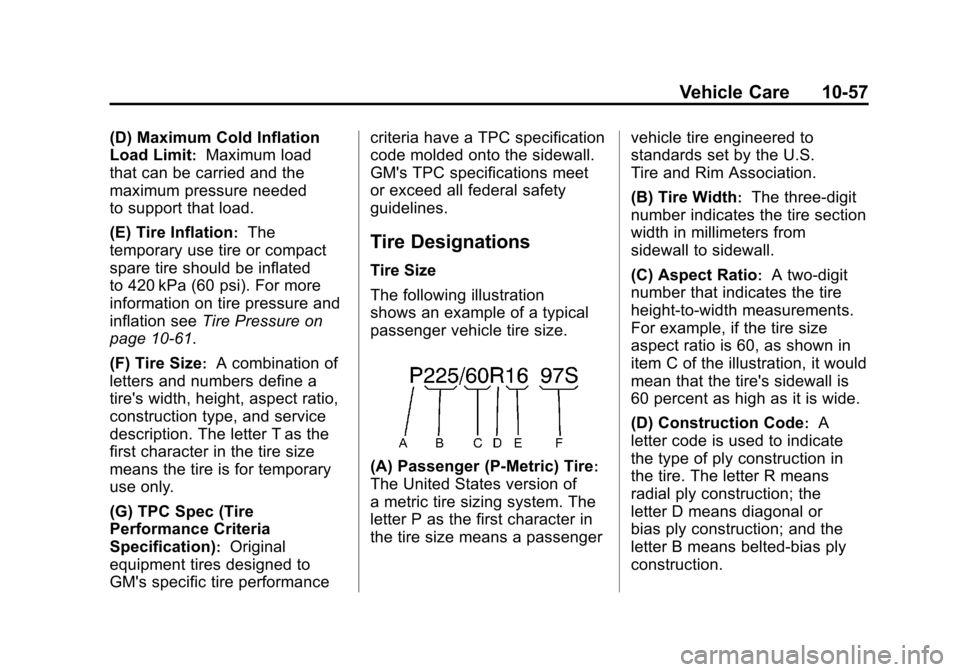
The following illustration
shows an example of a typical
passenger vehicle tire size.
(A) Passenger (P‐Metric) Tire:
The United States version of
a metric tire sizing system. The
letter P as the first character in
the tire size means a passenger
vehicle tire engineered to
standards set by the U.S.
Tire and Rim Association.
(B) Tire Width
:The three‐digit
number indicates the tire section
width in millimeters from
sidewall to sidewall.
(C) Aspect Ratio
:A two‐digit
number that indicates the tire
height‐to‐width measurements.
For example, if the tire size
aspect ratio is 60, as shown in
item C of the illustration, it would
mean that the tire's sidewall is
60 percent as high as it is wide.
(D) Construction Code
:A
letter code is used to indicate
the type of ply construction in
the tire. The letter R means
radial ply construction; the
letter D means diagonal or
bias ply construction; and the
letter B means belted‐bias ply
construction.
Page 416 of 498

Black plate (78,1)Cadillac SRX Owner Manual - 2011
10-78 Vehicle Care
{WARNING
Changing a tire can be
dangerous. The vehicle can
slip off the jack and roll over
or fall on you or other people.
You and they could be badly
injured or even killed. Find a level
place to change your tire. To help
prevent the vehicle from moving:1. Set the parking brake firmly.
2. Put an automatic transmission shift lever in
P (Park), or shift a manual
transmission to 1 (First) or
R (Reverse).
3. Turn off the engine and do not restart while the vehicle
is raised.
4. Do not allow passengers to remain in the vehicle.
(Continued)
WARNING (Continued)
To be certain the vehicle will not
move, put blocks at the front
and rear of the tire farthest away
from the one being changed.
That would be the tire on the
other side, at the opposite end
of the vehicle.
This vehicle may come with a
jack and spare tire or a tire sealant
and compressor kit. To use the
jacking equipment to change
a spare tire safely, follow the
instructions below. Then see Tire
Changing on page 10‑86. To use
the tire sealant and compressor kit,
see Tire Sealant and Compressor
Kit on page 10‑79. When the vehicle has a flat tire (B),
use the following example as a
guide to assist you in the placement
of wheel blocks (A).
A. Wheel Block
B. Flat Tire
The following information explains
how to repair or change a tire.