2011 BMW ACTIVEHYBRID X6 driver
[x] Cancel search: driverPage 130 of 312

Practical interior accessories
128
Center armrest front
A storage compartment is located under the
armrest between the front seats and, depend-
ing on the vehicle's equipment, also a cover for
the mobile phone bracket or the snap-in
adapter. Also refer to page212.
Opening cover
Push cover down slightly and press the button.
The cover folds upward.
Connection for external audio device
You can connect an external audio device such
as a CD or MP3 player and play audio tracks
over the vehicle's speaker system:
>AUX-IN connection, refer to page192
>USB audio interface, refer to page192
Storage compartments
Compartments are located in the doors, in the
center console in the front and rear
* as well as
in the rear console in the X6.
Storage nets
* are located on the backrests of
the front seats.
Do not stow hard or sharp-edged objects
in the storage nets; otherwise there is an
increased risk of injury in the event of an acci-
dent.<
Clothes hooks
When hanging clothing on the hooks,
ensure that it will not obstruct the driver's
vision. Do not hang heavy objects on the hooks.
If you do so, they could cause personal injury to occupants during braking or evasive maneu-
vers.<
BMW X5
Clothes hooks are located near the grab han-
dles in the rear.
BMW X6
To fold out, press against upper edge.
Cupholders
Use lightweight, unbreakable containers
and do not transport hot beverages; oth-
erwise, there is an increased risk of injury in the
event of an accident. Do not force unsuitable
containers into the cupholders, as otherwise
damage can result.<
Front
Slide the cover back.
Page 143 of 312

Driving tips
141Reference
At a glance
Controls
Communications
Navigation
Entertainment
Mobility
Make sure that no fluids leak in the cargo
area; otherwise the vehicle could be dam-
aged.<
Determining loading limit
1.Locate the following statement on your
vehicle's placard
*:
The combined weight of occupants
and cargo should never exceed
YYY lbs. or XXX kg. Otherwise, this could
damage the vehicle and produce unstable
vehicle operating conditions.<
2.Determine the combined weight of the
driver and passengers that will be riding in
your vehicle.
3.Subtract the combined weight of the driver
and passengers from YYY lbs. or XXX kg.
4.The resulting figure equals the available
amount of cargo and luggage load capacity.
For example, if the YYY amount equals
1,400 lbs. and there will be five 150 lbs.
passengers in your vehicle, the amount of
available cargo and luggage load capacity is
650 lbs.:
1,400 lbs. minus 750 lbs. = 650 lbs.
5.Determine the combined weight of luggage
and cargo being loaded on the vehicle. That
weight may not safely exceed the available
cargo and luggage load capacity calculated
in step 4.
6.If your vehicle will be towing a trailer, part of
the load from your trailer will be transferred
to your vehicle. Consult the manual for
transporting a trailer to determine how this
may reduce the available cargo and luggage
load capacity of your vehicle.
Load
BMW X5:
BMW X6:
The permissible load is the total of the weight of
occupants and cargo/luggage. The greater the
weight of occupants, the less cargo/luggage
can be transported.
Page 165 of 312
Navigation
Driving tips
163Reference
At a glance
Controls
Communications
Entertainment
Mobility
1.Select the symbol.
2.Additional information is displayed.
3.To exit from the menu:
Move the controller to the left.
Traffic bulletins in the map
When the traffic info map is activated, the pic-
ture on the Control Display is switched to a
grayscale. This permits an optimized depiction
of traffic information. The day/night mode is dis-
regarded in this setting. The symbols for the
special destinations are no longer displayed.
1."Navigation"
2."Map"
3.Open "Options".
4."Settings"
5."Traffic conditions/gray map"
Symbols in map view
The symbols of traffic obstructions are dis-
played differently, depending on the scale of
the map and location of the traffic obstruction in
relation to the route.
Additional information in the map
display
Depending on the map scale, the length, direc-
tion, and effects of a traffic obstruction are
depicted by traffic symbols in the map or by
bars along the planned route. The colors dis-
played depend on the information sent by the
traffic information service.
>Red: traffic congestion
>Orange: stop-and-go traffic
>Yellow: heavy traffic
>Green: clear roads
>Gray: general traffic information such as
road construction
Filtering of traffic bulletins
You can filter which traffic bulletins are to be
displayed by the system:
1."Navigation"
2."Map"3.Open "Options".
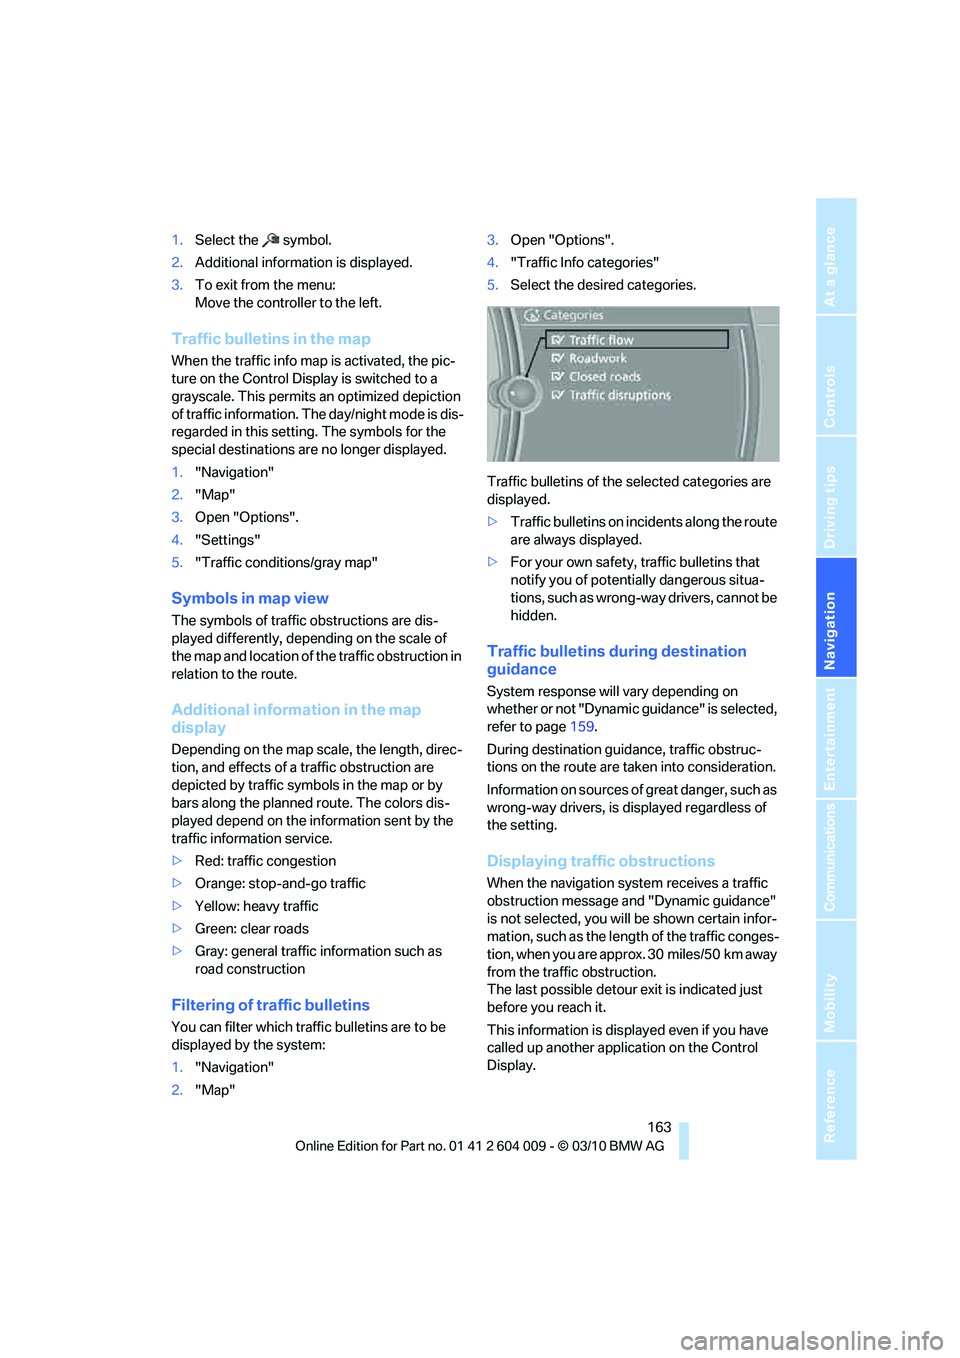
4."Traffic Info categories"
5.Select the desired categories.
Traffic bulletins of the selected categories are
displayed.
>Traffic bulletins on incidents along the route
are always displayed.
>For your own safety, traffic bulletins that
notify you of potentially dangerous situa-
tions, such as wrong-way drivers, cannot be
hidden.
Traffic bulletins during destination
guidance
System response will vary depending on
whether or not "Dynamic guidance" is selected,
refer to page159.
During destination guidance, traffic obstruc-
tions on the route are taken into consideration.
Information on sources of great danger, such as
wrong-way drivers, is displayed regardless of
the setting.
Displaying traffic obstructions
When the navigation system receives a traffic
obstruction message and "Dynamic guidance"
is not selected, you will be shown certain infor-
mation, such as the length of the traffic conges-
tion, when you are approx. 30 miles/50 km away
from the traffic obstruction.
The last possible detour exit is indicated just
before you reach it.
This information is displayed even if you have
called up another application on the Control
Display.
Page 215 of 312

213
Entertainment
Reference
At a glance
Controls
Driving tips Communications
Navigation
Mobility
>Depending on the mobile phone, certain
settings may be necessary on the mobile
phone, e.g. via the following menu items:
>Bluetooth activated
>Connection must be allowed without
requiring further confirmation
>Reconnect
>Depending on the mobile phone model, the
setting energy saving mode can, for exam-
ple, result in vehicle failing to detect the
paired mobile phone.
>For pairing purposes, define any 4 to 16-
digit number as a Bluetooth passkey,
e.g. 25081107. A long and complex number
offers the best protection against unautho-
rized access. This Bluetooth passkey is no
longer required following successful pair-
ing.
>The ignition is switched on.
Only pair the mobile phone with the vehi-
cle stationary, otherwise the passengers
and other road users can be endangered due to
a lack of attentiveness on the part of the
driver.<
Switching on ignition
1.Insert the remote control as far as possible
into the ignition lock.
2.Switch on ignition without operating the
brake or clutch or pressing the Start/Stop
button.
Preparation via iDrive
3."Telephone"
4."Bluetooth (telephone)"
5."Add new phone"The Bluetooth name of the vehicle is dis-
played.
Preparation with mobile phone
6.Further steps must be carried out with the
mobile phone and vary depending on the
model. Please refer to your mobile phone's
operating instructions, e.g. under the topics
of Searching for a Bluetooth device, Linking
or Pairing.
The Bluetooth name of the vehicle appears
on the mobile phone display.
7.Select the Bluetooth name of the vehicle on
the mobile phone display.
Pairing
Depending on your mobile phone, you will first
be requested consecutively via the display of
your mobile phone or iDrive to enter the Blue-
tooth passkey you specified.
8.Enter the Bluetooth passkey.
Depending on the mobile phone, approx.
30 seconds are available for entering the
Bluetooth passkey on the mobile phone
and on the Control Display.
If pairing was successful, the mobile phone
appears at the top of the list of mobile phones.
Following the initial pairing
>The mobile phone is detected/connected in
the vehicle within a short period of time
when the engine is running or the ignition is
switched on.
>As soon as a mobile phone is detected by
the vehicle, the phone book entries stored
on the SIM card or on your mobile phone are
transmitted to your vehicle. This transmis-
Page 241 of 312

Mobility
239Reference
At a glance
Controls
Driving tips
Communications
Navigation
Entertainment
Wheels and tires
Tire inflation pressure
Information for your safety
The condition of the tires and the maintenance
of the specified tire pressure are crucial not only
to the tire's service life, but also to driving com-
fort and most importantly, driving safety.
Checking pressure
Only check tire inflation pressure when the tires
are cold. This means after a maximum of
1.25 miles/2 km driving or when the vehicle has
been parked for at least 2 hours. When tires are
warm, the tire inflation pressure increases.
Check the tire inflation pressure regularly
and correct it as needed, even on the
compact tire
*: at least twice a month and before
starting long trips. If you fail to observe this pre-
caution, you may be driving on tires with incor-
rect tire pressures, a condition that can not only
compromise your vehicle's driving stability, but
also lead to tire damage and the risk of an acci-
dent. Do not drive with depressurized, i.e. flat
tires, except run-flat tires. A flat tire will seri-
ously impair your vehicle's handling and braking
response. Attempts to drive on a flat tire can
lead to a loss of control over the vehicle.<
After correcting the tire inflation pressure,
reinitialize the Flat Tire Monitor, refer to
page100, or reset the Tire Pressure Monitor,
refer to page102.<
Pressure specifications
The tables below provide all the correct inflation
pressures for the specified tire sizes at ambient
temperature.
The inflation pressures apply to the tire
sizes and tire brands respectively
approved and recommended by BMW; a list of
these is available from your BMW Sports Activ-
ity Vehicle Center.
ing:
>Tire sizes of your vehicle
>Load conditions
>Maximum allowable driving speed
Tire inflation pressures for speeds
up to 100 mph/160 km/h
For normal driving up to 100 mph/160 km/h,
adjust pressures to the respective tire inflation
pressures listed on the following pages in the
column Traveling speeds up to max. of
100 mph/160 km/h to achieve optimum driving
comfort.
These pressure specifications can be found on
the door post when you open the driver's door.
The permissible top speed for these tire
inflation pressures is 100 mph/160 km/h.
Do not exceed this speed, otherwise tire dam-
age and accidents may result.<
Tire inflation pressures for speeds
above 100 mph/160 km/h
In order to drive at maximum speeds in
excess of 100 mph/160 km/h, please
observe, and, if necessary, adjust tire pressures
for speeds exceeding 100 mph/160 km/h from
the relevant table on the following pages. Oth-
erwise tire damage and accidents could
occur.<
Page 259 of 312

Mobility
257Reference
At a glance
Controls
Driving tips
Communications
Navigation
Entertainment
Socket for OBD Onboard
Diagnostics interface
The chief components that make up the emis-
sions content can be checked by a device that
uses the OBD socket.
This socket is located to the left on the driver's
side, on the underside of the instrument cluster
under a cover.
Emissions
The warning lamp lights up:
The vehicle is producing higher emis-
sions. Continued driving is possible.
Have the vehicle checked as soon as possible.
The lamp flashes under certain conditions. This
is a sign of excessive misfiring of the engine. In
this case, you should reduce your speed and
proceed to the nearest BMW Sports Activity
Vehicle Center. Heavy engine misfiring causes
serious damage to the emission-relevant com-
ponents, especially the catalytic converter,
within a short time.
The warning lamp lights up if the fuel
cap has not been properly tightened
and the OBD system detects the
escape of fuel vapors. Check that the fuel cap is
correctly seated and tighten it until you hear a
clearly audible click.
Data memory
Your vehicle records data on vehicle operation,
malfunctions and user settings. These data are
stored in the vehicle and in part in the remote
control and can be read out by suitable devices
during service, for example. The read data are
used to assist in servicing and repairing your
vehicle or for the optimization and continued development of vehicle functions. In addition, if
you signed a service contract for Assist, certain
vehicle data can be sent directly from the vehi-
cle to facilitate the desired services.
Page 266 of 312
Replacing components
264
Side marker lamps, rear
To replace, please go to a BMW Sports Activity
Vehicle Center or a workshop that works
according to BMW repair procedures with cor-
respondingly trained personnel.
Tail lamps
>Turn signals, brake lamps: 21-watt bulb,
P21W
>Brake force display: 21-watt bulb, P21W
>Backup lamp: 16-watt bulb, W16W
>Rear lamp: LED technology.
In case of a defect, please go to a BMW
Sports Activity Vehicle Center or a work-
shop that works according to BMW repair
procedures with correspondingly trained
personnel.
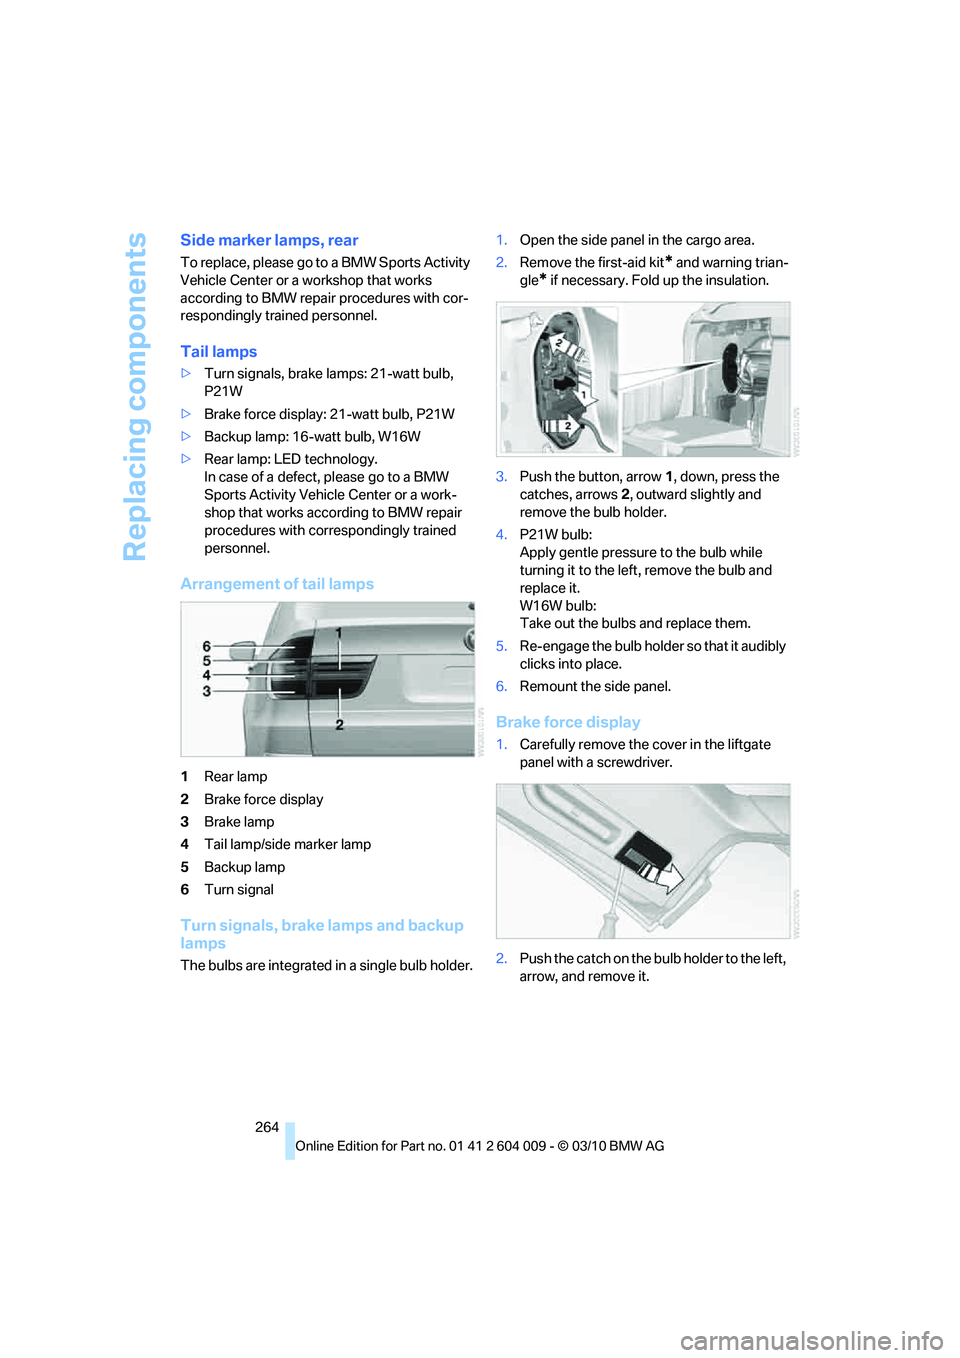
Arrangement of tail lamps
1Rear lamp
2Brake force display
3Brake lamp
4Tail lamp/side marker lamp
5Backup lamp
6Turn signal
Turn signals, brake lamps and backup
lamps
The bulbs are integrated in a single bulb holder.1.Open the side panel in the cargo area.
2.Remove the first-aid kit
* and warning trian-
gle
* if necessary. Fold up the insulation.
3.Push the button, arrow1, down, press the
catches, arrows2, outward slightly and
remove the bulb holder.
4.P21W bulb:
Apply gentle pressure to the bulb while
turning it to the left, remove the bulb and
replace it.
W16W bulb:
Take out the bulbs and replace them.
5.Re-engage the bulb holder so that it audibly
clicks into place.
6.Remount the side panel.
Brake force display
1.Carefully remove the cover in the liftgate
panel with a screwdriver.
2.Push the catch on the bulb holder to the left,
arrow, and remove it.
Page 267 of 312
Mobility
265Reference
At a glance
Controls
Driving tips
Communications
Navigation
Entertainment
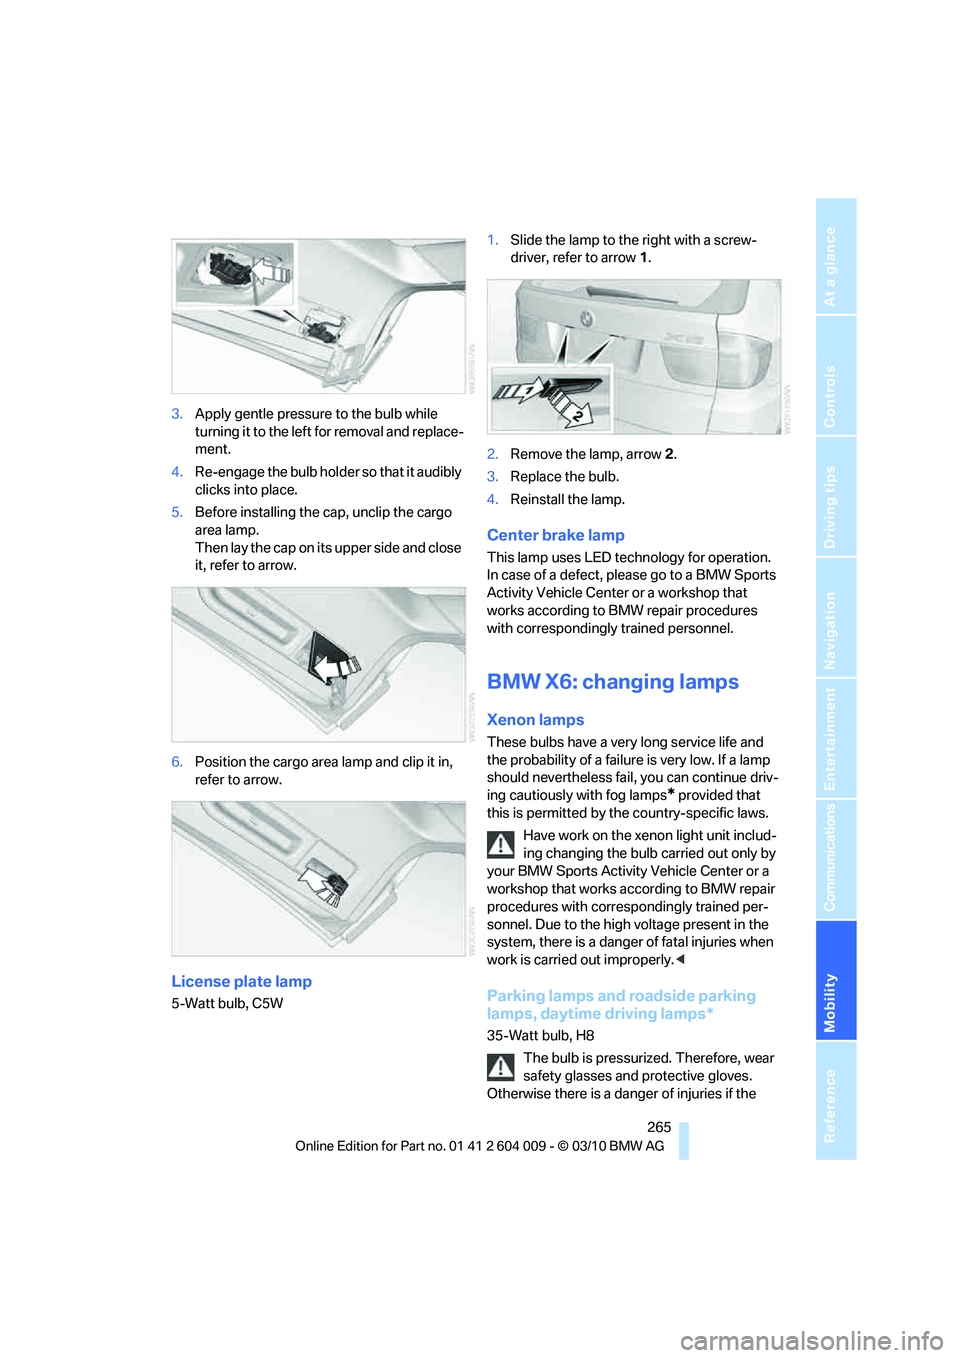
3.Apply gentle pressure to the bulb while
turning it to the left for removal and replace-
ment.
4.Re-engage the bulb holder so that it audibly
clicks into place.
5.Before installing the cap, unclip the cargo
area lamp.
Then lay the cap on its upper side and close
it, refer to arrow.
6.Position the cargo area lamp and clip it in,
refer to arrow.
License plate lamp
5-Watt bulb, C5W1.Slide the lamp to the right with a screw-
driver, refer to arrow1.
2.Remove the lamp, arrow2.
3.Replace the bulb.
4.Reinstall the lamp.
Center brake lamp
This lamp uses LED technology for operation.
In case of a defect, please go to a BMW Sports
Activity Vehicle Center or a workshop that
works according to BMW repair procedures
with correspondingly trained personnel.
BMW X6: changing lamps
Xenon lamps
These bulbs have a very long service life and
the probability of a failure is very low. If a lamp
should nevertheless fail, you can continue driv-
ing cautiously with fog lamps
* provided that
this is permitted by the country-specific laws.
Have work on the xenon light unit includ-
ing changing the bulb carried out only by
your BMW Sports Activity Vehicle Center or a
workshop that works according to BMW repair
procedures with correspondingly trained per-
sonnel. Due to the high voltage present in the
system, there is a danger of fatal injuries when
work is carried out improperly.<
Parking lamps and roadside parking
lamps, daytime driving lamps*
35-Watt bulb, H8
The bulb is pressurized. Therefore, wear
safety glasses and protective gloves.
Otherwise there is a danger of injuries if the