2011 BMW ACTIVEHYBRID X6 driver
[x] Cancel search: driverPage 106 of 312

Technology for comfort, convenience and safety
104 possible, and inflate them to the proper pres-
sure. Driving on a significantly underinflated tire
causes the tire to overheat and can lead to tire
failure. Underinflation also reduces fuel effi-
ciency and tire tread life, and may affect the
vehicle's handling and stopping ability.
Please note that the TPMS is not a substitute
for proper tire maintenance, and it is the driver's
responsibility to maintain correct tire pressure,
even if underinflation has not reached the level
to trigger illumination of the TPMS low tire
pressure telltale.
Your vehicle has also been equipped with a
TPMS malfunction indicator to indicate when
the system is not operating properly. The
TPMS malfunction indicator is combined with
the low tire pressure telltale. When the system
detects a malfunction, the telltale will flash for
approximately one minute and then remain con-
tinuously illuminated. This sequence will con-
tinue upon subsequent vehicle startups as long
as the malfunction exists. When the malfunc-
tion indicator is illuminated, the system may not
be able to detect or signal low tire pressure as
intended. TPMS malfunctions may occur for a
variety of reasons, including the installation of
replacement or alternate tires or wheels on the
vehicle that prevent the TPMS from functioning
properly. Always check the TPMS malfunction
telltale after replacing one or more tires or
wheels on your vehicle to ensure that the
replacement or alternate tires and wheels allow
the TPMS to continue to function properly.
Lane departure warning*
The concept
On roads with lane markings, this system warns
you at speeds exceeding approx. 40 mph/
65 km/h when the vehicle is about to leave the
lane.
The steering wheel begins vibrating lightly.
The system does not issue a warning if the turn
signal is set before leaving the lane.
Switching on/off
Press button 1 on the steering wheel.
>On: lane markings 2 light up.
>Off: lane markings 2 go out.
The system can issue warnings at speeds
exceeding approx. 40 mph/65 km/h.
The state is stored for the remote control cur-
rently in use.
Display
1The system is activated.
2Arrows: at least one lane marking was
detected and warnings can be issued.
Issuing a warning
If the vehicle begins leaving the lane and a lane
marking has been detected, the steering wheel
begins vibrating.
If the turn signal is set before the lane is
changed, a warning is not issued.
Canceling a warning
The warning is canceled:
>Automatically after approx. 3 seconds.
>After the vehicle returns to its lane.
>During heavy brake application.
Page 107 of 312

Controls
105Reference
At a glance
Driving tips
Communications
Navigation
Entertainment
Mobility
>When the turn signal flashes.
System limits
The system cannot replace the driver's
personal judgment of the course of the
road and the traffic situation.
In the event of a warning, do not jerk the steer-
ing wheel; otherwise, you may lose control over
the vehicle.<
The system may not be fully functional in the
following situations:
>In heavy fog, rain or snowfall.
>When the lane markings are worn away,
poorly visible, convergent, divergent or
unclear, as in road construction areas.
>When the limit lines are covered by snow,
ice, dirt or water.
>In tight curves or on narrow lanes.
>When the limit lines are not white.
>When the limit lines are covered by objects.
>When driving very close to the vehicle in
front of you.
>When driving toward bright lights.
>When the windshield is fogged over, dirty or
covered by a sticker, etc., in front of the
interior rearview mirror.
Malfunctions
Steering wheel vibration
Frequent activation of the steering wheel vibra-
tion causes the system to overheat.
This causes the lane departure warning to
become deactivated.
Let the system cool and reactivate it by press-
ing the button.
Camera
The camera is located on the front of the interior
rearview mirror. Keep the area in front of the
interior rearview mirror clear.
Active steering*
The concept
The active steering actively varies the steering
angle of the front wheels in relation to the steer-
ing wheel movements. In addition, it also varies
the steering force required for steering depend-
ing on the vehicle's speed.
When you are driving in the low speed range,
e.g. in a town or when parking, the steering
angle increases, i.e. the steering becomes very
direct. In the higher speed range, on the other
hand, the steering angle is reduced more and
more. This improves the handling capability of
your BMW over the entire speed range.
In critical situations, the system can make tar-
geted corrections to the steering angle pro-
vided by the driver and thus stabilize the vehicle
before the driver intervenes.
Malfunction
The warning lamp lights up yellow
and a message is shown on the Con-
trol Display. The active steering is
defective or has been temporarily
deactivated. At low speeds, greater steering
wheel movements are required, whereas at
higher speeds, the vehicle reacts more sensi-
tively to steering wheel movements. The stabil-
ity-promoting intervention can also be deacti-
vated. Proceed cautiously and drive
defensively.
Page 109 of 312
Controls
107Reference
At a glance
Driving tips
Communications
Navigation
Entertainment
Mobility
Airbags
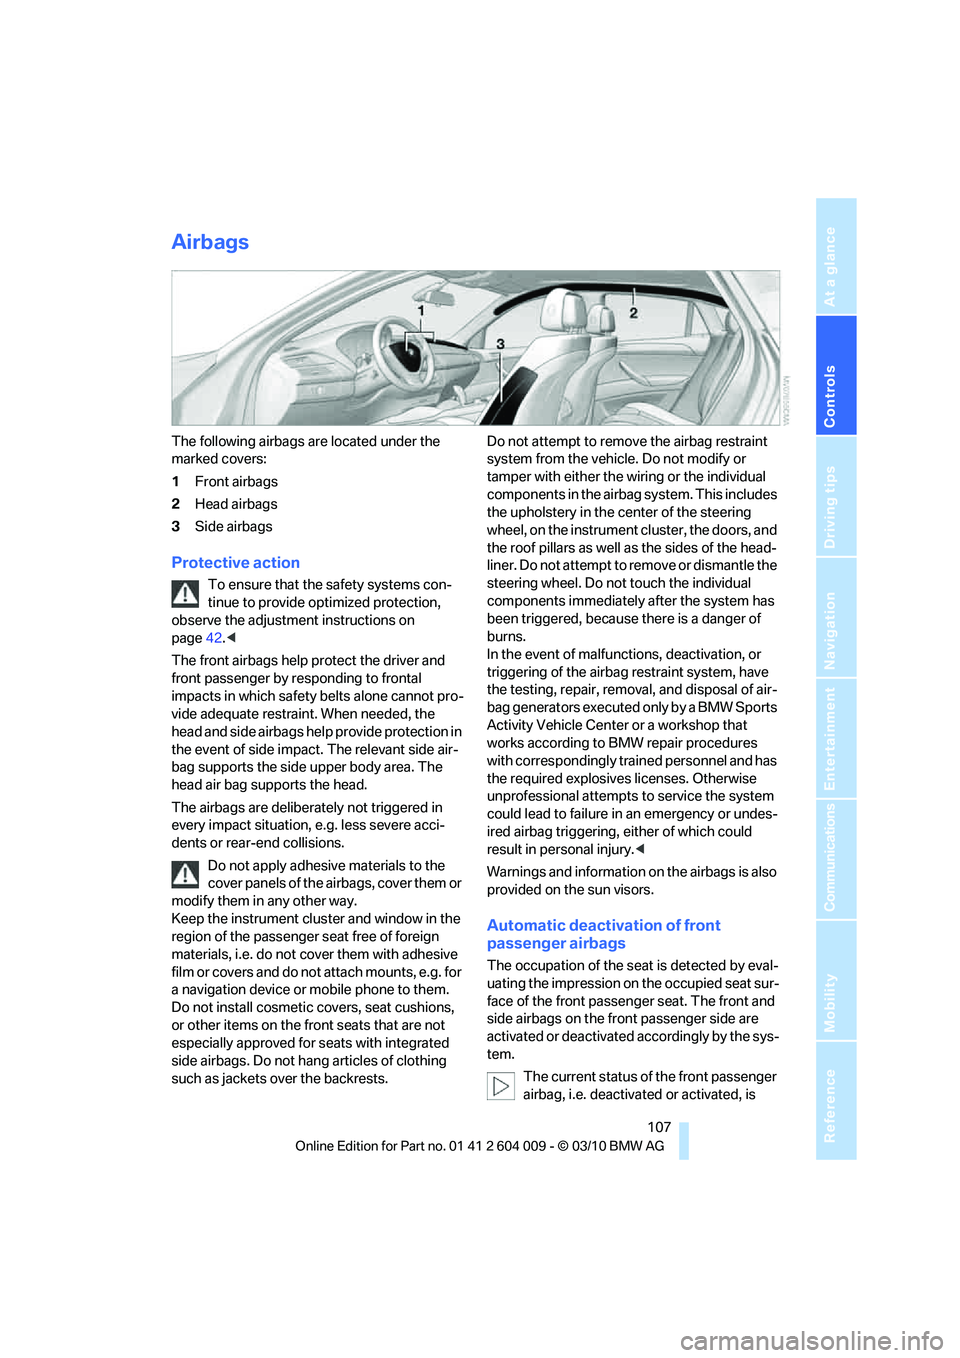
The following airbags are located under the
marked covers:
1Front airbags
2Head airbags
3Side airbags
Protective action
To ensure that the safety systems con-
tinue to provide optimized protection,
observe the adjustment instructions on
page42.<
The front airbags help protect the driver and
front passenger by responding to frontal
impacts in which safety belts alone cannot pro-
vide adequate restraint. When needed, the
head and side airbags help provide protection in
the event of side impact. The relevant side air-
bag supports the side upper body area. The
head air bag supports the head.
The airbags are deliberately not triggered in
every impact situation, e.g. less severe acci-
dents or rear-end collisions.
Do not apply adhesive materials to the
cover panels of the airbags, cover them or
modify them in any other way.
Keep the instrument cluster and window in the
region of the passenger seat free of foreign
materials, i.e. do not cover them with adhesive
film or covers and do not attach mounts, e.g. for
a navigation device or mobile phone to them.
Do not install cosmetic covers, seat cushions,
or other items on the front seats that are not
especially approved for seats with integrated
side airbags. Do not hang articles of clothing
such as jackets over the backrests.Do not attempt to remove the airbag restraint
system from the vehicle. Do not modify or
tamper with either the wiring or the individual
components in the airbag system. This includes
the upholstery in the center of the steering
wheel, on the instrument cluster, the doors, and
the roof pillars as well as the sides of the head-
liner. Do not attempt to remove or dismantle the
steering wheel. Do not touch the individual
components immediately after the system has
been triggered, because there is a danger of
burns.
In the event of malfunctions, deactivation, or
triggering of the airbag restraint system, have
the testing, repair, removal, and disposal of air-
bag generators executed only by a BMW Sports
Activity Vehicle Center or a workshop that
works according to BMW repair procedures
with correspondingly trained personnel and has
the required explosives licenses. Otherwise
unprofessional attempts to service the system
could lead to failure in an emergency or undes-
ired airbag triggering, either of which could
result in personal injury.<
Warnings and information on the airbags is also
provided on the sun visors.
Automatic deactivation of front
passenger airbags
The occupation of the seat is detected by eval-
uating the impression on the occupied seat sur-
face of the front passenger seat. The front and
side airbags on the front passenger side are
activated or deactivated accordingly by the sys-
tem.
The current status of the front passenger
airbag, i.e. deactivated or activated, is
Page 111 of 312
Controls
109Reference
At a glance
Driving tips
Communications
Navigation
Entertainment
Mobility
Head-up Display*
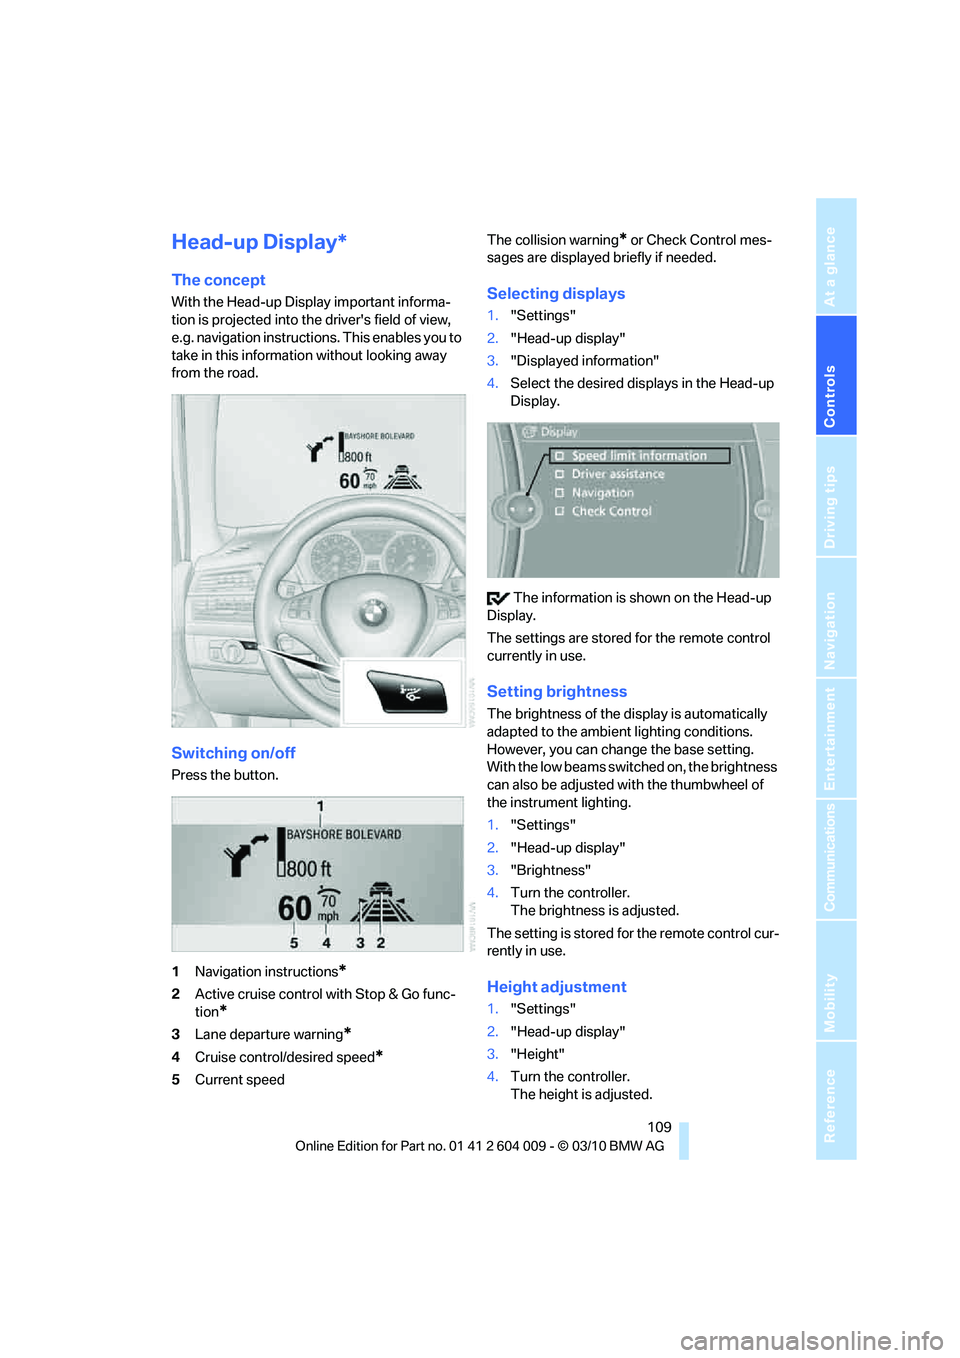
The concept
With the Head-up Display important informa-
tion is projected into the driver's field of view,
e.g. navigation instructions. This enables you to
take in this information without looking away
from the road.
Switching on/off
Press the button.
1Navigation instructions
*
2Active cruise control with Stop & Go func-
tion
*
3Lane departure warning*
4Cruise control/desired speed*
5Current speedThe collision warning
* or Check Control mes-
sages are displayed briefly if needed.
Selecting displays
1."Settings"
2."Head-up display"
3."Displayed information"
4.Select the desired displays in the Head-up
Display.
The information is shown on the Head-up
Display.
The settings are stored for the remote control
currently in use.
Setting brightness
The brightness of the display is automatically
adapted to the ambient lighting conditions.
However, you can change the base setting.
With the low beams switched on, the brightness
can also be adjusted with the thumbwheel of
the instrument lighting.
1."Settings"
2."Head-up display"
3."Brightness"
4.Turn the controller.
The brightness is adjusted.
The setting is stored for the remote control cur-
rently in use.
Height adjustment
1."Settings"
2."Head-up display"
3."Height"
4.Turn the controller.
The height is adjusted.
Page 113 of 312

Controls
111Reference
At a glance
Driving tips
Communications
Navigation
Entertainment
Mobility
Lamps
Parking lamps/low beams
0Lights off and daytime driving lamps*
1Parking lamps and daytime driving lamps*
2Low beams and welcome lamps
3Automatic headlamp control
*, daytime
driving lamps
*, welcome lamps, Adaptive
Light Control
* and high-beam assistant*
If you open the driver's door with the ignition
switched off, the exterior lighting is automati-
cally switched off when the light switch is in
position0, 2 or 3.
If necessary, switch on the parking lamps,
switch position1.
Parking lamps
In switch position1, the front, rear and side
vehicle lighting is switched on. You can use the
parking lamps for parking.
The parking lamps drain the battery. Do
not leave them switched on for long peri-
ods of time, otherwise it may no longer be pos-
sible to start the engine. It is better to switch on
the roadside parking lamps on one side, refer to
page113.<
Low beams
The low beams light up when the light switch is
in position 2 and the ignition is on.
Automatic headlamp control*
In switch position3, the system activates the
low beams and switches them on or off in response to changes in ambient light condi-
tions, for instance, in a tunnel, at dawn and dusk
and in case of precipitation. Adaptive Light
Control
* is active. The LED next to the symbol
lights up when the low beams are on. You can
activate the daytime driving lamps, refer to
page112. In the situations named above, the
system then automatically switches over to the
low beams.
A blue sky with the sun low on the horizon can
cause the lights to be switched on.
The low beams remain switched on inde-
pendent of the ambient lighting condi-
tions when you switch on the fog lamps
*.<
The automatic headlamp control cannot
serve as a substitute for your personal
judgment in determining when the lamps
should be switched on in response to ambient
lighting conditions. For example, the sensors
cannot detect fog or hazy weather. To avoid
safety risks, you should always switch on the
low beams manually under these conditions.<
Welcome lamps
When parking the vehicle, if you leave the light
switch in position2 or3, the parking lamps and
the interior lamps light up briefly when the vehi-
cle is unlocked.
Activating/deactivating welcome
lamps
1."Settings"
2."Lighting"
3."Welcome light"
Page 116 of 312

Lamps
114 >Use the headlamp flasher as usual when the
low beams are on.
System limits
The high-beam assistant cannot replace
personal judgment about the use of high
beams. In situations that require it, you should
therefore switch to low beams manually; failure
to do so can constitute a safety hazard.<
In the following sample situations, the system
will not function or will only function to a limited
degree, possibly requiring the driver to react
personally:
>In extremely unfavorable weather condi-
tions such as fog or heavy precipitation
>When you perceive poorly illuminated road
users such as pedestrians, cyclists, horse-
back riders, carriages, when rail or shipping
traffic is close to the road, or at deer cross-
ings
>In sharp curves, on steep hilltops or dips,
when there cross-traffic, or in the presence
of half-concealed oncoming traffic on the
highway
>In poorly lit areas and in the presence of
highly reflective signs
>In the low speed range
>When the windshield in the region of the
interior rearview mirror is fogged, dirty, or
covered by stickers, decals, etc.
>When the sensor is dirty. Clean the sensor
on the front side of the interior rearview mir-
ror with a cloth moistened with a little glass
cleaner.
Switching on and off via iDrive
1."Settings"
2."Lighting"3."High beam assistant"
High-beam Assistant is activated and is
stored for the remote control currently in use.
Fog lamps*
First, switch on the parking lamps or the low
beams. The green indicator lamp in the instru-
ment panel lights up whenever the fog lamps
are on.
If the automatic headlamp control is acti-
vated, the low beams will come on auto-
matically when you switch on the fog lamps.<
Page 119 of 312

Controls
117Reference
At a glance
Driving tips
Communications
Navigation
Entertainment
Mobility
Automatic climate control with 2-zone control
1Seat heating and ventilation, driver's
side50
2Temperature, left side of passenger com-
partment
3AUTO program
4Temperature, right side of passenger com-
partment
5Maximum cooling
6Seat heating
and ventilation, front passen-
ger side50
7Passenger side
>Air distribution, manual
>Accessing setting for ventilation tem-
perature on the Control Display
8Switching cooling function on and off man-
ually9AUC Automatic recirculated-air control/
recirculated-air mode
10Manual air volume, switching off automatic
climate control, residual heat
11Rear window defroster
12Defrosting windows and removing conden-
sation
13Air grill for interior temperature sensor –
please keep clear and unobstructed
14Driver's side
>Air distribution, manual
>Accessing setting for ventilation tem-
perature on the Control Display
The current setting for manual air distribution is
displayed on the Control Display.
A congenial climate
The AUTO program offers the optimum air dis-
tribution and air volume for virtually all condi-
tions, refer to AUTO program below. Now you
only need to select an interior temperature
comfortable for you.
The following sections contain more detailed
information on the available setting options.
Most settings are stored for the remote control
currently in use, also refer to Personal Profile
settings on page26.AUTO program
The AUTO program handles the
adjustment of air volume and air
distribution to the windshield and
side windows, in the direction of
the upper body and in the footwell.
It also adapts your instructions for the tempera-
ture to outside influences throughout the year.
The cooling is switched on automatically with
the AUTO program. At the same time, a con-
densation sensor controls the program in such
a way that window condensation is prevented
as much as possible.
Page 120 of 312

Climate
118
Intensity of AUTO program
You can adjust the intensity of the AUTO pro-
gram by repeatedly pressing the AUTO button.
The selected intensity, SOFT, MEDIUM or
INTENSIVE, appears on the display of the auto-
matic climate control.
Temperature
Set the desired temperature indi-
vidually on the driver's and front
passenger side.
The automatic climate control
adjusts this temperature as quickly as possible
at any time of year, if necessary with the maxi-
mum cooling or heating capacity, and then
keeps it constant.
In the highest setting you activate the maximum
heating capacity, regardless of the outside tem-
perature. And in the lowest setting, the maxi-
mum cooling capacity.
When switching between different tem-
perature settings in rapid succession, the
automatic climate control does not have suffi-
cient time to adjust the set temperature.<
Adapting Ventilation temperature
This function can be used to adjust the temper-
ature of the air to the upper body region, refer to
page116, separately for the driver and front
passenger.
Use the controller on the Control Display to
adjust the ventilation temperature.
To accomplish this, the access the Ventilation
temperature setting manually via the buttons
for air distribution, refer to page117, or via
iDrive.
1."Settings"
2."Climate"
3.Select "Driver ventilation" or "Front pas-
senger ventilation".4.Turn the controller to adjust the tempera-
ture.
>Turn toward blue: colder
>Turn toward red: warmer
Defrosting windows and removing
condensation
Quickly remove ice and condensa-
tion from the windshield and front
side windows.
To do this, also switch on the cooling function.
Rear window defroster
The rear window defroster
switches off automatically after a
while. Depending on the vehicle
equipment, upper wires are used
as an antenna and are not part of the rear win-
dow defroster.
Air volume, manual
You can vary the air volume by
pressing on the corresponding
side. You can reactivate the auto-
matic mode for the air volume with the AUTO
button.
Air distribution, manual
You can use various programs to separately
direct the emerging airflow to the driver and
passenger side of the vehicle interior.
>Upper body region
>Upper body region and footwell
>Footwell
>Driver's side: also the windshield, side win-
dows, and footwell