2011 BMW 535I settings
[x] Cancel search: settingsPage 212 of 304

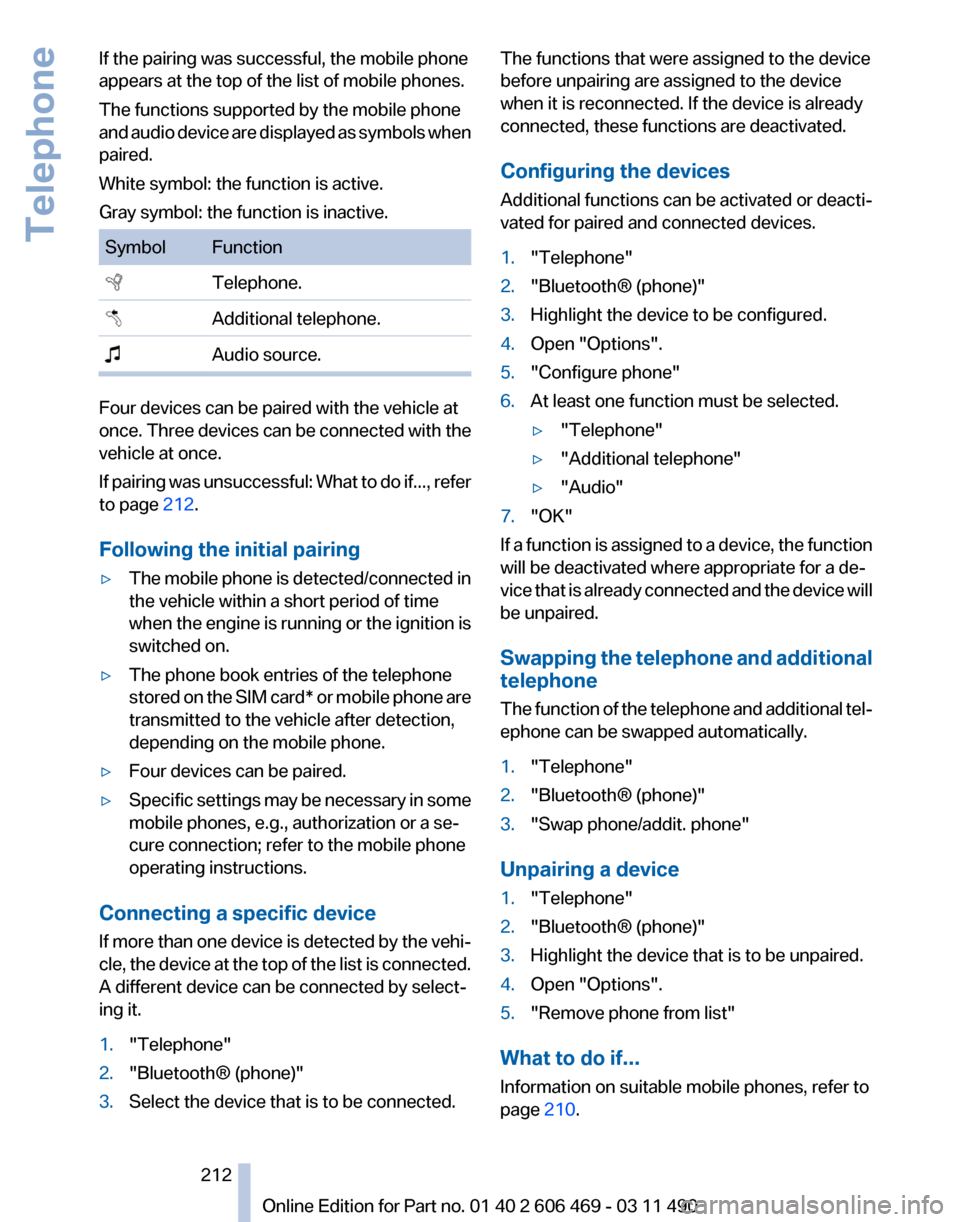
If the pairing was successful, the mobile phone
appears at the top of the list of mobile phones.
The functions supported by the mobile phone
and
audio device are displayed as symbols when
paired.
White symbol: the function is active.
Gray symbol: the function is inactive. Symbol Function
Telephone.
Additional telephone.
Audio source. Four devices can be paired with the vehicle at
once.
Three devices can be connected with the
vehicle at once.
If pairing was unsuccessful: What to do if..., refer
to page 212.
Following the initial pairing
▷ The mobile phone is detected/connected in
the vehicle within a short period of time
when
the engine is running or the ignition is
switched on.
▷ The phone book entries of the telephone
stored
on the SIM card* or mobile phone are
transmitted to the vehicle after detection,
depending on the mobile phone.
▷ Four devices can be paired.
▷ Specific settings may be necessary in some
mobile phones, e.g., authorization or a se‐
cure connection; refer to the mobile phone
operating instructions.
Connecting a specific device
If
more than one device is detected by the vehi‐
cle, the device at the top of the list is connected.
A different device can be connected by select‐
ing it.
1. "Telephone"
2. "Bluetooth® (phone)"
3. Select the device that is to be connected. The functions that were assigned to the device
before unpairing are assigned to the device
when it is reconnected. If the device is already
connected, these functions are deactivated.
Configuring the devices
Additional functions can be activated or deacti‐
vated for paired and connected devices.
1.
"Telephone"
2. "Bluetooth® (phone)"
3. Highlight the device to be configured.
4. Open "Options".
5. "Configure phone"
6. At least one function must be selected.
▷"Telephone"
▷ "Additional telephone"
▷ "Audio"
7. "OK"
If a function is assigned to a device, the function
will be deactivated where appropriate for a de‐
vice
that is already connected and the device will
be unpaired.
Swapping the telephone and additional
telephone
The function of the telephone and additional tel‐
ephone can be swapped automatically.
1. "Telephone"
2. "Bluetooth® (phone)"
3. "Swap phone/addit. phone"
Unpairing a device
1. "Telephone"
2. "Bluetooth® (phone)"
3. Highlight the device that is to be unpaired.
4. Open "Options".
5. "Remove phone from list"
What to do if...
Information on suitable mobile phones, refer to
page 210.
Seite 212
212 Online Edition for Part no. 01 40 2 606 469 - 03 11 490
Telephone
Page 213 of 304

The mobile phone could not be paired or con‐
nected.
▷
Is Bluetooth activated in the vehicle and on
the
mobile phone? Activate Bluetooth in the
vehicle and on the mobile phone.
▷ Do the Bluetooth passkeys on the mobile
phone and the vehicle match? Enter the
same passkey on the mobile phone and via
iDrive.
▷ Did it take longer than 30 seconds to enter
the
passkey? Repeat the pairing procedure.
▷ Are too many Bluetooth devices connected
to
the mobile phone or vehicle? Delete con‐
nections with other devices if necessary.
▷ Is the audio connection activated? Deacti‐
vate the audio connection.
▷ Is the mobile phone in power-save mode or
does
it have only a limited remaining battery
life? Charge the mobile phone in the snap-
in adapter* or via the charging cable.
▷ Depending on the mobile phone, it is possi‐
ble that only one device can be connected
to the vehicle. Unpair the connected device
from the vehicle and pair and connect only
one device.
▷ The mobile phone no longer reacts? Switch
the mobile phone off and on again. Repeat
the pairing procedure.
The telephone functions are not available.
▷ Is the mobile phone paired as an additional
telephone and is the additional telephone
function
deactivated? Activate the function.
▷ Is an outgoing call not possible? Connect
the mobile phone as a telephone.
No or not all phone book entries are displayed,
or they are incomplete.
▷ Transmission of the phone book entries is
not yet complete.
▷ It is possible that only the phone book en‐
tries of the mobile phone or the
SIM card*
are transmitted.
▷ It may not be possible to display phone book
entries with special characters. ▷
The number of phone book entries being
stored is too high.
▷ Is the data volume of the contact too large,
e.g., due to stored information such as
notes? Reduce the data volume of the con‐
tact.
▷ Is the mobile phone connected as an audio
source
or additional telephone? The mobile
phone must be connected as a telephone.
The phone connection quality is poor.
▷ The strength of the Bluetooth signal on the
mobile phone can be adjusted, depending
on the mobile phone.
▷ Insert the mobile phone into the snap-in
adapter* or place it in the area of the center
console.
▷ Adjust the volume of the microphone and
loudspeakers separately.
If all points in this list have been checked and the
required function is still not available, please
contact the hotline or service center.
Controls
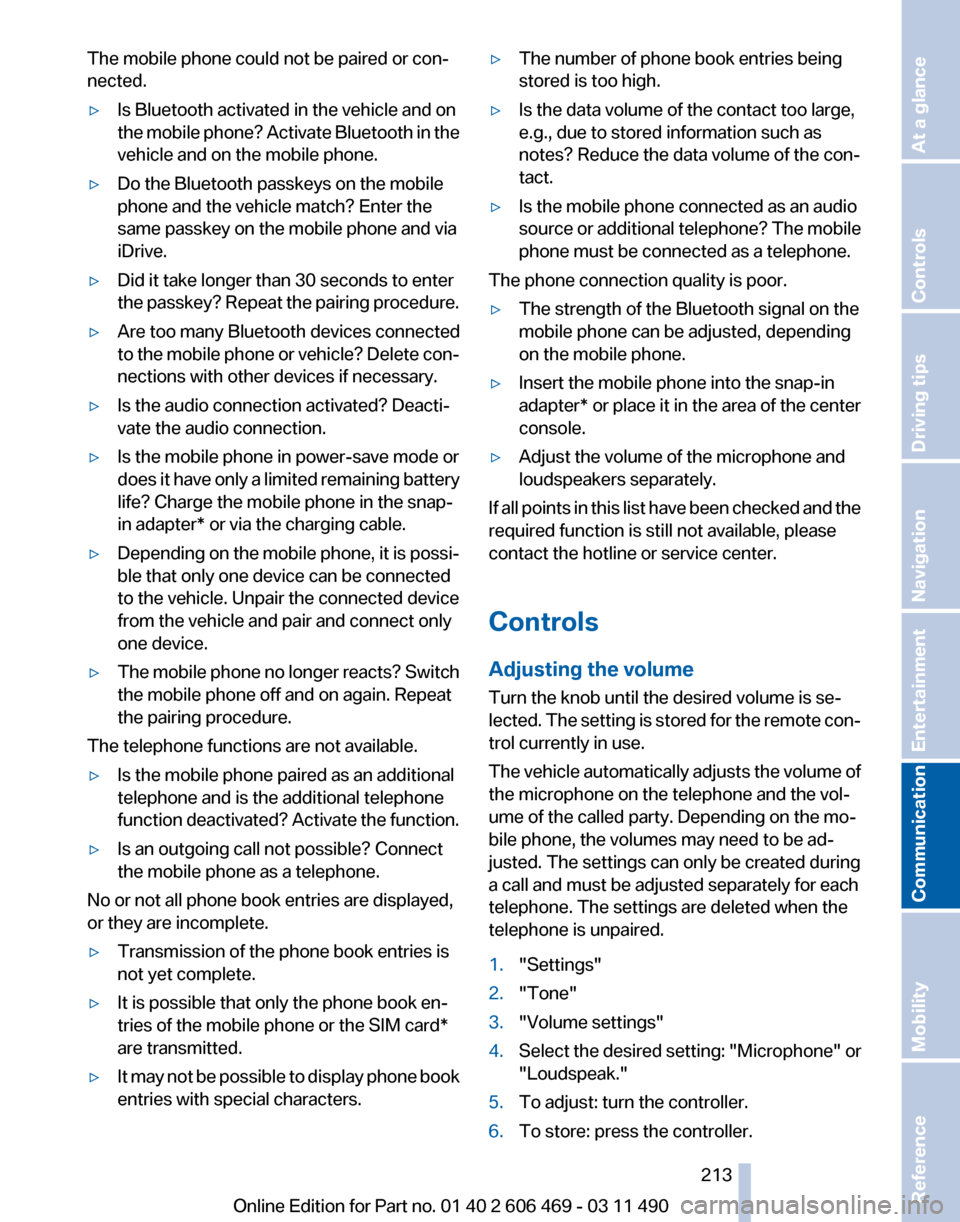
Adjusting the volume
Turn the knob until the desired volume is se‐
lected.
The setting is stored for the remote con‐
trol currently in use.
The vehicle automatically adjusts the volume of
the microphone on the telephone and the vol‐
ume of the called party. Depending on the mo‐
bile phone, the volumes may need to be ad‐
justed. The settings can only be created during
a call and must be adjusted separately for each
telephone. The settings are deleted when the
telephone is unpaired.
1. "Settings"
2. "Tone"
3. "Volume settings"
4. Select the desired setting: "Microphone" or
"Loudspeak."
5. To adjust: turn the controller.
6. To store: press the controller.
Seite 213
213Online Edition for Part no. 01 40 2 606 469 - 03 11 490
Reference Mobility
Communication Entertainment Navigation Driving tips Controls At a glance
Page 229 of 304

▷
Check the e-mail settings on the telephone
and adjust if necessary.
If all points in this list have been checked and the
required function is still not available, please
contact the hotline or service center.
Seite 229
229Online Edition for Part no. 01 40 2 606 469 - 03 11 490
Reference Mobility
Communication Entertainment Navigation Driving tips Controls At a glance
Page 253 of 304

The wheels are composed of special rims and
tires that are self-supporting, to a limited de‐
gree.
The
support of the sidewall allows the tire to re‐
main drivable to a restricted degree in the event
of a pressure loss.
Continued driving with a damaged tire., refer to
page 90
Changing run-flat tires
For your own safety, only use run-flat tires. No
spare tire is available in the case of a flat tire. Your
service center will be glad to advise you.
Snow chains
Fine-link snow chains
Only certain types of fine-link snow chains have
been tested by the manufacturer of your vehicle,
classified as road-safe and recommended.
Consult your service center for more informa‐
tion.
Use
Use only in pairs on the rear wheels, equipped
with the tires of the following size:
▷ 225/55 R 17.
▷ 245/45 R 18.
Follow the chain manufacturer's instructions.
Make
sure that the snow chains are always suf‐
ficiently tight. Retighten as needed according to
the chain manufacturer's instructions.
Do not initialize the Tire Pressure Monitor after
mounting snow chains, as doing so may result
in incorrect readings.
When driving with snow chains, briefly activate
Dynamic Traction Control if necessary.
Maximum speed with snow chains
Do not exceed a speed of 30 mph/50 km/h when
using snow chains. Snow chain detection*
The concept
When using snow chains, you should set
whether you are driving with or without snow
chains via the iDrive.
The
snow chain detection system supports you
by automatically showing the detected state on
the Control Display.
When snow chains are in use, the rear axle steer‐
ing of the Integral Active Steering* is deacti‐
vated automatically.
At speeds above the maximum allowable speed
with snow chains of 30 mph/50 km/h, the rear
axle steering is activated again automatically.
Activating the status
1. "Settings"
2. "Tire chains"
3. "Tire chains installed"
Automatic detection
If functioning properly:
▷ Snow chains are mounted. The setting is not
activated .
After you drive a short distance, a Check
Control message is shown and the state is
activated automatically.
Confirm the automatic activation.
▷ Snow chains are not mounted. The setting
is activated .
At speeds above 30 mph/50 km/h, a Check
Control message is displayed. Deactivate
the status manually.
If not functioning properly:
▷ Snow chains are mounted. The setting is not
activated .
A Check Control message is not displayed.
The
automatic detection system is malfunc‐
tioning. Activate the status manually.
Seite 253
253Online Edition for Part no. 01 40 2 606 469 - 03 11 490
Reference
Mobility Communication Entertainment Navigation Driving tips Controls At a glance
Page 261 of 304

This indicates that there is excessive
misfiring in the engine.
Reduce the vehicle speed and have
the system checked immediately;
otherwise, serious engine misfiring
within a brief period can seriously
damage emission control compo‐
nents,
in particular the catalytic con‐
verter.
Fuel cap The indicator lamp lights up.
If the fuel cap is not properly tightened,
the
OBD system may conclude that fuel
vapor is escaping. If the cap is then tightened,
the display should go out in a short time.
Data memory
Your vehicle records data relating to vehicle op‐
eration, faults and user settings. These data are
stored in the remote control and can be read out
with suitable devices, particularly when the ve‐
hicle is serviced. The data obtained in this way
provide valuable information for service proc‐
esses and repair or for optimizing and develop‐
ing vehicle functions further.
In addition, if you signed a service contract for
Assist, certain vehicle data can be sent directly
from the vehicle to facilitate the desired serv‐
ices. Seite 261
261Online Edition for Part no. 01 40 2 606 469 - 03 11 490
Reference
Mobility Communication Entertainment Navigation Driving tips Controls At a glance
Page 268 of 304

systems or functions may not be fully availa‐
ble.◀
After a battery replacement, have the battery
registered
on the vehicle by your service center
to ensure that all comfort functions are fully
available.
Charging the battery
In the vehicle, only charge the battery via the
terminals, refer to page 271, in the engine com‐
partment with the engine off.
Power failure
After a temporary power loss, some equipment
needs to be reinitialized.
Individual settings need to be reprogrammed:
▷ Seat, mirror, and steering wheel memory:
store the positions again.
▷ Time: update.
▷ Date: update.
▷ Radio station: save again.
▷ Navigation system: wait for the operability of
the navigation.
Disposing of old batteries Have old batteries disposed of by your
service center or bring them to a recy‐
cling center.
Maintain the battery in an upright position for
transport and storage. Secure the battery so
that it does not tip over during transport.
Fuses
Notes
Replacing fuses
Never attempt to repair a blown fuse and
do
not replace a defective fuse with a substitute
of another color or amperage rating; this could
lead to a circuit overload, ultimately resulting in
a fire in the vehicle.◀ Plastic tweezers and information on the fuse
types
and locations are stored in the fuse box in
the cargo area.
In the glove compartment Push the handle up, arrow 1, and open the lid,
arrow 2.
In the cargo area
Open the cover on the right side trim.
Information on the fuse types and locations is
found on a separate sheet.
Seite 268
268 Online Edition for Part no. 01 40 2 606 469 - 03 11 490
Replacing components
Page 285 of 304

Short commands of the voice activation
system*
General information
Instructions
for voice activation system, refer to
page 22. To have the available spoken instructions read
out loud: ›Voice commands‹
Adjusting
Vehicle
Function
Command
Open the main menu. ›Main menu‹
Open the options. ›Options‹
Open the settings. ›Settings‹
Info display of the instrument cluster. ›Info Display‹
Settings on the Control Display. ›Control display‹
Open the time and date. ›Time and date‹
Open the language and units. ›Language and units‹
Open the speed limit. ›Speed‹
Open the light. ›Lighting‹
Open the door lock. ›Door locks‹
Open the profiles. ›Profiles‹Equipment*
Function
Command
Open the air conditioning settings. ›Climate‹
Open the Head-up Display. ›head up display‹
Enable the rear. ›Allow rear control‹ Seite 285
285Online Edition for Part no. 01 40 2 606 469 - 03 11 490
Reference Mobility Communication Entertainment Navigation Driving tips Controls At a glance
Page 287 of 304

Function
Command
Open the route. ›Route information‹
Switch on the spoken instruction. ›Switch on voice instructions‹
Repeat the spoken instruction. ›Repeat voice instructions‹
Switch off the spoken instruction. ›Switch off voice instructions‹
Display the address book. ›Address book‹
Display the most recent destinations. ›Last destinations‹
Open the traffic bulletins. ›Traffic Info‹
Special destinations. ›Points of interest‹Map
Function
Command
Display the map. ›Map‹
Map facing north. ›Map facing north‹
Map facing the direction of travel. ›Map in direction of travel‹
Perspective map. ›Map perspective view‹
Automatic scaling of the map. ›Map with automatic scaling‹
Scale...feet. ›Map scale ... feet‹
Scale...meters. ›Map scale ... meters‹ e.g., map scale 100 meters
Scale...kilometers. ›Map scale ... kilometers‹ e.g., map scale 5 kilo‐
meters
Scale...miles. ›Map scale ... miles‹ e.g., map scale 5 milesSplit screen settings
Function
Command
Split screen. ›Switch on splitscreen‹
Switch off the split screen. ›Turn off split screen‹
Adjust the split screen. ›Split screen content‹
Split screen, map facing north. ›Split screen map facing north‹
Split screen, current position. ›Split screen current position‹ Seite 287
287Online Edition for Part no. 01 40 2 606 469 - 03 11 490
Reference Mobility Communication Entertainment Navigation Driving tips Controls At a glance