2011 BMW 535I park distance control
[x] Cancel search: park distance controlPage 13 of 304

8
Steering column stalk, left Turn signal 62
High beams, head‐
lamp flasher 62
High-beam Assistant* 82
Roadside parking lamps 81
Computer 75
9 Steering wheel buttons, left Store speed* 110 103
Resume speed 111 104
Cruise control on/off, interrupt‐
ing 110 102
Increase distance* 104
Decrease distance* 104
10 Instrument cluster 67
11 Steering wheel buttons, right Entertainment source
Volume Voice activation* 22
Telephone* 210
12 Steering column stalk, right Windshield wipers 62
Rain sensor*
63 Clean the windshields and head‐
lamps* 62
13 Start/stop the engine and switch
the ignition on/off 59
14 Horn
15 Steering wheel heating* 53
16 Adjust the steering wheel
53
17 Open the trunk lid
35
18 Unlocking the hood
Seite 13
13Online Edition for Part no. 01 40 2 606 469 - 03 11 490
Reference Mobility Communication Entertainment Navigation Driving tips Controls
At a glance
Page 14 of 304

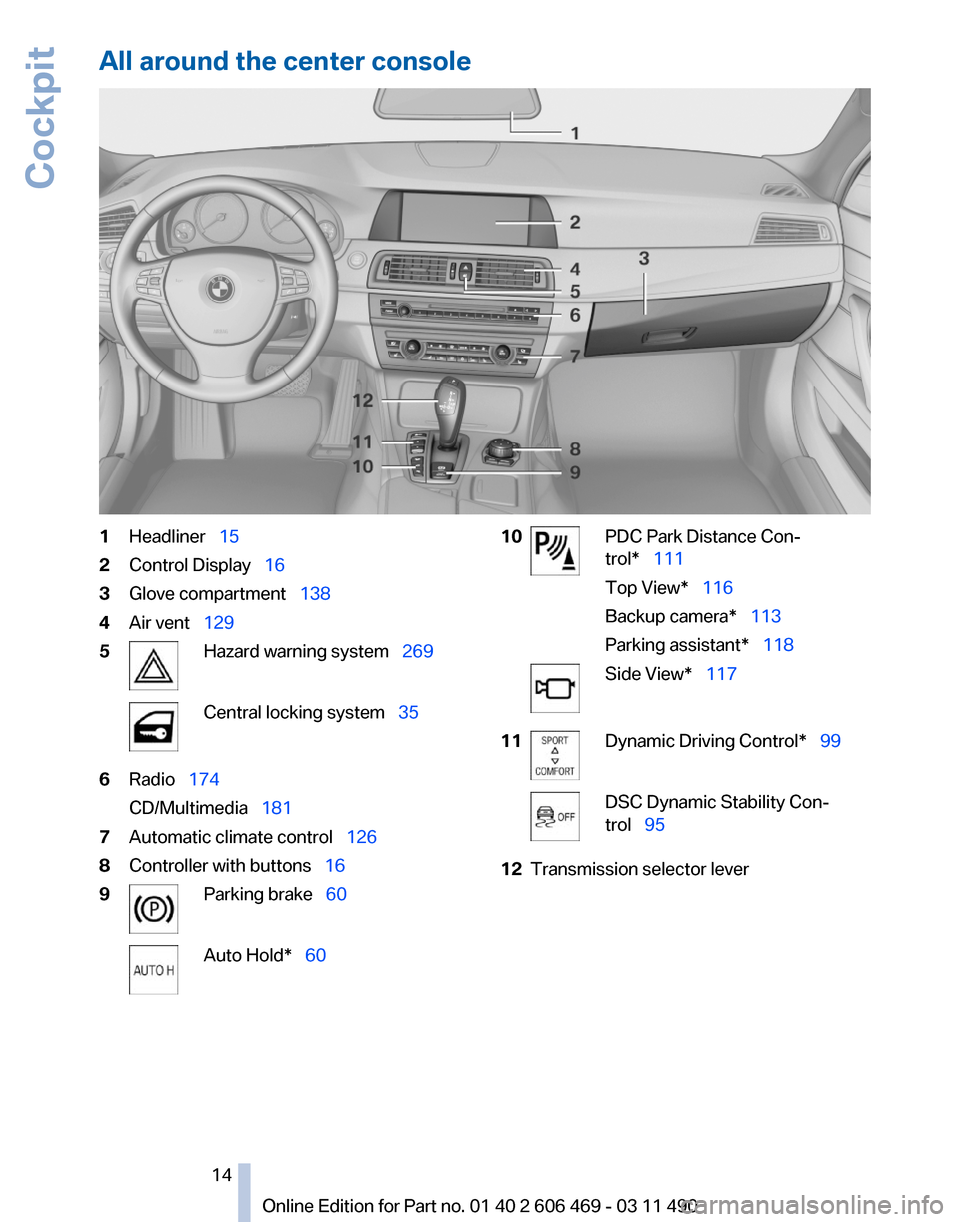
All around the center console
1
Headliner 15
2 Control Display 16
3 Glove compartment 138
4 Air vent 129
5 Hazard warning system 269
Central locking system 35
6 Radio 174
CD/Multimedia 181
7 Automatic climate control 126
8 Controller with buttons 16
9 Parking brake
60 Auto Hold* 60 10 PDC Park Distance Con‐
trol* 111
Top View* 116
Backup camera* 113
Parking assistant* 118
Side View* 117
11 Dynamic Driving Control* 99
DSC Dynamic Stability Con‐
trol 95
12 Transmission selector lever
Seite 14
14 Online Edition for Part no. 01 40 2 606 469 - 03 11 490Cockpit
Page 31 of 304

Display profile list during start
The profile list can be displayed during each
start for selecting the desired profile.
1.
"Settings"
2. "Profiles"
3. Open "Options".
4. "Display user list at startup"
Personal Profile settings
The following functions and settings can be
stored in a profile.
More information on the settings can be found
under:
▷ Active Cruise Control: collision warning, re‐
fer to page 108.
▷ Exterior mirror position, refer to page 51.
▷ CD/Multimedia, refer to page 181: audio
source listened to last.
▷ Dynamic Driving Control: sport program, re‐
fer to page 99.
▷ Driver's seat position, refer to page 33: au‐
tomatic retrieval after unlocking.
▷ Programmable memory buttons, refer to
page 20: assignment.
▷ Head-up Display, refer to page 124: selec‐
tion, brightness and position of the display.
▷ Headlamp courtesy delay feature, refer to
page 80: time setting.
▷ Tone, refer to page 172: tone settings.
▷ Automatic climate control, refer to
page 126: settings.
▷ Steering wheel position, refer to page 53
▷ Navigation, refer to page 154: map views,
route criteria, voice output on/off.
▷ Night Vision with pedestrian detection, refer
to
page 122: selection of functions and type
of display.
▷ Daytime running lights*, refer to page 81:
current setting.
▷ Park Distance Control PDC, refer to
page 173:
adjusting the signal tone volume. ▷
Radio, refer to page 174: stored stations,
station listened to last, special settings.
▷ Backup camera, refer to page 113: selec‐
tion of functions and type of display.
▷ Side View, refer to page 117: selection of
the display type.
▷ Language on the Control Display, refer to
page 79.
▷ Lane departure warning, refer to page 91:
last setting, on/off.
▷ Active Blind Spot Detection, refer to
page 92: last setting, on/off.
▷ Triple turn signal activation, refer to
page 62.
▷ Locking the vehicle, refer to page 35: after
a brief period or after starting to drive.
Central locking system
The concept
The central locking system becomes active
when the driver's door is closed.
The system simultaneously engages and re‐
leases the locks on the following:
▷ Doors.
▷ Trunk lid.
▷ Fuel filler flap.
Operating from the outside
▷ Via the remote control.
▷ Via the driver's door lock*.
▷ Via the door handles*.
▷ Via the button in the trunk lid*.
The following takes place simultaneously when
locking/unlocking the vehicle via the remote
control:
▷ Anti-theft protection is switched on/off.
Doors cannot be unlocked using the lock
buttons or the door opener.
▷ The welcome lamps, interior lamps and
courtesy lamps* are switched on and off.
Seite 31
31Online Edition for Part no. 01 40 2 606 469 - 03 11 490
Reference Mobility Communication Entertainment Navigation Driving tips
Controls At a glance
Page 52 of 304

General information
The
mirror on the passenger side is more curved
than the driver's side mirror.
Estimating distances correctly
Objects reflected in the mirror are closer
than they appear. Do not estimate the distance
to the traffic behind you based on what you see
in the mirror, as this will increase your risk of an
accident.◀
The mirror setting is stored for the remote con‐
trol currently in use. When the vehicle is un‐
locked via the remote control, the position is au‐
tomatically retrieved if the setting for this
function is active.
Selecting a mirror
To change over to the other mirror:
Slide the mirror changeover switch.
Adjusting electrically The setting corresponds to the direction
in which the button is pressed.
Storing positions*
Seat, mirror, and steering wheel memory, refer
to page 51.
Adjusting manually
If an electrical malfunction occurs, for example,
press the edges of the mirror glass.
Automatic Curb Monitor*
When the reverse gear is engaged, the mirror
glass tilts downward slightly on the front pas‐
senger side. This improves your view of the curb
and other low-lying obstacles when parking, for
example.
Activating
1. Slide the mirror changeover switch
to the driver's side mirror position.
2. Engage transmission position R. Deactivating
Slide the mirror changeover switch to the pas‐
senger's side mirror position.
Fold in and out*
Press the button.
Possible up to approx. 15 mph/20 km/h.
For example, this is advantageous
▷ In car washes.
▷ In narrow streets.
▷ For folding back mirrors that were folded
away manually.
Mirrors that were folded in are folded out auto‐
matically
at a speed of approx. 25 mph/40 km/h.
Fold in the mirror in a car wash
Before entering an automatic car wash,
fold in the exterior mirrors by hand or with the
button; otherwise, they could be damaged, de‐
pending on the width of the vehicle.◀
Automatic heating
Both exterior mirrors are automatically heated
whenever the engine is running.
Automatic dimming feature
Both exterior mirrors are automatically dimmed.
Photocells are used for control in the Interior rear
view mirror, refer to page 53.
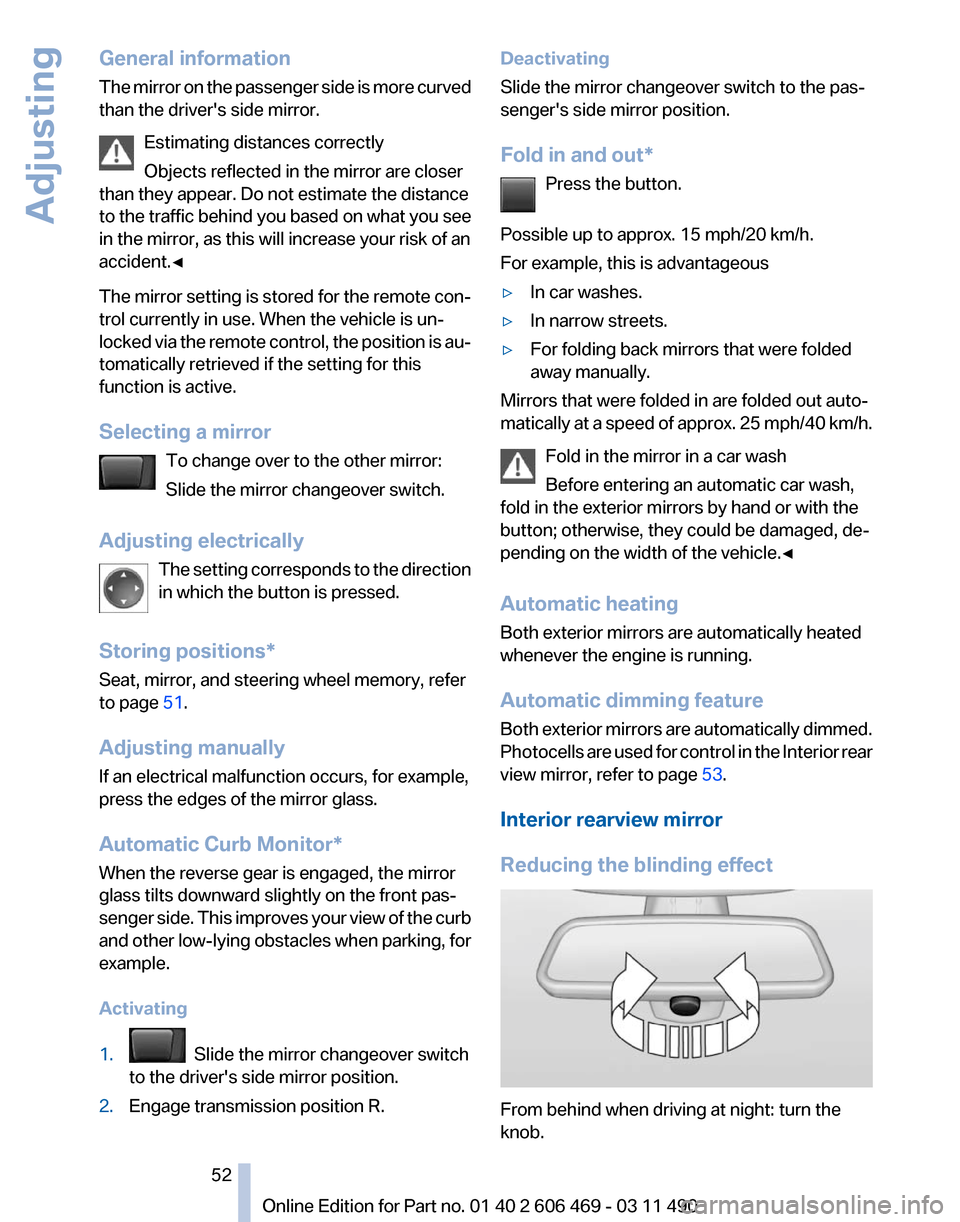
Interior rearview mirror
Reducing the blinding effect From behind when driving at night: turn the
knob. Seite 52
52 Online Edition for Part no. 01 40 2 606 469 - 03 11 490
Adjusting
Page 95 of 304

Driving stability control systems
Antilock Brake System ABS
ABS
prevents locking of the wheels during brak‐
ing.
The vehicle remains steerable even during full
brake applications, thus increasing active
safety.
ABS is operational every time you start the en‐
gine.
Brake assistant
When you apply the brakes rapidly, this system
automatically produces the maximum braking
force boost. It thus helps to achieve the shortest
possible braking distance during full braking.
This system utilizes all of the benefits provided
by ABS.
Do not reduce the pressure on the brake pedal
for the duration of the full braking.
Adaptive brake assistant
In combination with the Active Cruise Control,
this system ensures that the brakes respond
even more rapidly when braking in critical situa‐
tions. Refer also to Collision warning, refer to
page 108.
Drive-off assistant
This system supports driving away on gradients.
The parking brake is not required.
1. Hold the vehicle in place with the foot brake.
2. Release the foot brake and drive away with‐
out delay.
After the foot brake is released, the vehicle is
held in place for approx. 2 seconds.
Depending on the vehicle load, the vehicle may
roll back slightly. Driving off without delay
After
releasing the foot brake, start driving
without delay, since the drive-off assistant will
not hold the vehicle in place for more than ap‐
prox. 2 seconds and the vehicle will begin rolling
back.◀
DSC Dynamic Stability
Control
The concept
DSC prevents traction loss in the driving wheels
when driving away and accelerating.
DSC also recognizes unstable vehicle condi‐
tions, such as fishtailing or nose-diving. Subject
to physical limits, DSC helps to keep the vehicle
on a steady course by reducing engine speed
and by applying brakes at individual wheels.
Adjust your driving style to the situation
An appropriate driving style is always the
responsibility of the driver.
The laws of physics cannot be repealed, even
with DSC.
Therefore, do not reduce the additional safety
margin by driving in a risky manner.◀
Indicator/warning lamps
The indicator lamp flashes: DSC con‐
trols the drive forces and brake forces.
The indicator lamp lights up: DSC has
failed.
Deactivating DSC: DSC OFF
When DSC is deactivated, driving stability is re‐
duced during acceleration and when driving in
bends.
Stabilizing interventions by the Integral Active
Steering* system are only performed by the rear
axle steering. Seite 95
95Online Edition for Part no. 01 40 2 606 469 - 03 11 490
Reference Mobility Communication Entertainment Navigation Driving tips
Controls At a glance
Page 104 of 304

Reduce distance
Press the button repeatedly until the
desired distance is set.
The
selected distance, refer to page 105, is dis‐
played in the instrument cluster.
Increase distance
Press the button repeatedly until the
desired distance is set.
The selected distance, refer to page 105, is dis‐
played in the instrument cluster.
Calling up the desired speed and
distance
While driving
Press the button with the system
switched on.
In the following cases, the stored speed value is
deleted and cannot be called up again:
▷ When the system is switched off.
▷ When the ignition is switched off.
While standing Before leaving the vehicle, secure it
against rolling.
Before leaving the vehicle with the engine run‐
ning, engage position P of the automatic trans‐
mission
and apply the parking brake. Otherwise,
the vehicle may begin to roll.◀
The system brought the vehicle to a complete
standstill.
▷ Green mark in the speedometer during a
brief idle phase:
The vehicle ahead of you drives away while
the mark is green: your vehicle accelerates
without anything having to be done.
▷ Switch to orange of the mark in the speed‐
ometer after approx. 2 sec.:
The
vehicle ahead of you drives away, while
the mark is orange: in order to accelerate,
briefly press the accelerator or press the
RES button or SET button. Rolling bars in the distance indicator mean that
the vehicle ahead of you has driven off.
You actively braked your vehicle to a halt by
pressing on the brake pedal and it is standing
behind another vehicle:
1.
Press the button to call up a stored
desired speed.
2. Release the brake pedal.
3. Press on the accelerator briefly, or press the
RES button or the rocker switch when the
vehicle ahead of you drives away.
Displays in the instrument cluster 1
Display of desired speed
2 Distance to vehicle ahead of you
3 Vehicle symbol
4 Brief status display
Desired speed
Marking in the speedometer ▷The marking lights up in
green: the system is active.
▷ The marking lights up in or‐
ange: the system has been
interrupted.
▷ The marking does not light up: the system is
switched off.
Brief status display Selected desired speed.
If --- appears briefly on the display for Check
Control
messages, it is possible that the system Seite 104
104 Online Edition for Part no. 01 40 2 606 469 - 03 11 490
Driving comfort
Page 111 of 304

Resuming the desired speed
Press the button.
The stored speed is reached and maintained.
Displays in the instrument cluster 1
Display of desired speed
2 Indicator lamp
3 Brief status display
Desired speed
Display in the speedometer: ▷The marking lights up in
green: the system is active.
▷ The marking lights up in or‐
ange: the system has been
interrupted.
▷ The marking does not light up: the system is
switched off.
Brief status display
Brief display in the speedometer: Selected desired speed
If --- appears briefly, conditions may not be ad‐
equate to operate the system.
PDC Park Distance Control*
The concept
In
addition to the PDC Park Distance Control, the
backup camera*, refer to page 113, can be
switched on. PDC supports you when parking. Objects that
you
are approaching slowly in front of or behind
your vehicle are indicated with:
▷ Signal tones.
▷ Visual display.
Measurement
Measurements
are made by ultrasound sensors
in the bumpers.
The range is approx. 6 ft/2 m.
An acoustic warning is first given:
▷ By the front* sensors and the two rear cor‐
ner sensors at approx. 24 in/60 cm.
▷ By the rear middle sensors at approx. 5 ft/
1.50 m.
System limits Check the traffic situation as well
PDC cannot serve as a substitute for the
driver's personal judgment of the traffic situa‐
tion.
Check the traffic situation around the vehi‐
cle with your own eyes. Otherwise, an accident
could result from road users or objects located
outside of the PDC detection range.
Loud noises from outside and inside the vehicle
may prevent you from hearing the PDC's signal
tone.◀
Avoid driving quickly with PDC
Avoid approaching an object quickly.
Avoid driving away quickly while PDC is not yet
active.
For technical reasons, the system may other‐
wise be too late in issuing a warning.◀
Limits of ultrasonic measurement
The detection of objects can reach the physical
limits of ultrasonic measurement, for instance:
▷ With tow bars and trailer hitches.
▷ With thin or wedge-shaped objects.
▷ With low objects.
▷ With objects with corners and sharp edges. Seite 111
111Online Edition for Part no. 01 40 2 606 469 - 03 11 490
Reference Mobility Communication Entertainment Navigation Driving tips
Controls At a glance
Page 112 of 304

Low objects already displayed, e.g., curbs, can
move
into the blind area of the sensors before or
after a continuous tone sounds.
High, protruding objects such as ledges may not
be detected.
False warnings
PDC may issue a warning under the following
conditions even though there is no obstacle
within the detection range:
▷ In heavy rain.
▷ When sensors are very dirty or covered in
ice.
▷ When sensors are covered in snow.
▷ On rough road surfaces.
▷ In large buildings with right angles and
smooth
walls, e.g., in underground garages.
▷ In heavy exhaust.
▷ Due to other ultrasound sources, e.g.,
sweeping machines, high pressure steam
cleaners or neon lights.
Switching on automatically
Select transmission position R with the engine
running.
Switching off automatically
The
system switches off and the LED goes out:
▷ After approx. 160 ft/50 m when driving for‐
ward.
▷ Above approx. 22 mph/36 km/h when driv‐
ing forward.
Switch on the system again if necessary.
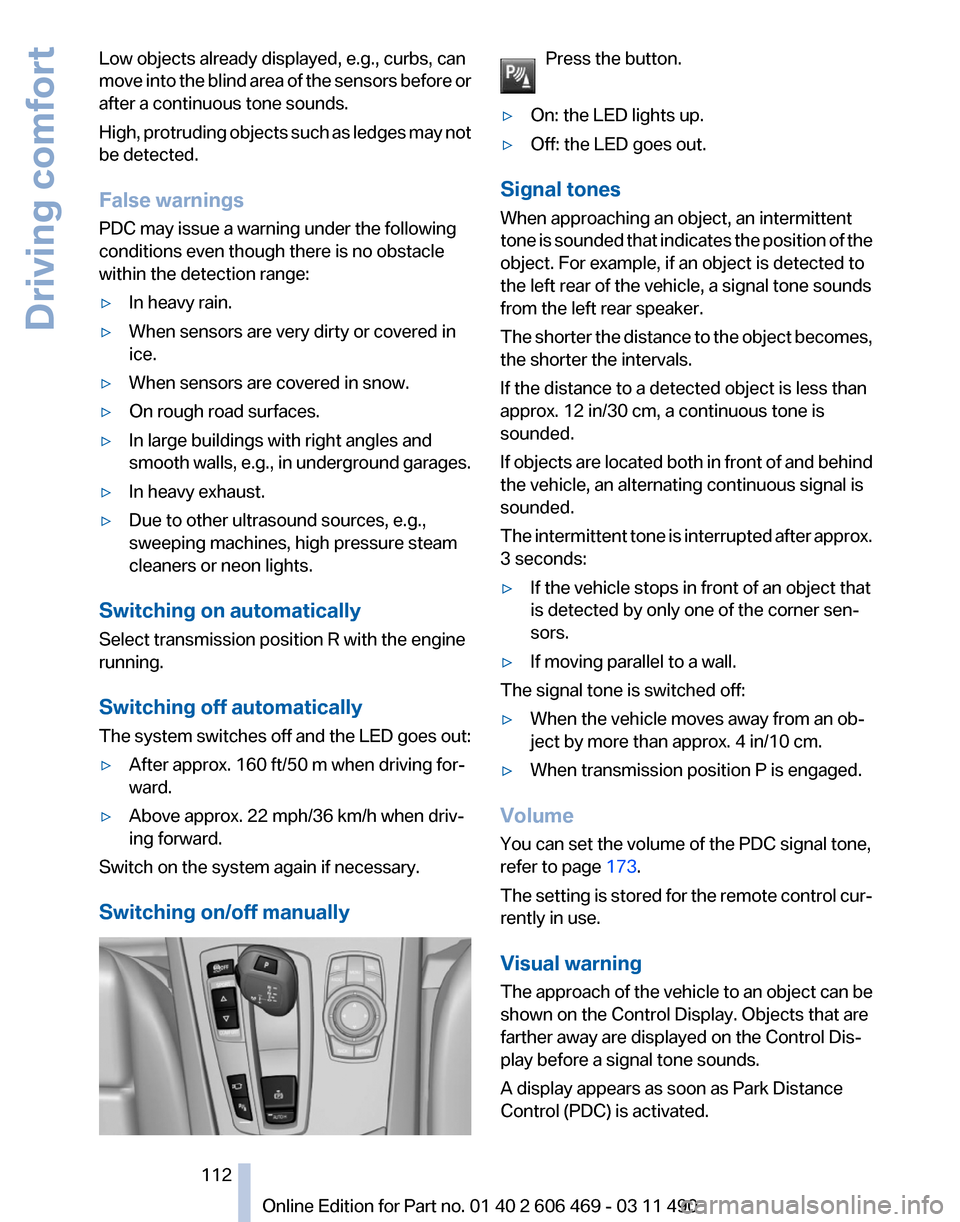
Switching on/off manually Press the button.
▷ On: the LED lights up.
▷ Off: the LED goes out.
Signal tones
When approaching an object, an intermittent
tone
is sounded that indicates the position of the
object. For example, if an object is detected to
the left rear of the vehicle, a signal tone sounds
from the left rear speaker.
The shorter the distance to the object becomes,
the shorter the intervals.
If the distance to a detected object is less than
approx. 12 in/30 cm, a continuous tone is
sounded.
If objects are located both in front of and behind
the vehicle, an alternating continuous signal is
sounded.
The intermittent tone is interrupted after approx.
3 seconds:
▷ If the vehicle stops in front of an object that
is detected by only one of the corner sen‐
sors.
▷ If moving parallel to a wall.
The signal tone is switched off:
▷ When the vehicle moves away from an ob‐
ject by more than approx. 4 in/10 cm.
▷ When transmission position P is engaged.
Volume
You can set the volume of the PDC signal tone,
refer to page 173.
The
setting is stored for the remote control cur‐
rently in use.
Visual warning
The approach of the vehicle to an object can be
shown on the Control Display. Objects that are
farther away are displayed on the Control Dis‐
play before a signal tone sounds.
A display appears as soon as Park Distance
Control (PDC) is activated. Seite 112
112 Online Edition for Part no. 01 40 2 606 469 - 03 11 490
Driving comfort