Page 190 of 253
188
Bluetooth® HandsFreeLink®Receiving a Call
Bluetooth ® HandsFreeLink®
Receiving a Call
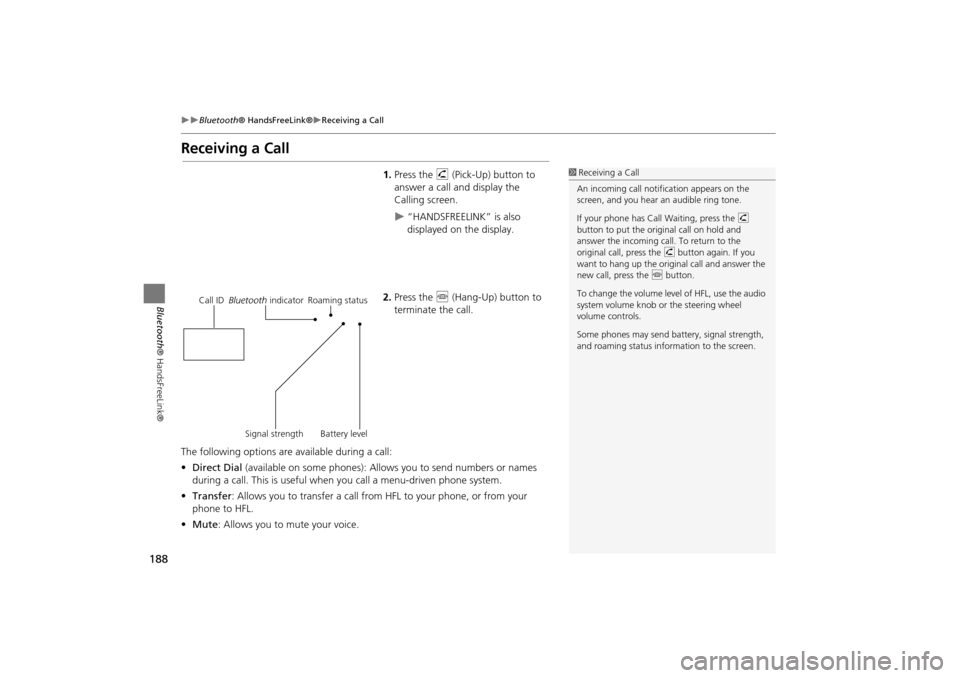
1.Press the h (Pick-Up) button to
answer a call and display the
Calling screen.
“HANDSFREELINK” is also
displayed on the display.
2. Press the j (Hang-Up) button to
terminate the call.
The following options are available during a call:
• Direct Dial (available on some phones): Allows you to send numbers or names
during a call. This is useful when you call a menu-driven phone system.
• Transfer: Allows you to transfer a call from HFL to your phone, or from your
phone to HFL.
• Mute : Allows you to mute your voice.
1Receiving a Call
An incoming call notif ication appears on the
screen, and you hear an audible ring tone.
If your phone has Call Waiting, press the h
button to put the original call on hold and
answer the incoming call. To return to the
original call, press the h button again. If you
want to hang up the origin al call and answer the
new call, press the j button.
To change the volume leve l of HFL, use the audio
system volume knob or the steering wheel
volume controls.
Some phones may send battery, signal strength,
and roaming status information to the screen.
Call ID Bluetooth indicator Roaming status
Signal strength Battery level
TSX_KA-31TL1820.book Page 188 Wednesday, September 22, 2010 3:17 PM
Page 191 of 253
189
Bluetooth® HandsFreeLink®HFL Menus
Bluetooth ® HandsFreeLink®
HFL Menus
Use HFL when the vehicle’s ignition is in the ACCESSORY (I) or ON (II) position.
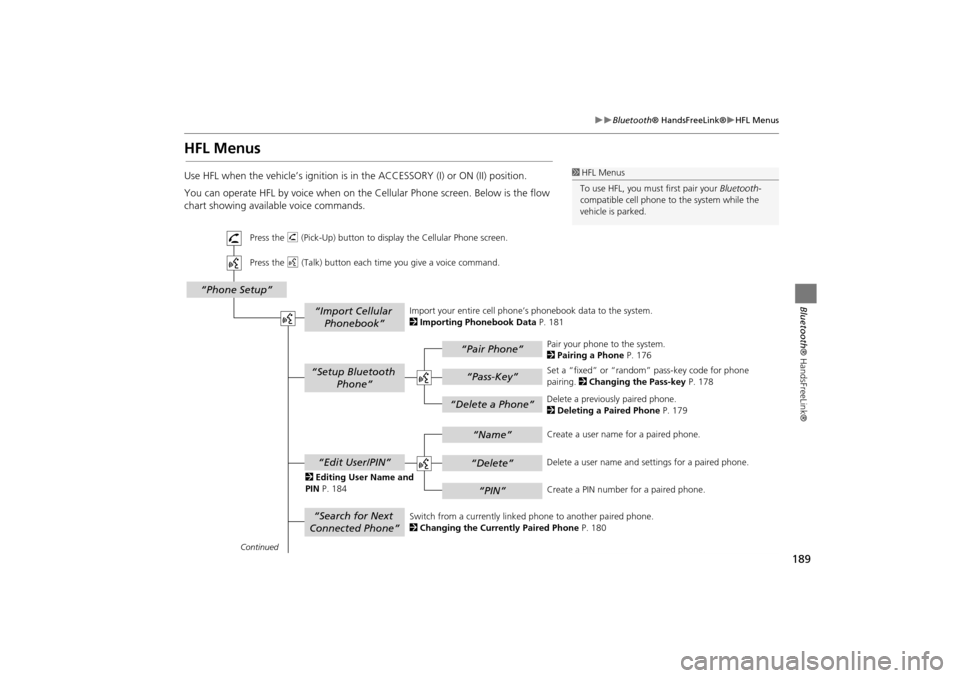
You can operate HFL by voice when on the Cellular Phone screen. Below is the flow
chart showing available voice commands.1HFL Menus
To use HFL, you must first pair your Bluetooth-
compatible cell phone to the system while the
vehicle is parked.
“Pair Phone”
“Delete a Phone”
“Name”
“Delete”
“PIN”
“Edit User/PIN”
“Setup Bluetooth Phone”
“Search for Next
Connected Phone”
“Phone Setup”
“Import Cellular Phonebook”
“Pass-Key”
Continued
Press the h (Pick-Up) button to display the Cellular Phone screen.
Press the d (Talk) button each time you give a voice command.
Pair your phone to the system.
2Pairing a Phone P. 176
Set a “fixed” or “random” pass-key code for phone
pairing. 2Changing the Pass-key P. 178
Delete a previously paired phone.
2 Deleting a Paired Phone P. 179
Switch from a currently linked phone to another paired phone.
2 Changing the Currently Paired Phone P. 180
Create a user name
for a paired phone.
Delete a user name and settings for a paired phone.
Create a PIN number for a paired phone.
Import your entire
cell phone’s phonebook data to the system.
2 Importing Phonebook Data P. 181
2 Editing User Name and
PIN P. 184
TSX_KA-31TL1820.book Page 189 Wednesday, September 22, 2010 3:17 PM
Page 192 of 253
190
Bluetooth® HandsFreeLink®HFL Menus
Bluetooth ® HandsFreeLink®
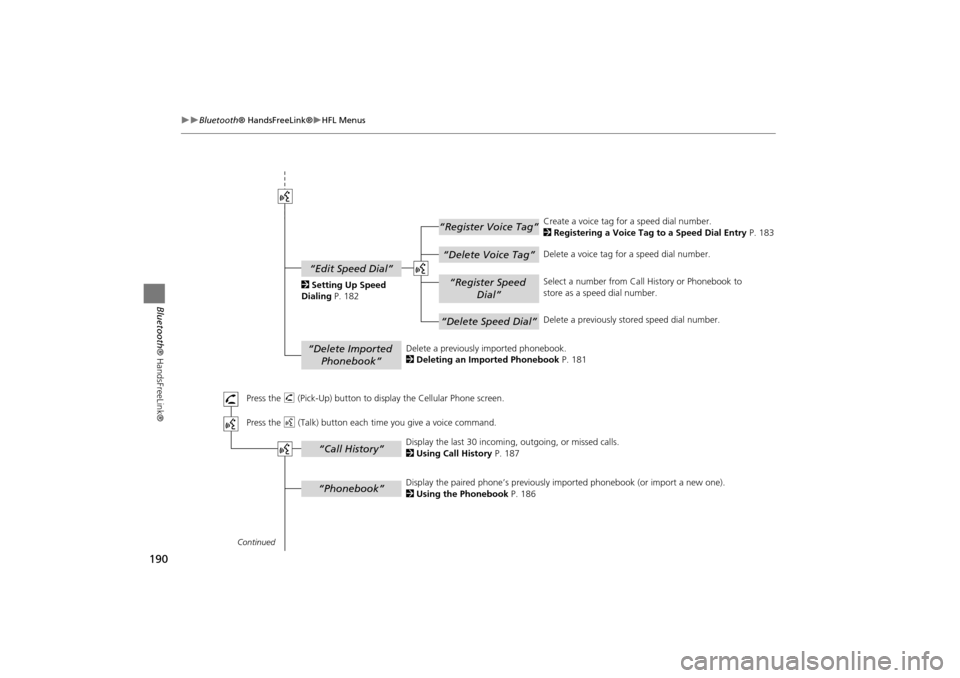
“Register Voice Tag”
“Delete Voice Tag”
“Register Speed
Dial”
“Delete Speed Dial”
“Edit Speed Dial”
“Delete Imported Phonebook”
“Phonebook”
“Call History”
Continued
Press the h (Pick-Up) button to display the Cellular Phone screen.
Press the d (Talk) button each time you give a voice command.Delete a previously
imported phonebook.
2 Deleting an Imported Phonebook P. 181 Create a voice tag for a speed dial number.
2
Registering a Voice Tag to a Speed Dial Entry P. 183
Delete a voice tag for a speed dial number.
Select a number from Call History or Phonebook to
store as a speed dial number.
Delete a previously st ored speed dial number.
2
Setting Up Speed
Dialing P. 182
Display the paired phone’s previously imported phonebook (or import a new one).
2 Using the Phonebook P. 186
Display the last 30 incoming,
outgoing, or missed calls.
2 Using Call History P. 187
TSX_KA-31TL1820.book Page 190 Wednesday, September 22, 2010 3:17 PM
Page 193 of 253
191
Bluetooth® HandsFreeLink®HFL Menus
Bluetooth ® HandsFreeLink®
“Dial”
“Dial”
“Mute”
“Transfer”
“Eric”*
“Mike”*
“Lisa”*
“John”*
“More Speed
Dial”
“Speed dial entries”
“Dial”
The first four on the Cellular Phone screen.
* : Example
Display a list of all 20 speed dial entries.
2
Using Speed Dial P. 187
2 Using Speed Dial P. 187 Send numbers or na
mes during a call.
Say a phone number to dial.
2
Entering a Phone Number P. 186
Mute your voice during a call.
Transfer a call from HFL to your phone, or from your
phone to HFL.
TSX_KA-31TL1820.book Page 191 Wednesday, September 22, 2010 3:17 PM
Page 198 of 253
196
AcuraLink® MessagesMessage Options
AcuraLink® Messages
•Diagnostic Info : Provides information about the ca use for a warning indicator or
multi-information message. Rotate i to select Check Later or Check Now . If
you choose to check the information now, AcuraLink lets you know whether you
should see your dealer immediately or later in accordance with the level of
severity. Call your dealer or find the near est dealer. (If your navigation system is
still at the start-up disclaimer screen, you need to select OK before checking the
information.)
• Maintenance Minder : Tells you exactly which main tenance item is due along
with the multi-information message.
• Recalls/Campaigns : Reminds you of a recall or important safety information. You
should also be notified by mail.
Message Options
When a message is displayed, you may select some of the following options:
• Voice : Reads the message aloud. Select Stop Reading to stop.
• Delete : Display the message you want to delete before rotating i to select this
option. Press u to complete the deletion.
• Call : Dials a number displayed in the message via HFL.
1Message Options
The options available vary depending on the
category of the message.
You can delete all me ssages in a category
simultaneously.
2 AcuraLink/Messages P. 63
Only your dealer can delete Diagnostic Info and
Recall/Campaign messages.
TSX_KA-31TL1820.book Page 196 Wednesday, September 22, 2010 3:17 PM
Page 199 of 253

197
AcuraLink® MessagesDealer Appointments
AcuraLink® Messages
•Find Acura Dlr : Searches for the nearest Acura dealer.
• Call Your Dealer : Calls your Acura dealer using HFL.
• Diagnostic Info : Updates, if any, the current diagnostic message by connecting
to the Acura server using HFL.
• Schedule Dealer Appt. : Automatically sets an appoin tment date at your dealer.
Dealer Appointments
Schedule a dealer appointment for Ma intenance Minder and Recalls/Campaigns
messages. You can reschedule or cancel a dealer appointment from the Scheduled
Dealer Appointments option.
1.Display a Maintenance Minder,
Recalls/Campaigns, or Scheduled
Dealer Appointments message.
2. Rotate i to select Schedule
Dealer Appt. or Reschedule
Appointment (depending on the
screen). Press u .
A proposed date and time are
displayed.
3. Rotate i to select Confirm
Appointment . Press u to accept
the proposed appointment.
4. Rotate u to select OK when the
appointment is confirmed.
■ Scheduling an Appointment
1 Dealer Appointments
You can automaticall y schedule dealer
appointments when regular maintenance is due.
To use the Automated Appointment function,
visit the My Acura website at
www.owners.acura.com and set the required
option. A reminder message will be sent as the
date for the dealer appointment approaches. A
reminder message will also be sent if you
schedule an appointment online using My
Acura’s Schedule Servic e Appointment function.
If you are not satisfied with the proposed
appointment date and ti me, call your dealer
directly.
TSX_KA-31TL1820.book Page 197 Wednesday, September 22, 2010 3:17 PM
Page 202 of 253
200
Other Features
Calendar
HINFO/PHONE button Other Calendar
Enter events and display reminders each time you start your vehicle.
1.Rotate i to select the day. Press
u .
2. Rotate i to select an item. Press
u .
The following item s are available:
• Edit Date : Moves the calendar entry to a ne w date. The display automatically
returns to the Schedule screen.
• Edit Title : Enter the name of your event. Move r to select OK to return to the
Schedule screen.
• Edit Message : Enter a message for your event. You can enter a message on two
lines using k to change between lines. Move r to select OK to return to the
Schedule screen.1 Calendar
You can select the day of the month on the
calendar using voice commands (e.g., say d
“Five” to select the 5th).
Move w or y to scroll through the months of
the year.
Only one event entry can be stored for each
date. Dates with an icon indicate there is a
scheduled entry for that date.
A maximum of 50 entries can be stored in the
calendar.
Entries may be stored in the calendar for 10
years.
Active calendar entries are displayed when you
start your vehicle after you select OK on the Start
Confirmation screen.
2 Start-up P. 20
TSX_KA-31TL1820.book Page 200 Wednesday, September 22, 2010 3:17 PM
Page 203 of 253
201
Calendar
Other Features
•Message Icon : Select an icon from the list to he lp identify the type of message.
The message icon you choose will be displayed alongside the specified date on the
Calendar screen.
• Reminder : Sets whether event reminders are displayed each time you start your
vehicle.
2 Start-up P. 20
• Delete : Deletes the event. Select Yes on the confirmation screen to remove the
event from the calendar.
1 Calendar
Message Icons
The following icons can be selected:
ScheduleTimeCall
RestaurantOthers
TSX_KA-31TL1820.book Page 201 Wednesday, September 22, 2010 3:17 PM