2011 Acura CSX navigation
[x] Cancel search: navigationPage 17 of 145

Navigation System17Getting Started
Read this disclaimer carefully so you
understand it before continuing. Push in
on the joystick, or touch OK, and the
map screen will appear on the display.
The “OK” cannot be activated by voice.
Tip:
You can change the language of the
messages displayed on the screen to
French. Select Français, and select
Oui, and then restart the navigation
system. After restarting the system, the
messages will be changed to French,
and Français will be changed to
English.
NOTE:
If you do not select OK, and then enter
the Setup or Information screens, some
items are not available and will show up
as darkened buttons (grayed out). See
System Function Diagram on page 21.If you do not press the joystick or touch
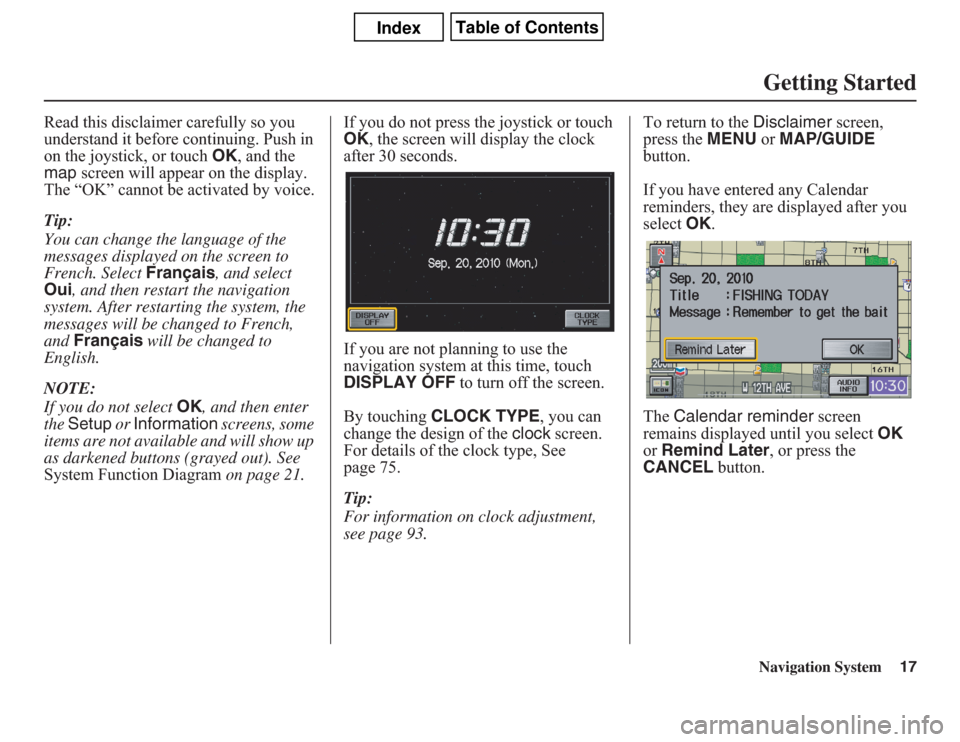
OK, the screen will display the clock
after 30 seconds.
If you are not planning to use the
navigation system at this time, touch
DISPLAY OFF to turn off the screen.
By touching CLOCK TYPE, you can
change the design of the clock screen.
For details of the clock type, See
page 75.
Tip:
For information on clock adjustment,
see page 93.To return to the Disclaimer screen,
press the MENU or MAP/GUIDE
button.
If you have entered any Calendar
reminders, they are displayed after you
select OK.
The Calendar reminder screen
remains displayed until you select OK
or Remind Later, or press the
CANCEL button.
Page 18 of 145

18
Navigation System
Getting StartedIf you select OK, the reminder will not
show up again. If you wish to have the
reminder show up again later in the day,
touch the Remind Later button.
If you press the CANCEL button, the
message will be displayed the next time
you start the vehicle.
NOTE:
The system will display the current
message and any older or previously
unread messages, with the newest
message listed first.
Bluetooth
® HandsFreeLink
®
If you have a Bluetooth-compatible cell
phone that is paired, then CALL on the
Calculate route to screen is enabled. When you select CALL, the system
dials the number shown on the screen. If
CALL is not available (dark gray), and
your phone is paired, then make sure the
phone has service or that HFL is not in
use; press the HFL BACK button.
For more information on Bluetooth®
HandsFreeLink®, see your Owner’s
Manual.
Page 19 of 145

Navigation System19Getting Started
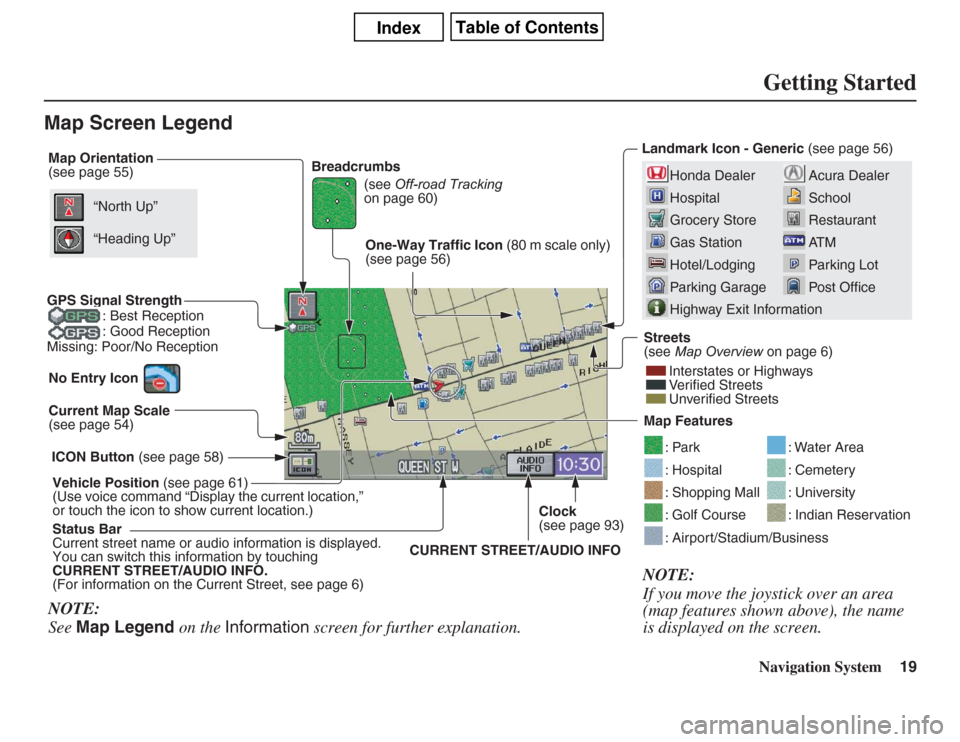
Map Screen Legend
Acura Dealer
School
Restaurant
AT M
Parking Lot
Post Office
Honda Dealer
Hospital
Grocery Store
Gas Station
Hotel/Lodging
Parking Garage
Highway Exit Information
Map Orientation
(see page 55)
Current Map Scale
(see page 54)
ICON Button (see page 58)
Vehicle Position (see page 61)
(Use voice command “Display the current location,”
or touch the icon to show current location.)Landmark Icon - Generic (see page 56)
Streets
(see Map Overview on page 6)
Interstates or Highways
Verified Streets
Unverified Streets
Map Features
: Par k: Hospital: Shopping Mall: Golf Course
: Water Area: Cemetery: University: Indian Reservation
: Airport/Stadium/Business
“North Up”
NOTE:
See Map Legend on the Information screen for further explanation.
(see Off-road Tracking
on page 60)
“Heading Up”Breadcrumbs
NOTE:
If you move the joystick over an area
(map features shown above), the name
is displayed on the screen.
GPS Signal Strength
: Best Reception
: Good Reception
Missing: Poor/No Reception
One-Way Traffic Icon (80 m scale only)
(see page 56)
Status Bar
Current street name or audio information is displayed.
You can switch this information by touching
CURRENT STREET/AUDIO INFO.
(For information on the Current Street, see page 6)Clock
(see page 93)
CURRENT STREET/AUDIO INFO No Entry Icon
Page 20 of 145

20
Navigation System
Getting StartedMap Screen DescriptionZoom In/OutUse the ZOOM buttons to change the
scale of the map. Zooming in increases
the detail, while zooming out gives you
a wide area view. After changing the
scale, give the system a few moments to
update the display.Map ScrollingTo view other areas on the map, move
the joystick left, right, up, or down. The
map will shift in that direction. To
return the map to your current location,
press either the MAP/GUIDE,
CANCEL, or NAVI BACK button on
the steering wheel.
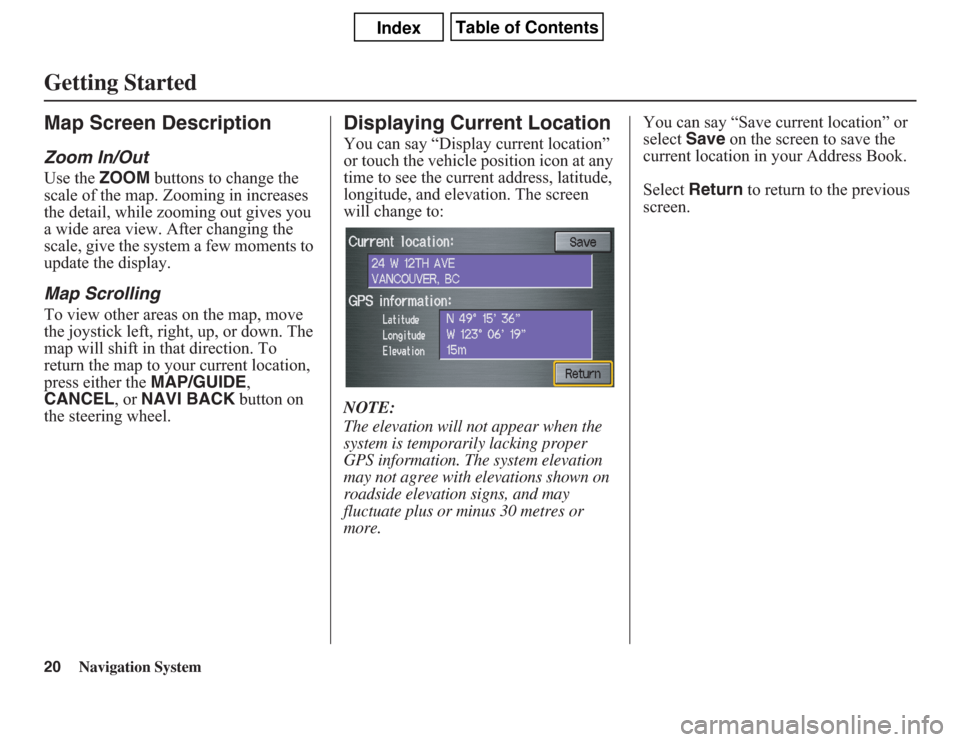
Displaying Current LocationYou can say “Display current location”
or touch the vehicle position icon at any
time to see the current address, latitude,
longitude, and elevation. The screen
will change to:
NOTE:The elevation will not appear when the
system is temporarily lacking proper
GPS information. The system elevation
may not agree with elevations shown on
roadside elevation signs, and may
fluctuate plus or minus 30 metres or
more.
You can say “Save current location” or
select Save on the screen to save the
current location in your Address Book.
Select Return to return to the previous
screen.
Page 21 of 145

Navigation System21Getting Started
System Function DiagramThis diagram shows the navigation
system features, starting at the centre
and working outward in layers. The
navigation program starts at “Key ON,”
and then displays the globe screen
(blue). If OK is selected on the
Disclaimer screen, the functions in the
yellow segments of the diagram become
available in the Setup and Information
screens. The white segments of the
diagram are available anytime, even if
you do not select OK.
The items above the map screen show
various methods to begin driving to
your destination (orange). You are
provided with map/voice guidance,
routing cautions, and a direction list.
While driving to your destination, use
the voice control system as much as
possible to interact with the navigation,
audio, and climate control systems
(green).
VOICE: "FIND
NEARES
T..."
ATM, E
TC.
(pg. 133)
SELECT A
DESTINATION
WITH
JOYSTICK
(pg. 66)
VOICE:
"GO HOME"
(pg. 43)
VOICE:
(ALL)
(pg. 131)
VOICE:
SCREEN"
(pg. 68)
VOICE:
"MENU" (to
change route)
(pg. 63)
VOICE:
"HOW FAR TO THE
DESTINATION?"
(pg. 131)
VOICE:
"DISPLAY (OR SAVE)
CURRENT LOCATION"
(pg. 61)
VOICE:
"WHAT TIME
IS IT?"
(pg. 131)
VO
ICE:
"AUDIO/C
D"
(pg. 135, 136)
VOICE:
CLIMATE
FAN, TEMP
(pg.134, 135)
VOICE:
"ZOOM IN/ZOO
M OUT"
(pg. 54, 132)VOICE:
"HIDE/DISPLAY ICONS"
(pg. 57, 132
)
PERSO
NALBASIC
ADD B
OOK (pg. 76
)PINs (pg. 80)
UNITS KM/MI (pg. 9
2)UNVERIFIED (pg. 83)AVOID AREAS (pg. 87)ADJ. TIME (p
g. 94)CLOCK TYPE (pg. 94)OFF-ROAD TRACKING(pg. 60,
90)
CORRECT VEHICLE
POSITION (pg. 91)MAP COLOUR (pg. 95)MENU COLOUR (pg. 95)
GUIDE. PROMPTS (pg. 75)
VERSION (pg. 9
2)
BRIGHTNESS (pg. 73)
VO
LUM
E (pg. 73)
ROUTING
GUIDANCECLOCK
SETTINGS
VEHICLECOLOUR
SYSTEM INFO.
SETUP
SCREEN
(FIRST)
DISPLAY (pg. 74)
CONTRAST (pg. 75)SETUP
BUTTON
(pg. 73)
AUDIO
BUTTON
(pg. 11)
INFO
BUTTON
(pg. 68)
ENTER (pg. 70)LIST (pg. 70) MATH (pg. 71)CONVERT (pg. 72)
LIST (pg. 69)
NAVI AUDIO
CLIMATE (pg. 68)
CALENDARCALCULATORMAP LEGEND
VOICE HELP
SELECT
BAND/
FREQUE
NCY
VOL
BALANCE
CD
FUNCTIONS
OTHER
AUDIO
VOICE:
"MENU" FOR
ENTER
DESTINATION
SCREEN
(pg. 22)
CONTINUE
TO THE
DESTINATION
(RESUME)
AFTER RESTART
(pg. 67)
KEY
ON
PRESS
OK
Formoreinformation,see
yourOwner’sManual
VOICECOMMANDS
NOT
PRESSEDOK
OKNOTPRESSED
INFORMATION
SCREEN (pg. 137)
AUDIO (pg. 135, 136)CLIMATE CONTROL
(pg. 134, 135)"INFORMATION
"HELP"
-
DRIVING
TO
Y
O
U
R
D
E
S
TIN
ATION
-
(MAP/VOICEGUIDANCE,ROUTING
CAUTIONS,DIRECTIONLIST)
-THEMAP
SCREEN
(pg.19)-
CALENDAR
REMINDERS(pg.17)
THEDISCLAIMERSCREEN(pg.16)
GLOBESCREEN
VOICE:
"SET W
AYPOINT"
(pg. 63
)
IMPORT, SEARCH,
DELETE (pg. 68)
PHONEBOOK
Page 22 of 145

22
Navigation System
When you press the MENU button, the
display changes to:
Address (see page 23)
This selection requires you to enter the
city (and possibly the province) and the
address that you want to go to.
Intersection (see page 27)
This selection allows you to enter the
names of two intersecting streets in a
city. This is useful if you know the
general location of your destination, but
not the exact address.Places (see page 31)
The system has been programmed with
the locations of many businesses, parks,
hospitals, etc. This selection lets you
search these by category, name, or
phone number.
Map Input (see page 36)
This selection allows you to point to a
destination on the map using the
joystick. This allows you to enter a
destination or address that may not be
listed in the database.
Previous Destinations (see page 40)
When you enter a destination with any
of the available selections (except
Address Book and Go Home), the
last 50 destinations are saved by the
system. Use this selection to choose a
destination again.
NOTE:
If Previous Destinations is grayed
out, there are no Previous Destinations
entered.Today’s Destinations (see page 41)
You can enter and sort up to five
destinations and store them in the
Today’s Destinations list. You can then
use the Today’s Destination selection.
NOTE:
If Today’s Destinations is grayed
out, there are no Today’s Destinations
entered.
Address Book (see page 42)
This selection allows you to select a
stored address. The system can store up
to a combined total of 200 User 1 and
User 2 addresses.
Go Home (see page 43)
This selection allows you to select your
home or a common place as a
destination.
NOTE:
If you have no home address entered,
the system prompts you for one.Entering a Destination
Page 23 of 145

Navigation System23
By AddressAfter you select Address from the
Enter destination by screen, the
display changes to:
Tip:
• When entering an address by voice, it
is more efficient to say the city name
first, then the street name.
• When entering an address by touch, it
is usually easier to enter the street
first. A city or cities that the street
appears in will be displayed. For
your convenience, you do not have to
enter both city and street.NOTE:
• If you find that your city is not listed,
it may be part of a larger
metropolitan area. Try entering the
street first.
• Prior to departure, you can set areas
to avoid. The system then includes
them in its calculations for the
destination you have entered. See
Edit Avoid Area on page 87.
Selecting the Province or StateThe province you are in is displayed at
the top of the screen. If your desired
destination is in another province, select
Change State.
The display then changes to the Enter
state/province name screen. Use the
voice control system and say the name
of the province or use the on-screen
keyboard to enter the name of the
province.
Selecting the CityThis is helpful if the street runs through
several cities, and you know what city
includes the street. The city you are in is
displayed on the screen. If your desired
destination is in another city, say or
enter that city.By Voice Control:Say “City” on the Find address by
screen, and the display changes to the
Enter city name screen. Say the city
name by saying individual letters, or
words that represent the letters, one at a
time.
Entering a Destination
Page 24 of 145

24
Navigation System
The system has a talk back function. If
your spoken letter is not recognized, the
system will talk back to you. For
example, if you say “E” but the system
does not recognize the command, it will
ask you, “Please select the number of
the input letter from the list,” and the
following pop-up box will appear:
You should select a letter by saying the
number.
Alternatively, to improve voice
recognition, you can say “Echo” or
“Edward” instead of “E.”
See page 15 for a list of available words
for each letter.
By Touch Control:Select City, and the display then
changes to the Enter city name screen.
Use the on-screen keyboard to enter the
name of the city.
The system will display a list of city
names, with the closest match to the
name you entered at the top of the list.
Select the number (1-6) of the desired
city from the list.If the system does not find an exact
match, select List when you finish
entering the name of the city. Most of
the cities and towns for that province are
listed.
Listings of cities and towns in the non-
detailed coverage area may have an
asterisk “*” next to their names. If you
select one, a pop-up box is displayed
saying, “No detailed street data…”, and
a street address cannot be entered (see
Map Coverage on page 107). Try
entering the street first, and then select
the city if available.
Select View Dest. Map and use the
joystick to select an icon, approximate
area, or street you wish to choose as
your destination. Otherwise, a central
location of the city will be selected. If
you select a point of interest (POI) or
road in an unverified area, you may or
may not have routing in these areas. See
Map Overview on page 6.
Entering a Destination