2010 VOLKSWAGEN TRANSPORTER window
[x] Cancel search: windowPage 234 of 486
A WARNING (Continued)
• In addition, a leak/function check must be carried out on the gas system by a qualified workshop every time the system is repaired or the gas system connections are opened.
A WARNING
Improper use of the gas system can cause serious Injury.
• The cover on the gas bottle holder must be screwed on securely whenever the gas bottle is In the holder.
• Never connect the gas system to the town gas/gas mains.
• Close all gas shut-off valves before driv-lng and when not using the cooker for long periods.
• Never allow the vents In the floor of the gas bottle holder to become blocked by snow slush, cleaning rags, or any other object. Check the floor vents regularly to make sure they are free from obstruction.
A WARNING
There is a danger of fire any time a gas burn-er is lit.
• Never leave a lit burner unattended -es-pecially when children are nearby.
• Make sure the gas flame never extends beyond the edge of the pot or pan.
• The refrigerator box lid must always be kept closed from the moment the gas flame is lit until it is turned off again.
• The blind on the window behind the gas cooker must always be kept open from the moment the gas flame is lit until it is turned off again.
234 I Before the journey
A WARNING (Continued)
• Make sure that no inflammable Items are left close to the burners, e.g. cooking fat or oil.
• Keep towels, clothing, paper, plastic and other inflammable materials well away from the gas cooker.
• Never overheat oil or cooking fat.
A WARNING
Improper use of the gas cooker can cause se-rious injury.
• Never allow the handles of pots and pans to protrude over the edge of the gas cooker. Otherwise, they could be knocked off the gas cooker.
• Never use the gas cooker while the vehi-cle is in motion.
• Close all gas shut-off valves before driv-ing and when not using the cooker for long periods.
A WARNING
Damp or wet oven mitts or potholders can be-come very hot and cause scalding.
• Use only dry oven mitts and potholders .
CD
Never place hot objects, e.g. pots or pans, on the surface of the kitchen unit, on the refriger-ated box, or on table tops. Such objects could damage these surfaces.
Page 235 of 486
Connecting the gas bottle
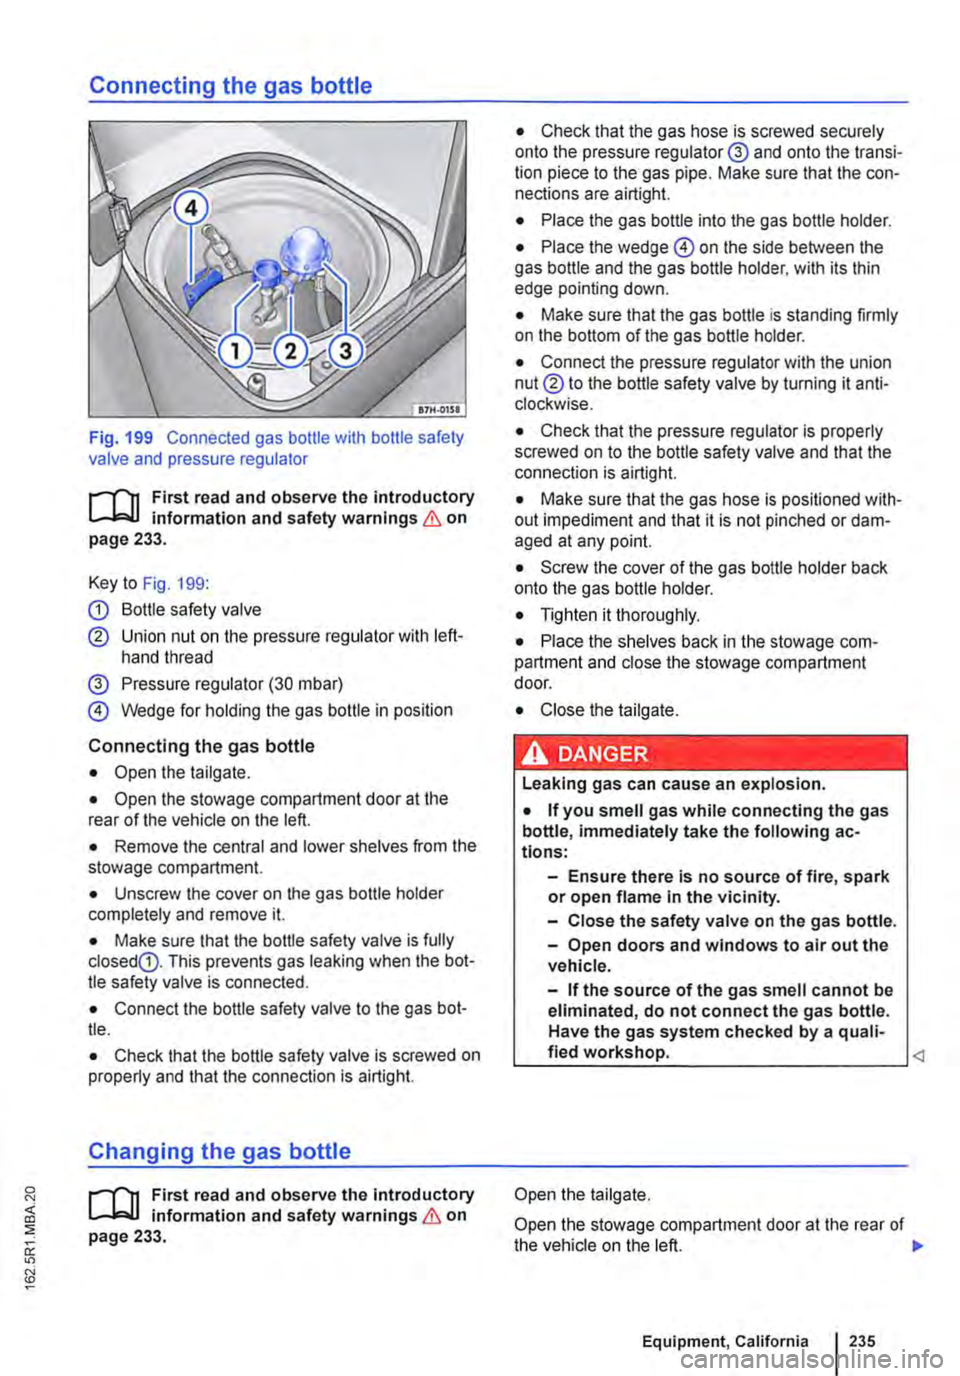
Fig. 199 Connected gas bottle with bottle safety valve and pressure regulator
r-l'n First read and observe the introductory L-J.:.IJ information and safety warnings & on page 233.
Key to Fig. 199:
G) Bottle safety valve
® Union nut on the pressure regulator with left-hand thread
@ Pressure regulator (30 mbar)
@ Wedge for holding the gas bottle in position
Connecting the gas bottle
• Open the tailgate.
• Open the stowage compartment door at the rear of the vehicle on the left.
• Remove the central and lower shelves from the stowage compartment.
• Unscrew the cover on the gas bottle holder completely and remove it.
• Make sure that the bottle safety valve is fully closedG). This prevents gas leaking when the bot-tle safety valve is connected.
• Connect the bottle safety valve to the gas bot-tle.
• Check that the bottle safety valve is screwed on properly and that the connection is airtight.
Changing the gas bottle
r-l'n First read and observe the Introductory L-J.:.IJ information and safety warnings & on page 233.
• Check that the gas hose is screwed securely onto the pressure regulator@ and onto the transi-tion piece to the gas pipe. Make sure that the con-nections are airtight.
• Place the gas bottle into the gas bottle holder.
• Place the wedge @ on the side between the gas bottle and the gas bottle holder. with its thin edge pointing down.
• Make sure that the gas bottle is standing firmly on the bottom of the gas bottle holder.
• Connect the pressure regulator with the union nut® to the bottle safety valve by turning it anti-clockwise.
• Check that the pressure regulator is properly screwed on to the bottle safety valve and that the connection is airtight.
• Make sure that the gas hose is positioned with-out impediment and that it is not pinched or dam-aged at any point.
• Screw the cover of the gas bottle holder back onto the gas bottle holder.
• Tighten it thoroughly.
• Place the shelves back in the stowage com-partment and close the stowage compartment door.
• Close the tailgate.
· &' DANGER .. --' • ,.,_.._.. '·-• I Leaking gas can cause an explosion.
• If you smell gas while connecting the gas bottle, immediately take the following ac-tions:
-Ensure there is no source of fire, spark or open flame in the vicinity.
-Close the safety valve on the gas bottle.
-Open doors and windows to air out the vehicle.
-If the source of the gas smell cannot be eliminated, do not connect the gas bottle. Have the gas system checked by a quali-fied workshop.
Open the stowage compartment door at the rear of the vehicle on the left. 11>
Equipment, California I 235
Page 236 of 486
Remove the central and lower shelves from the stowage compartment.
Unscrew the cover on the gas bottle holder com-pletely and remove it.
Make sure that the bottle safety valve 199 G) is completely closed. This prevents gas from leaking when the union nut® is slack-ened.
Completely unscrew the union nut of the pressure regulator from the bottle safety valve by turning it clockwise.
Lift out the gas bottle together with the wedge.
Connecting a new gas bottle 235
Turning the gas cooker on and off
B7H·0274
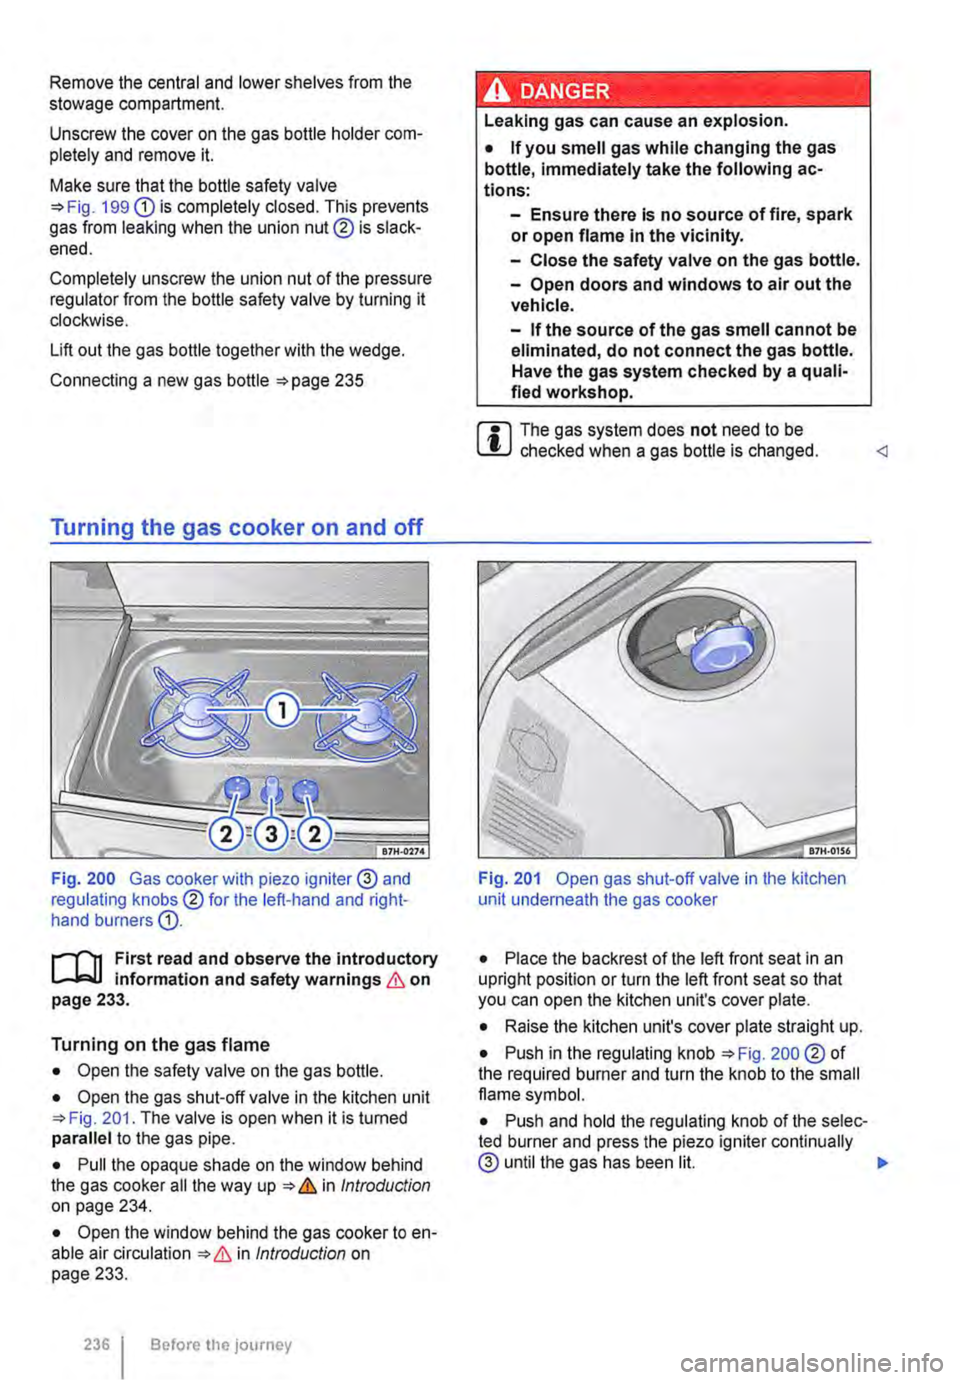
Fig. 200 Gas cooker with piezo igniter 0 and regulating knobs® for the left-hand and right-hand burners G).
i""""('n First read and observe the introductory information and safety warnings & on page 233.
Turning on the gas flame
• Open the safety valve on the gas bottle.
• Open the gas shut-off valve in the kitchen unit 201. The valve is open when it is turned parallel to the gas pipe.
• Pull the opaque shade on the window behind the gas cooker all the way up & in Introduction on page 234.
• Open the window behind the gas cooker to en-able air circulation & in Introduction on page 233.
236 Before the journey
Leaking gas can cause an explosion.
• If you smell gas while changing the gas bottle, immediately take the following ac-tions:
-Ensure there is no source of fire, spark or open flame In the vicinity.
-Close the safety valve on the gas bottle.
-Open doors and windows to air out the vehicle.
-If the source of the gas smell cannot be eliminated, do not connect the gas bottle. Have the gas system checked by a quali-fied workshop.
m The gas system does not need to be L!J checked when a gas bottle is changed.
• Place the backrest of the left front seat in an upright position or turn the left front seat so that you can open the kitchen unit's cover plate.
• Raise the kitchen unit's cover plate straight up.
• Push in the regulating knob 200 ®of the required burner and turn the knob to the small flame symbol.
• Push and hold the regulating knob of the selec-ted burner and press the piezo igniter continually 0 until the gas has been lit. .,.
Page 258 of 486
Ignition lock
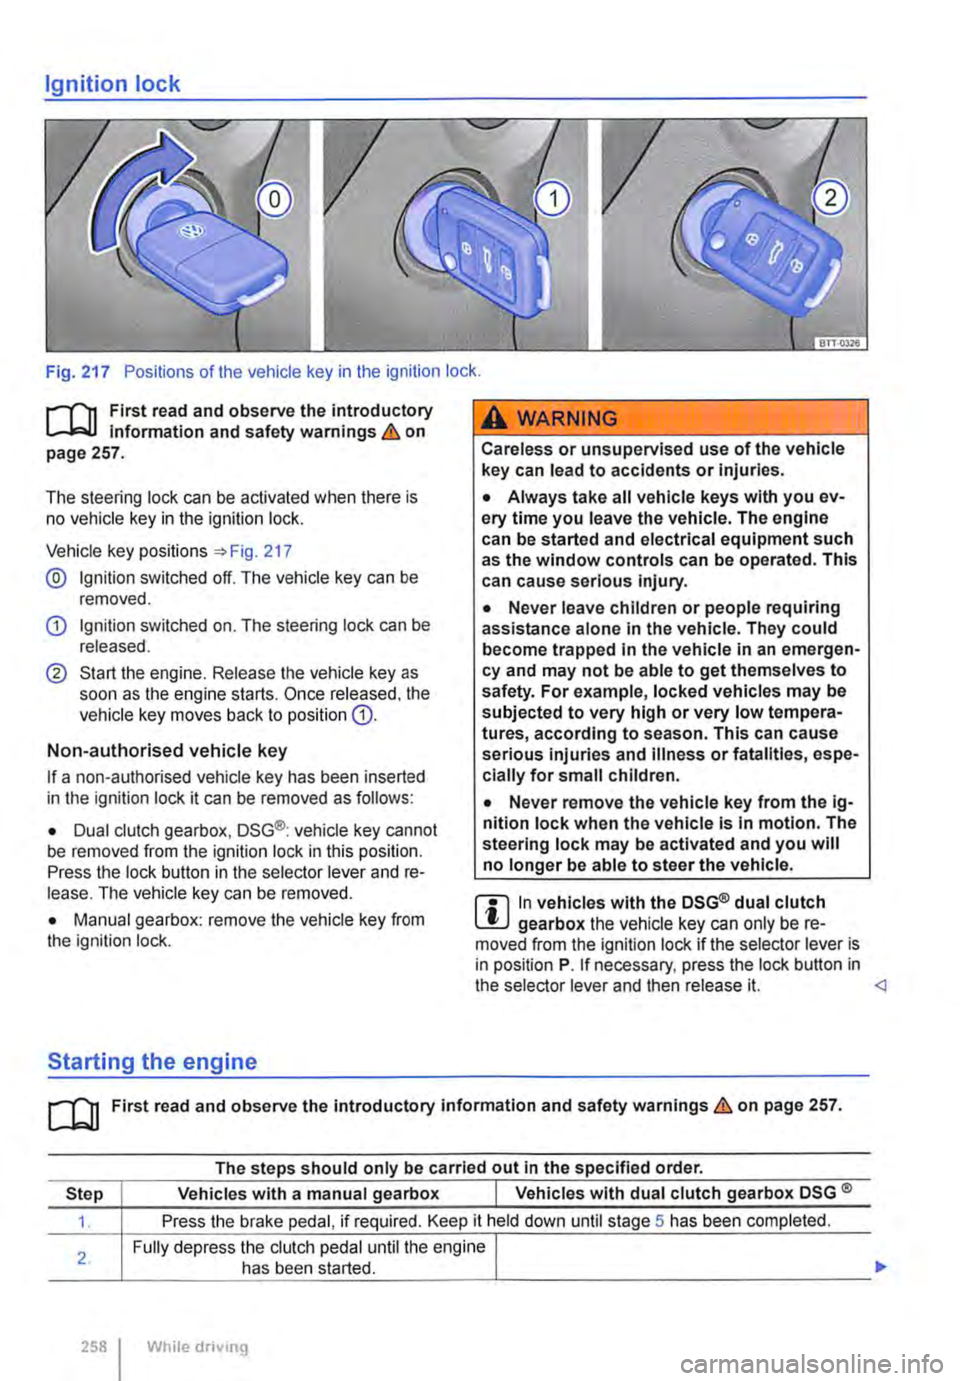
Fig. 217 Positions of the vehicle key in the ignition lock .
.--m First read and observe the introductory Information and safety warnings & on page 257.
The steering lock can be activated when there is no vehicle key in the ignition lock.
Vehicle key positions :) Fig. 217
@ Ignition switched off. The vehicle key can be removed.
G) Ignition switched on. The steering lock can be released.
® Start the engine. Release the vehicle key as soon as the engine starts. Once released. the vehicle key moves back to position G).
Non-authorised vehicle key
If a non-authorised vehicle key has been inserted in the ignition lock it can be removed as follows:
• Dual clutch gearbox, DSG®: vehicle key cannot be removed from the ignition lock in this position. Press the lock button in the selector lever and re-lease. The vehicle key can be removed.
• Manual gearbox: remove the vehicle key from the ignition lock.
Starting the engine
A WARNING
Careless or unsupervised use of the vehicle key can lead to accidents or Injuries.
• Always take all vehicle keys with you ev-ery time you leave the vehicle. The engine can be started and electrical equipment such as the window controls can be operated. This can cause serious Injury.
• Never leave children or people requiring assistance alone In the vehicle. They could become trapped In the vehicle in an emergen-cy and may not be able to get themselves to safety. For example, locked vehicles may be subjected to very high or very low tempera-tures, according to season. This can cause serious Injuries and Illness or fatalities, espe-cially for small children.
• Never remove the vehicle key from the ig-nition lock when the vehicle Is In motion. The steering lock may be activated and you will no longer be able to steer the vehicle.
m In vehicles with the DSG® dual clutch W gearbox the vehicle key can only be re-moved from the Ignition lock if the selector lever is in position P. If necessary, press the lock button in the selector lever and then release it.
The steps should only be carried out In the specified order.
Step Vehicles with a manual gearbox I Vehicles with dual clutch gearbox DSG ®
1. Press the brake pedal, if required. Keep it held down until stage 5 has been completed.
Fully depress the clutch pedal until the engine I
___
258 I While drivong
Page 269 of 486
Braking, stopping and parking
COl Introduction
This chapter contains information on the following subjects:
Warning and indicator lamps Handbrake ............................ .
Parking . . . . . . . ............. .
Information on the brakes ................ . Brake support systems .................. .
Switching the TCS on and off ............. .
Brake fluid ............................ .
270 271
272 272
274
276
277
The brake support systems are the anti-lock brake system (ASS), the Brake Assist system (SAS), the electronic differential lock (EDS), the traction control system (TCS) and the Electronic Stability Control (ESC).
Additional information and warnings:
• Towing a trailer 139
• Pull-away assist systems 282
• Wheels and tyres 367
• Accessories, modifications, repairs and renewal of parts 394
A WARNING
Driving with worn brake pads or with a faulty brake system can cause accidents and seri-ous Injuries.
• If the warning lamp 0 lights up either on its own or with a text message In the display of the Instrument cluster, go to a qualified workshop Immediately, have the brake pads checked and any worn brake pads replaced.
A WARNING
Incorrect parking can cause serious Injuries.
• Never remove the vehicle key from the lg-nltlon lock when the vehicle Is In motion. The steering lock may be activated and you will no longer be able to steer or control the vehl-cl e.
A WARNING (Continued)
• Never park the vehicle where parts of the exhaust system can come into contact with inflammable material underneath the vehicle, e.g. undergrowth, leaves, dry grass, spilt fuel.
• Always apply the handbrake when the ve-hicle Is parked.
• Never leave children or people requiring assistance alone In the vehicle. They could release the handbrake, move the selector lev-er or gearshift lever and thus set the vehicle In motion. This can lead to accidents and se-rious injuries.
• Always take all vehicle keys with you ev-ery time you leave the vehicle. The engine can be started and electrical equipment such as the window controls can be used which could cause serious injury.
• Never leave children or people requiring assistance alone in the vehicle. They could become trapped in the vehicle in an emergen-cy and may not be able to get themselves to safety. For example, locked vehicles may be subjected to very high or very low tempera-tures, according to season. This can cause serious Injuries and illness or fatalities, espe-cially for small children.
CD
• To avoid unintentional movement when parking the vehicle, first apply the handbrake and then remove your foot from the brake ped-al.
• Always take care when driving in car parks with protruding kerbstones or bollards. Objects that protrude from the ground can damage the bumper and other components when parking the vehicle. In order to avoid any damage, stop the vehicle before the wheels can touch the bollards or kerbs.
• Drive carefully through dips in the road, over driveways, ramps, kerbstones and other objects. Low-lying vehicle components such as the bumper, spoiler and parts of the running gear, engine or exhaust system could be dam-aged.
Starting the engine, changing gear and parking I 269
Page 279 of 486
Changing gear earlier
In principle, the highest gear is always the most economical gear. A rule of thumb for most vehicles: at a speed of 30 kmlh (19 m ph} drive in third gear, at 40 km/h (25 mph) in 4th gear and at 50 km/h (31 mph) In 5th gear.
If the traffic and driving situation allows it, skipping gears when changing up a gear will also save fuel.
Do not drive gears to their upper limit. Use first gear only for pulling away then quickly change up to second gear. Avoid using the kickdown func-tion in vehicles with a DSG® dual clutch gearbox.
Vehicles with a gear display help to improve fuel economy by indicating the optimum time to change gear.
Rolling to a stop
Taking your foot off the accelerator will interrupt the supply of fuel to the engine and decrease fuel con-sumption.
Therefore, in situations such as approaching a red traffic light, let the vehicle roll without applying the accelerator.
Only press on the dutch pedal to disengage if the vehicle becomes too slow or if the stopping dis-tance is longer. The engine will then run at idling speed 263.
Switch off the engine in situations when the vehicle might be stationary for a long time, e.g. at a level crossing. In vehicles with an active start/stop sys-tem, the engine will switch off automatically when the vehicle Is stationary.
Thinking ahead when driving, and driving with the flow of traffic
Applying the brake and accelerator too often will significantly increase fuel consumption. If you think ahead when driving and maintain a sufficient dis-tance from the vehicle in front, simply keeping your foot off the accelerator should stop the speed from fluctuating. This means that active braking and ac-celerating is not always necessary.
Driving smoothly and evenly
Smoothness is even more important than speed. The more evenly you drive, the lower your fuel consumption will be.
When driving on a motorway, it is much more ef-fective to drive at a constant moderate speed than to drive with constant acceleration and braking. As a rule, driving with a constant style will get you to your destination just as quickly.
The cruise control system will help you to maintain a constant driving style.
Using additional equipment in moderation
lt is always important to be comfortable in your ve-hicle, but it is also important to consider the envi-ronment.
Some equipment will increase fuel consumption when switched on:
• The cooling function of the air conditioning sys-tem: if the air conditioning system is set to a very high or low temperature it will require a lot of ener-gy, which is generated by the engine. Therefore the temperature setting in the vehicle should not vary too much from the outside temperature. lt may be a good idea to air the vehicle before setting off and then to travel a short distance with the win-dows open. The air conditioning system should then be switched on once the windows have been closed. Keep the windows closed when driving at high speeds. Having the windows open increases fuel consumption.
• Switch the seat heating off as soon as it has served its purpose.
• Switch the windscreen and rear window heating off as soon as the windows have defogged and are clear of ice.
• Do not leave the supplementary heating system on when the vehicle is moving 332.
Other factors that Increase fuel consumption (examples):
• Fault in engine management.
• Driving in hilly regions.
• Driving with a trailer.
Page 314 of 486
Operation
Fig. 248 Display in the exterior mirror
r-f"n First read and observe the introductory L-W! information and safety warnings & on page 312.
Visual display in the exterior Situation mirror housing
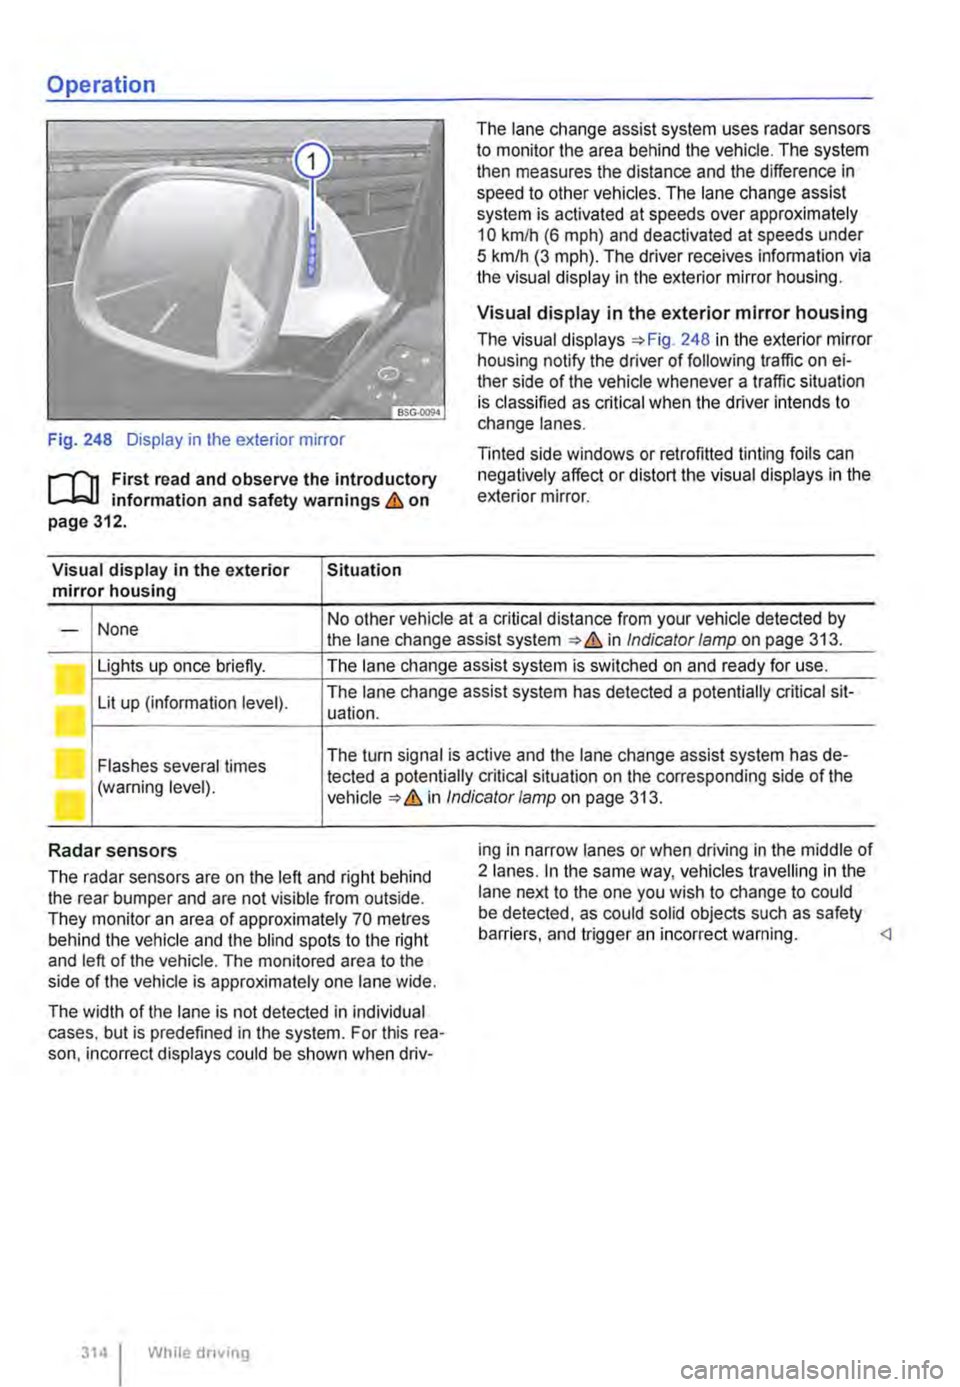
The lane change assist system uses radar sensors to monitor the area behind the vehicle. The system then measures the distance and the difference in speed to other vehicles. The lane change assist system is activated at speeds over approximately 10 km/h (6 m ph) and deactivated at speeds under 5 km/h (3 mph). The driver receives infonmation via the visual display in the exterior mirror housing.
Visual display in the exterior mirror housing
The visual displays 248 in the exterior mirror housing notify the driver of following traffic on ei-ther side of the vehicle whenever a traffic situation is classified as critical when the driver intends to change lanes.
Tinted side windows or retrofitted tinting foils can negatively affect or distort the visual displays in the exterior mirror.
None No other vehicle at a critical distance from your vehicle detected by -the lane change assist system & in Indicator lamp on page 313.
Lights up once briefly. The lane change assist system is switched on and ready for use.
Lit up (information level). The lane change assist system has detected a potentially critical sit-uation.
Flashes several times The turn signal is active and the lane change assist system has de-
(warning level). tected a potentially critical situation on the corresponding side of the in Indicator/amp on page 313.
Radar sensors
The radar sensors are on the left and right behind the rear bumper and are not visible from outside. They monitor an area of approximately 70 metres behind the vehicle and the blind spots to the right and left of the vehicle. The monitored area to the side of the vehicle is approximately one lane wide.
The width of the lane is not detected in individual cases. but is predefined in the system. For this rea-son. incorrect displays could be shown when driv-
314 I While driving
ing in narrow lanes or when driving in the middle of 2 lanes. In the same way, vehicles travelling in the lane next to the one you wish to change to could be detected, as could solid objects such as safety barriers. and trigger an incorrect warning.
Page 322 of 486

Air conditioning system
Heating, ventilating, cooling
o:n Introduction
This chapter contains information on the following subjects:
Controls for Climatic . . . . . . . . . . . . . . . . . . . . 323
Controls for Climatronic . . . . . . . . . . . . . . . . . 325
Controls for the heating and fresh air system . 327
Information on the air conditioning system . . . 328
..................... m
Air recirculation mode . . . . . . . • . . . . . . . . . . . . 330
Windscreen heating . . . . . . . . . . . . . . . . . . . . . 331
Roof ventilator . . . . . . . . . . . . . . . . . . . . . . . . . . 331
Displays for the Climatronic information
Depending on the vehicle equipment level, infor-mation on the Climatronic is displayed briefly on the screen of the factory-fitted radio or navigation system.
The dust and pollen filter
The dust and pollen filter with activated charcoal reduces the level of impurities in the outside air en-tering the vehicle.
The dust and pollen filler must be changed regular-ly to avoid impairing the performance of the air conditioning system.
The dust and pollen filter must be changed more frequently than stated in the service schedule if the efficiency of the filter declines prematurely due to the vehicle being used in areas with high levels of air pollution.
Additional information and warnings:
• Exterior views 5
• Wipers/washer 116
• Supplementary heaters (auxiliary air heater or auxiliary coolant heater) 332
• Cleaning and caring for the vehicle exterior 380
A WARNING
Poor visibility through all windows increases the risk of collisions and accidents, which can cause serious injuries.
• Always ensure that all windows are free of ice, snow and mist to ensure good visibility.
3221 While driving
A WARNING (Continued)
• Maximum heat output, which Is needed to defrost the windows as quickly as possible, is only available when the engine has reached Its operating temperature. Do not start your journey until you have good visibil-Ity.
• Always ensure that the heating and fresh air system or the air conditioning system and the rear window heating are used correctly so that you have good visibility.
• Never use the air reclrculatlon mode for an extended period. If the cooling system Is switched off, the windows can mist up very quickly In air reclrculatlon mode and reduce visibility considerably.
• Always switch off the air reclrculatlon mode when it Is not required.
A WARNING
Stale air can quickly make the driver tired and affect their concentration, which In turn can cause collisions, accidents and serious Inju-ries.
• Never switch off the blowers or switch on the air recirculatlon mode for an extended pe· riod as this prevents fresh air from entering the vehicle interior.
• Repairs to the air conditioning system re-quire specialist knowledge and special tools. Volkswagen Commercial Vehicles recommends using a Volkswagen Commercial Vehicles deal-ership for this purpose.