Page 393 of 592
393
3-7. Other interior features
3
Interior features
Rear side sunshades (if equipped)
NOTICE
■To ensure normal operation of the sunshade
Observe the following precautions.
●Do not place anything where it may hinder the opening/closing of the sun-
shade.
● Do not place anything on the sunshade.
Rear door window
Pull the tab up.
Secure the sunshade using
the hooks.
To retract the sunshade, pull
the tab up slightly to unhook
the sunshade, and lower the
sunshade slowly.
Rear quarter windowPull the tab up.
Secure the sunshade using
the hooks.
To retract the sunshade, pull
the tab up slightly to unhook
the sunshade, and lower the
sunshade slowly.
Page 405 of 592
405
3-7. Other interior features
3
Interior features
Garage door opener (if equipped)
The garage door opener (HomeLink Universal Transceiver) is manufac-
tured under license from HomeLink.
Programming the HomeLink (for U.S.A. owners)
The HomeLink
compatible transceiver in your vehicle has 3 buttons
which can be programmed to operate 3 different devices. Refer to the
programming method below appropriate for the device.
Indicator
Buttons
■ Programming the HomeLink
Point the remote control for the
device 1 to 3 in. (25 to 75 mm)
from the HomeLink
control but-
tons.
Keep the indicator light on the
HomeLink in view while pro-
gramming.
The garage door opener can be programmed to operate garage
doors, gates, entry do ors, door locks, home lighting systems, secu-
rity systems, and other devices.
STEP1
Page 406 of 592
406 3-7. Other interior features
Press and hold down one of the
buttons on the HomeLink and
the button on the transmitter.
When the indicator light on the
HomeLink
changes from a slow
to a rapid flash after 20 seconds,
you can release both buttons.
Test the operation of the
HomeLink
by pressing the
newly programmed button.
If programming a garage door
opener, check to see if the garage
door opens and closes. If the
garage door does not operate,
see if your garage transmitter is
of the Rolling Code type. Press
and hold the programmed
HomeLink
button. The garage
door has the rolling code feature
if the indicator light (on the
HomeLink
) flashes rapidly for 2
seconds and then remains lit. If
your transmitter is the Rolling
Code type, proceed to the head-
ing “Programming a rolling code
system”.
Repeat the steps above to program another device for each of
the remaining HomeLink buttons.
STEP2
STEP3
STEP4
Page 407 of 592

407
3-7. Other interior features
3
Interior features
■
Programming a Rolling Code sys tem (for U.S.A. owners)
If your device is Rolling Code equipped, follow the steps under the
heading “Programming the HomeLink
” before proceeding with
the steps listed below.
Locate the training button on the ceiling mounted garage door
opener motor. The exact location and color of the button may
vary by brand of garage door opener.
Refer to the operation manual supplied with the garage door opener
for the location of the training button.
Press the training button.
Press and release the vehicle’s programmed HomeLink
but-
ton twice. The garage door may open.
If the garage door opens, the programming process is complete. If
the door does not open, press and release the button a third time.
This third press and release will complete the programming process
by opening the garage door.
The ceiling mounted garage door opener motor should now recog-
nize the HomeLink
transceiver and operate the garage door.
Repeat the steps above to prog ram another rolling code sys-
tem for any of the remaining HomeLink buttons.
■ Programming an entry gate (f or U.S.A. owners)/Programming
all devices in the Canadian market
Place your transmitter 1 to 3 in. (25 to 75 mm) away from the
surface of the HomeLink
.
Keep the indicator light on the HomeLink in view while program-
ming.
Press and hold the selected HomeLink button.
Repeatedly press and releas e (cycle) the device’s remote
control button for two seconds each until step 4 is complete.
When the indicator light on the HomeLink
compatible trans-
ceiver starts to flashing ra pidly, release the buttons.
STEP1
STEP2
STEP3
STEP4
STEP1
STEP2
STEP3
STEP4
Page 408 of 592

408 3-7. Other interior features
Test the operation of the HomeLink by pressing the newly
programmed button. Check to se e if the gate/device operates
correctly.
Repeat the steps above to program another device for each of
the remaining HomeLink
buttons.
■ Programming other devices
To program other devices such as home security systems, home
door locks or lighting, contact your authorized Toyota dealer for
assistance.
■ Reprogramming a button
The individual HomeLink
buttons cannot be erased but can be
reprogrammed. To reprogram a button, follow the programming
instructions.
Operating the HomeLink
Press the appropriate HomeLink button. The HomeLink indicator
light on the HomeLink transceiver should turn on.
The HomeLink continues to send a signal for up to 20 seconds as long
as the button is pressed.
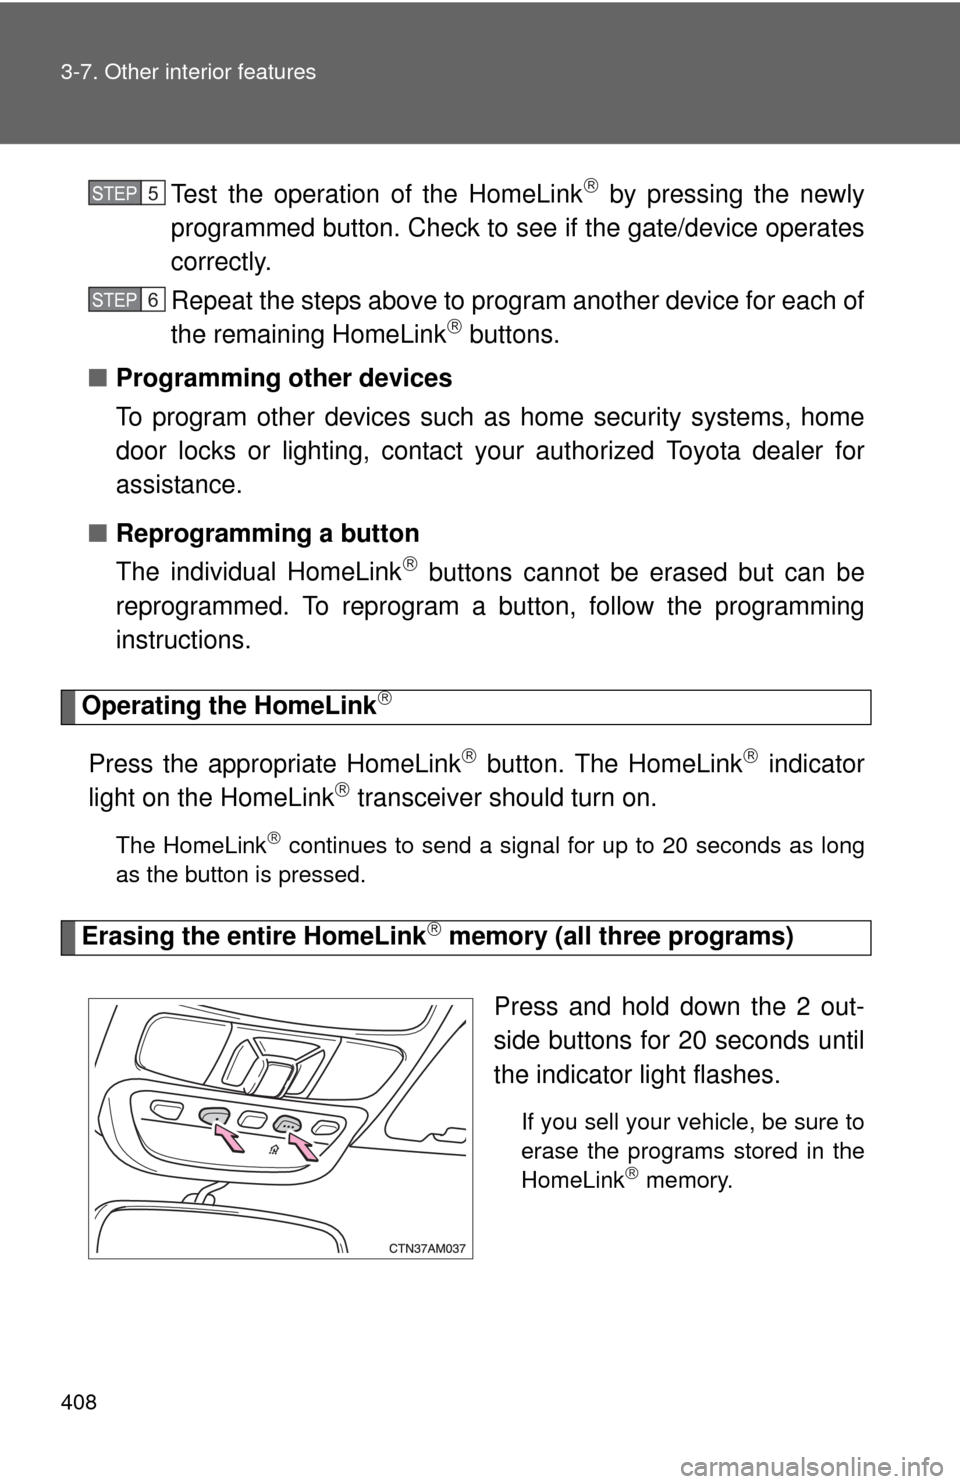
Erasing the entire HomeLink memory (all three programs)
Press and hold down the 2 out-
side buttons for 20 seconds until
the indicator light flashes.
If you sell your vehicle, be sure to
erase the programs stored in the
HomeLink
memory.
STEP5
STEP6
Page 417 of 592
Maintenance and care4
417
4-1. Maintenance and careCleaning and protecting the vehicle exterior......... 418
Cleaning and protecting the vehicle interior.......... 421
4-2. Maintenance Maintenance requirements .................. 424
General maintenance....... 426
Emission inspection and maintenance (I/M)
programs........................ 429 4-3. Do-it-yourself maintenance
Do-it-yourself service precautions .................... 430
Hood ................................ 434
Positioning a floor jack ..... 436
Engine compartment ........ 438
Tires ................................. 454
Tire inflation pressure ...... 463
Wheels ............................. 467
Air conditioning filter......... 469
Wireless remote control battery ............................ 472
Checking and replacing fuses .............................. 474
Light bulbs........................ 486
Page 420 of 592
420 4-1. Maintenance and care
NOTICE
■To protect your vehicle’s painted surfaces
Do not use organic cleaners such as benzene or gasoline.
■ If the windshield washer nozzl e or rear window washer nozzle
becomes blocked
Contact your Toyota dealer. Do not try to clear it with a pin or other object.
This may damage the nozzle.
■ Cleaning the exterior lights
●Wash carefully. Do not use organic substances or scrub with a hard brush.
This may damage the surfaces of the lights.
● Do not apply wax on the surfaces of the lights.
Wax may cause damage to the lenses.
Page 423 of 592

423
4-1. Maintenance and care
4
Maintenance and care
NOTICE
■
Cleaning detergents
Do not use organic substances such as benzene or gasoline, acidic or alka-
line solutions, dye, bleach or other detergent. Doing so may discolor the
vehicle interior or cause streaks or damage to painted surfaces.
■ Preventing damage to leather surfaces
Observe the following precautions to avoid damage to and deterioration o\
f
leather surfaces.
●Remove any dust or dirt on leather surfaces immediately.
● Do not expose the vehicle to direct sunlight for extended periods of time.
Park the vehicle in the shade, especially during summer.
● Do not place items made of vinyl, plastic, or that contain wax on the uphol-
stery, as they may stick to the leather surface if the vehicle interior heats
up significantly.
■ Water on the floor
Do not wash the vehicle floor with water.
Vehicle systems such as the audio system may be damaged if water comes
into contact with electrical components under the floor of the vehicle, and
may also cause the body to rust.
■ Cleaning the inside of the rear wi ndow and the rear quarter windows
● Do not use glass cleaner to clean the rear window and the rear quarter
windows, as this may cause damage to the rear window defogger heater
wires or print type antenna (if equipped). Use a cloth dampened with luke-
warm water to gently wipe the windows clean. Wipe the windows in
strokes running parallel to the heater wires or print type antenna (if
equipped).
● Be careful not to scratch or damage the heater wires or print type antenna
(if equipped).