Page 220 of 315

ADVANCED PARKING GUIDANCE SYSTEM
223
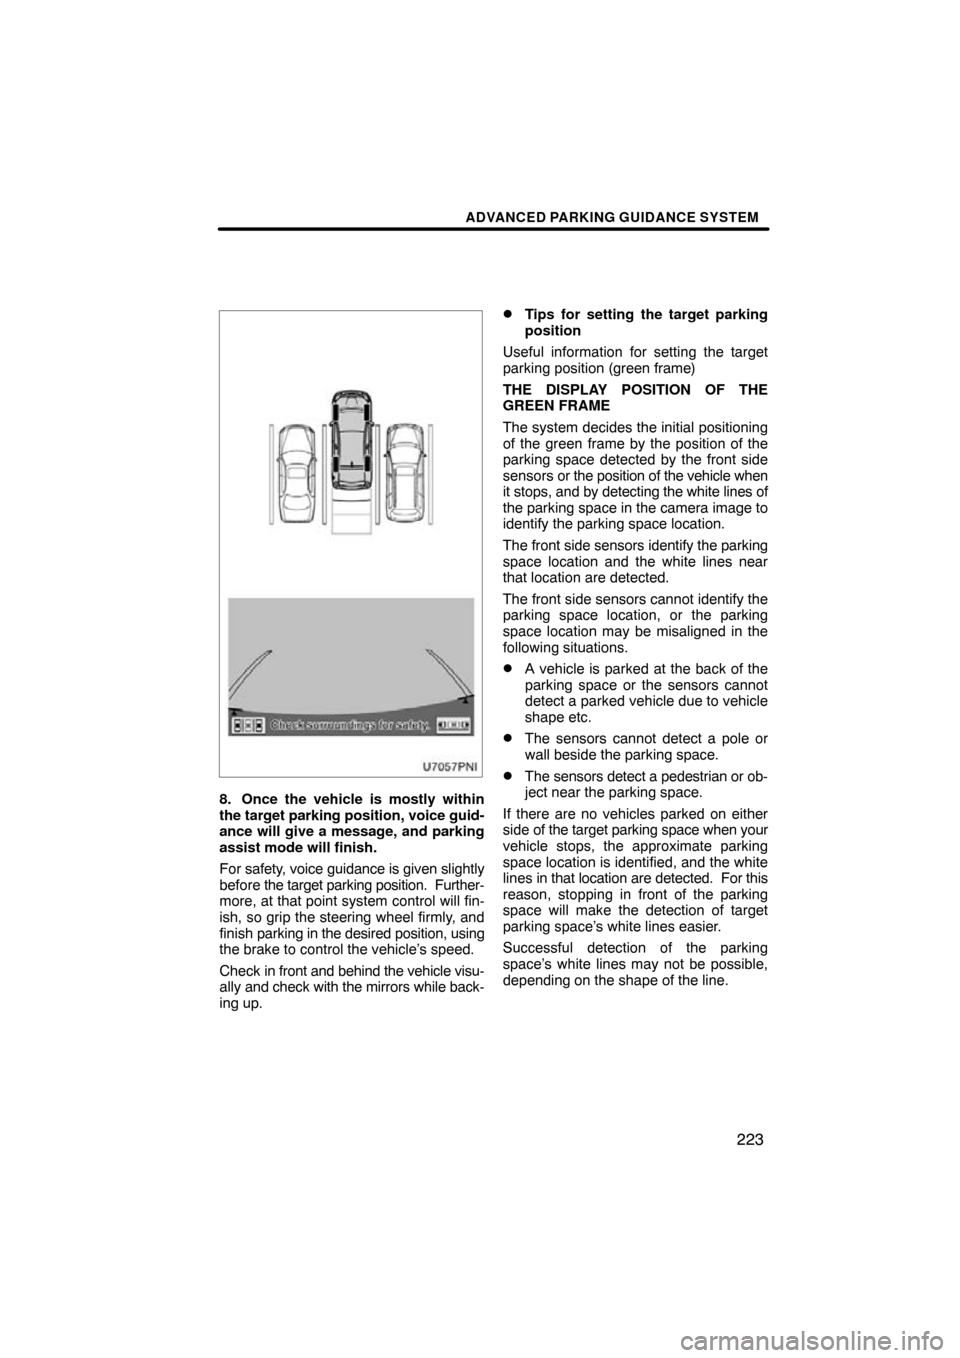
8. Once the vehicle is mostly within
the target parking position, voice guid-
ance will give a message, and parking
assist mode will finish.
For safety, voice guidance is given slightly
before the target parking position. Further-
more, at that point system control will fin-
ish, so grip the steering wheel firmly, and
finish parking in the desired position, using
the brake to control the vehicle’s speed.
Check in front and behind the vehicle visu-
ally and check with the mirrors while back-
ing up.
�Tips for setting the target parking
position
Useful information for setting the target
parking position (green frame)
THE DISPLAY POSITION OF THE
GREEN FRAME
The system decides the initial positioning
of the green frame by the position of the
parking space detected by the front side
sensors or the position of the vehicle when
it stops, and by detecting the white lines of
the parking space in the camera image to
identify the parking space location.
The front side sensors identify the parking
space location and the white lines near
that location are detected.
The front side sensors cannot identify the
parking space location, or the parking
space location may be misaligned in the
following situations.
�A vehicle is parked at the back of the
parking space or the sensors cannot
detect a parked vehicle due to vehicle
shape etc.
�The sensors cannot detect a pole or
wall beside the parking space.
�The sensors detect a pedestrian or ob-
ject near the parking space.
If there are no vehicles parked on either
side of the target parking space when your
vehicle stops, the approximate parking
space location is identified, and the white
lines in that location are detected. For this
reason, stopping in front of the parking
space will make the detection of target
parking space’s white lines easier.
Successful detection of the parking
space’s white lines may not be possible,
depending on the shape of the line.
Page 221 of 315

ADVANCED PARKING GUIDANCE SYSTEM
224
In the following circumstances, detec-
tion of the parking space lines on the
road surface may not be possible:
�The lines are faded or dirty, making
them unclear.
�The road surface is of a light color
which does not contrast well with the
white lines.
�The parking space lines are a color oth-
er than white (yellow etc.).
�The area is dark, for example at night
or in a covered parking lot.
�During or after rain, when the road sur-
face is wet and reflects light, or puddles
have formed.
�The sun is shining directly on the cam-
era, for example early morning or late
afternoon.
�The parking space is covered with
snow or de −icing agent.
�There are markings or maintenance
marks on the road surface.
�The color or brightness of the road sur-
face is not uniform.
�Hot or cold water has splashed on the
camera, and the lens is fogged.
�There are dirt or water droplets on the
lens.
If the point at which you stop is correctly
identified, the green frame will display the
parking space accurately. If the white lines
of the parking space have not been cor-
rectly identified, the green frame will not
match the parking space even if you stop
in the correct location. In this case, adjust
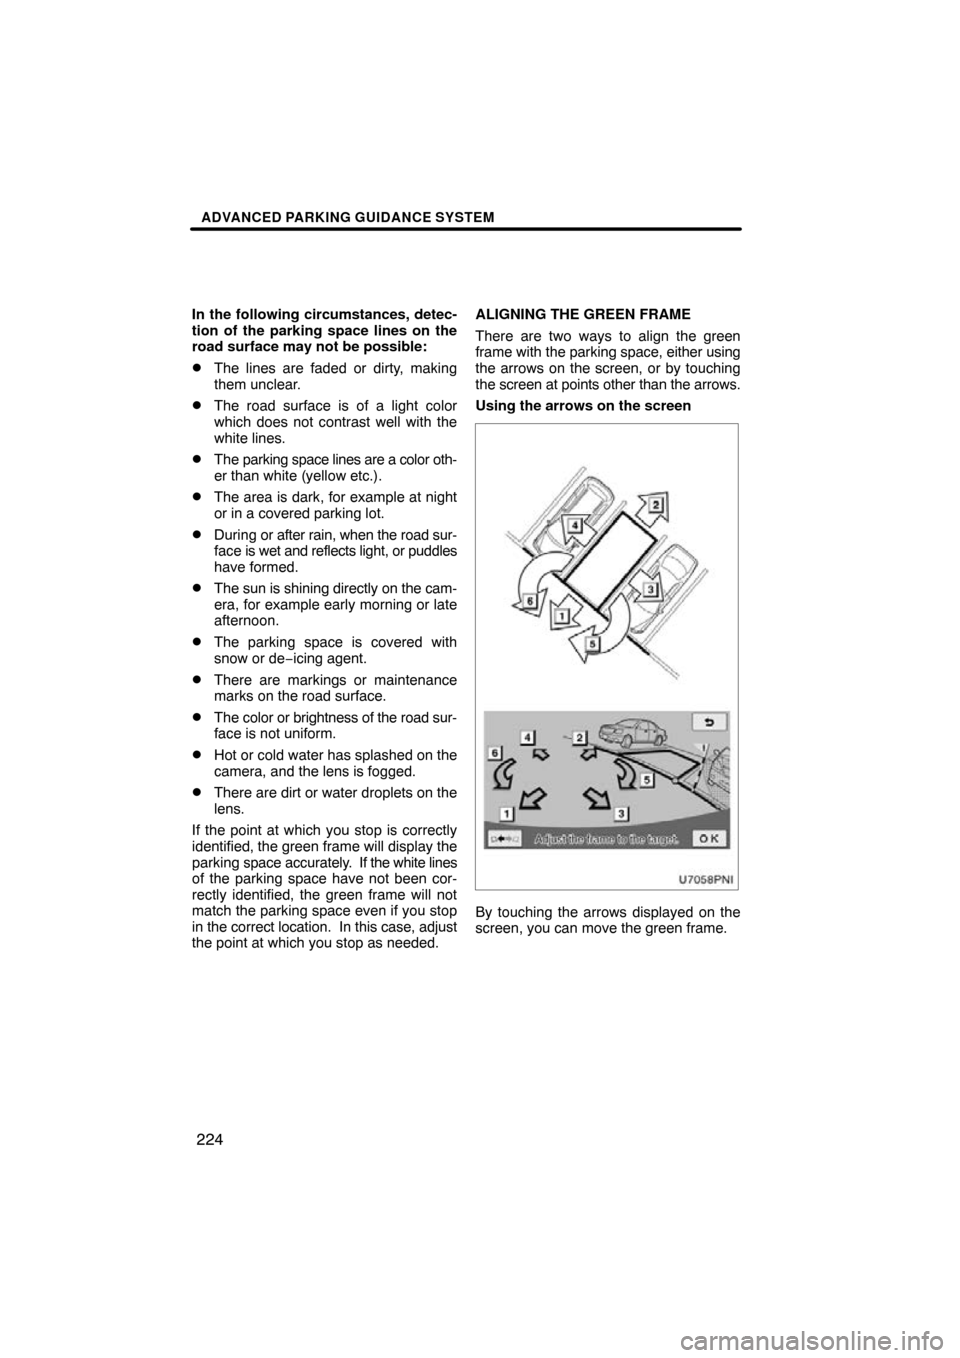
the point at which you stop as needed. ALIGNING THE GREEN FRAME
There are two ways to align the green
frame with
the parking space, either using
the arrows on the screen, or by touching
the screen at points other than the arrows.
Using the arrows on the screen
By touching the arrows displayed on the
screen, you can move the green frame.
Page 224 of 315

ADVANCED PARKING GUIDANCE SYSTEM
227
MessageCauseWhat to do
Steering position is not
straight. Turn the steering
wheel to LEFT (or RIGHT).The steering wheel is not
straight.Straighten the steering
wheel.
Steer to left (or right) until
the frame becomes green.It is possible to begin to
park if you turn the steering
wheel in the direction indi-
cated.Turn the steering wheel in
the direction indicated until
the frame turns green (the
message “Too much force
applied to the steering
wheel” is displayed). Turn
the wheel slightly more
than necessary to over-
come tire resistance. Once
you have turned the steer-
ing wheel, you can no lon-
ger change the target park-
ing position. Be sure to
align the frame before turn-
ing the steering wheel.
! Parking position has not
been set.You have begun to back up
without touching “OK”.Stop the vehicle and touch
“OK”.
! Speed is too fast.The speed at which you are
backing up is too fast.Back up at a speed that
does not cause the warning
chime to sound, using the
brake pedal. The system
will be disabled if you back
up too quickly.
! Guidance canceled by
user operation.You have turned the steer-
ing wheel or depressed the
accelerator pedal during
the assist mode.The system has been dis-
abled, so restart from the
beginning.
! Accelerator pedal has
been depressed.You have depressed the
accelerator pedal when
setting the target parking
position.Do not depress the acceler-
ator pedal.
! Guidance unavailable.Some sort of malfunction
has occurred within the
system.Have the vehicle checked
by your Toyota dealer.
! System not ready.−Take your vehicle to your
Toyota dealer.
! Clean Park Sonar.In extreme cold weather or
foreign matter gets on the
sensors.Have the vehicle checked
by your Toyota dealer.
Page 226 of 315

ADVANCED PARKING GUIDANCE SYSTEM
229
�
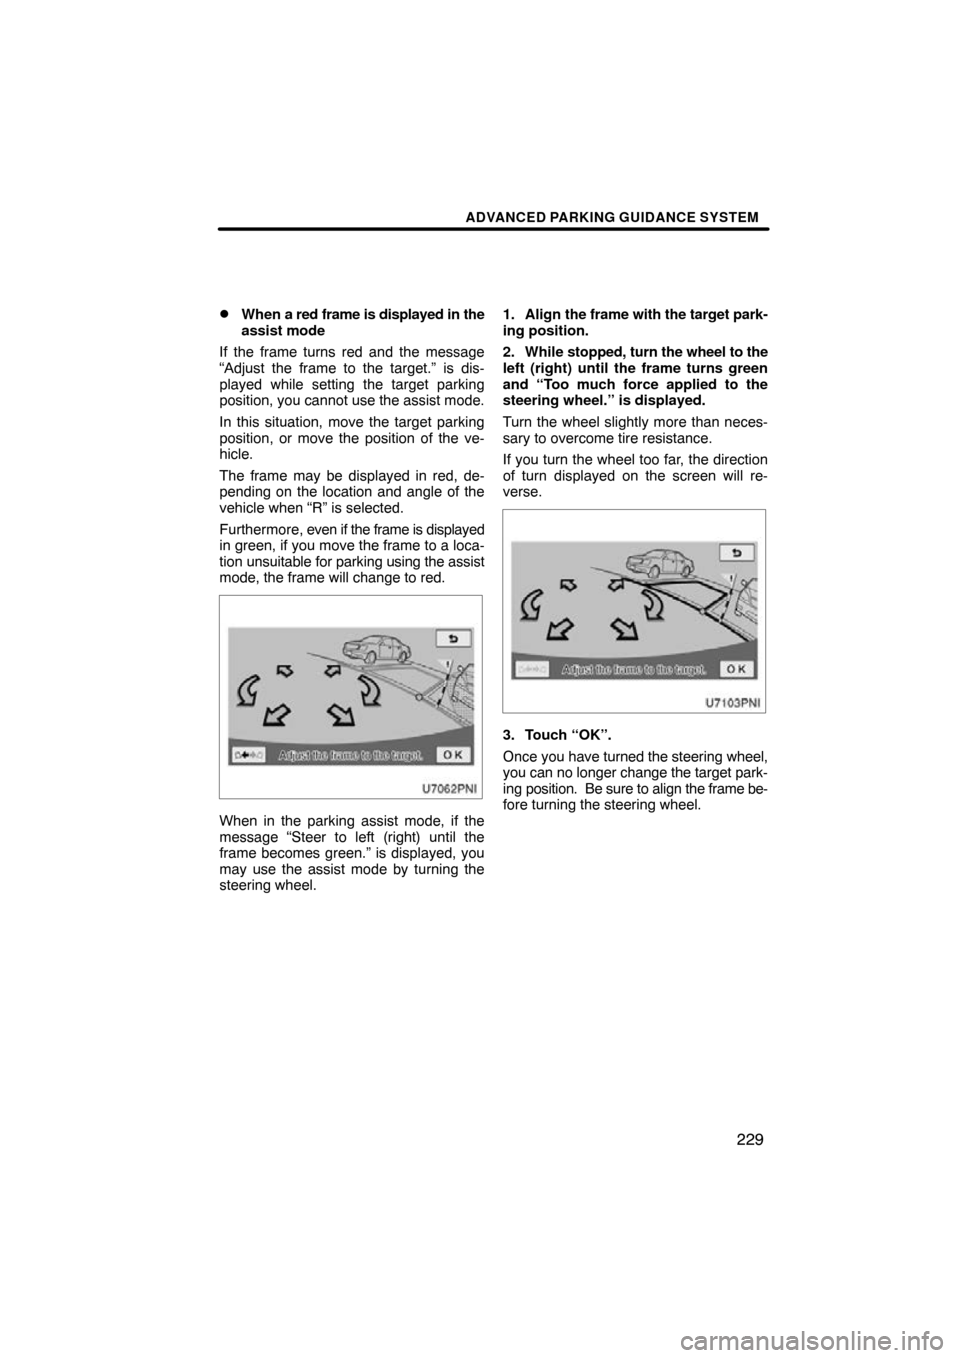
When a red frame is displayed in the
assist mode
If the frame turns red and the message
“Adjust the frame to the target.” is dis-
played while setting the target parking
position, you cannot use the assist mode.
In this situation, move the target parking
position, or move the position of the ve-
hicle.
The frame may be displayed in red, de-
pending on the location and angle of the
vehicle when “R” is selected.
Furthermore, even if the frame is displayed
in green, if you move the frame to a loca-
tion unsuitable for parking using the assist
mode, the frame will change to red.
When in the parking assist mode, if the
message “Steer to left (right) until the
frame becomes green.” is displayed, you
may use the assist mode by turning the
steering wheel. 1. Align
the frame with the target park-
ing position.
2. While stopped, turn the wheel to the
left (right) until the frame turns green
and “Too much force applied to the
steering wheel.” is displayed.
Turn the wheel slightly more than neces-
sary to overcome tire resistance.
If you turn the wheel too far, the direction
of turn displayed on the screen will re-
verse.
3. Touch “OK”.
Once you have turned the steering wheel,
you can no longer change the target park-
ing position. Be sure to align the frame be-
fore turning the steering wheel.
Page 230 of 315
ADVANCED PARKING GUIDANCE SYSTEM
233
�1Too far forward
If the vehicle is too far forward, the mes-
sage “Start after moving slightly back-
ward.” is displayed.�1Too far back
If the vehicle is too far back, the message
“Start after moving slightly forward.” is dis-
played.
Page 232 of 315

SECTION 8
SETUP
235
SETUP
�General settings 236
(Used for language selection and the on/off settings of
operation sounds and automatic screen change.)
� Clock settings 241
(Used for changing time zones and the on/off settings of
daylight saving time.)
� Voice settings 242
(Voice guidance can be set.)
� Navigation settings 244
(“Home” and “Preset Destinations” can be set and edited.)
� Detailed navigation settings 245
(Average cruising speed, displayed screen contents,
and POI icon categories can be set.)
� Telephone settings 254
(Bluetooth � phones can be registered.)
� Audio settings 292
(Settings are available for portable audio devices and
Bluetooth � audio devices players.)
� Vehicle settings 300
(Vehicle information can be set.) . . . . . . . . . . . . . . . . . . . . . . . . . . . . . . . . . . . .\
. . . . . . . . . . . . . . . . . . . . . . . . . . . . .
. . . . . . . . . . . . . . . . . . . . . . . . . . . . . . . . . . . .\
. . . . .
. . . . . . . . . . . . . . . . . . . . . . . . . . . . . . . . . . . .\
. . . . . . . . . . . . . . . . . . . . . . . . . . . . . . . . . . . . . . . . .\
. . .
. . . . . . . . . . . . . . . . . . . . . . . . . . . . . . . . . . . .\
.
. . . . . . . . . . . . . . . . . . . . . . . . . . . . . . . . . . . .\
. . . . .
. . . . . . . . . . . . . . . . . . . . . . . . . . . . . . . . . . . .\
. . .
Page 238 of 315
SETUP
241
Used for changing time zones and the on/
off settings of daylight saving time.
1. Push the “SETUP” button.
2. Touch “Clock”.
3. Touch the items to be set.
4. Touch “Save”. SCREEN FOR CLOCK SETTINGS
On this screen, the following functions can
be performed.
No.
Function
1Time zone can be changed. (See
“� Time zone” on page 242.)
2“On” or “Off” can be selected for
daylight savings time.
Clock settings
Page 240 of 315
SETUP
243
SCREEN FOR VOICE SETTINGS
On this screen, the following functions can
be performed.No.
Function
1The voice guidance volume can
be adjusted or switched off. (See
“
� Voice volume” on page 243.)
2Voice guidance during route guid-
ance can be set to “On” or “Off” .
3Voice guidance during audio sys-
tem use can be set to “On” or
“Off” .
4Voice recognition talkback can be
set to “On” or “Off” .
5
When “On” is selected, the
speech command system can be
operated without pressing the talk
switch more than once.
6When using the traffic information
function, voice guidance can be
set to “On” or “Off” .
�Voice volume
The voice guidance volume can be ad-
justed or switched off.
1. Push the “SETUP” button.
2. Touch “Voice” on the “Setup”
screen.
3. Select the desired level by touching
the number.
If voice guidance is not needed, touch
“Off” to disable the feature.
When selected the number or “Off” will be
highlighted.
4. Touch “Save”.
Page:
< prev 1-8 9-16 17-24