Page 57 of 148

BASIC FUNCTIONS
55
You can change from the map screen to
a “Turn list” screen that displays the list
of the roads up to your destination. This
list can be used for a route guidance.
1. Push the “MENU” button on the
navigation controller.
2. Screen and select the “Route
overview” switch.
3. The screen will change to the “En-
tire route map” screen, push the “EN-
TER” button on the navigation con-
troller to display the menu switches.
And then select the
“Turn list”switch.
You can scroll through the list of roads.
However, not all road names in the route
may appear on the list. If a road changes
its name without requiring a turn (such as
on a street that runs through two or more
cities), the name change will not appear on
the list. The street name closest to the
starting point will be displayed with a mile-
age to the next turn.
These marks indicate the
direction which you
should turn at an
intersection.
Select the “Map” switch on the “T urn list”
screen of your desired point. The point
which you choose is displayed on the map
screen.
Turn list
Page 58 of 148

BASIC FUNCTIONS
56
INFORMATION
�The current vehicle position mark
appears at the bottom of the
screen next to the name of the
street you are driving on. The mark
does not move.
� If you leave the guidance route, the
name of the street you are on is not
shown on the list next to the cur-
rent vehicle position mark.
� If the road type you are on changes
between a highway, a main street
or a residential street (at an inter-
change or fork), it will appear on
the turn list.
� If a long route has been selected, it
may take a long time to display the
turn list.
� Push the
“MAP/VOICE” button
on the navigation controller to re-
turn to the map display with route
guidance.
The map scale can be changed by pushing
the zoom in/out buttons of the navigation
controller to the
“+” (zoom in) side or to
the “�” (zoom out) side while the map is
displayed and while guiding as well. The
scale runs from 1/32nd of a mile to 128
miles. Push and release the zoom in/out
buttons to the
“+” side or “�” side to
change the scale one step at a time. Push
and hold either button to zoom in or out
smoothly.
The map scale is displayed under the
North−up symbol or Heading −up symbol
at the top left of the screen.
Map scale
Page 59 of 148

BASIC FUNCTIONS
57
If you wish to look at a different point on the
map other than your current vehicle posi-
tion, you can bring the desired point to the
center of the screen by using the scroll fea-
ture.
Move the cursor mark
to the point you
desire by operating the select and scroll le-
ver of the navigation controller. Push the
“ENTER” button on the navigation con-
troller, and select the
“Enter ” switch.
If you continue to hold the lever by your fin-
ger on the navigation controller, the map
will continue scrolling in that direction until
you lift your finger.
After scrolling the screen, the map remains
centered at the selected location until you
push the
“MAP/VOICE” button. The
current vehicle position mark will continue
to move along your actual route and may
move off the screen. When you push the
“MAP/VOICE” button, the current ve-
hicle position mark returns to the center of
the screen and the map moves as you pro-
ceed on your route.
INFORMATION
If you enter a destination using the
screen scrolling function, the road
nearest to the point you selected is
set as the destination. At this time, if
the nearest road is over 4 miles from
destination point, the system may not
be able to calculate a guidance route.
You can change the orientation of the map
from North −up to Heading −up.
Select the
or switch.
�North�up screen
�Heading�up screen
North�up symbol
Regardless of the direction of vehicle trav-
el, the north is always up.
Heading�up symbol
The direction of the vehicle travel is always
up. A red arrow indicates the North.
Screen scrollingOrientation of the map
Page 60 of 148
BASIC FUNCTIONS
58
1. Push the “ENTER” button while
the map screen is displayed.
2. When the “Map orient” at the
right side of the screen is selected, the
orientation of the map screen is
switched between the North�up and
the Heading�up. When there are 2 map
screens displayed, the North�up and
the Heading�up of the left side map
screen is switched by this operation.
3. When there are 2 map screens dis-
played to switch the North�up/Head-
ing�up of the right screen map, select
the
“Right screen” switch.
4. Select the “Map orient.” of the
“Edit right screen”, and then the North�
up/Heading�up of the right screen is
switched.
When 2 map screens are displayed, you
can set one as the North −up and the other
one as the Heading −up.
Page 61 of 148

BASIC FUNCTIONS
59
This navigation system calculates the
current vehicle position using satellite
signals, various vehicle signals, map
data, etc. However, an accurate posi-
tion may not be shown depending on
the satellite condition, road configura-
tion, vehicle condition or other circum-
stances.
The Global Positioning System (GPS) de-
veloped and operated by the U.S. Depart-
ment of Defense provides an accurate cur-
rent vehicle position, normally using 4 or
more satellites, and in some cases 3 satel-
lites. The GPS system has a certain level
of inaccuracy built in for security reasons.
While the navigation system will compen-
sate for this most of the time, occasional
positioning errors of up to 300 feet (100 m)
can and should be expected. Generally,
position errors will be corrected within a
few seconds.
When your vehicle is not receiving signals
from the satellites, the “GPS” mark does
not appear at the screen.
The GPS signal may be physically ob-
structed, leading to inaccurate vehicle
position on the map display. Tunnels, tall
buildings, trucks, or even the placement of
objects on the instrument panel may ob-
struct the GPS signals.
The GPS satellites may not send signals
due to repairs or improvements being
made to them.
Even when the navigation system is re-
ceiving good GPS signals, the vehicle
position may not be shown accurately or
inappropriate route guidance may occur in
some cases.
NOTICE
The installation of window tinting
may obstruct the GPS signals. Most
window tinting contains some metal-
lic content that will interfere with GPS
signal reception of the antenna in the
instrument panel. We advise against
the use of window tinting on vehicles
equipped with navigation systems.
Limitations of the navigation
system
Page 62 of 148
 Accurate current vehicle position
may not be shown in the following
cases:
�When driving on a small angled Y−
shaped road.
�When driving on a spiral road.
�When driving on a s")
BASIC FUNCTIONS
60
(a) Accurate current vehicle position
may not be shown in the following
cases:
�When driving on a small angled Y−
shaped road.
�When driving on a spiral road.
�When driving on a slippery road such
as in sand, gravel, snow, etc.
�When driving on a long straight road.
�When freeway and surface streets run
in parallel.
�After moving by ferry or vehicle carrier.
�When a long route is searched during
high speed driving.
�When driving without setting the cur-
rent position calibration correctly.
�After repeating a change of directions
by going forward and backward, or
turning on a turntable in the parking lot.
�When leaving a covered parking lot or
parking garage.
�When a roof carrier is installed.
�When driving with the tire chains
installed.
�When the tires are worn.
�After replacing a tire or tires.
�When using tires that are smaller or
larger than the factory specifications.
�When the tire pressure in any of the
four tires is not correct.
INFORMATION
If your vehicle cannot receive GPS
signals, you can correct the current
position manually. For the informa-
tion on setting the current position
calibration, see page 95.
(b) Inappropriate route guidance may
occur in the following cases:
�When turning at a wrong intersection
off the designated route guidance.
�If you are heading for a destination
without passing through a set preferred
road, automatic rerouting may display
a route returning to the set preferred
road.
�When turning at an intersection for
which there is no route guidance.
�When passing through an intersection
for which there is no route guidance.
�During automatic rerouting, the route
guidance may not be available for the
next turn to the right or left.
�It may take a long time to operate auto-
matic rerouting during high speed dri-
ving. In automatic rerouting, a detour
route may be shown.
�During automatic rerouting, the route
may not be changed.
�The route in a U− turn may be shown or
announced.
�A location may have multiple names
and the system will announce one or
more.
�Some routes may not be searched.
�If the route to your destination includes
gravel, unpaved roads or alleys, the
route guidance may not be shown.
�Your destination point might be shown
on the opposite side of the street.
�When a portion of the route has regula-
tions prohibiting the entry of the vehicle
that vary by time or season or other
reasons.
�The road and map data stored in your
navigation system may not be com-
plete or may not be the latest release.
Page 63 of 148

This navigation system uses tire turning
data and")
BASIC FUNCTIONS
61
After replacing the tire, implement the
operation described in the “Current
position calibration”. (For details, see
page 95.)
This navigation system uses tire turning
data and is designed to work with factory −
specified tires for your Toyota. Installing
tires that are larger or smaller than the orig-
inally equipped diameter may cause inac-
curate display of the vehicle’s position.
The tire pressure also affects the diameter
of the tires so please make sure the tire
pressure of all four tires is correct. Map database is made based on the
maps, 2008 edition of DENSO, whose
information source comes from
NAVTEQ maps, Tele Atlas maps and
infoUSA POIs.
�2007 NAVTEQ. All rights reserved.�2007 Tele Atlas North America, Inc.
All rights reserved. This material is pro-
prietary and the subject of copyright
protection and other intellectual prop-
erty rights owned by or licensed to Tele
Atlas North America, Inc. The use of
this material is subject to the terms of a
license agreement. You will be held li-
able for any unauthorized copying or
disclosure of this material.
Data by infoUSA Copyright
�2007, All
Rights Reserved.
This product contains proprietary and
confidential property of NAVTEQ, Tele
Atlas and infoUSA. Unauthorized use,
including duplication of this product is
expressly prohibited.
Map database information
and updates
Page 64 of 148
 In one type of area, primarily
around metropolitan centers, detailed
route guidance is availabl")
BASIC FUNCTIONS
62
There are two types of areas available
for route guidance. (See the following
pages.) In one type of area, primarily
around metropolitan centers, detailed
route guidance is available for the en-
tire area. In the other type of area, all
roads are displayed on the map but
route guidance is limited. The naviga-
tion route might lack precision because
the data (no right turns, one�way traf-
fic, etc.) is not complete. It is still pos-
sible to reach the destination by follow-
ing the arrow direction and distance as
shown on the bottom left of the screen.
The arrow points in the direction of the
destination. The distance shown is as
measured in a straight line from the cur-
rent vehicle position to the destination
area. END�USER TERMS
The data (“Data”) is provided for
your personal, internal use only
and not for resale. It is
protected by copyright, and is
subject to the following terms
and conditions which are agreed
to by you, on the one hand, and
DENSO CORPORATION
(“DENSO”) and its licensors
(including their licensors and
suppliers) on the other hand.
© 2007 NAVTEQ. All rights re-
served.
The Data for areas of Canada
includes information taken with
permission from Canadian author-
ities, including: ©Her Majesty the
Queen in Right of Canada,
© Queen’s Printer for Ontario,
© Canada Post Corporation, Geo-
Base �.
NAVTEQ holds a non −exclusive li-
cense from the United States Postal
Service � to publish and sell ZIP+4 �
information.
© United States Postal Service � 2007.
Prices are not established, controlled
or approved by the United States Post-
al Service �. The following trademarks
and registrations are owned by the
USPS: United States Postal Service,
USPS, and ZIP+4.
 1
1 2
2 3
3 4
4 5
5 6
6 7
7 8
8 9
9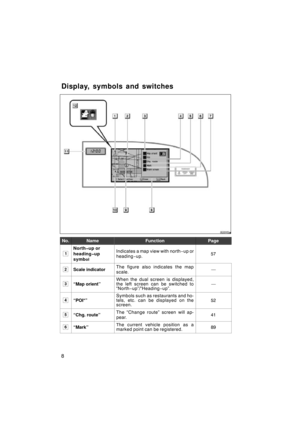 10
10 11
11 12
12 13
13 14
14 15
15 16
16 17
17 18
18 19
19 20
20 21
21 22
22 23
23 24
24 25
25 26
26 27
27 28
28 29
29 30
30 31
31 32
32 33
33 34
34 35
35 36
36 37
37 38
38 39
39 40
40 41
41 42
42 43
43 44
44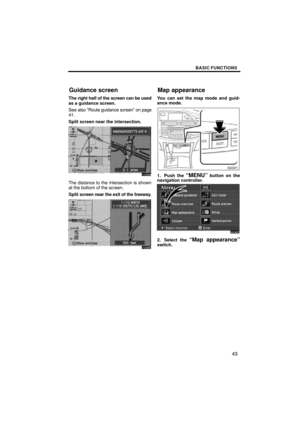 45
45 46
46 47
47 48
48 49
49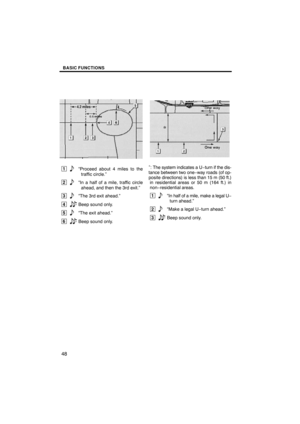 50
50 51
51 52
52 53
53 54
54 55
55 56
56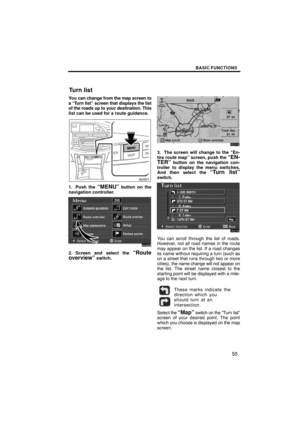 57
57 58
58 59
59 60
60 61
61 62
62 63
63 64
64 65
65 66
66 67
67 68
68 69
69 70
70 71
71 72
72 73
73 74
74 75
75 76
76 77
77 78
78 79
79 80
80 81
81 82
82 83
83 84
84 85
85 86
86 87
87 88
88 89
89 90
90 91
91 92
92 93
93 94
94 95
95 96
96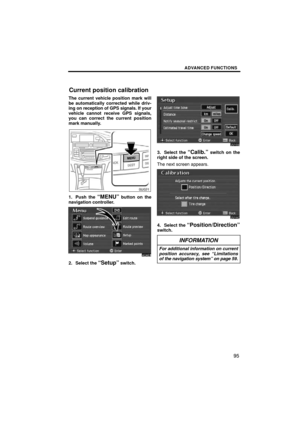 97
97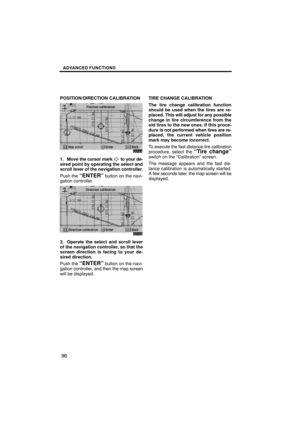 98
98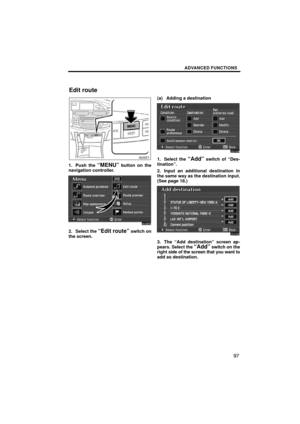 99
99 100
100 101
101 102
102 103
103 104
104 105
105 106
106 107
107 108
108 109
109 110
110 111
111 112
112 113
113 114
114 115
115 116
116 117
117 118
118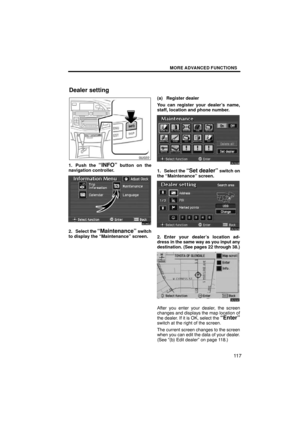 119
119 120
120 121
121 122
122 123
123 124
124 125
125 126
126 127
127 128
128 129
129 130
130 131
131 132
132 133
133 134
134 135
135 136
136 137
137 138
138 139
139 140
140 141
141 142
142 143
143 144
144 145
145 146
146 147
147